
zaina-ml/ml_forge
zaina-ml/ml_forge has 429 GitHub stars and 50 forks. GitHot measured 0 stars in 24 hours, +1 in 7 days, and +2 in 15 days. Last checked 2026-11-19 09:12 UTC. Last push 2026-08-17.
实测星标增长
- 24小时
- 0
- 7天
- +1
- 15天
- +2
- 1个月
- 正在收集历史
各周期内的星标净变化,周期相互重叠,并非每日新增。缺失的测量保持空白。星标代表关注度,不代表软件质量。
关于
A visual-based graph node editor for training computer vision models.
机器学习README.md
原文ML Forge

A visual PyTorch pipeline editor. Build, train and run image classification models without writing code.
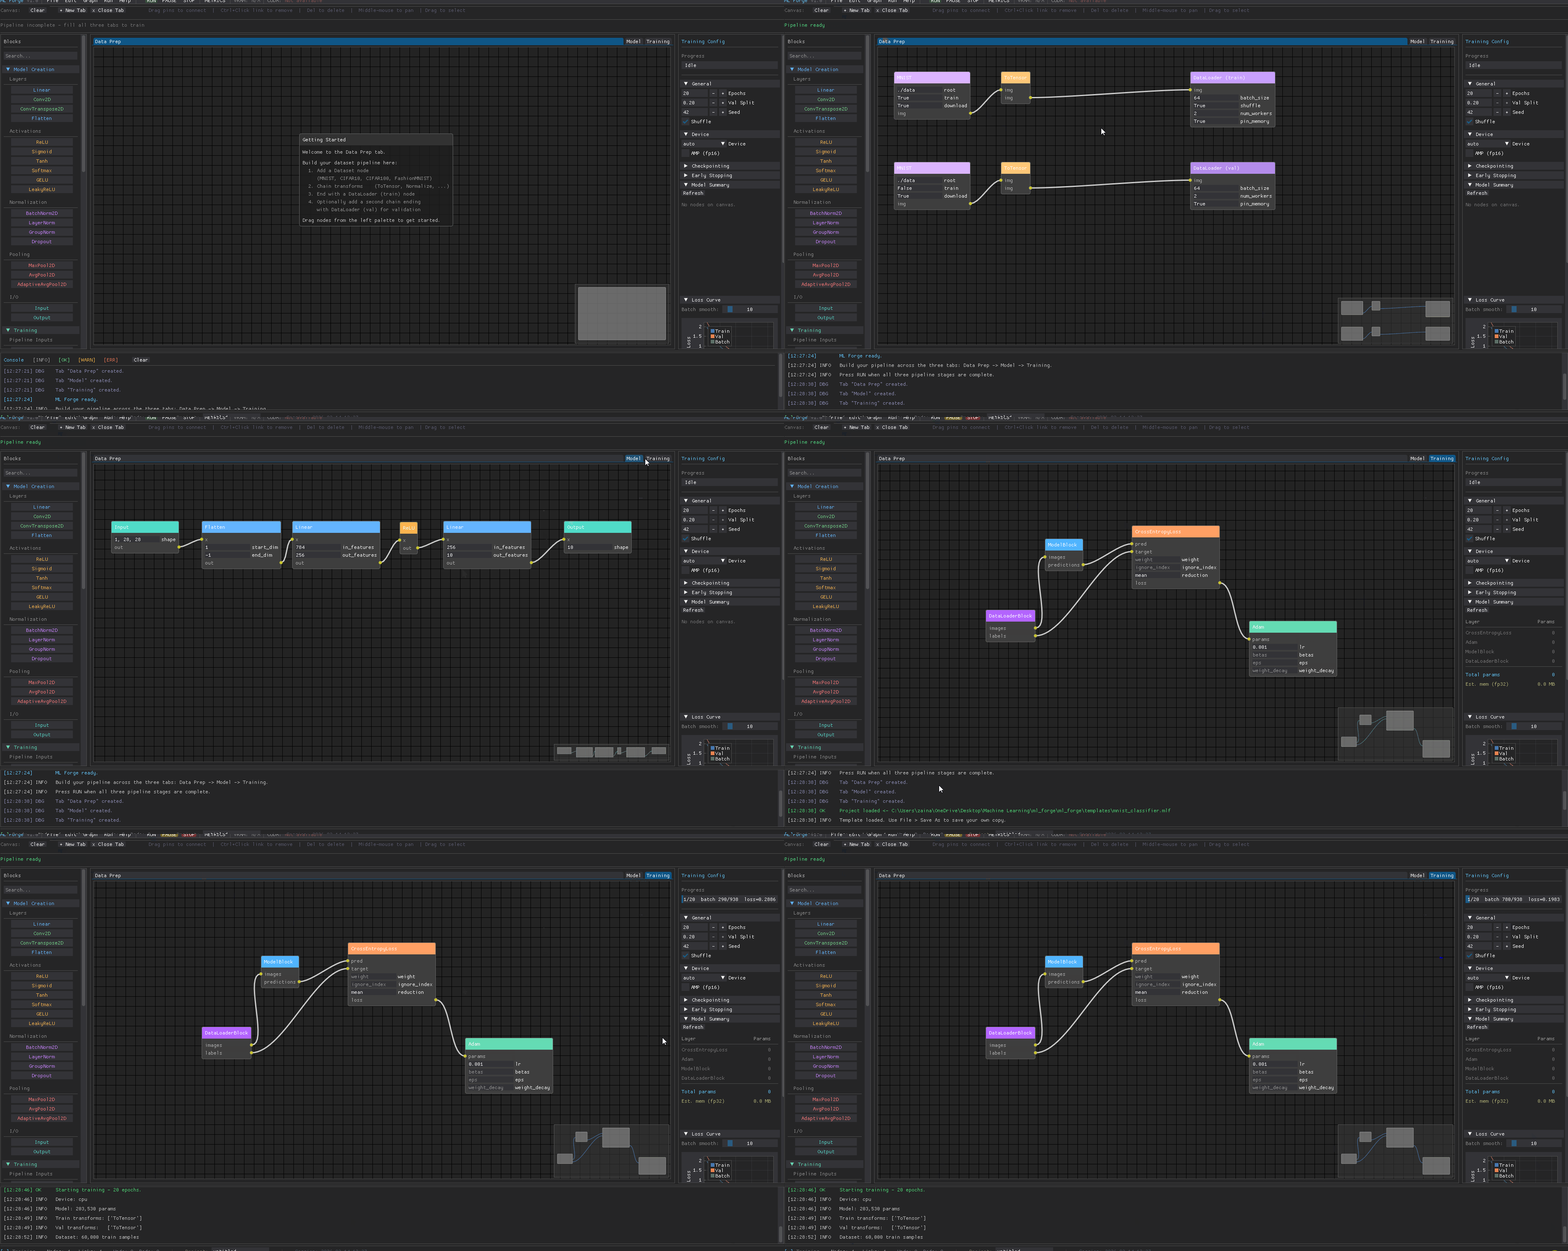
MLForge v1.0.4
Additions:
- Patched segfault error on Mac during template loading
- Added logo to splash loading widnow
- Added hints to node pallete when hovering over certain nodes.
What it does
- Visual pipeline - drag nodes onto a canvas, connect them with wires, and ML Forge generates and runs the training code for you
- Three-tab workflow - Data Prep -> Model -> Training
- Live training - watch loss curves update in real time, save checkpoints, run inference on your trained model
- Export - export projects into clean PyTorch
Tutorial
Watch the MLForge tutorial video here: MLForge Tutorial
Requirements
IMPORTANT: PyTorch must be preinstalled for training, it is not installed as a dependency.
- Python 3.10 or newer
- PyTorch 2.0 or newer
- torchvision
pip install torch torchvision
GPU training is automatic if CUDA is available. CPU and Apple MPS are also supported.
Quick Start
To install MLForge, enter the following in your command prompt
pip install zaina-ml-forge
Then
ml-forge
Cloning
git clone https://github.com/zaina-ml/ml-forge
python -m ml_forge
Building your first model
1. Data Prep tab
- Add a Dataset node (MNIST, CIFAR10, CIFAR100, FashionMNIST, or ImageFolder)
- Chain transforms: ToTensor is required, add Normalize for best results
- End with a DataLoader (train) node
- For proper validation, add a second chain (same dataset with
train=False) ending with DataLoader (val)
2. Model tab
- Start with an Input node - shape is auto-filled from your dataset
- Add layers: Linear, Conv2D, ReLU, BatchNorm2D, Flatten, Dropout, etc.
- End with an Output node - num classes is auto-filled from your dataset
- Connect nodes by dragging from an output pin to an input pin
in_featuresandin_channelsauto-fill when you connect layers- After a Flatten node, the next Linear's
in_featuresis calculated automatically
3. Training tab
Add these four nodes from the palette and wire them up:
DataLoaderBlock.images  ->  ModelBlock.images
ModelBlock.predictions  ->  Loss.pred
DataLoaderBlock.labels  ->  Loss.target
Loss.loss               ->  Optimizer.params
Configure epochs, device, checkpointing and early stopping in the right panel, then press RUN.
Keyboard shortcuts
| Key | Action |
|---|---|
Del / Ctrl-Backspace |
Delete selected nodes |
Ctrl+S |
Save project |
Ctrl+Z |
Undo |
Ctrl+Y |
Redo |
Middle-drag |
Pan the canvas |
Supported datasets
| Dataset | Classes | Input shape |
|---|---|---|
| MNIST | 10 | 1 × 28 × 28 |
| FashionMNIST | 10 | 1 × 28 × 28 |
| CIFAR-10 | 10 | 3 × 32 × 32 |
| CIFAR-100 | 100 | 3 × 32 × 32 |
| ImageFolder | custom | 3 × 224 × 224 |
Inference
After training, open Run -> Inference, browse to your checkpoint (.pth), and click Run Inference to sample from the test set and see top-k predictions.
Metrics
Click the METRICS button to see a summary of your training run: final loss, best validation accuracy, fit diagnosis, and loss/accuracy curves, you may also see the curves on the right training panel.
Saving and loading
Projects are saved as .mlf files (JSON). Use File -> Save / Save As or Ctrl+S.
Exporting code
File -> Export -> Python -> PyTorch generates a standalone train.py that reproduces your pipeline. No ML Forge required to run it.
Future Plans
- Orient to a more beginner-friendly approach
- Add custom block functionality
License
MIT