
wb04307201/sql-forge
wb04307201/sql-forge has 188 GitHub stars and 2 forks. GitHot measured 0 stars in 24 hours and -1 in 7 days. Last checked 2026-11-22 09:28 UTC. Last push 2026-10-25.
可以做什么
- JSON CRUD API — describe conditions in JSON for CRUD, pagination, and multi-table joins; no backend code needed
- Type-safe Entity operations — compile-time safe field references via Lambda, chainable select/insert/update/delete/save
- SQL template engine — Enjoy syntax with <if> conditionals, <foreach> loops, and #{var} binding for dynamic SQL
- Cross-database federated queries — Apache Calcite-powered, join MySQL, PostgreSQL and other heterogeneous sources in one SQL
实测星标增长
- 24小时
- 0
- 7天
- -1
- 15天
- 正在收集历史
- 1个月
- 正在收集历史
各周期内的星标净变化,周期相互重叠,并非每日新增。缺失的测量保持空白。星标代表关注度,不代表软件质量。
关于
SQL Forge — a Spring Boot database framework providing JSON CRUD API, type-safe entity operations, SQL template engine, Apache Calcite cross-database federated queries, and Amis low-code visual management. Ready to use, import on demand.
数据README.zh-CN.md
原文SQL Forge - SQL工坊
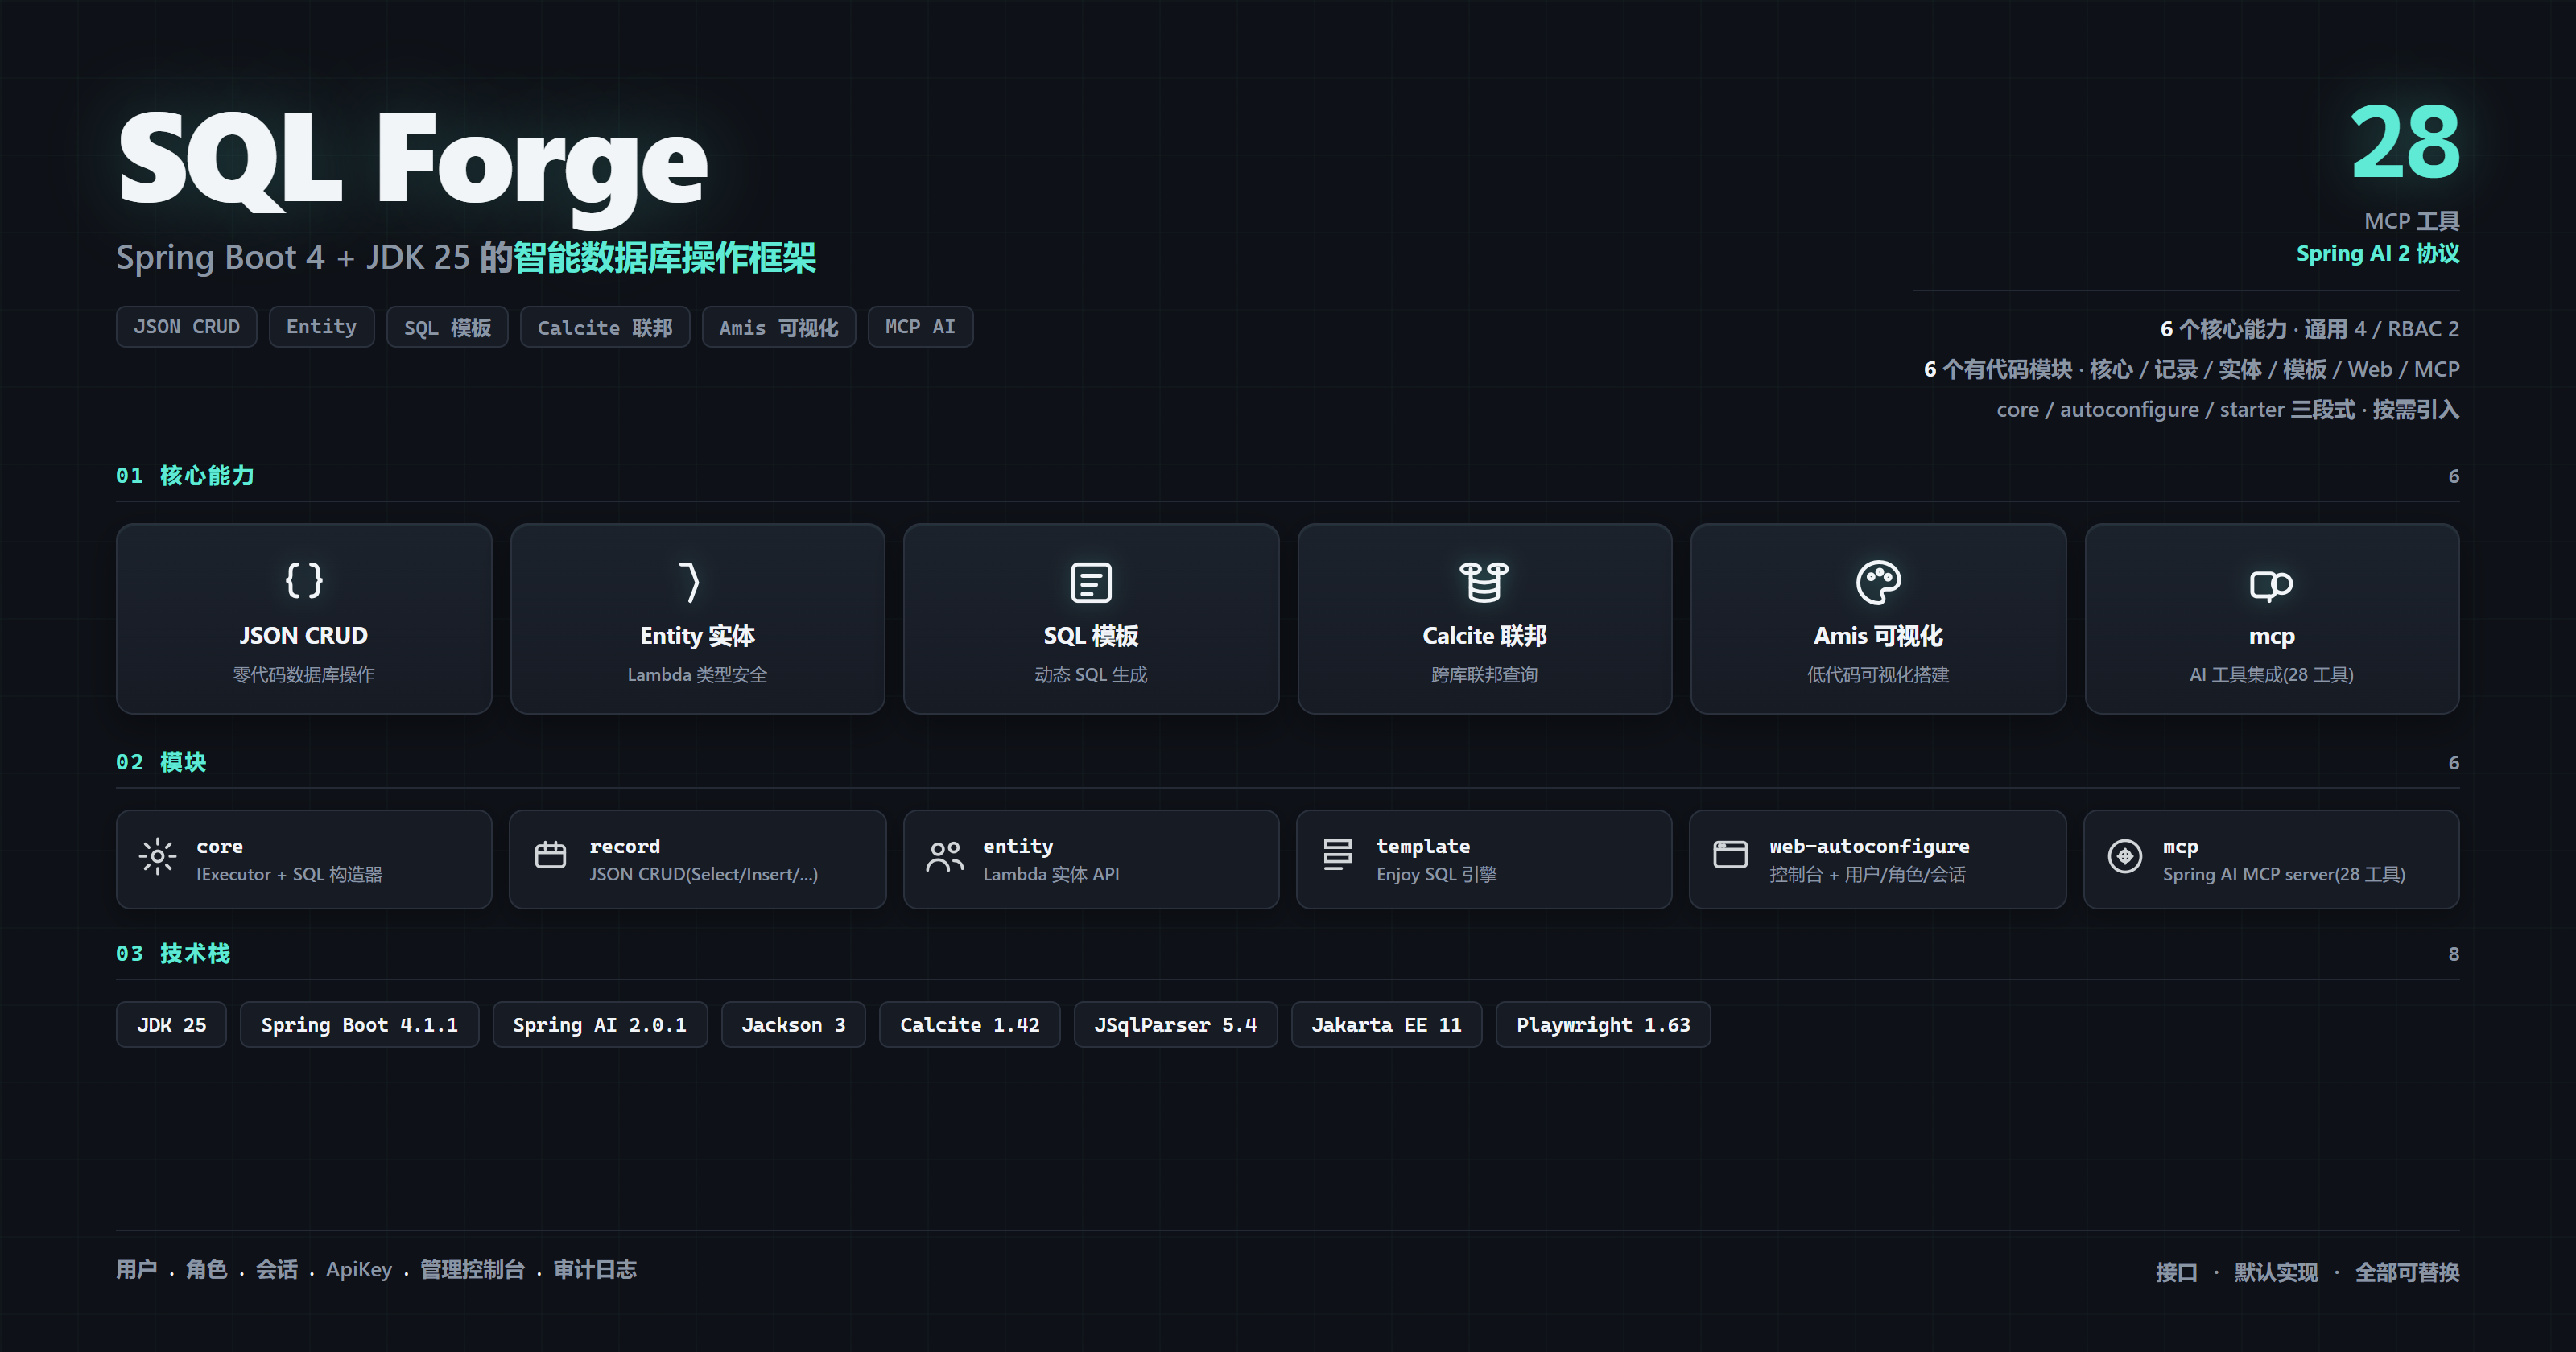
一套基于 Spring Boot 的数据库操作框架,提供 JSON CRUD API、类型安全的实体操作、SQL 模板引擎、Apache Calcite 跨库联邦查询、Amis 低代码可视化管理以及 MCP(Model Context Protocol)AI 工具集成服务器,开箱即用、按需引入。


| SQL工坊 | ||
| 应用页 | 项目概览 | 控制台 |
|
|
|
功能特性
- JSON CRUD API — 用 JSON 描述条件即可完成增删改查、分页、多表 JOIN,前端无需编写后端代码
- 类型安全 Entity 操作 — Lambda 引用字段,编译期检查,链式
select/insert/update/delete/save - SQL 模板引擎 — Enjoy 语法支持
<if>条件分支、<foreach>循环、#{var}变量绑定,动态生成复杂 SQL - 跨库联邦查询 — 基于 Apache Calcite,一条 SQL 联合查询 MySQL、PostgreSQL 等异构数据源
- Amis 低代码页面 — JSON Schema 即页面,配合 JSON CRUD / SQL 模板 API 快速搭建 Web 界面
- Web Console 可视化控制台 — 元数据浏览、SQL / JSON API / 模板 / 页面调试一站式完成
- 内置认证授权 — Session 登录 + ApiKey 双通道,用户—角色—页面 三级授权
- MCP AI 集成 — 自然语言生成 CRUD、报表与页面,支持 Claude Code、Cursor 等 MCP 客户端
- 灵活扩展点 — 自定义执行器、Record 执行前切面(加密 / 审计 / 自动时间戳)、模板与用户存储持久化
- 按需引入 — 三个 Starter 各司其职,基础 / 跨库 / Web 能力自由组合
快速开始
引入依赖
根据需求引入对应 Starter:
<!-- 基础数据库操作(必选) -->
<dependency>
    <groupId>io.github.wb04307201</groupId>
    <artifactId>sql-forge-spring-boot-starter</artifactId>
    <version>1.7.0</version>
</dependency>

<!-- Calcite 跨库联邦查询(可选) -->
<dependency>
    <groupId>io.github.wb04307201</groupId>
    <artifactId>sql-forge-calcite-spring-boot-starter</artifactId>
    <version>1.7.0</version>
</dependency>

<!-- Amis 模板 + Web Console(可选) -->
<dependency>
    <groupId>io.github.wb04307201</groupId>
    <artifactId>sql-forge-web-spring-boot-starter</artifactId>
    <version>1.7.0</version>
</dependency>
使用 Entity 模块的 @Id、@Table、@Column 等注解时需额外引入:
<dependency>
    <groupId>jakarta.persistence</groupId>
    <artifactId>jakarta.persistence-api</artifactId>
    <version>3.2.0</version>
</dependency>
Starter 一览
| Starter | 说明 |
|---|---|
| sql-forge-spring-boot-starter | 基础 Starter:数据库执行器、JSON CRUD API、类型安全实体操作(Entity)、SQL 模板引擎、Record 操作切面、内置用户认证(Session + ApiKey) |
| sql-forge-calcite-spring-boot-starter | 基于 Apache Calcite 的跨数据库联邦查询执行器,可同时查询 MySQL、PostgreSQL 等多种数据源 |
| sql-forge-web-spring-boot-starter | Amis 低代码模板管理 API、Web Console 可视化界面、用户/角色管理 |
| sql-forge-mcp | Model Context Protocol (MCP) 服务器,用于 AI 工具集成 — 通过 stdio 暴露数据库元数据查询、SQL 执行、Amis 模板管理等 MCP 工具 |
零代码搭建完整业务系统
不写一行 Java 后端代码,仅靠 JSON 配置就能搭建一套具备 数据访问 · 动态 SQL · 跨库联邦 · 鉴权授权 · 可视化页面 · AI 接入 的完整业务系统。
能力闭环
SQL Forge 把"建系统"这件事拆成八个零代码环节,每一环都可以独立使用,也可以任意组合:
| 层级 | 能力 | 配置方式 | 落地点 |
|---|---|---|---|
| 数据访问 | CRUD 增删改查 / 分页 / 多表关联 | JSON 描述条件 | POST /sql/forge/api/json/{method}/{tableName} |
| 复杂查询 | 条件分支、循环 IN、统计报表 | 模板语法 <if> / <foreach> |
POST /sql/forge/api/template/sql/{id} |
| 跨库联邦 | MySQL、PostgreSQL 等异构库一条 SQL JOIN | JSON + model.json |
executorName=calcite |
| 鉴权 | Session 登录 + ApiKey 双通道 | YAML / 接口 | 内置 |
| 授权 | 用户—角色—页面 三级授权 | 接口 | /api/role-template · /api/user-role |
| 页面 | CRUD 表单、图表、详情、弹窗 | Amis JSON Schema | PUT /api/template/amis |
| 控制台 | 元数据浏览、SQL/模板/页面 调试 | 浏览器 | /sql/forge/web |
| AI 接入 | 自然语言生成 CRUD / 报表 / 页面 | MCP 工具 | 任意 MCP 客户端 |
30 秒上手流程
- 写一段 Amis JSON →
PUT /api/template/amis自动渲染一个 CRUD 页面 - 页面里
api字段指向/sql/forge/api/json/{method}/{table}→ 数据自动读写 - 想跨库查询? 把 URL 的
executorName改成calcite,无需改 SQL - 想让 AI 也能用? 启动
sql-forge-mcp,Claude / Cursor 即可自然语言操控 - 想限制谁能看哪些页面? 用
/api/role-template给角色授权 Amis 模板
下面章节是对每一个环节的详细文档,按需查阅即可。
1. sql-forge-spring-boot-starter(基础 Starter)
提供数据库操作的核心能力,包括数据库执行器管理、JSON CRUD API、Entity 链式操作、SQL 模板引擎和 Record 切面扩展。
1.1 SQL 执行器
sql-forge-spring-boot-starter 自动注册一个名为 database 的执行器,直接使用 Spring 项目中已配置的数据源。
sql:
  forge:
    schemata:  # 配置 schema
      - PUBLIC
自定义执行器
实现 IExecutor 接口并注册为 Spring Bean 即可扩展自定义执行器。
@Component
public class MyCustomExecutor implements IExecutor {
    @Override
    public String getExecutorName() {
        return "myCustom";
    }
    // ... 实现其他方法
}
1.2 数据库直连 API
提供直接执行 SQL 的能力(默认关闭,需手动开启)。
sql:
  forge:
    api:
      database:
        enabled: true       # 开启数据库直连 API
        select-only: true   # true=仅允许 SELECT,false=允许所有操作
POST /sql/forge/api/database/execute?executorName=database- 执行 SQL
💡 低代码视角:这是零代码的数据访问层。前端调用一个 URL 即可对任意表完成 CRUD、分页、JOIN,无需任何后端代码。
1.3 JSON CRUD API
让前端无需编写后端代码即可操作数据库 — 通过 JSON 格式描述需要的数据结构和操作,后端自动生成对应的 SQL 执行并返回结果。
- 请求路径:
sql/forge/api/json/{method}/{tableName}?executorName={executorName} - 请求方法:
POST - 内容类型:
application/json - 路径参数:
{method}: 操作方法类型(delete、insert、select、selectPage、update){tableName}: 数据库表名称{executorName}: 执行器名称,不传则默认使用database
delete 方法
{
  "@where": [
    {
      "column": "字段名",
      "condition": "条件类型",
      "value": "值"
    }
  ],
  "@with_select": {
    // 删除后查询 JSON
  }
}
参数说明
@where: 删除条件数组- column: 要匹配的字段名
- condition: 条件类型(EQ、NOT_EQ、GT、LT、GTEQ、LTEQ、LIKE、NOT_LIKE、LEFT_LIKE、RIGHT_LIKE、BETWEEN、NOT_BETWEEN、IN、NOT_IN、IS_NULL、IS_NOT_NULL)
- value: 匹配的值
@with_select: 可选,删除后执行一个查询
insert 方法
{
  "@set": {
    "字段名1": "值1",
    "字段名2": "值2"
  },
  "@with_select": {
    // 插入后查询 JSON
  }
}
参数说明
@set: 要插入的字段和值的键值对,至少一个字段@with_select: 可选,插入后执行一个查询
select 方法
{
  "@column": ["字段名1", "字段名2"],
  "@where": [
    {
      "column": "字段名",
      "condition": "条件类型",
      "value": "值"
    }
  ],
  "@join": [
    {
      "type": "JOIN类型",
      "joinTable": "关联表名",
      "on": "关联条件"
    }
  ],
  "@order": ["字段名 ASC", "字段名 DESC"],
  "@group": ["字段名"],
  "@distinct": false
}
参数说明
@column: 要查询的字段数组,为空则查询所有字段@where: 查询条件数组@join: 关联查询条件数组@order: 排序字段数组@group: 分组字段数组@distinct: 是否去重
selectPage 方法
{
  "@column": ["字段名1", "字段名2"],
  "@where": [
    {
      "column": "字段名",
      "condition": "条件类型",
      "value": "值"
    }
  ],
  "@page": {
    "pageIndex": 0,
    "pageSize": 10
  },
  "@join": [
    {
      "type": "JOIN类型",
      "joinTable": "关联表名",
      "on": "关联条件"
    }
  ],
  "@order": ["字段名 ASC", "字段名 DESC"],
  "@distinct": false
}
参数说明
@column: 要查询的字段数组,为空则查询所有字段@where: 查询条件数组@page: 分页参数(pageIndex 页码从 0 开始,pageSize 每页大小)@join: 关联查询条件数组@order: 排序字段数组@distinct: 是否去重
update 方法
{
  "@set": {
    "字段名1": "新值1",
    "字段名2": "新值2"
  },
  "@where": [
    {
      "column": "字段名",
      "condition": "条件类型",
      "value": "值"
    }
  ],
  "@with_select": {
    // 更新后查询 JSON
  }
}
参数说明
@set: 要更新的字段和新值的键值对,至少一个字段@where: 更新条件数组@with_select: 可选,更新后执行一个查询
示例
- 查询
POST http://localhost:8081/sql/forge/api/json/select/orders o
Content-Type: application/json

{
  "@column": [
    "u.username",
    "o.total_amount",
    "p.name               AS product_name",
    "oi.unit_price",
    "oi.quantity",
    "p.price"
  ],
  "@where": [
    {
      "column": "u.username",
      "condition": "IS_NOT_NULL",
      "value": null
    }
  ],
  "@join": [
    {
      "type": "JOIN",
      "joinTable": "users u",
      "on": "o.user_id = u.id"
    },
    {
      "type": "JOIN",
      "joinTable": "order_items oi",
      "on": "o.id = oi.order_id"
    },
    {
      "type": "JOIN",
      "joinTable": "products p",
      "on": "oi.product_id = p.id"
    }
  ],
  "@order": [
    "o.order_date"
  ]
}
- 分页查询
在查询 JSON 基础上增加 @page 参数即可:
POST http://localhost:8081/sql/forge/api/json/selectPage/orders o
Content-Type: application/json

{
  "@column": ["o.total_amount", "p.name AS product_name"],
  "@join": [
    {
      "type": "JOIN",
      "joinTable": "products p",
      "on": "o.product_id = p.id"
    }
  ],
  "@order": ["o.order_date"],
  "@page": {
    "pageIndex": 0,
    "pageSize": 5
  }
}
- 插入
POST http://localhost:8081/sql/forge/api/json/insert/users
Content-Type: application/json

{
  "@set": {
    "id": "26a05ba3-913d-4085-a505-36d40021c8d1",
    "username": "wb04307201",
    "password": "123456",
    "enabled": true,
    "category": "user"
  },
  "@with_select": {
    "@where": [
      {
        "column": "id",
        "condition": "EQ",
        "value": "26a05ba3-913d-4085-a505-36d40021c8d1"
      }
    ]
  }
}
- 更新
POST http://localhost:8081/sql/forge/api/json/update/users
Content-Type: application/json

{
  "@set": {
    "password": "newpassword"
  },
  "@where": [
    {
      "column": "id",
      "condition": "EQ",
      "value": "26a05ba3-913d-4085-a505-36d40021c8d1"
    }
  ],
  "@with_select": {
    "@where": [
      {
        "column": "id",
        "condition": "EQ",
        "value": "26a05ba3-913d-4085-a505-36d40021c8d1"
      }
    ]
  }
}
- 删除
POST http://localhost:8081/sql/forge/api/json/delete/users
Content-Type: application/json

{
  "@where": [
    {
      "column": "id",
      "condition": "EQ",
      "value": "26a05ba3-913d-4085-a505-36d40021c8d1"
    }
  ],
  "@with_select": {
    "@where": [
      {
        "column": "id",
        "condition": "EQ",
        "value": "26a05ba3-913d-4085-a505-36d40021c8d1"
      }
    ]
  }
}
方法执行前切面
通过实现 IBeforeRecordExecutor 接口自定义方法执行前的 JSON 调整,实现密码加密、自动更新时间戳、权限控制、日志、审计等。
例如实现在 Insert 时输出日志:
@Slf4j
@Component
public class LogInsertExecute implements IBeforeRecordExecutor<Insert> {
  @Override
  public Boolean support(String tableName, Insert insert) {
    return true;
  }

  @Override
  public Insert before(String tableName, Insert insert) {
    log.info("LogInsertExecute tableName: {} record: {}", tableName, insert);
    return insert;
  }
}
1.4 认证与 ApiKey
基础 Starter 内置用户认证体系,所有 API 默认需要认证后才能访问,支持 Session 登录 和 ApiKey 两种方式,任一通过即可访问。
ApiKey 认证
通过请求头 X-Api-Key 传递 ApiKey,无需登录即可访问所有 API:
sql:
  forge:
    api-keys:                # 配置 ApiKey 列表(默认为空,表示不启用 ApiKey 认证)
      - sk-your-api-key-here
      - sk-another-key
请求示例:
GET http://localhost:8081/sql/forge/api/json/select/users
X-Api-Key: sk-your-api-key-here
Session 登录认证
通过登录接口获取 Session,后续请求自动携带 Session Cookie:
POST /sql/forge/api/auth/login- 用户登录(Body:{"username": "admin", "password": "admin123"})POST /sql/forge/api/auth/logout- 用户登出GET /sql/forge/api/auth/status- 获取当前登录状态GET /sql/forge/api/auth/user- 获取当前用户信息
默认管理员账户:
admin/admin123
认证优先级
请求进入 → ApiKey 有效? → 放行
          → Session 已登录? → 放行
          → 都不满足 → 401 拒绝
白名单路径(登录接口、静态资源)无需认证直接放行。
💡 低代码视角:这是零代码的复杂查询层。条件分支(
<if>)、循环 IN(<foreach>)、统计报表都通过模板语法配置,无需写 Java。
1.5 SQL 模板引擎
提供 SQL 模板功能,支持条件判断(<if>)、循环(<foreach>)、变量绑定(#{var})等模板语法,根据参数动态生成 SQL 执行并返回结果。
模板管理接口
PUT /sql/forge/api/template/sql- 保存/更新 SQL 模板- id: 模板 ID
- executorName: 执行器名称,默认
database - context: 模板内容
GET /sql/forge/api/template/sql/{id}- 根据 ID 获取 SQL 模板GET /sql/forge/api/template/sql- 获取 SQL 模板列表DELETE /sql/forge/api/template/sql/{id}- 删除指定 ID 的 SQL 模板POST /sql/forge/api/template/sql/{id}- 执行指定 ID 的 SQL 模板(Body 为模板参数 Map)
示例
模板配置:
PUT http://localhost:8081/sql/forge/api/template/sql
content-type: application/json

{
    "id": "sql-template-database",
    "type": "templateSql",
    "executorName": "database",
    "context": "SELECT * FROM users WHERE 1=1\r\n<if test=\"name != null && name != ''\">AND username = #{name}</if>\r\n<if test=\"ids != null && !ids.isEmpty()\"><foreach collection=\"ids\" item=\"id\" open=\"AND id IN (\" separator=\",\" close=\")\">#{id}</foreach></if>\r\n<if test=\"(name == null || name == '') && (ids == null || ids.isEmpty()) \">AND 0=1</if>\r\nORDER BY username DESC"
}
执行模板:
POST http://localhost:8081/sql/forge/api/template/sql/sql-template-database
content-type: application/json

{
  "name": "alice",
  "ids": null
}
响应:
[
  {
    "ID": "1",
    "USERNAME": "alice"
  }
]
持久化模板
默认使用内存存储。实现 ITemplateSqlStorage 接口以自定义持久化。
1.6 Entity 模块
提供类型安全的实体操作构建器,通过 Lambda 引用实现编译期安全的字段引用,支持链式调用。
- Entity — 静态工具类,提供
select/insert/update/delete/save/selectPage等入口 - EntityExecutor — 负责执行构建器的数据库操作
特点
- 链式调用,代码简洁
- 通过 Lambda 表达式引用字段,编译期检查
- 构建器模式灵活配置查询条件
- 统一的数据库操作入口
使用示例
定义一个用户实体类:
@Data
@Table(name = "users")
public class User {
    @Id
    private String id;

    @Column(name = "username")
    private String username;

    @Column(name = "password")
    private String password;

    @Column(name = "category")
    private String category;
}
使用 Entity 进行数据库操作:
@Autowired
private EntityExecutor entityExecutor;

// 查询操作
EntitySelect<User> select = Entity.select(User.class)
                .distinct(true)
                .columns(User::getId, User::getUsername, User::getCategory)
                .orders(User::getUsername)
                .in(User::getUsername, "alice", "bob");
List<User> users = entityExecutor.run(select);

// 分页查询操作
EntitySelectPage<User> selectPage = Entity.selectPage(User.class)
        .columns(User::getId, User::getUsername, User::getCategory)
        .orders(User::getUsername)
        .page(0, 10);
SelectPageResult<User> result = entityExecutor.run(selectPage);

// 插入操作
EntityInsert<User> insert = Entity.insert(User.class)
        .set(User::getId, UUID.randomUUID().toString())
        .set(User::getUsername, "wb04307201")
        .set(User::getPassword, "123456");
entityExecutor.run(insert);

// 更新操作
EntityUpdate<User> update = Entity.update(User.class)
        .set(User::getPassword, "newpassword")
        .eq(User::getId, id);
int count = entityExecutor.run(update);

// 删除操作
EntityDelete<User> delete = Entity.delete(User.class)
        .eq(User::getId, id);
count = entityExecutor.run(delete);

// 对象保存(自动判断插入或更新)
User user = new User();
user.setUsername("wb04307201");
user.setPassword("123456");
user = entityExecutor.run(Entity.save(user));  // id 为 null,执行插入

user.setPassword("newpassword");
user = entityExecutor.run(Entity.save(user));  // id 不为 null,执行更新

// 对象删除
count = entityExecutor.run(Entity.delete(user));
查询构建器说明
1. 列选择
column(SFunction<T, ?> column)- 选择单个列columns(SFunction<T, ?>... columns)- 选择多个列
2. 查询条件
eq(SFunction<T, ?> column, Object value)- 等于neq(SFunction<T, ?> column, Object value)- 不等于gt(SFunction<T, ?> column, Object value)- 大于lt(SFunction<T, ?> column, Object value)- 小于gteq(SFunction<T, ?> column, Object value)- 大于等于lteq(SFunction<T, ?> column, Object value)- 小于等于like(SFunction<T, ?> column, Object value)- 模糊匹配notLike(SFunction<T, ?> column, Object value)- 不匹配(NOT LIKE)leftLike(SFunction<T, ?> column, Object value)- 左模糊匹配rightLike(SFunction<T, ?> column, Object value)- 右模糊匹配between(SFunction<T, ?> column, Object value1, Object value2)- 在范围内notBetween(SFunction<T, ?> column, Object value1, Object value2)- 不在范围内in(SFunction<T, ?> column, Object... value)- 在集合中notIn(SFunction<T, ?> column, Object... value)- 不在集合中isNull(SFunction<T, ?> column)- 为 NULLisNotNull(SFunction<T, ?> column)- 不为 NULL
3. 排序
orderAsc(SFunction<T, ?> column)- 升序排序orderDesc(SFunction<T, ?> column)- 降序排序orders(SFunction<T, ?>... columns)- 多列排序(默认升序)
4. 分页
page(Integer pageIndex, Integer pageSize)- 设置分页参数
5. 去重
distinct(Boolean distinct)- 设置是否去重
对象保存(save)说明
根据 @Id 注解判断主键字段,如果没有主键字段则抛出 IllegalArgumentException。
- 插入条件: 当主键值为
null时执行插入操作String类型主键:自动生成UUID作为主键值- 其他类型主键:使用数据库自动生成的主键值
- 更新条件: 当主键值不为
null时执行更新操作- 使用主键值作为更新条件
注意: 如果需要插入一条预先设置了主键值的新记录,请使用
Entity.insert()而非Entity.save(),因为save()在主键不为null时会执行更新操作。
2. sql-forge-calcite-spring-boot-starter(跨库联邦查询)
基于 Apache Calcite 实现跨数据库联邦查询,可以在一条 SQL 中联合查询来自 MySQL、PostgreSQL 等不同数据库的数据。
依赖基础 Starter(
sql-forge-spring-boot-starter),会自动引入。
配置
sql:
  forge:
    calcite:
      enabled: true                          # 启用 Calcite
      configuration: classpath:model.json    # Calcite 模型配置文件路径
      schemata:                              # 配置 schema
        - MYSQL
        - POSTGRES
model.json 用于描述 Calcite 的数据源连接信息,参考 Apache Calcite 文档。
使用方式
启用后会自动注册一个名为 calcite 的执行器,在所有 API 中通过 executorName=calcite 参数即可使用:
POST http://localhost:8081/sql/forge/api/json/select/orders o?executorName=calcite
Content-Type: application/json

{
  "@column": ["o.id", "u.username", "p.name"],
  "@join": [
    {
      "type": "JOIN",
      "joinTable": "MYSQL_DB.users u",
      "on": "o.user_id = u.id"
    },
    {
      "type": "JOIN",
      "joinTable": "POSTGRES_DB.products p",
      "on": "o.product_id = p.id"
    }
  ]
}
3. sql-forge-web-spring-boot-starter(Amis + 控制台)
提供 Amis 低代码模板管理、Web Console 可视化界面和用户/角色管理。
依赖基础 Starter(
sql-forge-spring-boot-starter),会自动引入。
💡 低代码视角:这是零代码的页面层。把 1.3 的 JSON CRUD URL 或 1.5 的 SQL 模板 URL 写进 Amis 的
api字段,页面就通了。
3.1 Amis 模板 API
使用 Amis 配合 JSON API、SQL 模板 API 快速构建 Web 页面。
模板管理接口
PUT /sql/forge/api/template/amis- 保存/更新 Amis 模板- id: 模板 ID
- name: 模板名称
- description: 模板描述
- context: Amis JSON Schema 内容
GET /sql/forge/api/template/amis/{id}- 根据 ID 获取模板GET /sql/forge/api/template/amis- 获取模板列表DELETE /sql/forge/api/template/amis/{id}- 删除指定 ID 的模板
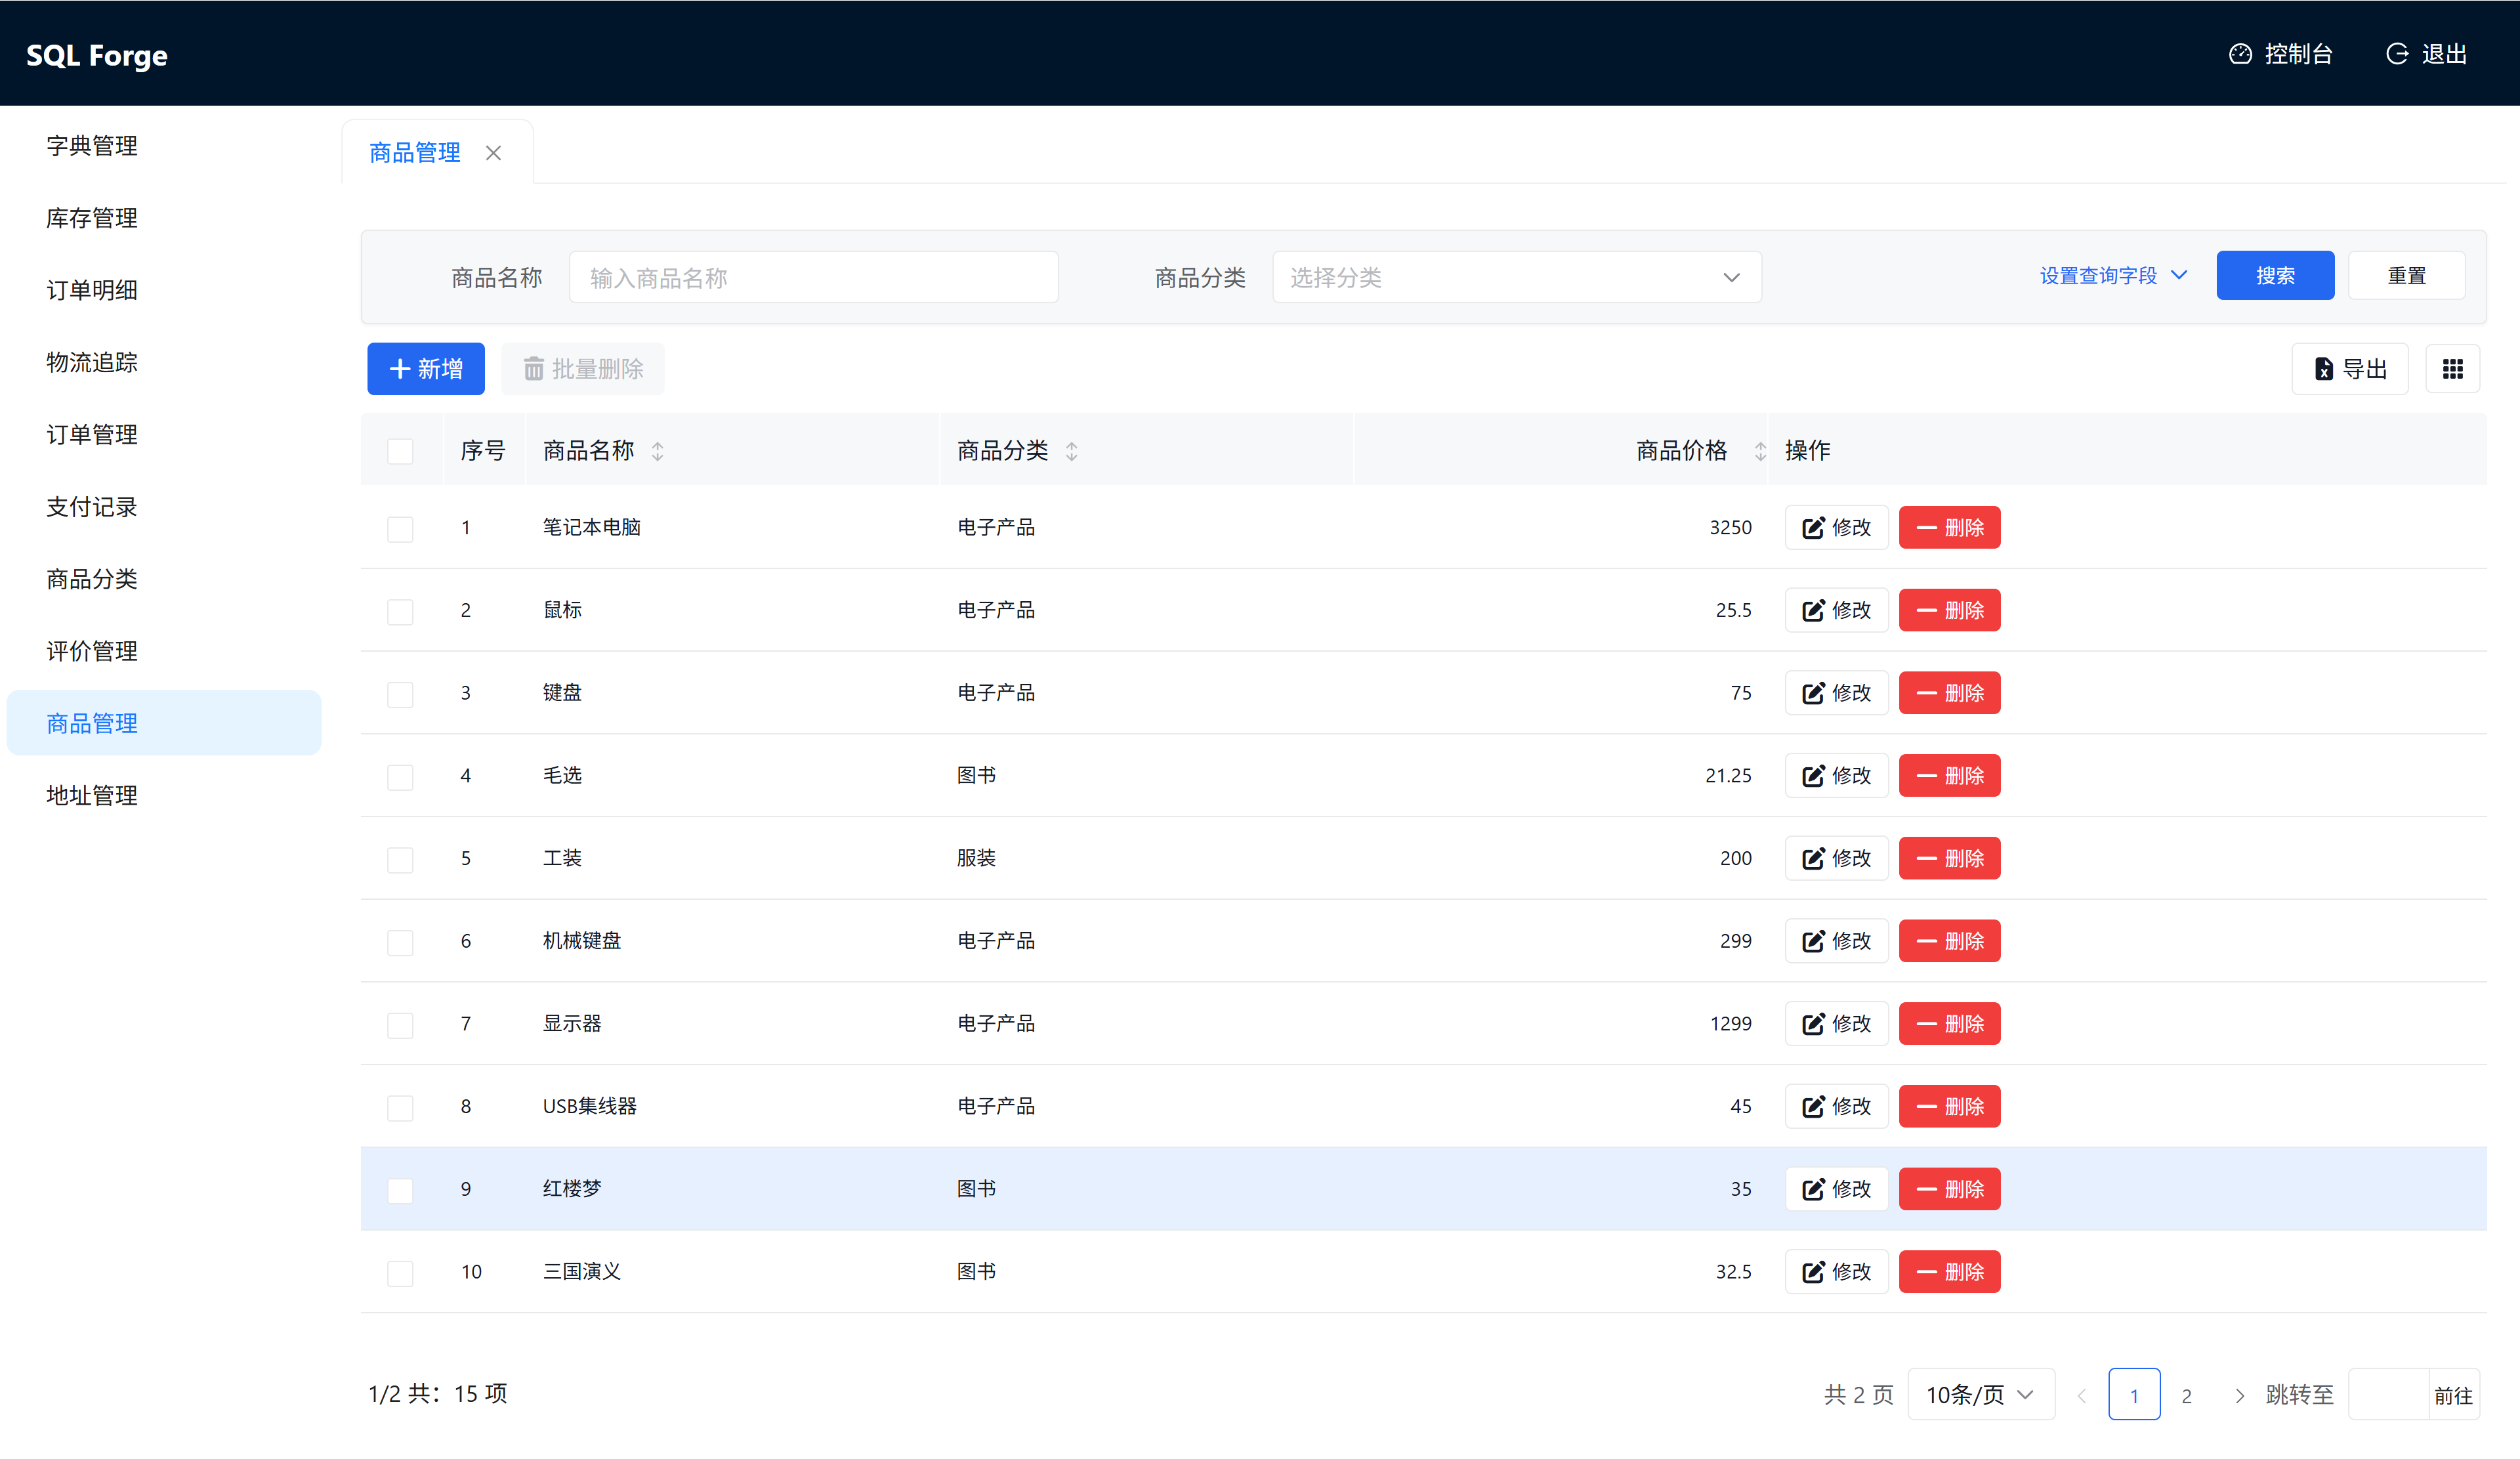
示例
PUT http://localhost:8081/sql/forge/api/template/amis
content-type: application/json

{
    "id": "amis-template-products",
    "name": "商品管理",
    "context": "{ \"type\": \"page\", \"body\": { \"type\": \"crud\", ... } }"
}
渲染后页面:
持久化模板
默认使用内存存储。实现 ITemplateAmisStorage 接口以自定义持久化。
💡 低代码视角:这是零代码的调试与运营层。所有模板、元数据、SQL 都能在浏览器里可视化管理,无需命令行。
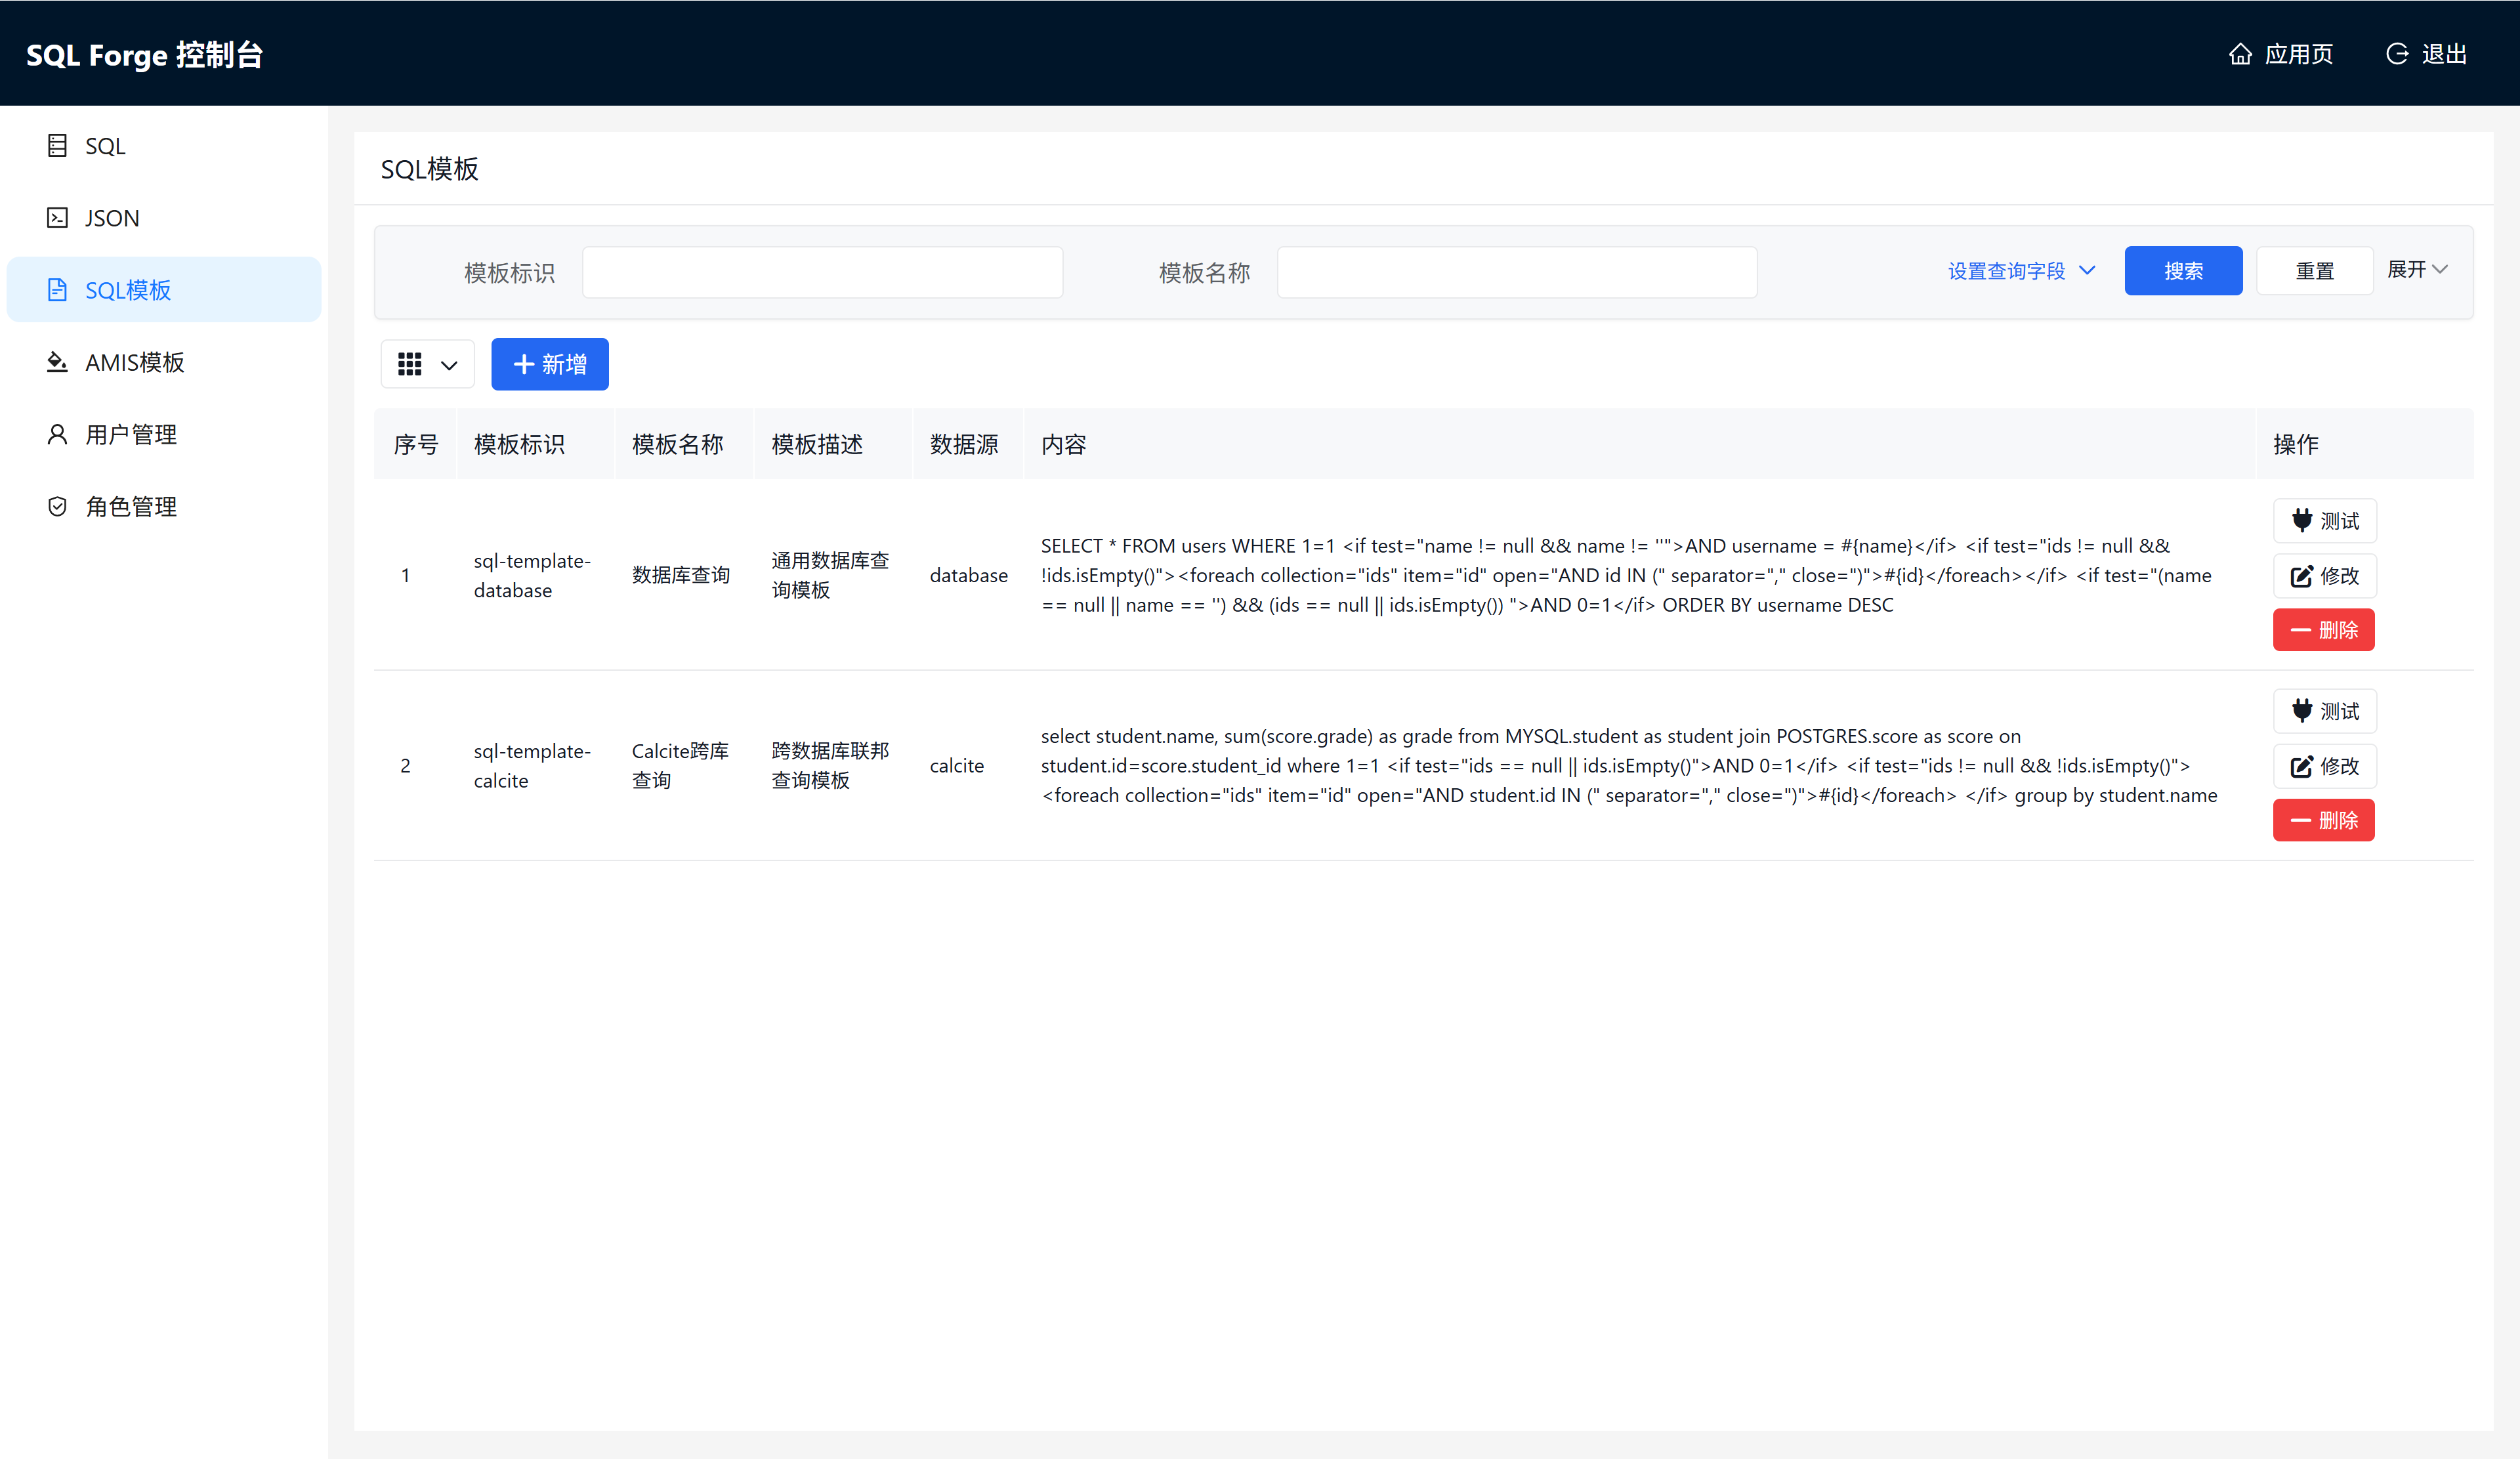
3.2 Web Console
提供可视化 Web 界面,访问地址:/sql/forge/web
- 数据库元数据查看、SQL 调试(需开启
sql.forge.api.database.enabled=true) - JSON API 调试
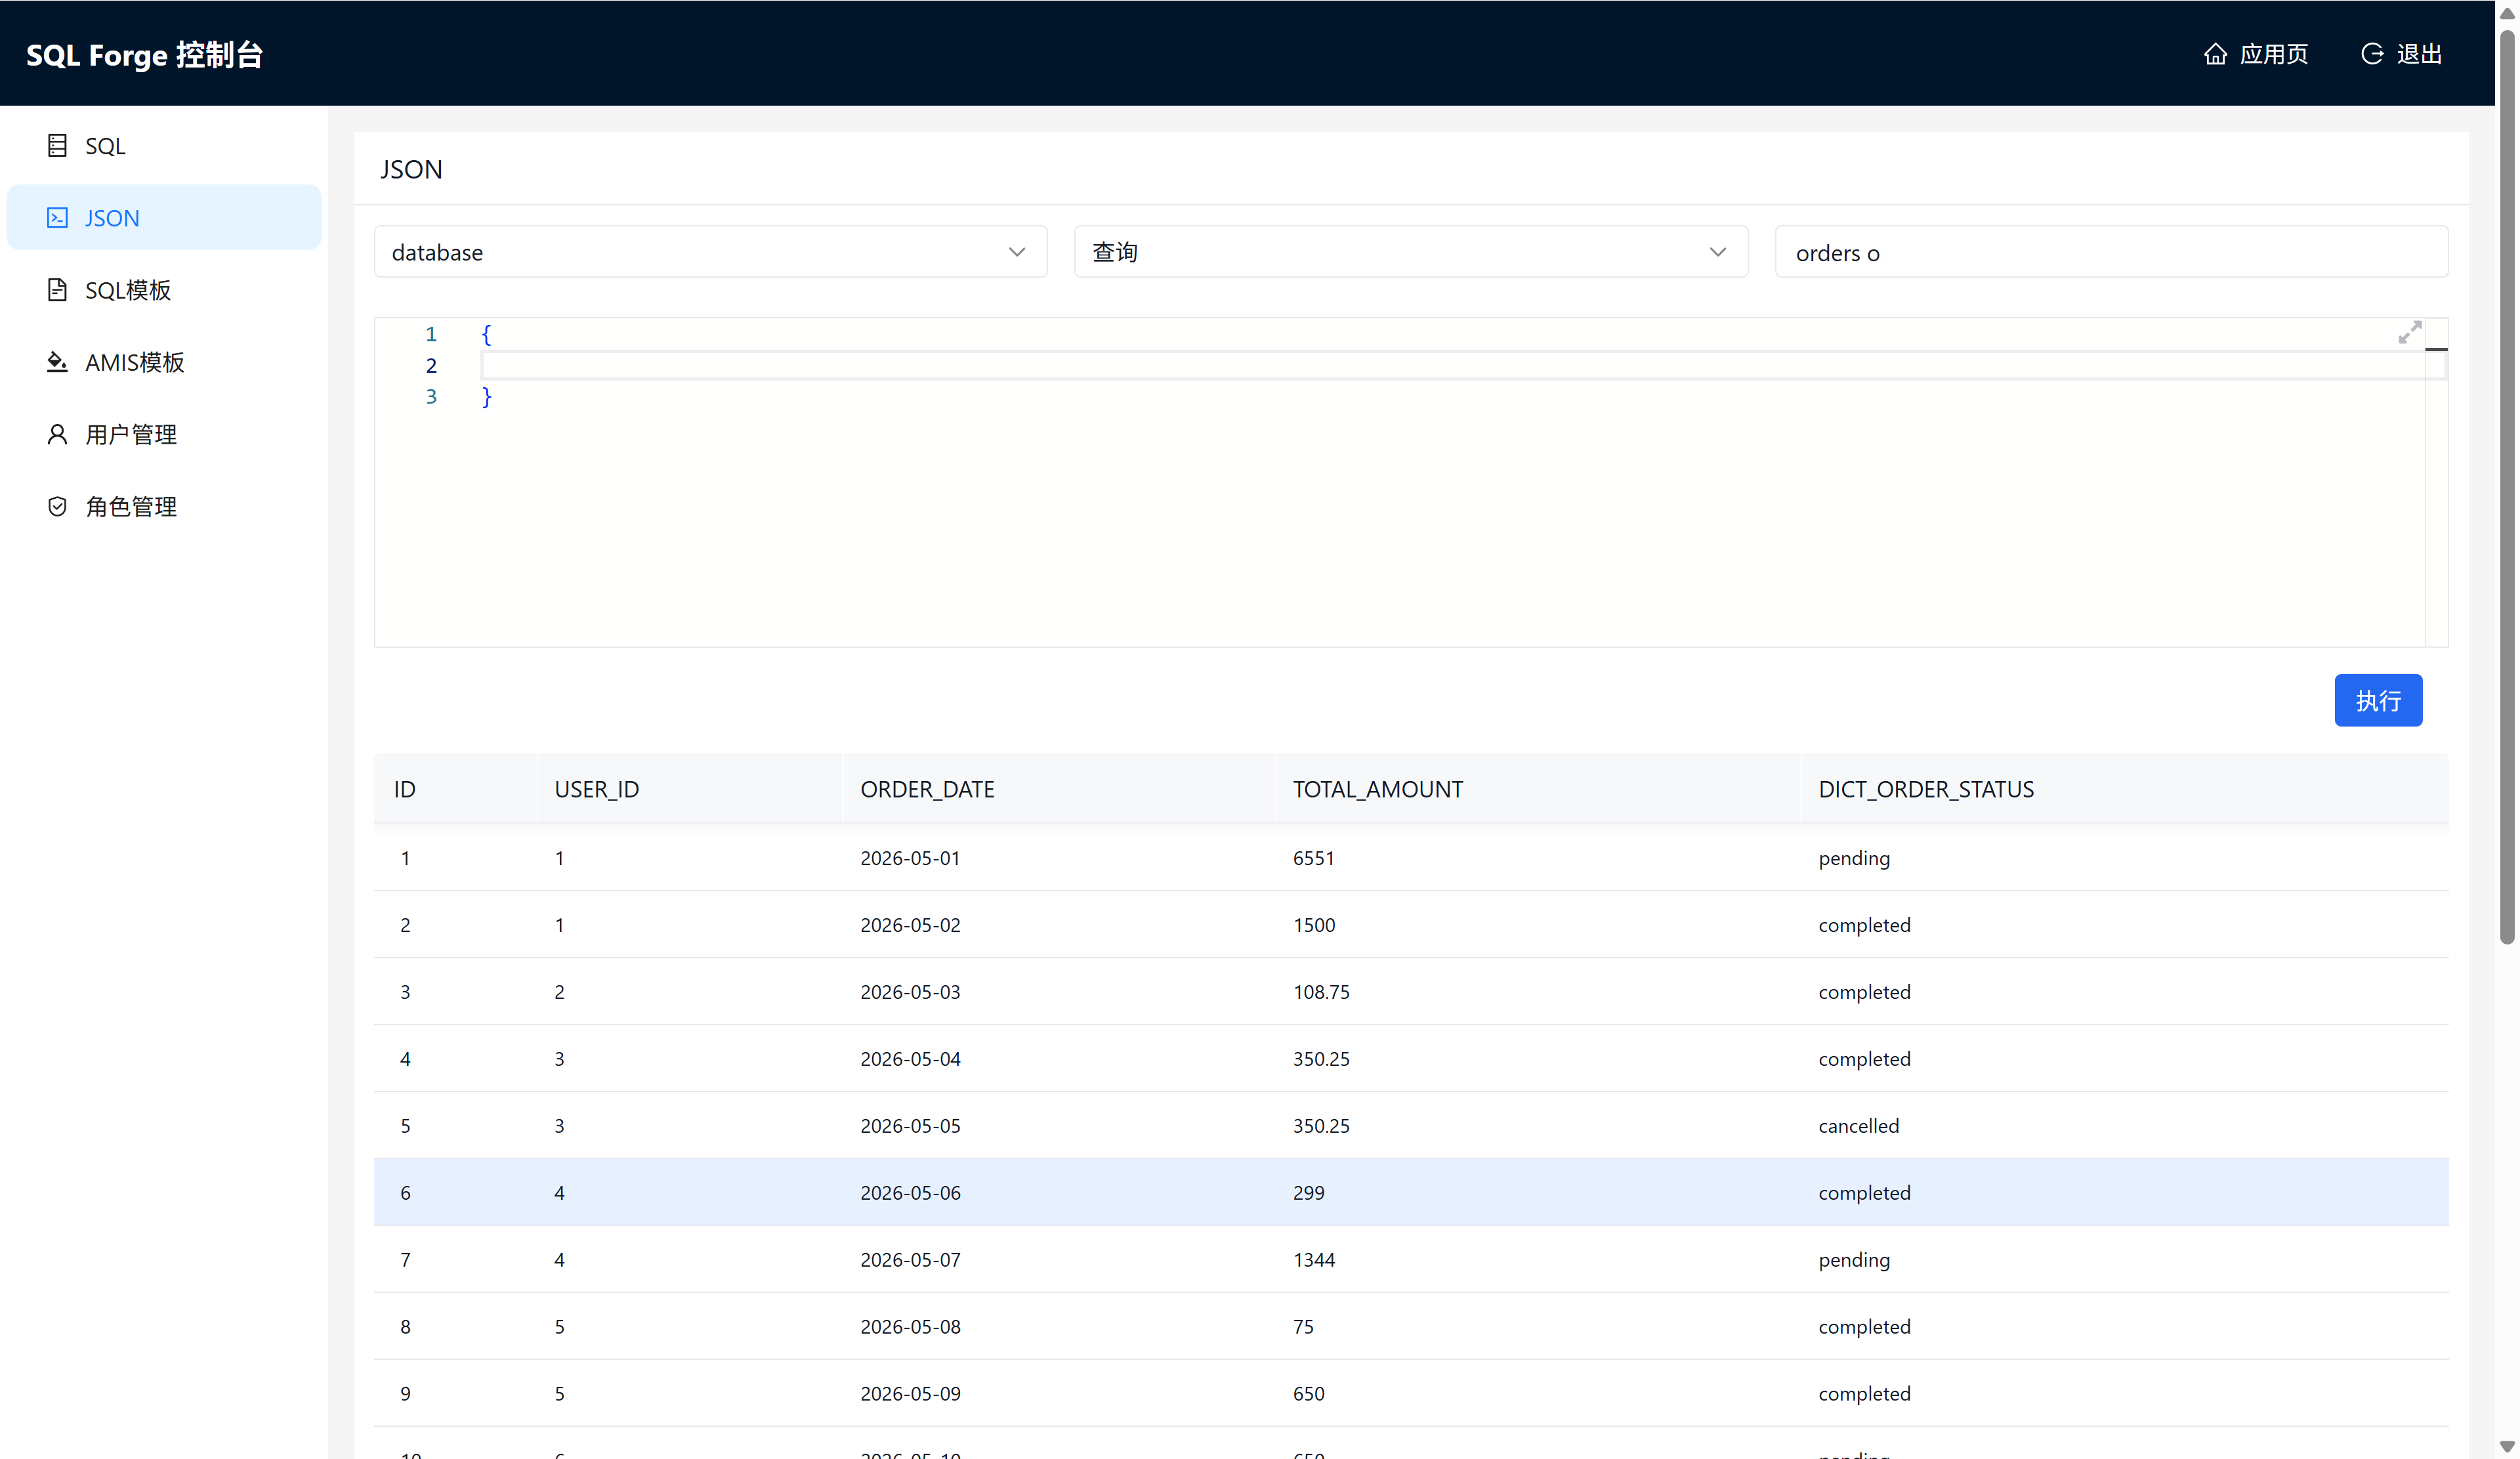
- SQL 模板管理、调试
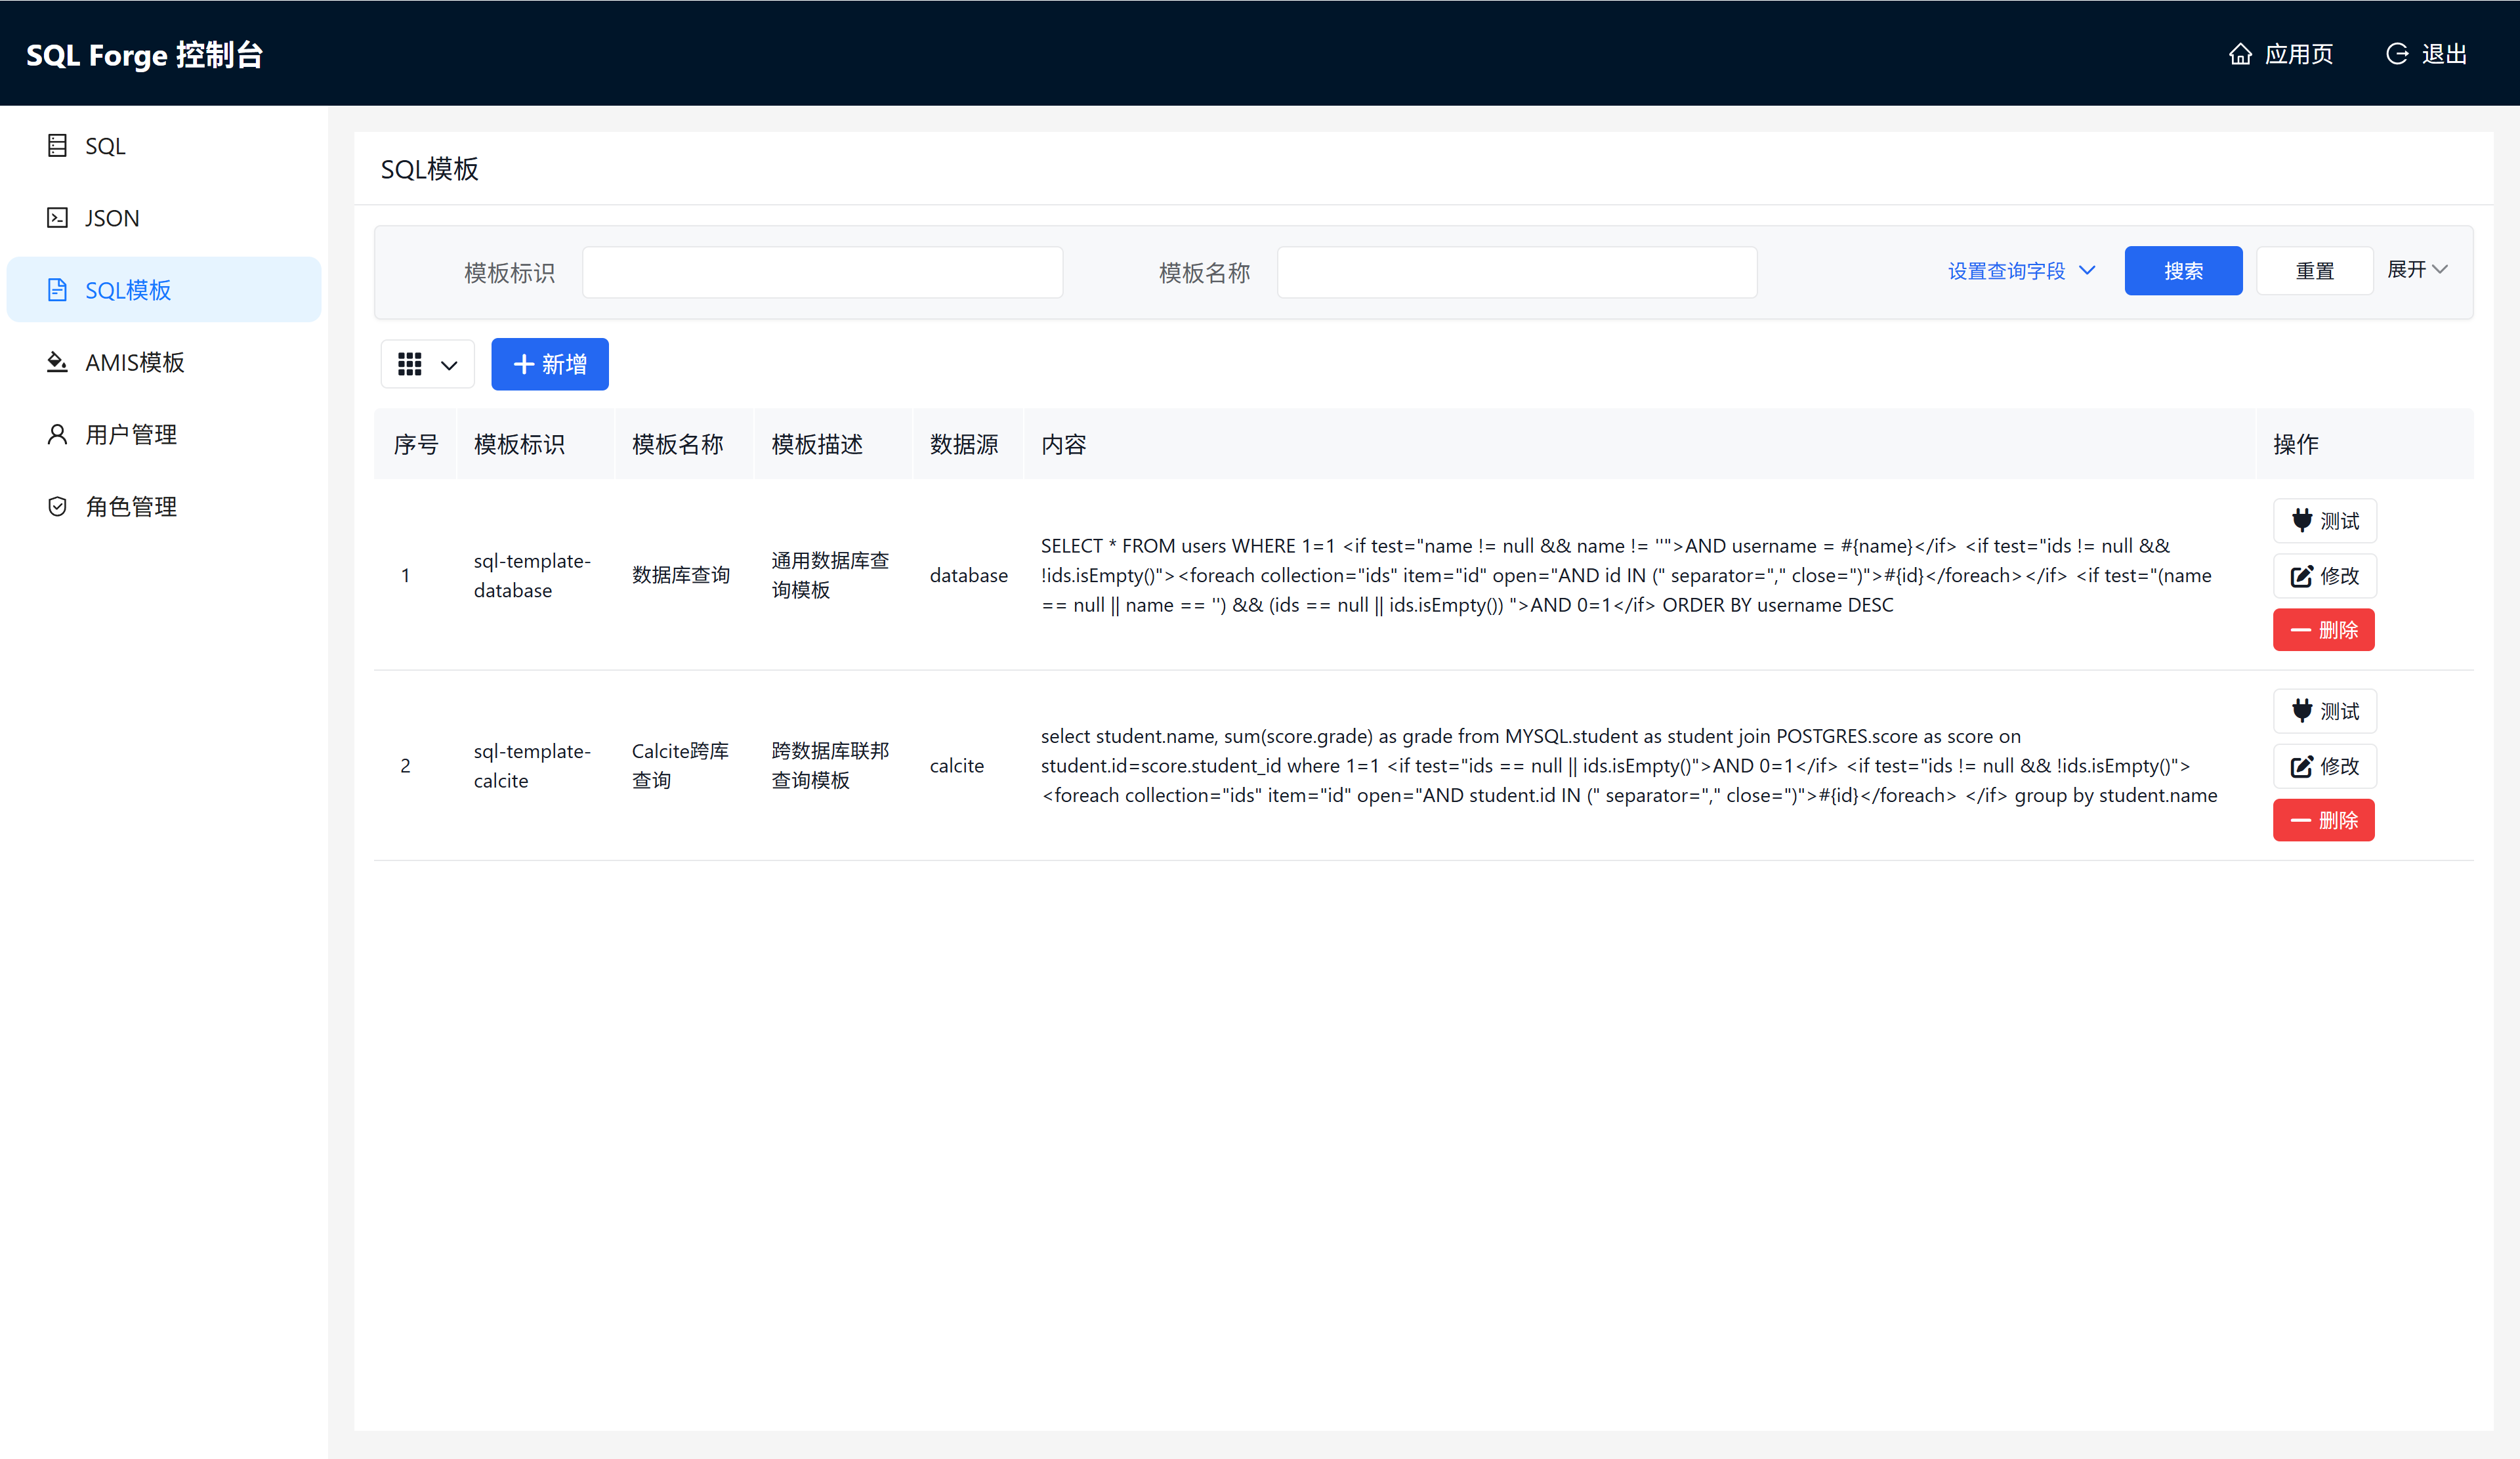
- Amis 模板管理、调试
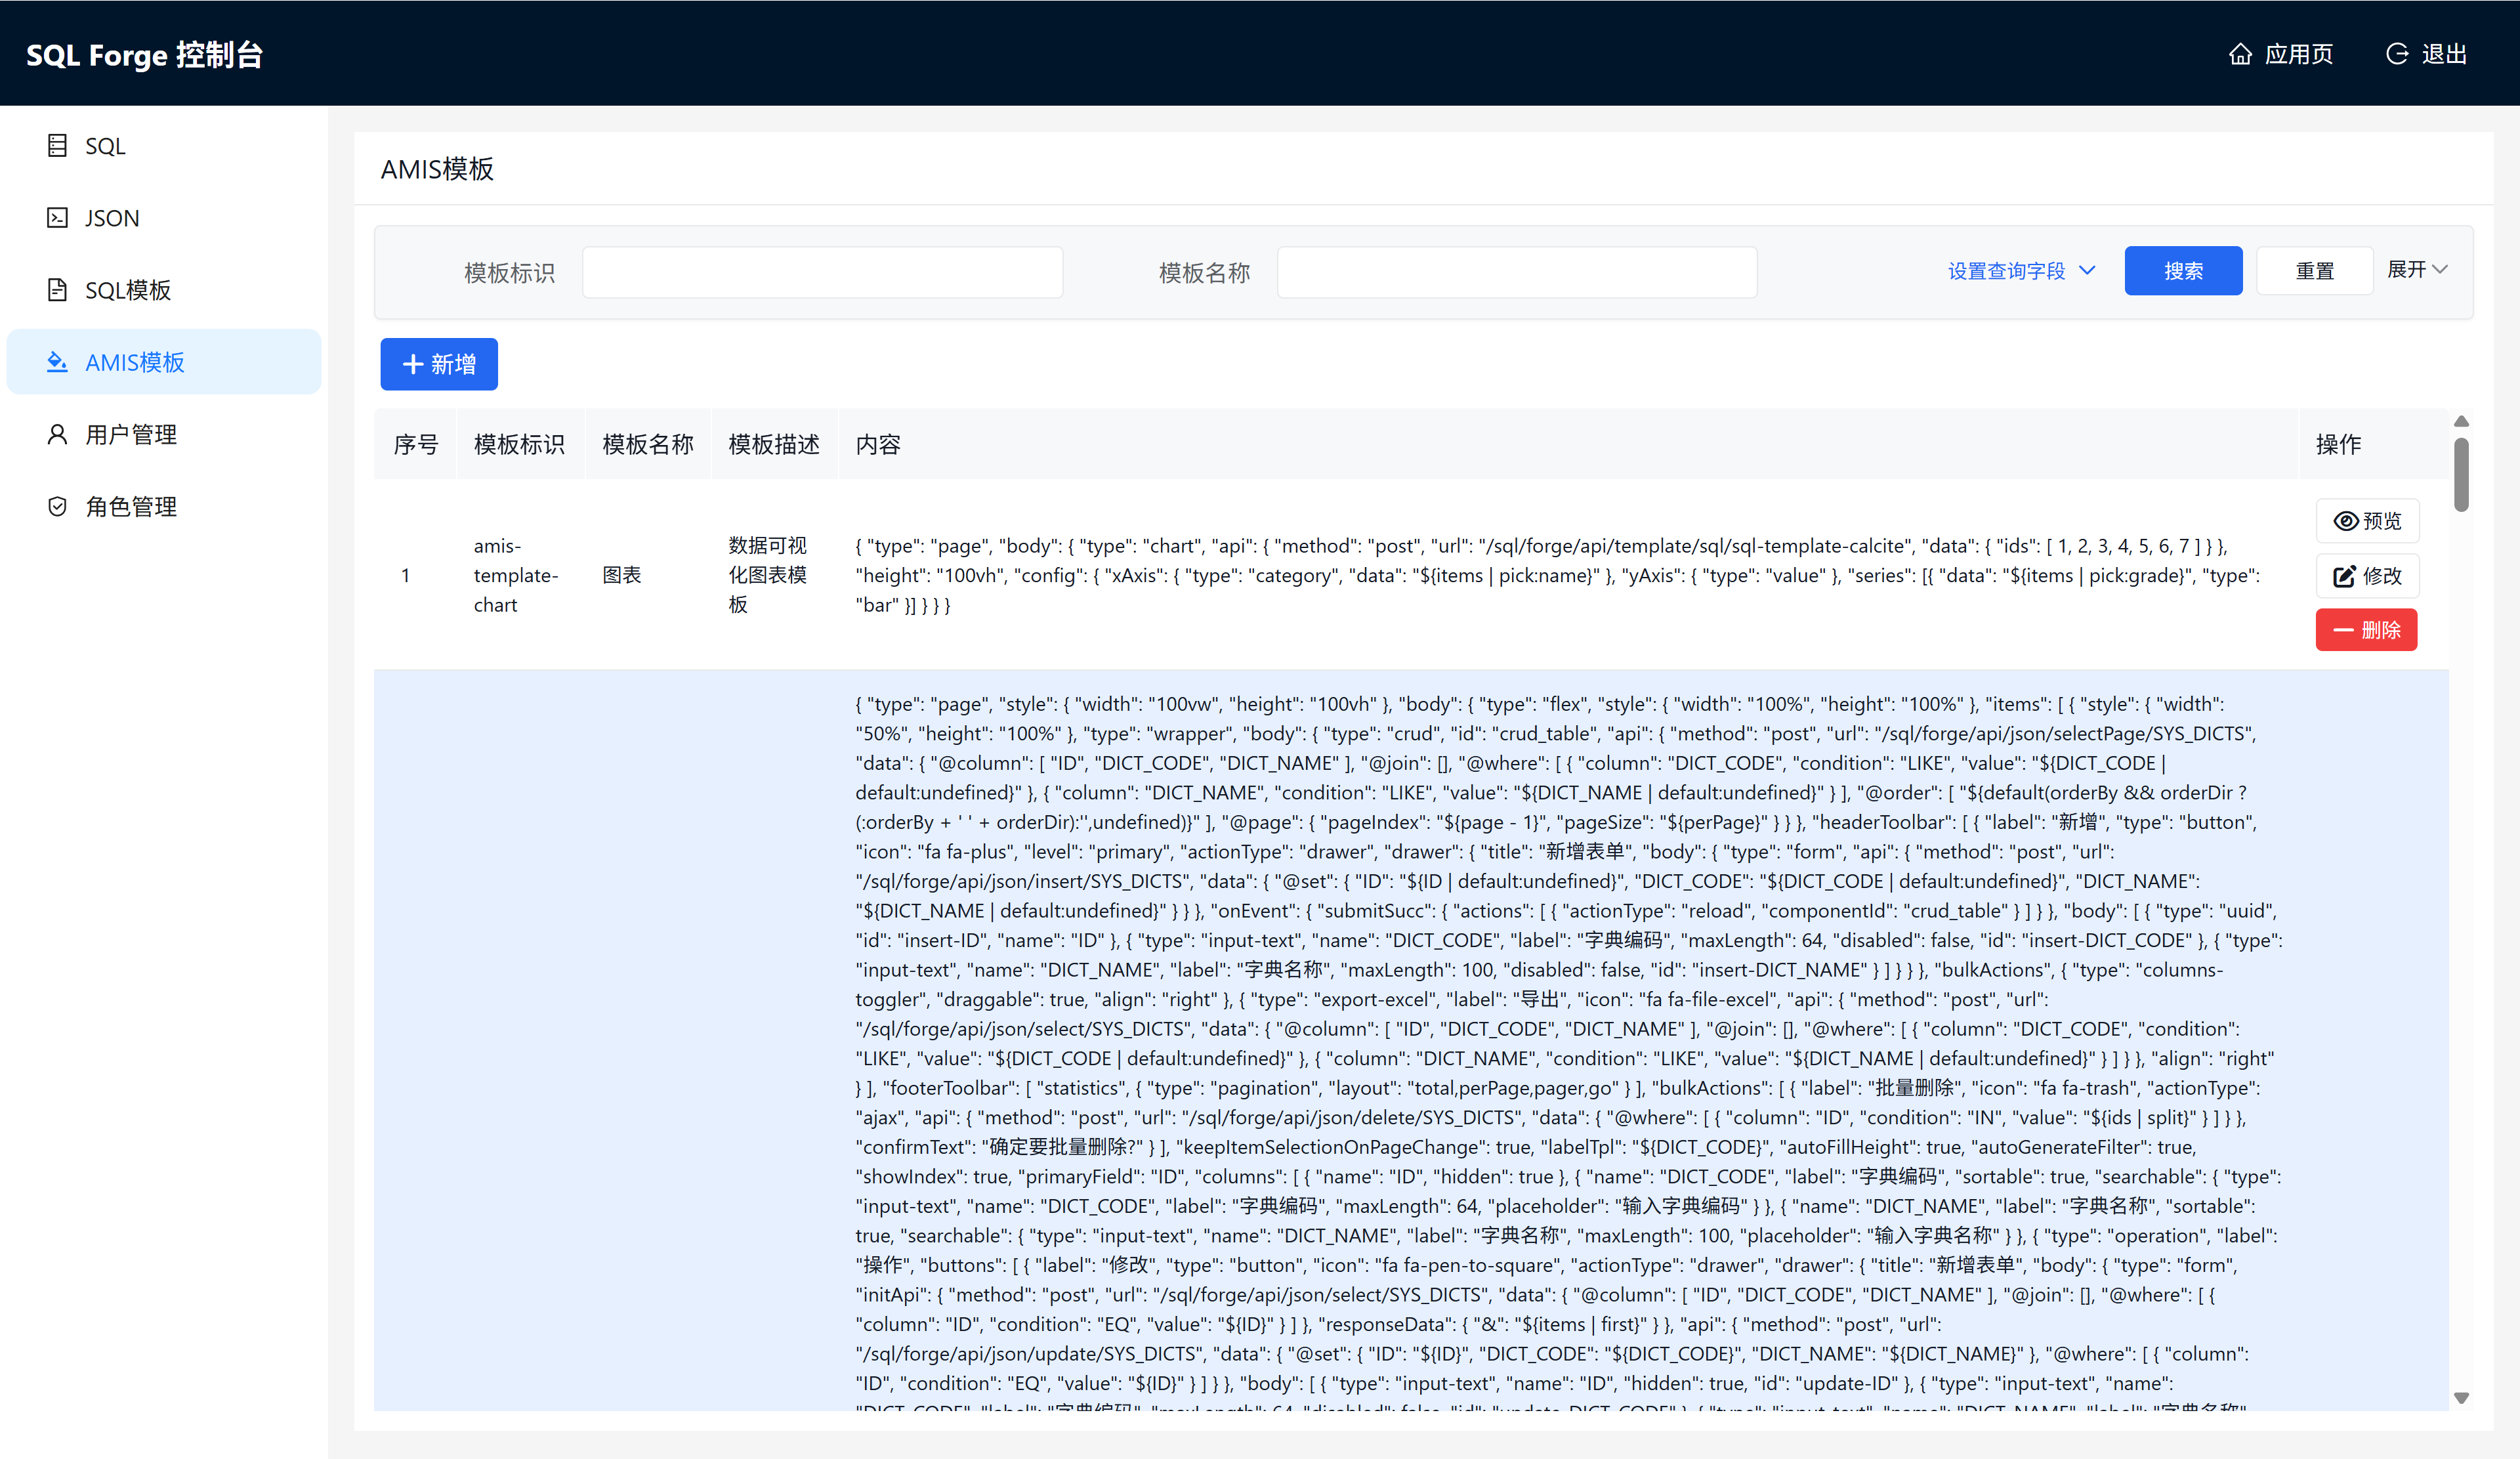
3.3 用户与角色管理
认证体系(Session 登录 + ApiKey)已内置于基础 Starter,详见 1.4 认证与 ApiKey。本节仅描述 Web Console 特有的用户/角色管理功能。
用户管理接口(需管理员权限)
GET /sql/forge/api/user- 获取用户列表PUT /sql/forge/api/user- 保存/更新用户DELETE /sql/forge/api/user/{id}- 删除用户
角色管理接口
GET /sql/forge/api/role- 获取角色列表PUT /sql/forge/api/role- 保存/更新角色(需管理员权限)DELETE /sql/forge/api/role/{id}- 删除角色(需管理员权限)GET /sql/forge/api/role-template?role={roleId}- 获取角色关联的模板 ID 列表PUT /sql/forge/api/role-template- 设置角色关联的模板(需管理员权限)GET /sql/forge/api/user-role?userId={userId}- 获取用户的角色 ID 列表(需管理员权限)PUT /sql/forge/api/user-role- 设置用户的角色(需管理员权限)
扩展持久化存储
所有存储均默认使用内存实现,可通过实现以下接口替换为数据库持久化:
| 接口 | 说明 |
|---|---|
| IUserStorage | 用户存储 |
| IUserRoleStorage | 用户-角色关联存储 |
| IRoleStorage | 角色存储 |
| IRoleTemplateStorage | 角色-模板关联存储 |
只需实现接口并注册为 Spring Bean 即可自动替换默认实现(@ConditionalOnMissingBean)。
4. sql-forge-mcp(AI MCP 服务器)
基于 Model Context Protocol(MCP)协议的服务器,通过 stdio 传输方式将 sql-forge 后端能力暴露为 AI 工具,让 Claude Code、Claude Desktop、Cursor、Windsurf 等 AI 助手可以直接"看到"数据库元数据、读 Amis 知识、按自然语言描述拼装 Amis 页面、保存到系统、用 headless Chromium 真实渲染校验。
需要一个运行中的 sql-forge 后端(需开启
sql.forge.api.database.enabled=true),并提前安装 Playwright Chromium 以使用previewAmisTemplate。
MCP 三类原语一览
MCP 服务按规范把能力分到三类原语(29 个 Tool + 5 个 Resource + 3 个 Prompt):
- Tools = 动作(CRUD、校验、渲染、保存),按需 invoke
- Resources = 只读参考(Amis 知识、组件清单、范例),建议 AI 客户端初始化阶段预读到上下文
- Prompts = 任务模板(带占位符的预制指令),可作为
/slash-command触发
元数据
| 工具 | 说明 |
|---|---|
getSystems |
获取所有已配置的系统信息 |
getMetaDataDatabase |
获取系统的数据库产品名称和版本 |
sqlForgeMetaDataTables |
获取系统数据库中的所有表 |
getMetaDataTableInfo |
获取表结构:列、主键、外键、索引 |
getMetaDataTree |
获取树形元数据(数据库 → schema → 表) |
listExecutorNames |
列出系统中可用的执行器名称(如 database、calcite) |
findTablesByName |
按关键字搜索表(不区分大小写) |
describeSchema |
一键获取完整 schema(数据库 → 表 → 列/主键/外键/索引) |
JSON CRUD
| 工具 | 说明 |
|---|---|
jsonSelect |
通用条件查询(POST /api/json/select/{tableName}) |
jsonSelectPage |
分页查询(POST /api/json/selectPage/{tableName}) |
jsonInsert |
插入一条记录(POST /api/json/insert/{tableName}) |
jsonUpdate |
按条件更新记录(POST /api/json/update/{tableName}) |
jsonDelete |
按条件删除记录(POST /api/json/delete/{tableName}) |
countRows |
统计符合 WHERE 条件的行数 |
SQL 模板与执行
| 工具 | 说明 |
|---|---|
executeSQL |
直接执行 SQL(默认仅 SELECT,受 sql.forge.api.database.select-only 控制) |
saveSqlTemplate |
保存或更新 SQL 模板(Enjoy 语法:#{} 占位符、<if>/<foreach> 条件循环) |
listSqlTemplates |
列出 SQL 模板(支持模糊过滤) |
getSqlTemplate |
根据 ID 获取单个 SQL 模板 |
deleteSqlTemplate |
根据 ID 删除 SQL 模板 |
executeSqlTemplate |
执行 SQL 模板并绑定参数 |
executeSqlTemplateSafely |
安全执行:先校验模板存在 + 参数完整 + 不执行未绑定占位符 SQL(推荐路径) |
Amis 模板 CRUD
| 工具 | 说明 |
|---|---|
amisTemplateSave |
保存 Amis 页面 JSON 模板配置(落业务后端 Amis 表) |
listAmisTemplates |
列出 Amis 模板(支持按 id/name/description/context 模糊过滤) |
getAmisTemplate |
根据 ID 获取单个 Amis 模板 |
deleteAmisTemplate |
根据 ID 删除 Amis 模板(破坏性,Agent 应先向用户确认) |
Amis 动作 & MCP 健康
| 工具 | 说明 |
|---|---|
validateAmisTemplate |
静态校验:JSON 语法、必填字段、组件 type、api 格式、嵌套递归。返回 {valid, errors[]}(severity: error/warning) |
previewAmisTemplate |
用 headless Chromium 真实渲染 Amis 模板(自包含 HTML,page.setContent() 注入,不弹窗)。返回 {available, rendered, reason, errors[]}。Chromium 不可用时降级返回 available=false + reason |
mcpHealth |
MCP 自身 + 各业务后端 + Playwright 健康检查。返回 {overall, mcp, backends, playwright, limits}。用于探活、Agent 启动自检、人工排查 |
metrics |
进程内指标:每个 Tool 的调用次数、错误数、平均延迟、最大延迟。用于探活、告警、Agent 自我诊断 |
MCP Resources(5 个,只读)
| URI | mimeType | 说明 |
|---|---|---|
amis://schema-hints |
text/markdown |
整篇 Amis Schema 速查手册(表达式 / API 写法 / CRUD 套路 / 踩坑清单)。最建议常驻 |
amis://components |
application/json |
组件目录轻量索引(仅 type/name/category/description,54 个) |
amis://examples |
application/json |
范例轻量索引(仅 name/title/tags/description,17 个) |
amis://components/{type} |
application/json |
按 type 获取组件完整规格(含 required/keyProps/minimalExample/docUrl) |
amis://examples/{name} |
application/json |
按 name 获取完整可运行的 JSON Schema,作为模板基础 |
资源加载由
AmisMcpResources暴露(spring-ai 1.1.x 用程序化List<McpServerFeatures.SyncResourceSpecification>Bean)。Round 5 把 6 个 Amis 知识 Tool 全部迁移到 Resource,以便 AI 客户端把amis://schema-hints预读到系统提示而无需 invoke。
MCP Prompts(3 个,任务模板)
| Prompt | 入参 | 作用 |
|---|---|---|
create-amis-page |
<systemName> <tableName> <pageTitle> |
标准化走"探表 → 读 schema-hints → 读 component spec → 改造 → 校验 → 预览"全流程 |
diagnose-render-error |
<context> <errors> |
把 preview 失败的 errors 喂回去,让 AI 改 schema 再来一次 |
quick-crud-template |
<systemName> <tableName> [withFilter] |
一键骨架:只读模式,最少对话生成最简 CRUD |
Agent 构造链路(11 步标准路径)
1. tools/call   mcpHealth                            → 确认后端可达 + Chromium 可用
2. tools/call   findTablesByName / describeSchema     → 探表 + 列元数据
3. resources/read amis://schema-hints                 → 速查手册(建议常驻)
4. resources/read amis://components/crud             → 必填字段
5. resources/read amis://examples/crud-page          → 范例 schema 作为模板
6. tools/call   validateAmisTemplate(json)           → 必须先通过
7. tools/call   previewAmisTemplate(systemName, json)→ 可视化验证(headless,不弹窗)
8. tools/call   amisTemplateSave(...)                → 保存到后端
9. tools/call   getAmisTemplate(...)                 → 反查验证
10. tools/call  update / re-validate / re-preview    → 修改重保存
11. tools/call  deleteAmisTemplate(...)              → 清场
完整实操示例(含每一步期望返回、常见错误排查、Prompts 触发方式)见
docs/agent-journey.md。
模块约束(本模块不持有任何 web 入口)
- 不依赖
sql-forge-web模块、不引入 servlet /RouterFunction - preview 用
page.setContent()自包含 HTML,spring.main.web-application-type=none - Amis SDK 由浏览器按需从 jsdelivr CDN 拉取(不内嵌到 MCP 包里)
- 这样保证 MCP 进程轻量、独立、可在任何环境下启动
stdio 使用方式(jbang)
使用 jbang 无需本地安装即可运行 MCP 服务器,在 MCP 客户端(Claude Desktop、Cursor 等)中配置如下:
{
  "mcpServers": {
    "sql-forge-mcp": {
      "command": "jbang.cmd",
      "args": [
        "io.github.wb04307201:sql-forge-mcp:1.7.0",
        "--sql.forge.mcp.systems[0].name=订单系统",
        "--sql.forge.mcp.systems[0].url=http://localhost:8081",
        "--sql.forge.mcp.systems[0].description=订单系统,包含系统表:用户、角色、字典等,业务表:商品、订单、支付记录、用户地址、库存、订单物流、商品分类、商品评价等",
        "--sql.forge.mcp.systems[0].apiKey=test"
      ]
    }
  }
}
多系统配置
配置多个系统可将一个 MCP 服务器连接到多个 sql-forge 后端:
{
  "mcpServers": {
    "sql-forge-mcp": {
      "command": "jbang.cmd",
      "args": [
        "io.github.wb04307201:sql-forge-mcp:1.7.0",
        "--sql.forge.mcp.systems[0].name=订单系统",
        "--sql.forge.mcp.systems[0].url=http://localhost:8081",
        "--sql.forge.mcp.systems[0].description=订单系统",
        "--sql.forge.mcp.systems[0].apiKey=test",
        "--sql.forge.mcp.systems[1].name=库存系统",
        "--sql.forge.mcp.systems[1].url=http://localhost:8082",
        "--sql.forge.mcp.systems[1].description=库存系统",
        "--sql.forge.mcp.systems[1].apiKey=test"
      ]
    }
  }
}
5. 端到端示例:从零搭建订单管理系统
跟随本节完整走一遍,你将看到:仅通过 JSON 配置,不写一行 Java 代码,就能搭出一个具备复杂报表 + CRUD + 权限控制的订单管理页面。
💡 端口约定:本节默认业务后端跑在
http://localhost:8081(与sql-forge-mcp章节示例一致,便于 Step 5 用 MCP 工具复刻)。这同时也是 Starter 的新默认(application.yml已将server.port改为 8081),改回 8080 仅是为了兼容旧习惯 — 直接替换 URL 即可。
业务目标
- 订单列表支持按用户名筛选
- 展示订单 + 用户 + 商品的关联信息(跨表 JOIN)
- 仅"经理"角色可见
步骤 1:注册 SQL 模板(复杂报表)
PUT http://localhost:8081/sql/forge/api/template/sql
Content-Type: application/json

{
  "id": "order-report",
  "executorName": "database",
  "context": "SELECT o.id, u.username, p.name AS product_name, o.total_amount, o.order_date FROM orders o JOIN users u ON o.user_id = u.id JOIN order_items oi ON o.id = oi.order_id JOIN products p ON oi.product_id = p.id <if test=\"username != null && username != ''\">WHERE u.username = #{username}</if> ORDER BY o.order_date DESC"
}
执行验证:
POST http://localhost:8081/sql/forge/api/template/sql/order-report
Content-Type: application/json

{"username": "alice"}
步骤 2:注册 Amis 页面模板
PUT http://localhost:8081/sql/forge/api/template/amis
Content-Type: application/json

{
  "id": "order-management",
  "name": "订单管理",
  "description": "按用户名筛选的订单报表",
  "context": "{ \"type\": \"page\", \"body\": [ { \"type\": \"form\", \"api\": \"post:/sql/forge/api/template/sql/order-report\", \"body\": [ { \"type\": \"input-text\", \"name\": \"username\", \"label\": \"用户名\" } ], \"actions\": [ { \"type\": \"submit\", \"label\": \"查询\" } ] }, { \"type\": \"crud\", \"api\": \"post:/sql/forge/api/template/sql/order-report\", \"columns\": [ { \"name\": \"id\", \"label\": \"订单号\" }, { \"name\": \"username\", \"label\": \"用户\" }, { \"name\": \"product_name\", \"label\": \"商品\" }, { \"name\": \"total_amount\", \"label\": \"金额\" }, { \"name\": \"order_date\", \"label\": \"下单时间\" } ] } ] }"
}
关键点:Amis 的
api字段直接指向 SQL 模板 URL,前端无需任何后端代码就能完成数据查询。
步骤 3:绑定角色权限
把订单管理页面授权给"经理"角色:
PUT http://localhost:8081/sql/forge/api/role-template
Content-Type: application/json

{
  "roleId": "manager",
  "templateIds": ["order-management"]
}
再把"经理"角色授予具体用户(管理员权限):
PUT http://localhost:8081/sql/forge/api/user-role
Content-Type: application/json

{
  "userId": "alice-id",
  "roleIds": ["manager"]
}
步骤 4:登录后访问
POST http://localhost:8081/sql/forge/api/auth/login
Content-Type: application/json

{"username": "alice", "password": "..."}
登录后访问 Web Console(/sql/forge/web),即可看到并打开"订单管理"页面。
步骤 5:用 AI Agent 通过 MCP 复刻上述全部步骤
如果你已经按 第 4 节 启动了 sql-forge-mcp 并把后端注册成 TestSys,上述 4 步可以用 AI Agent 一句话完成。比如对 Claude Code 说:
"用 TestSys 的 MCP 工具,给 ORDERS 表构造一个带按用户名筛选的订单管理页面,跟上面的 HTTP 示例功能一致,保存为
order-management。"
Agent 会按以下链路完成(每步对应一个 MCP Tool 调用):
| Agent 操作 | MCP 原语 | 工具 | 替代了哪个 HTTP 步骤 |
|---|---|---|---|
| 探表 + 拿列 | Tool | describeSchema(TestSys, ORDERS) |
—(HTTP 端没用到) |
| 读 Amis 知识 | Resource | amis://schema-hints + amis://examples/crud-page |
— |
| 注册 SQL 模板 | Tool | saveSqlTemplate(TestSys, order-report, ...) |
Step 1 PUT |
| 校验拼装的页面 JSON | Tool | validateAmisTemplate(json) |
— |
| 渲染验证 | Tool | previewAmisTemplate(TestSys, json) |
— |
| 保存 Amis 模板 | Tool | amisTemplateSave(TestSys, order-management, ...) |
Step 2 PUT |
| 绑定角色-模板 | Tool | saveSqlTemplate / 直接执行 SQL |
Step 3 PUT |
| 反查验证 | Tool | getAmisTemplate(TestSys, order-management) |
Step 4 起打开页面 |
无需手写 HTTP / 拼 JSON / 等浏览器刷新 —— Agent 全程用 MCP 通道完成,最终拿到的是同一个 order-management 页面。
完整 11 步标准链路、Prompts 触发方式、常见错误排查见
docs/agent-journey.md。
全程发生了什么
| 步骤 | 调用 | 触发的能力 |
|---|---|---|
| 1 | PUT /template/sql |
SQL 模板引擎(条件判断 ) |
| 2 | PUT /template/amis |
Amis 页面渲染 + 数据绑定 |
| 3 | PUT /role-template + PUT /user-role |
角色—页面 三级授权 |
| 4 | POST /auth/login + Console |
鉴权 + 可视化控制台 |
全程 0 行 Java 代码。如果想跨 MySQL/PostgreSQL 联合查询,只把 SQL 模板里的 executorName 改为 calcite;如果想让 AI 也能用自然语言操控整套系统,启动 sql-forge-mcp 即可。
完整配置参考
sql:
  forge:
    schemata:                      # 配置 schema 名称
      - PUBLIC
    api-keys:                      # ApiKey 列表(可选,配置后可通过 X-Api-Key 请求头免登录访问)
      - sk-your-api-key
    calcite:
      enabled: true                # 启用 Calcite 跨库联邦查询
      configuration: classpath:model.json
    api:
      database:
        enabled: true              # 启用数据库直连 API
        select-only: true          # true=仅允许 SELECT
      json:
        enabled: true              # 启用 JSON CRUD API(默认 true)
      template:
        sql:
          enabled: true            # 启用 SQL 模板 API(默认 true)
        amis:
          enabled: true            # 启用 Amis 模板 API(默认 true)
    console:
      enabled: true                # 启用 Web Console(默认 true)

server:
  port: 8081                      # 默认 8081,与 .mcp.json 配置对齐;详见下一节
🔌 端口配置同步指南
本仓库所有 HTTP / MCP 示例默认使用 http://localhost:8081。如需修改,需同时调整以下两处保持一致:
| 位置 | 字段 | 说明 |
|---|---|---|
业务后端 application.yml |
server.port |
Starter 实际监听端口(默认 8081,跟文档和 .mcp.json 配置完全对齐) |
MCP .mcp.json 的 --sql.forge.mcp.systems[i].url |
url | MCP fetcher 访问的后端 baseUrl,必须与 server.port 一致 |
任何 MCP 工具调用(
executeSQL/jsonSelect/amisTemplateSave…)都基于 url 配置访问后端;不一致会出现mcpHealth返回DEGRADED或 HTTP 404/401。不接 MCP、只用 Starter 时,若不想用默认 8081 也可以改回 8080(不需调 .mcp.json),文档中所有
localhost:8081替换为localhost:8080即可。
📚 延伸阅读
| 文档 | 内容 | 受众 |
|---|---|---|
docs/agent-journey.md |
完整 11 步 MCP Agent 实操链路:探表 → 读知识 → 拼装 → 校验 → 渲染 → 保存 → 反查 → 删除,含 Prompts 触发方式和常见错误排查 | Claude Code / Cursor / AI Agent 用户 |
docs/deployment.md |
sql-forge-mcp 生产部署手册:JVM 参数 / .mcp.json / 鉴权 / 日志 / 监控 / 告警阈值 / 回滚 / 安全审计 / 部署前后检查清单 | 运维 / SRE |
docs/profiling.md |
sql-forge-mcp 性能分析指南:async-profiler / JFR / jcmd / 5 类常见瓶颈与调优顺序 | 需要排查性能问题的开发者 |
sql-forge-mcp/README.md / README.en.md |
MCP 模块专属文档:Resources 5 / Tools 29 / Prompts 3,模块约束、设计理念 | MCP 服务开发者 / 集成方 |
探索相关项目
加载中…