
costachung/neumorphic
costachung/neumorphic has 1,012 GitHub stars and 74 forks. GitHot measured 0 stars in 24 hours, +2 in 7 days, and +1 in 15 days. Last checked 2026-11-20 15:38 UTC. Last push 2026-09-01.
实测星标增长
- 24小时
- 0
- 7天
- +2
- 15天
- +1
- 1个月
- 正在收集历史
各周期内的星标净变化,周期相互重叠,并非每日新增。缺失的测量保持空白。星标代表关注度,不代表软件质量。
关于
🚀Neumorphic is a SwiftUI utility to build Neumorphism Soft UI (supports both *outer shadow and *inner shadow)
开发工具README.md
原文Neumorphic SwiftUI : Neumorphism Soft UI
Neumorphic is a SwiftUI utility to build Neumorphism Soft UI easily using custom view modifier and custom button style. It supports all shapes.
Hi, I’m Costa. It is simple to create outer shadow in SwiftUI by writing two lines of code. However, we can’t easily create inner shadow in SwiftUI. That’s the reason why I build this tool to make it simple and reusable.
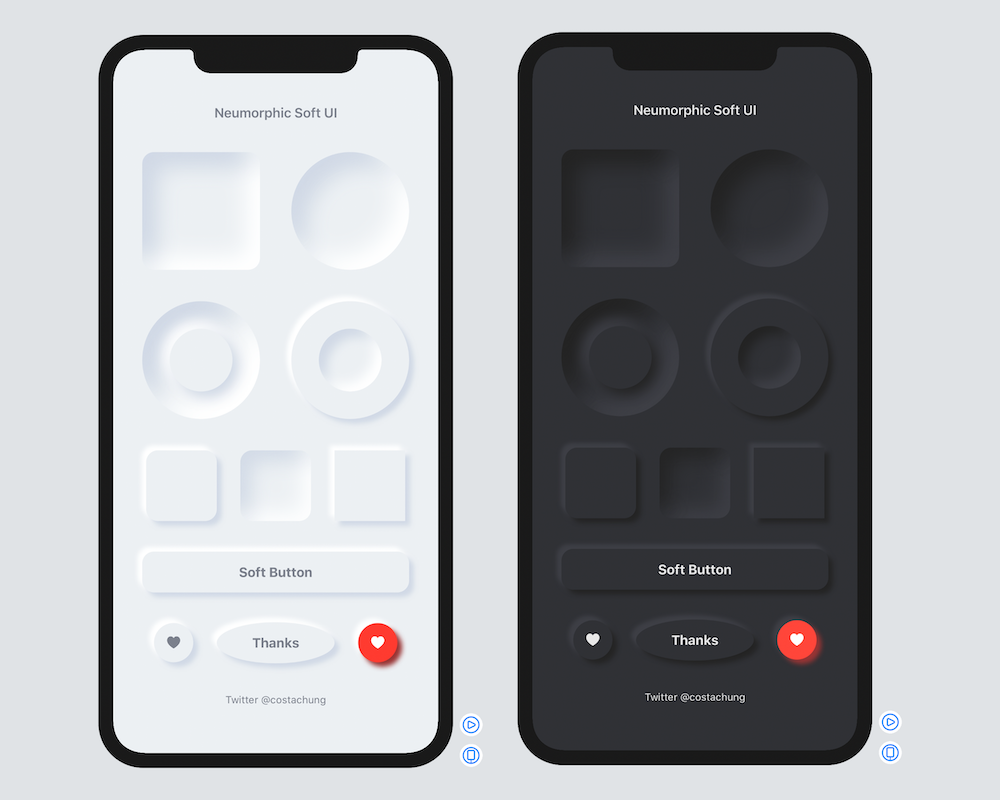
Additional controls
The following views and styles were added in the v2.x updates (see ExampleShowcaseView.swift for copy-ready usage):
- Theme —
NeumorphicTheme, including accent / onAccent button roles andresolvedButtonColors - Buttons —
FixedSizeSoftDynamicButtonStylefor fixed-size soft buttons - Inputs —
NeumorphicTextField,NeumorphicSlider,NeumorphicStepper,NeumorphicPicker,NeumorphicDatePicker - Chrome —
NeumorphicCard,NeumorphicLink,NeumorphicMenu,NeumorphicDisclosureGroup - Progress —
NeumorphicProgressView,NeumorphicCircularProgressView - Selection —
NeumorphicSelectionControls - Interaction —
NeumorphicFocusRing,NeumorphicHoverEffect - Accessibility —
NeumorphicAccessibilityhelpers (contrast / accessibility labels for soft UI)
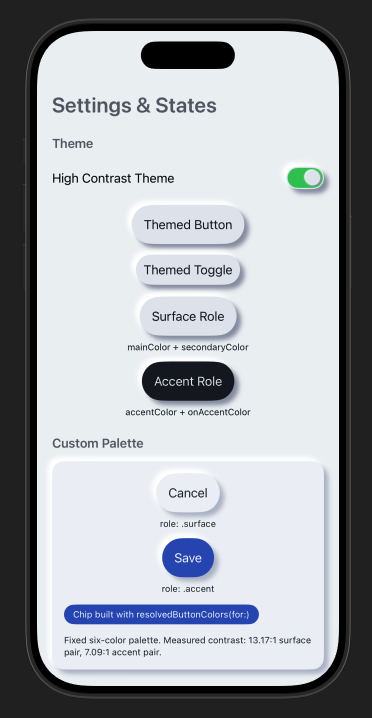
Open the example app, then the settings screen, to try accent palettes and the new controls.
Installation
Requirements .iOS(.v13),.macOS(.v10_15)
Swift Package Manager
- In Xcode, open your project and go to File → Swift Packages → Add Package Dependencies.
- Paste the repository URL (https://github.com/costachung/neumorphic/) and click Next.
- For Rules, select version.
- Click Finish.
Swift Package
.package(url: "https://github.com/costachung/neumorphic/", .upToNextMajor(from: "2.4.1"))
Usage
Import Neumorphic package to your view.
import Neumorphic
Simply use .softOuterShadow and .softInnerShadow methods to create outer shadow and inner shadow respectively.
Create Rounded Rectangle with Outer Shadow

RoundedRectangle(cornerRadius: 20).fill(Color.Neumorphic.main).softOuterShadow()
Create Rounded Rectangle with Inner Shadow

RoundedRectangle(cornerRadius: 20).fill(Color.Neumorphic.main).softInnerShadow(RoundedRectangle(cornerRadius: 20))
Create Circles

  HStack {
      Circle().fill(Color.Neumorphic.main).softOuterShadow()
      Circle().fill(Color.Neumorphic.main).softInnerShadow(Circle())
  }
Customization
You can change the color, spread of the shadow, and the shadow radius of the shadow.
func softOuterShadow(
    darkShadow: Color = Color.Neumorphic.darkShadow,
    lightShadow: Color = Color.Neumorphic.lightShadow,
    offset: CGFloat = 6,
    radius: CGFloat = 3
) -> some View

func softInnerShadow<S: Shape>(
    _ content: S,
    darkShadow: Color = Color.Neumorphic.darkShadow,
    lightShadow: Color = Color.Neumorphic.lightShadow,
    spread: CGFloat = 0.5,
    radius: CGFloat = 10
) -> some View
Or reach for a preset instead of tuning by hand — .standard, .subtle, or .none:
RoundedRectangle(cornerRadius: 16)
    .fill(Color.Neumorphic.main)
    .softOuterShadow(.subtle)
An inset field, for instance, is just a text field over an inner-shadowed background:

Example of using background method to add it under TextField:
HStack {
    Image(systemName: "magnifyingglass")
        .foregroundColor(Color.Neumorphic.secondary)
        .font(Font.body.weight(.bold))
    TextField("Search ...", text: $name)
        .foregroundColor(Color.Neumorphic.secondary)
}
.padding()
.background(
    RoundedRectangle(cornerRadius: 30)
        .fill(Color.Neumorphic.main)
        .softInnerShadow(RoundedRectangle(cornerRadius: 30), spread: 0.05, radius: 2)
)
And a bar chart is an inner-shadowed track with a plain fill on top:

ZStack(alignment: .bottom) {
    RoundedRectangle(cornerRadius: 20)
        .fill(Color.Neumorphic.main)
        .softInnerShadow(RoundedRectangle(cornerRadius: 20), spread: 0.3, radius: 2)
        .frame(width: 30, height: 150)

    RoundedRectangle(cornerRadius: 20)
        .fill(barColor)
        .frame(width: 30, height: 100)
}
Controls
Rather than rebuilding these on top of the shadow modifiers each time, the package ships them:
| Category | Controls |
|---|---|
| Input | NeumorphicSlider, NeumorphicTextField, NeumorphicStepper, NeumorphicDatePicker |
| Selection | NeumorphicPicker, NeumorphicCheckbox, NeumorphicRadio, NeumorphicMenu |
| Status | NeumorphicProgressView, NeumorphicCircularProgressView |
| Layout | NeumorphicDisclosureGroup, .neumorphicCard() |
| Navigation | NeumorphicLink |
VStack(spacing: 20) {
    NeumorphicSlider(value: $volume, in: 0...100, step: 1)
    NeumorphicTextField("Name", text: $name)
    NeumorphicProgressView(value: progress)
    NeumorphicPicker(selection: $mode, options: ["Light", "Dark"])
}
macOS gets two extras: .neumorphicFocusRing(_:isFocused:) for keyboard focus and .neumorphicHover(_:isHovered:) for pointer feedback.
Buttons
Create Soft Button

Button(action: {}) {
    Text("Soft Button").fontWeight(.bold)
}
.neumorphicThemedButtonStyle(RoundedRectangle(cornerRadius: 20))
func neumorphicThemedButtonStyle<S: Shape>(
    _ shape: S,
    padding: CGFloat = 16,
    pressedEffect: SoftButtonPressedEffect = .hard
) -> some View

func neumorphicThemedButtonStyle<S: Shape>(
    _ shape: S,
    role: NeumorphicButtonRole,
    padding: CGFloat = 16,
    pressedEffect: SoftButtonPressedEffect = .hard
) -> some View
Create Soft Button with custom style

HStack {
    Button(action: {}) {
        Image(systemName: "heart.fill")
    }.neumorphicThemedButtonStyle(Circle(), role: .accent)

    Button(action: {}) {
        Image(systemName: "heart.fill")
    }.buttonStyle(
        SoftDynamicButtonStyle(
            Circle(),
            mainColor: .red,
            textColor: .white,
            darkShadowColor: Color(red: 0.6, green: 0.2, blue: 0.2),
            lightShadowColor: Color("redButtonLightShadow"),
            pressedEffect: .hard
        )
    )
}
For a fixed visual size that still keeps a 44-point hit area, use .fixedSizeSoftButtonStyle(_:size:).
Soft Button - Pressed Effects

HStack {
    Button(action: {}) { Text(".none").fontWeight(.bold) }
        .neumorphicThemedButtonStyle(Capsule(), pressedEffect: .none)
    Button(action: {}) { Text(".flat").fontWeight(.bold) }
        .neumorphicThemedButtonStyle(Capsule(), pressedEffect: .flat)
    Button(action: {}) { Text(".hard").fontWeight(.bold) }
        .neumorphicThemedButtonStyle(Capsule(), pressedEffect: .hard)
}
.hard presses the surface in, .flat removes the shadow, .none leaves it alone.
Toggle
Switch

Toggle("Toggle", isOn: $toggleIsOn)
      .toggleStyle(.neumorphicSwitch)
Or .neumorphicThemedSwitchStyle(tint:labelsHidden:height:) to follow the environment theme, and NeumorphicSwitchToggleStyle(tint:labelsHidden:) when you want to configure it directly.
Shape

A toggle that presses in and stays in — good for play/stop:
Toggle(isOn: $toggleIsOn) {
    Image(systemName: toggleIsOn ? "stop.fill" : "play.fill")
        .font(.title)
}
.neumorphicThemedToggleStyle(Circle(), padding: 20)
Themes, light and dark
Color.Neumorphic adapts to light and dark mode on its own. For anything beyond that, put a theme in the environment — built-in controls read it, and the themed button and toggle modifiers follow it. Buttons use .surface by default; use .accent for the theme's accent/onAccent pair:
VStack {
    NeumorphicTextField("Name", text: $name)
    Button("Save") { }
        .neumorphicThemedButtonStyle(RoundedRectangle(cornerRadius: 12), role: .accent)
}
.neumorphicTheme(.highContrast)
.standard and .highContrast ship with the package; NeumorphicTheme is a plain struct, so your own palette is just another value. The four-color initializer remains available and maps accent/onAccent to secondary/main for source-compatible behavior; use the six-color initializer when those semantic pairs differ.
NeumorphicKit.colorSchemeType still exists for source compatibility with apps that override color resolution globally. New code should prefer preferredColorScheme(_:) and .neumorphicTheme(_:).
Accessibility
Neumorphism is a low-contrast style, which makes accessibility work load-bearing rather than optional. Across the full supported deployment range, the controls here provide VoiceOver labels, values, traits, and adjustable actions; keep at least 44-point interaction targets; signal selection with symbols and not color alone; and respect Reduce Motion in anything animated.
Two things worth doing on your side: pass accessibilityLabel to sliders and progress views so VoiceOver announces something more useful than "Slider", and test with VoiceOver, Larger Text, Increase Contrast, Reduce Motion, and a hardware keyboard on macOS.
Example Project
Check out the neumorphic-examples XCode project to see how to use neumorphic UI.
Open neumorphic-examples/neumorphic-examples.xcodeproj. Demo screens live in neumorphic-examples/Shared/ (ExampleShowcaseView.swift, ExampleSettingsView.swift).
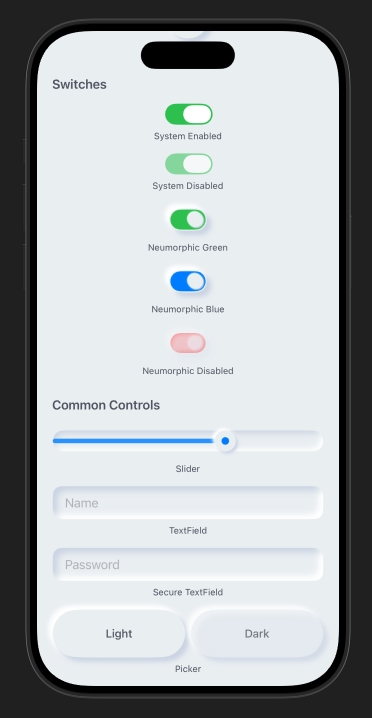
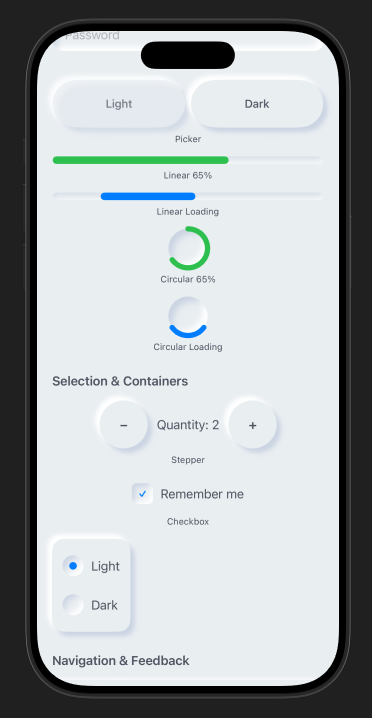
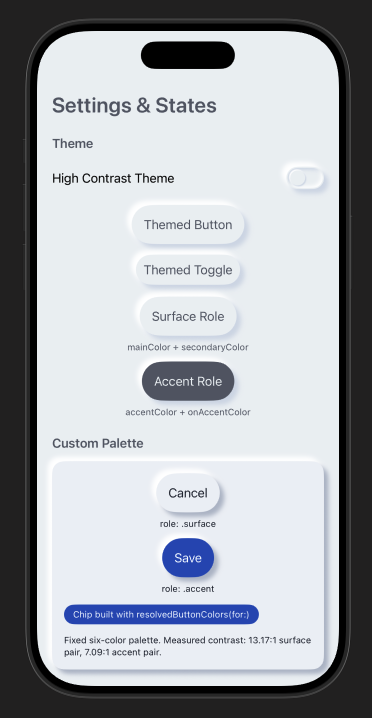
Contacts
https://twitter.com/costachung
License
Neumorphic Package is released under the MIT license. See the LICENSE file for more info.