
HyunCafe/contribute-practice
HyunCafe/contribute-practice has 68 GitHub stars and 65 forks. Star changes are not measured yet. Last checked 2026-11-14 01:44 UTC. Last push 2026-11-07.
实测星标增长
- 24小时
- 正在收集历史
- 7天
- 正在收集历史
- 15天
- 正在收集历史
- 1个月
- 正在收集历史
各周期内的星标净变化,周期相互重叠,并非每日新增。缺失的测量保持空白。星标代表关注度,不代表软件质量。
关于
Make your first open-source contribution! Practice Git, GitHub, and pull requests with a friendly, hands-on Git Bash and VS Code tutorial.
开发工具README.md
原文
 Your First Open-Source Contribution
Learn Git and GitHub by making one real pull request.

No coding experience needed. You'll use Git Bash to practice the commands, VS Code to edit one file, and GitHub to share your first contribution.
Start the Git Bash walkthrough · Contributor wall · Contribution rules · Troubleshooting
Welcome
This repository exists to teach the skills behind open-source collaboration: fork → clone → branch → edit → commit → push → pull request.
You'll introduce yourself on our contributor wall and share a learning goal. That is a real, small documentation contribution. The purpose is to practice Git Bash and GitHub, not to write code.
Your first challenge: Change one file (
contributing.md), create one commit, and open one pull request. There is no need to edit the README or install a build system.

The journey
GitHub website                 Your computer (Git Bash)                  GitHub website
┌──────────────────┐           ┌────────────────────────────┐           ┌─────────────────────┐
│ Fork the project │ ────────► │ Clone your fork            │           │                     │
└──────────────────┘           │ Create your branch         │           │                     │
                               │ Edit contributing.md only  │           │                     │
                               │ Review → Commit → Push     │ ────────► │ Open pull request   │
                               └────────────────────────────┘           │ Get feedback        │
                                                                        └─────────────────────┘
| Term | What it means |
|---|---|
| Fork | Your personal copy of this GitHub repository. |
| Clone | Download your fork with Git history to your computer. |
| Branch | A safe place to work on your edit without changing main. |
| Commit | Record your change in local Git history. |
| Push | Send your branch and commit to your fork on GitHub. |
| Pull request (PR) | Ask the original repository to review and merge your contribution. |
More definitions are in the glossary.
Before you begin
You will need:
- A GitHub account that you can sign in to.
- Git for Windows, from the official Git website. It includes Git Bash. If you already use Git Bash, you can skip installation.
- Visual Studio Code (VS Code) from the official website. We'll use it to edit the contributor file; no extensions needed.
Open Git Bash and verify Git is installed:
git --version
Commit identity: Git might ask for your name/email when you make your first commit. For privacy, consider using your GitHub no-reply email address. Don't copy another person's identity.
Your first contribution: step by step
1. Fork this repository on GitHub
- Sign in to GitHub and open HyunCafe/contribute-practice.
- Select Fork → Create fork.
- Confirm the address looks like
https://github.com/YOUR_USERNAME/contribute-practice, replacingYOUR_USERNAMEwith your own GitHub handle.
Real URL example: This project is at https://github.com/HyunCafe/contribute-practice. Here, HyunCafe is the original owner. After you fork it, your fork will have your GitHub username in that position. Don't submit your change to the original repository as though it were your fork.
You need write access to your fork. You do not need write access to the original repository.
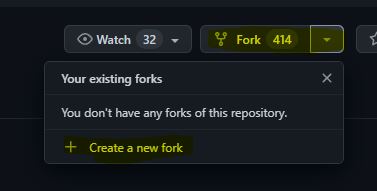
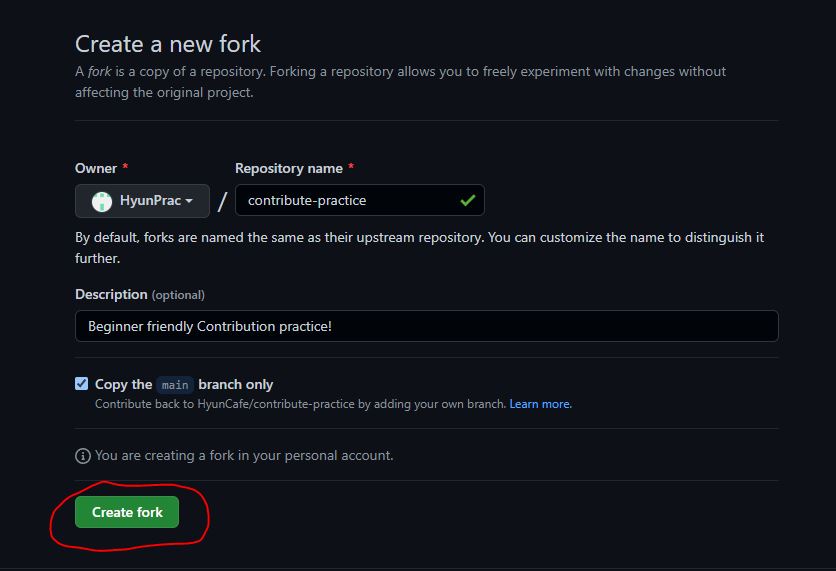
Screenshots from the original tutorial. GitHub's interface may look different today; follow the written instructions above.
2. Clone your fork using Git Bash
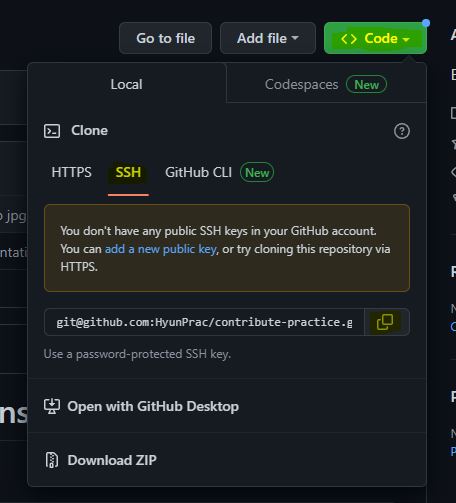
Note: This older screenshot shows SSH. For your first contribution, select HTTPS and follow the commands below instead. You do not need to set up SSH keys.
Open Git Bash in a folder where you'd like to keep your practice project (your home directory is fine).
Replace YOUR_USERNAME with your real GitHub username before running the command:
git clone https://github.com/YOUR_USERNAME/contribute-practice.git
cd contribute-practice
Real URL example (original project, not your fork):
https://github.com/HyunCafe/contribute-practice.git
This is the clone URL for HyunCafe's original repository. It shows what a complete GitHub clone address looks like. For your first contribution, use the git clone command above, with YOUR_USERNAME replaced by your own handle. Otherwise your origin remote may point to a repository you cannot push to.
Check that you cloned the right repository:
git remote -v
Both origin URLs should refer to your fork. Do not clone HyunCafe/contribute-practice when you intend to push to your own fork.
git clonecreates the project folder itself. If you seedestination path ... already exists, see troubleshooting rather than deleting a folder.
3. Create a branch for your change
git switch -c add-my-first-contribution
This creates and switches to a separate branch. Your local main stays unchanged.
4. Edit only contributing.md
From Git Bash, while you're inside your cloned repository, open the project in VS Code:
code .
In VS Code's Explorer (left sidebar), open contributing.md. That's the only file you need to edit. Keep Git Bash open for the Git commands that follow.
If Git Bash says code: command not found, reopen Git Bash after installing VS Code and try again. You can also use File → Open Folder in VS Code and select your cloned contribute-practice folder.
Find the letter matching the first character of your GitHub username, not your display name. Insert your entry in case-insensitive alphabetical order: compare the first character, then the second, third, and so on. If a letter section is missing, create it in the proper position. Handles starting with digits belong in ## 0–9 and symbols at the end.
Here's the entry template. Replace each placeholder with your own information:
Template — what to type in contributing.md:
- **YOUR_DISPLAY_NAME** ([`@YOUR_USERNAME`](https://github.com/YOUR_USERNAME))
  > "YOUR_LEARNING_GOAL"
Completed example — using the repository owner, HyunCafe:
- **HyunCafe** ([`@HyunCafe`](https://github.com/HyunCafe))
  > "My goal is to practice Git, make a small change, and open a pull request."
How it appears on GitHub:
- HyunCafe (
@HyunCafe)"My goal is to practice Git, make a small change, and open a pull request."
This is an illustrative entry, not an entry copied from the contributor wall. HyunCafe is the repository owner, and the goal shown here is sample wording—not a statement of the maintainer's personal goals. Please enter your own username, profile link, and learning goal instead.
For example, @anna comes before @anne, and @anne comes before @anton. Your display name can be different from your @handle; the handle in your profile link determines the order.
Keep your edit limited to your entry. Don't edit README.md, rewrite anyone else's goal, or reorganize existing records in your first PR. The contributor list is public, so don't include private contact information or passwords.
Press Ctrl+S in VS Code to save your change, then return to Git Bash.
5. Review the change before committing
Return to Git Bash:
git status --short
git diff -- contributing.md
git diff --check
You should see only contributing.md changed. For example, this is what git status --short often shows after you save:
M contributing.md
Check your spelling, GitHub profile URL, Markdown formatting, and alphabetical placement. If other files changed, investigate before staging or committing.
6. Make one commit
Stage only the contributor file, review the staged change, and commit it:
git add contributing.md
git diff --cached --name-only
git diff --cached --check
git commit -m "docs: add my contributor profile"
The staged-file list should contain only contributing.md, like this:
contributing.md
If Git asks you to configure your author identity, see troubleshooting.
7. Push your branch to your fork
git push -u origin HEAD
If a sign-in window opens, use the official GitHub authentication flow. GitHub account passwords are not used for Git over HTTPS. Never paste a token or a two-factor code into a GitHub issue or public PR comment.
8. Open your pull request
- Open your fork on GitHub and look for Compare & pull request. Alternatively select Pull requests → New pull request.
- Confirm the base is
HyunCafe/contribute-practiceonmainand the head is your fork's new branch. - Confirm the Files changed tab shows only
contributing.md. - Give the PR a clear title, such as
docs: add YOUR_USERNAME to contributors. For the illustrativeHyunCafeentry shown above, that title would bedocs: add HyunCafe to contributors. Use your own handle for your real PR. - Briefly describe what you learned, then click Create pull request.
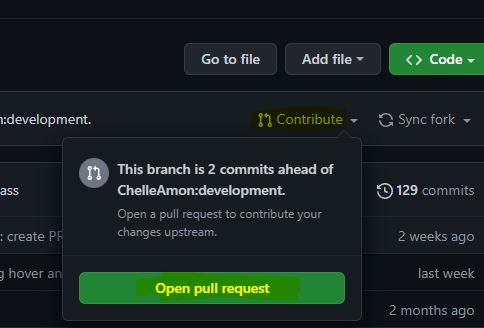
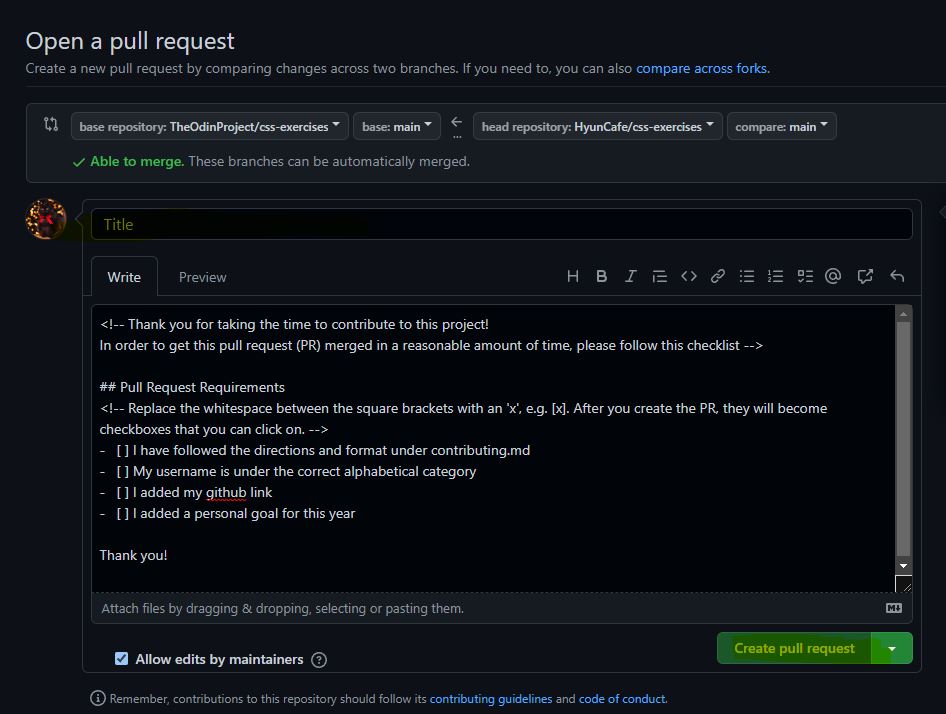
The GitHub interface may have changed since these were taken. Follow the steps above.
That's the complete exercise: one file → one commit → one PR. Your request may remain open while a maintainer reviews it. Watch for comments and follow up if changes are requested.
You did it! You've opened a pull request. That's the same workflow you'll use in other open-source projects. Keep an eye out for feedback, and thanks for joining in!

Our contributor wall
Meet the community contributors and their learning goals. New names are sorted by GitHub username, case-insensitively and character-by-character. Older goals and years are part of this project's history and should not be rewritten.
The wall is maintained in contributing.md alone. The README contains instructions, not a second contributor list.
Frequently asked questions
Do I need to know programming? No. Your first PR is a small Markdown edit.
Do I need Python, Node.js, SSH keys, or build tools? No. Git Bash, GitHub, and VS Code are enough for this exercise. We're using HTTPS, so there's no SSH setup.
Why use a branch? It lets you propose an isolated change that the maintainer can review safely.
Can I edit more than one file? For this beginner exercise, change only contributing.md. Larger documentation fixes are welcome as separate, focused PRs—open an issue first to discuss them.
Why hasn't my PR merged yet? Reviews depend on maintainer availability. Creating a correct PR and participating in review are the learning goals; merging is not guaranteed.
Help and further learning
- Contribution rules and entry format
- Common Git Bash and GitHub problems
- Plain-language Git glossary
- Community code of conduct
- Maintainer guide
- MIT license
Learn more: GitHub: Contributing to a project · Git: Getting started · Pro Git (free book)
Made and maintained by HyunCafe, with thanks to everyone who has practiced their first open-source contribution here.