
trzsz/trzsz-ssh
trzsz/trzsz-ssh has 2,781 GitHub stars and 162 forks. GitHot measured 0 stars in 24 hours. Last checked 2026-11-08 18:53 UTC. Last push 2026-10-31.
trzsz-ssh ( tssh ) is an ssh client designed as a drop-in replacement for the openssh client. It aims to provide complete compatibility with openssh, mirroring all its features, while also offering additional useful features. Such as login prompt, batch login, remember password, automated interaction, trzsz, zmodem(rz/sz), udp mode like mosh, etc.
What you can do
- Pseudo TTY - -t -T RequestTTY
- Algorithms - -c Ciphers KexAlgorithms
- SSH Proxy - -J -W ProxyJump ProxyCommand
- Network - -4 -6 AddressFamily ConnectTimeout
Measured star growth
- in 24h
- 0
- in 7 days
- Update delayed
- in 15 days
- Update delayed
- in 1 month
- Update delayed
Net star changes over overlapping periods, not daily totals. Missing measurements are left blank. Stars measure attention, not software quality.
README.en.md
Originaltrzsz-ssh(tssh): Highly OpenSSH-compatible SSH client with extended features




trzsz-ssh ( tssh ) is an ssh client designed as a drop-in replacement for the openssh client. It aims to provide complete compatibility with openssh, mirroring all its features, while also offering additional useful features not found in the openssh client.
trzsz-ssh ( tssh ) with tsshd also supports intermittent connectivity, allows roaming, and can be used on high-latency links such as cellular data connections, unstable Wi-Fi, etc.
Why to do
tsshlogin prompt supports searching and selecting the servers to log in to, if you can't remember them.tsshhas built-in support for trzsz ( trz / tsz ), no longer need to open a new session to transfer files.tsshsupports multiple selection and batch login, and supports executing the preset remote command.tsshsupports remember password, supports automated interaction, improving your login efficiency.tsshinstead oftrzsz sshon Windows, solves the issue of slow upload speed oftrzon Windows.tsshwith tsshd are similar to mosh, solved some of mosh's issues, such as SSH forwarding and ProxyJump.
Installation
💡 Note: The package is named
trzsz-sshin Homebrew, while it’s usually namedtsshelsewhere.
Install with scoop / winget / choco on Windows
scoop install tssh/winget install tssh/choco install tsshscoop install tsshwinget install tsshchoco install tsshInstall with Homebrew on MacOS
brew install trzsz-sshbrew update brew install trzsz-sshInstall with apt on Ubuntu
sudo apt install tsshsudo apt update && sudo apt install software-properties-common sudo add-apt-repository ppa:trzsz/ppa && sudo apt update sudo apt install tsshInstall with apt on Debian
sudo apt install tsshsudo apt install curl gpg curl -s 'https://keyserver.ubuntu.com/pks/lookup?op=get&search=0x7074ce75da7cc691c1ae1a7c7e51d1ad956055ca' \ | gpg --dearmor -o /usr/share/keyrings/trzsz.gpg echo 'deb [signed-by=/usr/share/keyrings/trzsz.gpg] https://ppa.launchpadcontent.net/trzsz/ppa/ubuntu jammy main' \ | sudo tee /etc/apt/sources.list.d/trzsz.list sudo apt update sudo apt install tsshInstall with dnf on Fedora / CentOS / RHEL
sudo dnf install tsshsudo dnf copr enable @trzsz/trzsz sudo dnf install tsshInstall with yum on Legacy CentOS / RHEL
sudo yum install tsshInstall with gemfury repository.
echo '[trzsz]
name=Trzsz Repo
baseurl=https://yum.fury.io/trzsz/
enabled=1
gpgcheck=0' | sudo tee /etc/yum.repos.d/trzsz.repo

sudo yum install tssh
Install with wlnmp repository. It's not necessary to configure the epel repository for tssh.
curl -fsSL "https://sh.wlnmp.com/wlnmp.sh" | bash

sudo yum install tssh
Install with yay on ArchLinux
yay -S tsshyay -Syu yay -S tsshInstall with Chromebrew on ChromeOS
crew install tsshcrew install tsshInstall with pixi / conda / mamba from conda-forge
pixi global install tssh/conda install tssh/mamba install tsshpixi global install tsshconda install -c conda-forge tsshmamba install -c conda-forge tsshInstall with Go ( Requires go 1.26 or later )
go install github.com/trzsz/trzsz-ssh/cmd/tssh@latest# latest release go install github.com/trzsz/trzsz-ssh/cmd/tssh@latest # latest development version (main branch) go install github.com/trzsz/trzsz-ssh/cmd/tssh@mainThe binaries are usually located in ~/go/bin/ ( C:\Users\your_name\go\bin\ on Windows ).
Build from source ( Requires go 1.26 or later )
sudo make installgit clone --depth 1 https://github.com/trzsz/trzsz-ssh.git cd trzsz-ssh make sudo make installDownload from the GitHub Releases (or Pre-Release) and install locally
download and install locallysudo apt install /tmp/tssh_*.deb sudo dpkg -i /tmp/tssh_*.deb sudo dnf install /tmp/tssh_*.rpm sudo yum install /tmp/tssh_*.rpm sudo rpm -i /tmp/tssh_*.rpm tar zxvf tssh_*.tar.gz && sudo cp tssh_*/tssh /usr/bin/
Login Prompt
Before use, you need to configure
~/.ssh/config(for Windows, it isC:\Users\xxx\.ssh\config, replacexxxwith your username).For how to configure
~/.ssh/config, please refer to the documentation of openssh. The built-in parser supportsMatch alland a standaloneMatch host; other criteria, combined criteria, andMatch execrequireUseOpenSSHConfigto be enabled (see configuration below).Running
tsshwithout arguments will open the login prompt. If there are arguments except destination will also open the login prompt.If the destination is part of the aliases in
~/.ssh/config, and can't completely match an alias, the login prompt will also be opened.If
#!! HideHost yesis configured, or the alias contains*or?wildcard characters, it will not be displayed in the login prompt.tsshsupports shortcuts, supports search, and supports multi-selection when used intmux,iTerm2, andWindows Terminal, etc.Action Global shortcuts Non search shortcuts Shortcuts description Confirm Enter Confirm and login Quit/Exit Ctrl+C Ctrl+Q q Q Cancel and quit Move Prev Ctrl+K Shift+Tab ↑ k K Move cursor up Move Next Ctrl+J Tab ↓ j J Move cursor down Page Up Ctrl+H Ctrl+U Ctrl+B PageUp ← h H u U b B Page up Page Down Ctrl+L Ctrl+D Ctrl+F PageDown → l L d D f F Page down Goto Home Home g Go to the first item Goto End End G Go to the last item EraseKeys Ctrl+E e E Erase search keywords TglSearch / Toggle search function Tgl Help ? Toggle help information TglSelect Ctrl+X Ctrl+Space Alt+Space Space x X Toggle selection SelectAll Ctrl+A a A Select all current items SelectOpp Ctrl+O o O Select the opposite items Open Wins Ctrl+W w W Batch login in new windows Open Tabs Ctrl+T t T Batch login in new tabs Open Pane Ctrl+P p P Batch login in new panes
Custom Theme
tsshsupports a few themes. Choose one by settingPromptThemeLayoutin$XDG_CONFIG_HOME/tssh/tssh.conf( or~/.tssh.conf). Welcome to create more and better themes together.Each theme supports custom colors. Just configure the
PromptThemeColorsin$XDG_CONFIG_HOME/tssh/tssh.conf( or~/.tssh.conf) to override the default colors as you prefer.Please ❤️vote❤️ for your favorite theme. The theme with the highest number of votes will be set as the default theme in the next version.
tiny theme
Configure
PromptThemeLayout = tinyin$XDG_CONFIG_HOME/tssh/tssh.conf( or~/.tssh.conf) to choosetiny theme.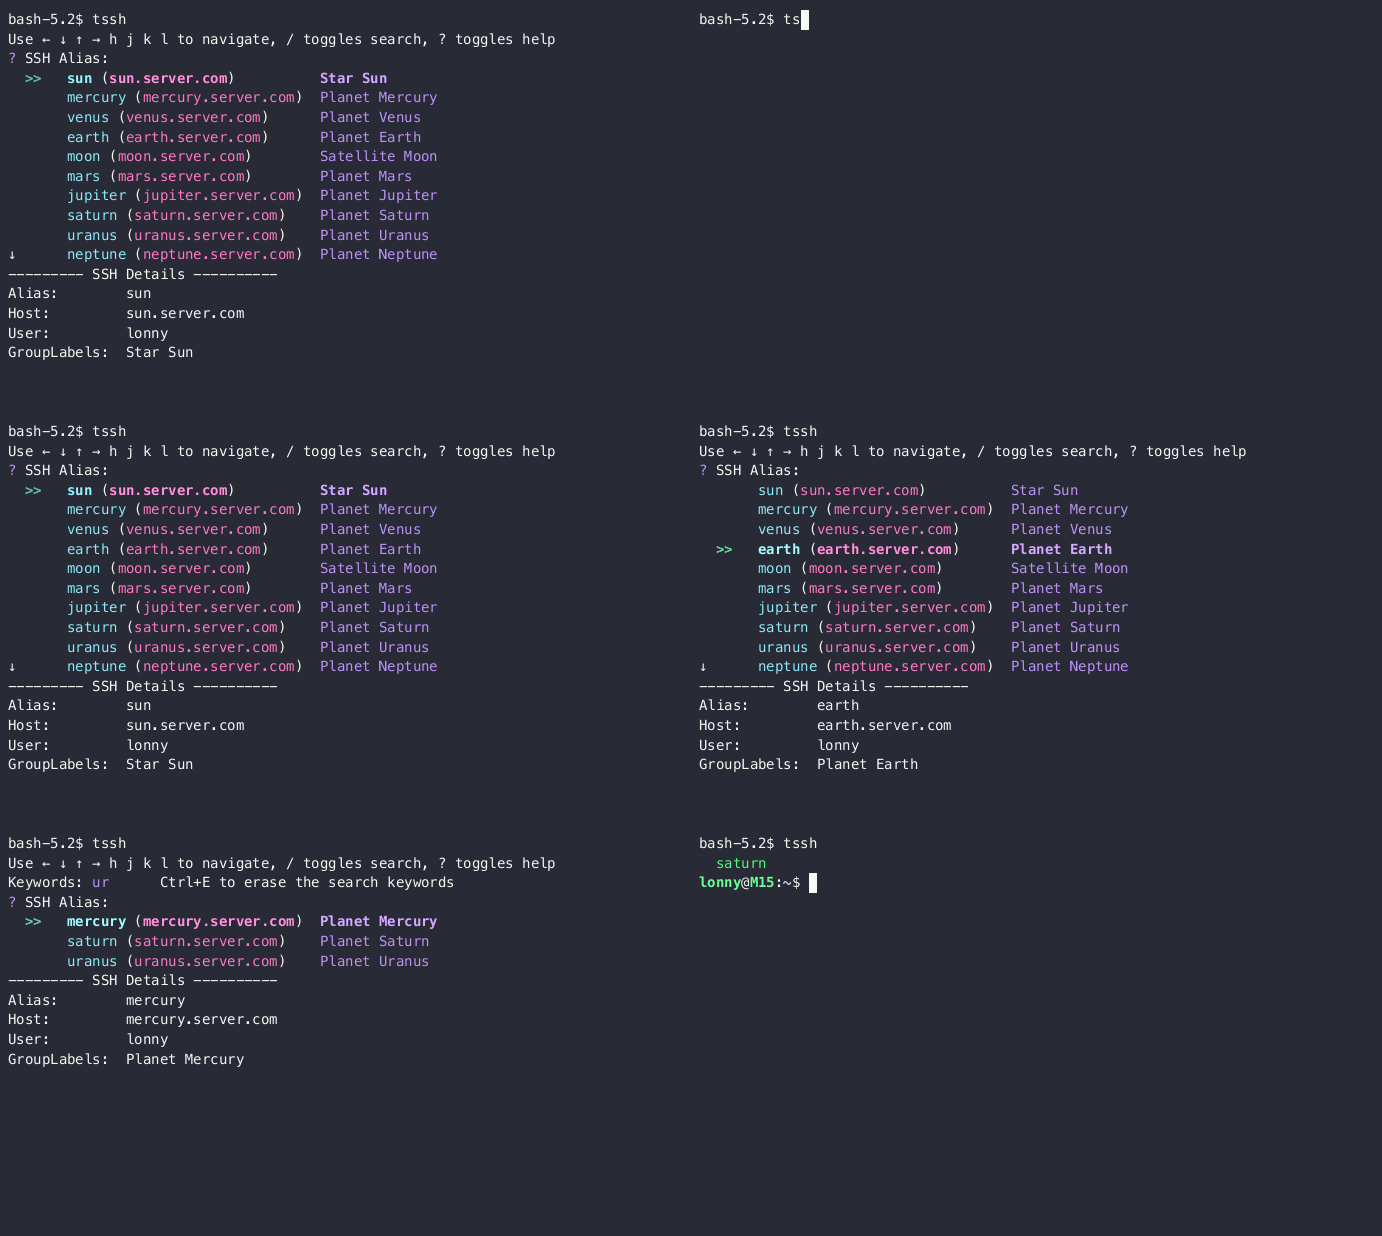
Configure
PromptThemeColorsin$XDG_CONFIG_HOME/tssh/tssh.conf( or~/.tssh.conf) and configure it in one line.tiny themesupports the following color items:tiny theme colors and default values:{ "help_tips": "faint", "shortcuts": "faint", "label_icon": "blue", "label_text": "default", "cursor_icon": "green|bold", "active_selected": "green|bold", "active_alias": "cyan|bold", "active_host": "magenta|bold", "active_group": "blue|bold", "inactive_selected": "green|bold", "inactive_alias": "cyan", "inactive_host": "magenta", "inactive_group": "blue", "details_title": "default", "details_name": "faint", "details_value": "default" }tiny theme color enumerations which can be concatenated with `|`:default black red green yellow blue magenta cyan white bgBlack bgRed bgGreen bgYellow bgBlue bgMagenta bgCyan bgWhite bold faint italic underline
simple theme
Configure
PromptThemeLayout = simplein$XDG_CONFIG_HOME/tssh/tssh.conf( or~/.tssh.conf) to choosesimple theme.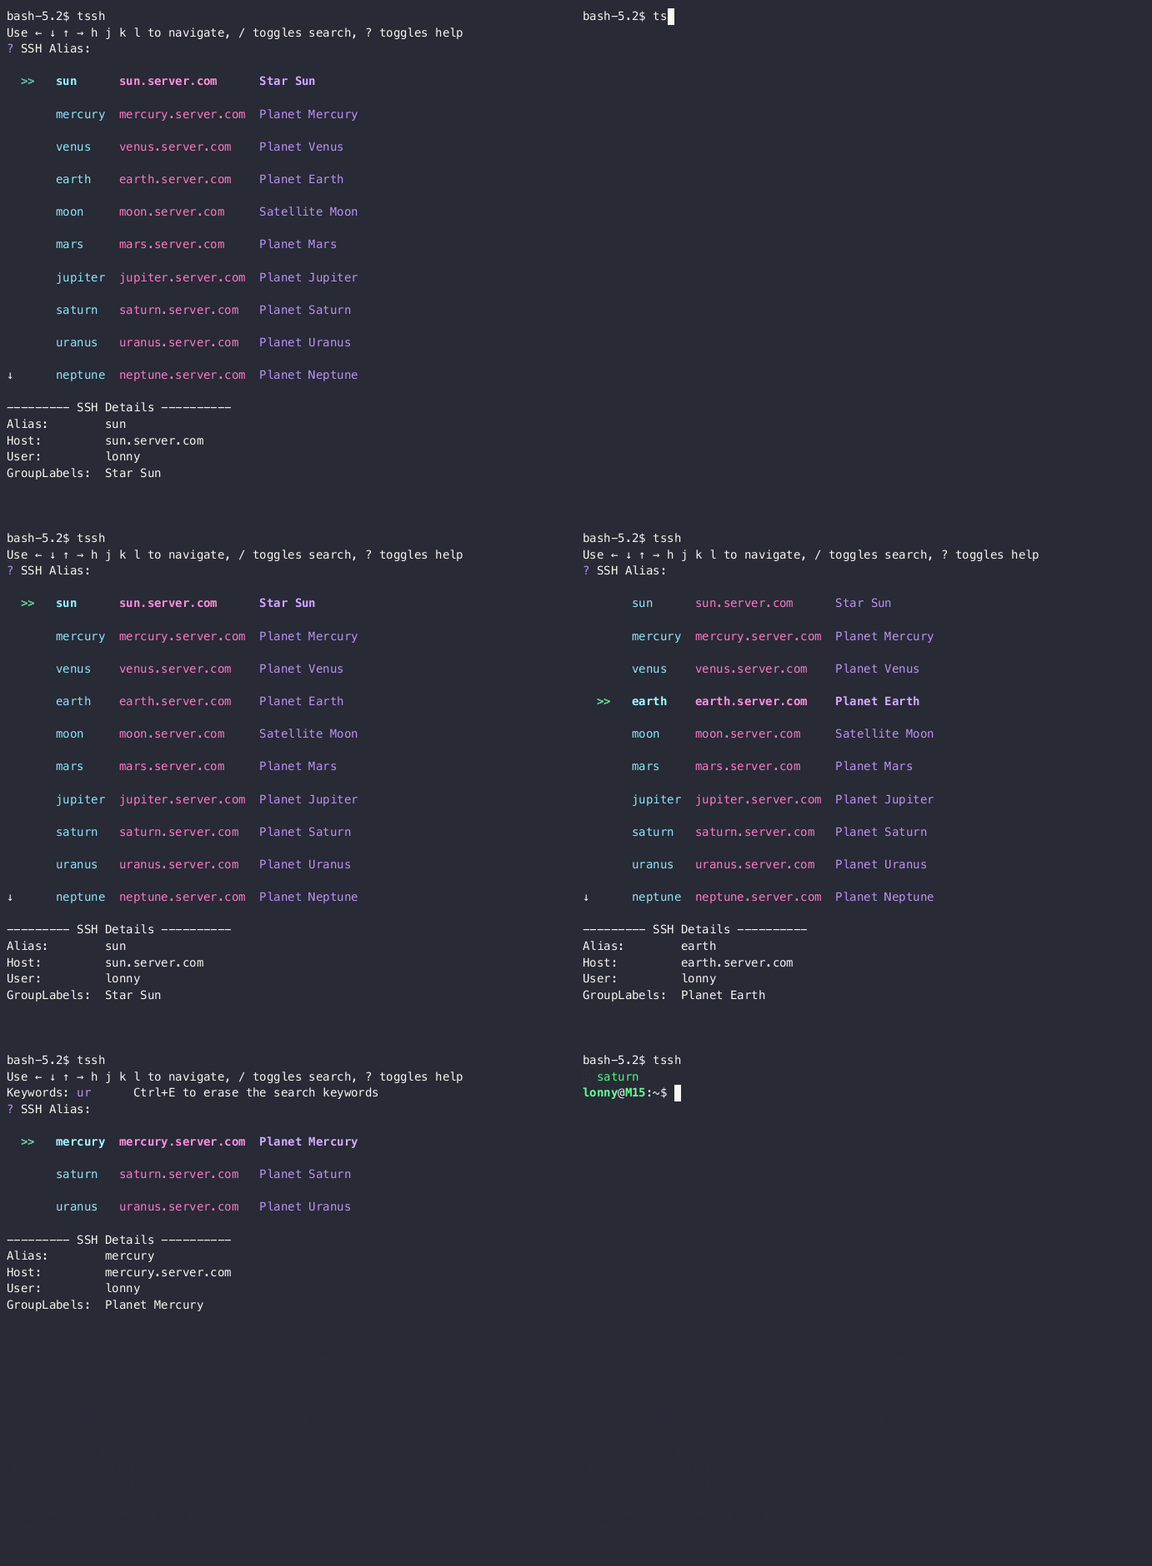
The custom colors and default values of
simple themeare exactly the same as thetiny theme.
table theme
Configure
PromptThemeLayout = tablein$XDG_CONFIG_HOME/tssh/tssh.conf( or~/.tssh.conf) to choosetable theme.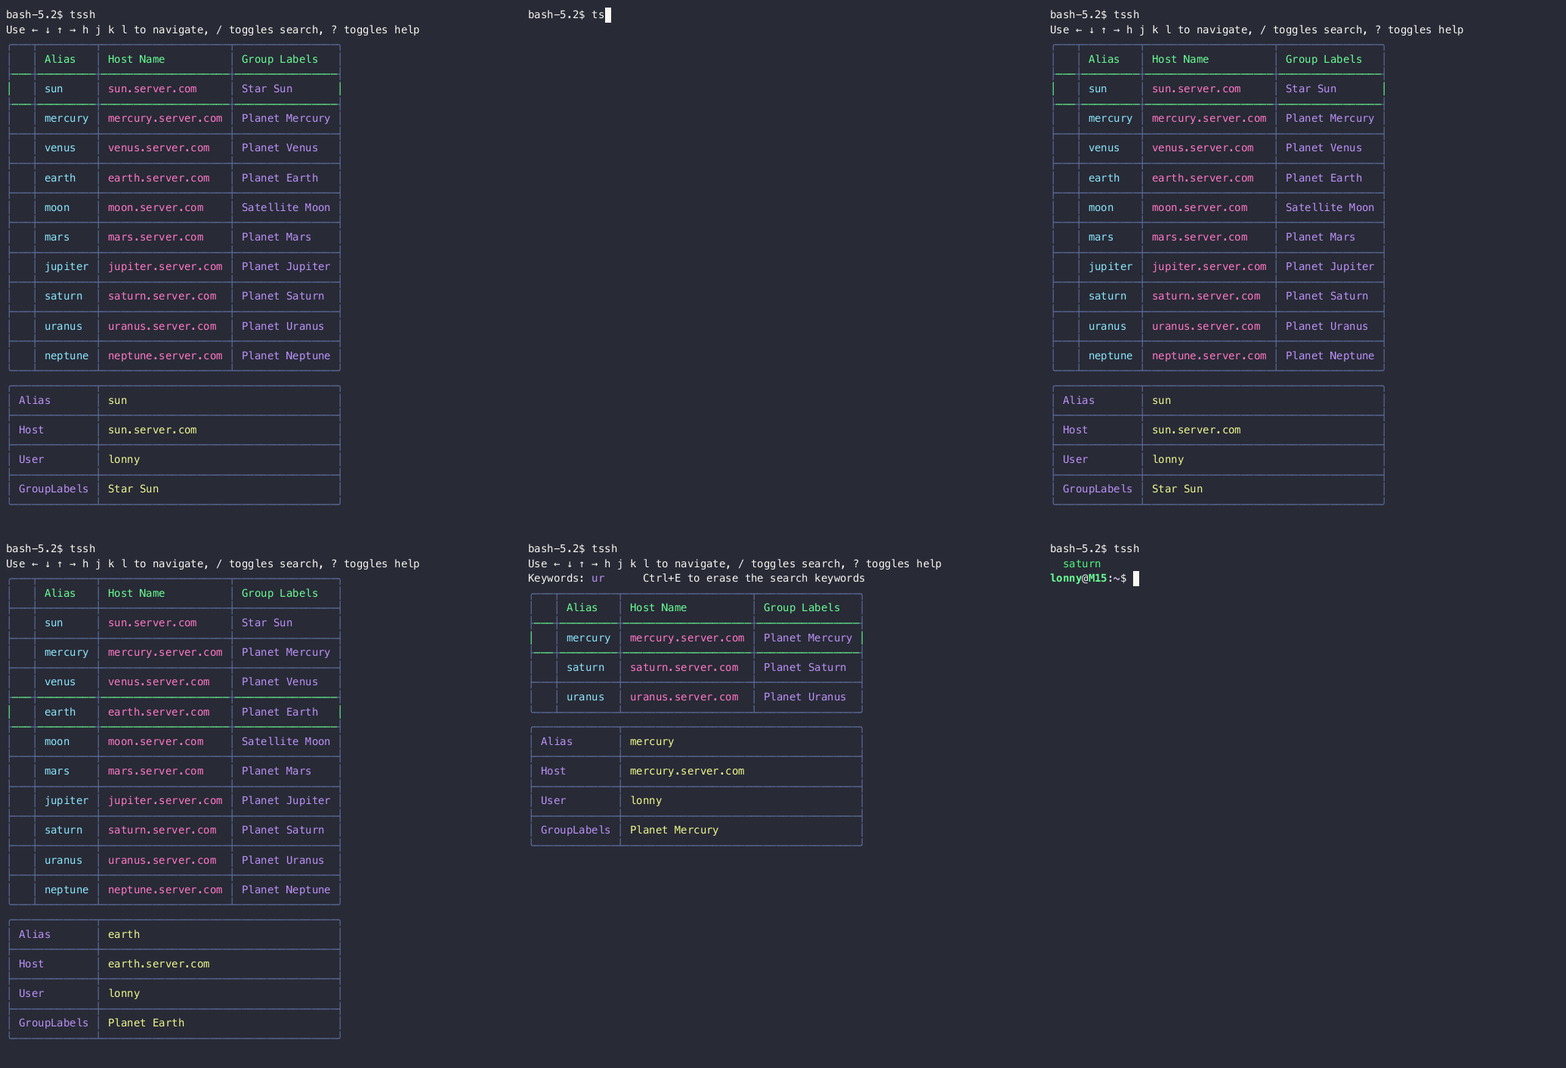
Configure
PromptThemeColorsin$XDG_CONFIG_HOME/tssh/tssh.conf( or~/.tssh.conf) and configure it in one line.table themesupports the following color items:table theme colors and default values:{ "help_tips": "faint", "shortcuts": "faint", "table_header": "10", "default_alias": "6", "default_host": "5", "default_group": "4", "selected_icon": "2", "selected_alias": "14", "selected_host": "13", "selected_group": "12", "default_border": "8", "selected_border": "10", "details_name": "4", "details_value": "3", "details_border": "8" }For supported color enumerations, please refer to lipgloss, except
help_tipsandshortcutsare the same as thetiny theme.
Support trzsz
trzsz needs to be installed on the server to use
trz / tszfor uploading and downloading files. Choose either the Go version ( ⭐ Recommended ), Py version, or Js version.In the
~/.ssh/configorExConfigPathconfiguration file, configureEnableDragFiletoyesto enable the drag and drop to upload feature.Host * # If configured in ~/.ssh/config, add `#!!` prefix to be compatible with openssh. EnableDragFile yesIf you want to overwrite the existing files when dragging files to upload, configure
DragFileUploadCommandtotrz -y:Host xxx # If configured in ~/.ssh/config, add `#!!` prefix to be compatible with openssh. DragFileUploadCommand trz -yIf you want to temporarily enable the drag and drop to upload feature, use
tssh --dragfileto log in.In the
~/.ssh/configorExConfigPathconfiguration file, configureEnableTrzsztonoto disable the trzsz and zmodem feature.Host no_trzsz_nor_zmodem # If configured in ~/.ssh/config, add `#!!` prefix to be compatible with openssh. EnableTrzsz noYou can use the
--upload-fileargument to specify file or directory to upload directly in the command line, and you can specify thetrzupload command arguments and save path after the server, such as:tssh --upload-file /path/to/file1 --upload-file /path/to/dir2 xxx_server '~/.local/bin/trz -d /tmp/'You can use
tszin the command line to directly download files and directories to your local computer. You can also use the--download-pathargument to specify the path for local saving, such as:tssh -t --client --download-path /tmp/ xxx_server 'tsz -d /path/to/file1 /path/to/dir2'

Support zmodem
In the
~/.ssh/configorExConfigPathconfiguration file, configureEnableZmodemtoyesto enable the zmodem ( rz / sz ) feature.Host * # If configured in ~/.ssh/config, add `#!!` prefix to be compatible with openssh. EnableZmodem yesIf you want to use
rzto upload when dragging files, configureDragFileUploadCommandtorz:Host xxx # If configured in ~/.ssh/config, add `#!!` prefix to be compatible with openssh. EnableDragFile yes DragFileUploadCommand rzNot only the server, but also the local computer needs to install
lrzsz. For Windows, you can download from lrzsz-win32, unzip and add toPATHenvironment, or install it as follows:scoop install lrzsz / choco install lrzsz / winget install lrzszIf you want to temporarily enable the zmodem ( rz / sz ) feature, use
tssh --zmodemto log in.About the progress, the transferred and speed are not precise. It just indicating that the transfer is in progress.
You can use the
--upload-fileargument to specify file to upload directly in the command line, andcdto the save path and specify therzcommand with arguments after the server, such as:tssh --upload-file /path/to/file1 --upload-file /path/to/file2 xxx_server 'cd /tmp/ && rz -yeb'You can use
szin the command line to directly download files to your local computer. You can also use the--download-pathargument to specify the path for local saving, such as:tssh -t --client --zmodem --download-path /tmp/ xxx_server 'sz /path/to/file1 /path/to/file2'
Support scp sftp
Using the
Remember Passwordfeature oftssh, you no longer need to manually enter your password. The same applies toscpandsftp.Using the
UDP Modefeature oftssh, the SSH session uses an encrypted UDP channel for communication. The same applies toscpandsftp.As long as
scpandsftpuse the-Soption to specifytssh, or configure an alias, you can use some of the features provided bytssh, such as:sftp -S tssh xxx scp -S tssh xxx @xxx:/tmp/ alias tscp='scp -S tssh' alias tsftp='sftp -S tssh'
Batch Login
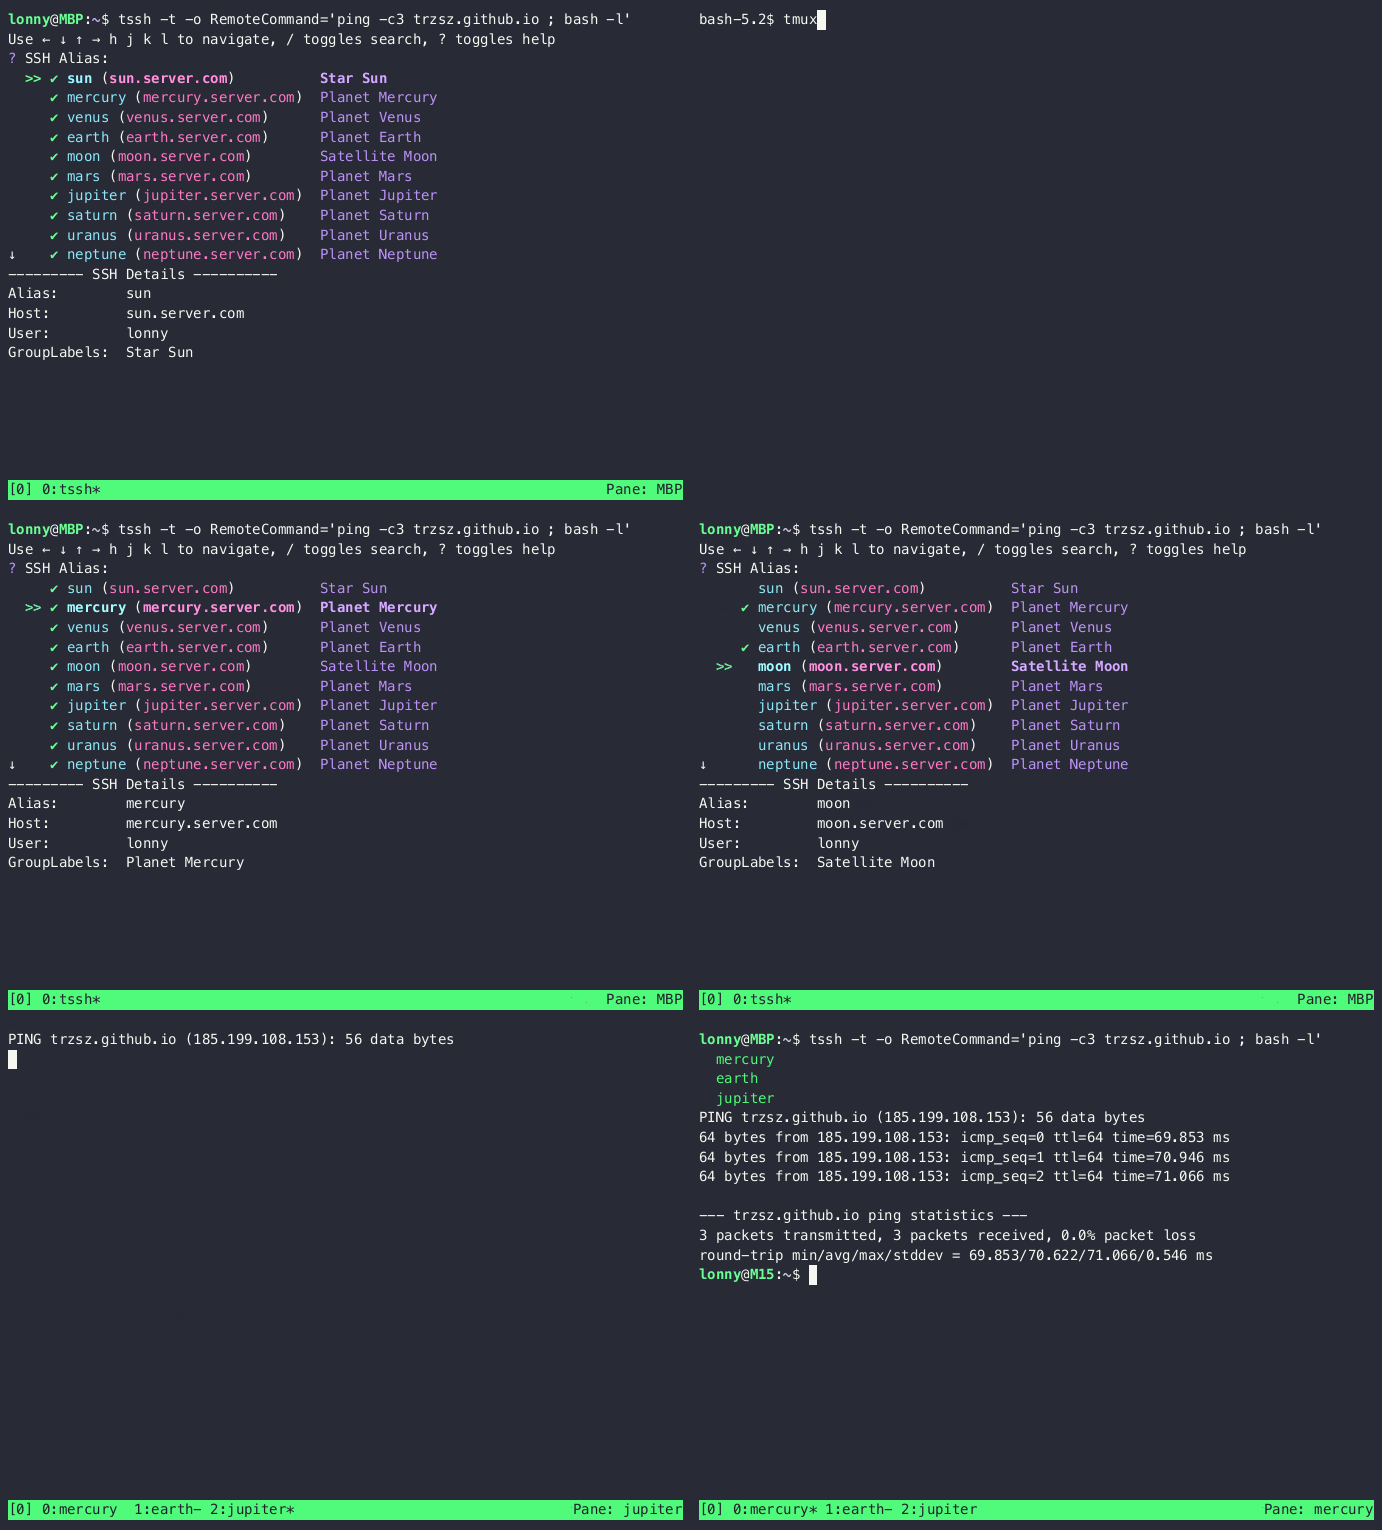
tssh supports selecting multiple servers in
iTerm2( Requires Python API, no need toAllow all apps to connect),tmuxandWindows Terminal, logging in to them in batches, and executing pre-specified commands in batches.Press
Space,xorCtrl+Xto toggle select the current host. If it cann't be selected, it means that the current terminal is not supported yet. Please runtmuxfirst.Press
aorCtrl+Ato select all the hosts on the current page,oorCtrl+Oto select the opposite hosts on the current page,dorlmove to next page.Press
porCtrl+Pwill split panes for batch login,worCtrl+Wwill open new windows for batch login,torCtrl+Twill open new tabs for batch login.Execute the
tsshcommand without arguments, you can log in to servers in batches. And you can specify the commands to be executed in batches by-o RemoteCommand. And you can switch to an interactive shell after executing the specified command.Windows Terminaldoes not support semicolon;, you can use|cat&&instead. For example:tssh -t -o RemoteCommand='ping -c3 trzsz.github.io ; bash -l' tssh -t -o RemoteCommand="ping -c3 trzsz.github.io |cat&& bash -l"
Group Labels
If there are a lot of servers,
GroupLabelscan be used to quickly find the target server when searching by/.After press
/and search for a group label, pressEnterto lock it. You can search for another group label by pressing/again, and pressEnterto lock it too.In non-search mode, press
Eto erase the current search group labels. In search mode, pressCtrl + Eto have the same effect.Supports configuring multiple group labels separated by spaces in one
GroupLabels. Supports configuring multipleGroupLabels.Supports configuring group labels on multiple Host nodes in the form of wildcard *, and
tsshwill summarize all the group labels.# The following testAA has group labels group1 group2 label3 label4 group5. Add `#!!` prefix to be compatible with openssh. Host test* #!! GroupLabels group1 group2 #!! GroupLabels label3 Host testAA #!! GroupLabels label4 group5
Automated Interaction
Supports automated interaction feature similar to
expect. After logging into the server, it automatically matches the server's output and then enters input accordingly.Host auto #!! ExpectCount 2 # Configures the number of automated interactions, default is 0 which means no automated interaction #!! ExpectTimeout 30 # Configures the timeout for automated interaction (in seconds), default is 30 seconds #!! ExpectPattern1 *assword # Configures the first automated interaction match expression # Configures the first automated input (encrypted). It was encoded by `tssh --enc-secret`, `tssh` will send \r (enter) automatically #!! ExpectSendPass1 d7983b4a8ac204bd073ed04741913befd4fbf813ad405d7404cb7d779536f8b87e71106d7780b2 #!! ExpectPattern2 hostname*$ # Configures the second automated interaction match expression #!! ExpectSendText2 echo tssh expect\r # Configures the second automated input (plaintext), specify \r to send enter # Choose either ExpectSendPass? or ExpectSendText? for each interaction; if both are configured, ExpectSendPass? has higher priorityBefore each
ExpectPattern?match, one or multiple optional matches can be configured as follows:Host case #!! ExpectCount 1 # Configures the number of automated interactions, default is 0 which means no automated interaction #!! ExpectPattern1 hostname*$ # Configures the first automated interaction match expression #!! ExpectSendText1 ssh xxx\r # Configures the first automated input, can also use ExpectSendPass1 then configure with encrypted text #!! ExpectCaseSendText1 yes/no y\r # Before matching ExpectPattern1, if encountering yes/no, then send y and enter #!! ExpectCaseSendText1 y/n yes\r # Before matching ExpectPattern1, if encountering y/n, then send yes and enter #!! ExpectCaseSendPass1 token d7... # Before matching ExpectPattern1, if encountering token, then decode d7... and sendWhen the server's output is matched, generate the
totp2FA code, and send it:Host totp #!! ExpectCount 2 # Configures the number of automated interactions, default is 0 which means no automated interaction #!! ExpectPattern1 token: # Configures the first automated interaction match expression #!! ExpectSendTotp1 xxxxx # Configure the secret (plain text) of totp, generally obtained by scanning the QR code #!! ExpectPattern2 token: # Configures the second automated interaction match expression # The following ciphertext was generated by encoding the secret of totp with `tssh --enc-secret`. #!! ExpectSendEncTotp2 821fe830270201c36cd1a869876a24453014ac2f1d2d3b056f3601ce9cc9a87023When the server's output is matched, execute the specified command to obtain the one-time password, and send it:
Host otp
    #!! ExpectCount 2  # Configures the number of automated interactions, default is 0 which means no automated interaction
    #!! ExpectPattern1 token:  # Configures the first automated interaction match expression
    #!! ExpectSendOtp1 oathtool --totp -b xxxxx  # Configure the command line to obtain the one-time password
    #!! ExpectPattern2 token:  # Configures the second automated interaction match expression
    # The following ciphertext was generated by encoding `oathtool --totp -b xxxxx` with `tssh --enc-secret`.
    #!! ExpectSendEncOtp2 77b4ce85d087b39909e563efb165659b22b9ea700a537f1258bdf56ce6fdd6ea70bc7591ea5c01918537a65433133bc0bd5ed3e4
Some servers may not support sending data continuously. For example, sending
1\rrequires a slight delay after1before sending\r. You can use\|to separate them.Host sleep #!! ExpectCount 2 # Configures the number of automated interactions, default is 0 which means no automated interaction #!! ExpectSleepMS 100 # Number of milliseconds to sleep between separate inputs, default is 100ms #!! ExpectPattern1 x> # Configures the first automated interaction match expression #!! ExpectSendText1 1\|\r # Configures the first automated input, send 1, sleep 100ms, send \r. #!! ExpectPattern2 y> # Configures the second automated interaction match expression #!! ExpectSendText2 \|1\|\|\r # Configures the second automated input, sleep 100ms, send 1, sleep 200ms, send \r.Some servers may not support sending password continuously. Then you need to configure
ExpectPassSleep, which isnoby default, and can be configured aseachorenter:- Configuring
ExpectPassSleep eachwill sleep for a short period of time for each character send, the default is 100 milliseconds, and you can configureExpectSleepMSto adjust it. - Configuring
ExpectPassSleep enterwill only sleep for a short period of time before\rsend, the default is 100 milliseconds, and you can configureExpectSleepMSto adjust it.
- Configuring
If you don’t know how to configure
ExpectPattern2, you can first configureExpectCountto2, then usetssh --debugto log in, you will see the output captured byexpect, and you can directly copy the last part of the output to configureExpectPattern2. Replacing2with any other number will also work.
Remember Password
It is recommended to use public key authentication to log in. Please refer to openssh documentation.
If you can only log in with a password, it is recommended to at least set the permissions of the configuration file:
chmod 700 ~/.ssh && chmod 600 ~/.ssh/password ~/.ssh/configThe passwords configured below for
test1andtest2are123456, and the passwords for other aliases starting withtestare111111:# If configured in ~/.ssh/config, you can add `#!!` prefix to be compatible with openssh. Host test1 # The following ciphertext was generated by encoding `123456` with `tssh --enc-secret`. #!! encPassword 756b17766f45bdc44c37f811db9990b0880318d5f00f6531b15e068ef1fde2666550 # If configured in ~/.ssh/password, there is no need to consider whether it's compatible with openssh. Host test2 # The following ciphertext was generated by encoding `123456` with `tssh --enc-secret`. encPassword 051a2f0fdc7d0d40794b845967df4c2d05b5eb0f25339021dc4e02a9d7620070654b # ~/.ssh/config and ~/.ssh/password support wildcards, and tssh will use the first matched value. # Here we want test2 to use a different password from other test*, so we put test* behind test2. Host test* Password 111111 # supports plain text, but it is recommended to encrypt with `tssh --enc-secret`.If you are still prompted to enter password after remembering password, it may be need to remember answers. Try configuring
encQuestionAnswer1:Host test1 # The following ciphertext was generated by encoding `123456` with `tssh --enc-secret`. #!! encQuestionAnswer1 756b17766f45bdc44c37f811db9990b0880318d5f00f6531b15e068ef1fde2666550- If
ControlMastermultiplexing is enabled, or in older versions of theWarpterminal, you will need to use theAutomated Interactionmentioned earlier to achieve remembering password. Please refer to the earlierAutomated Interactionsection, simply add aCtrlprefix as follows:
Host ctrl #!! CtrlExpectCount 1 # Configure the number of automated interactions, typically only requires entering the password once #!! CtrlExpectPattern1 *assword # Configure the matching expression for the password prompt #!! CtrlExpectSendPass1 d7983b... # Configure the password encoded by `tssh --enc-secret`- If
Support remember
Passphrasefor private keys ( It's recommended to usessh-agent). Support configuringPassphrasetogether withIdentityFile. Support configuringPassphraseusing private key filename instead of host alias. For example:# Configuring Passphrase together with IdentityFile. Add `#!!` prefix to be compatible with openssh. Host test1 IdentityFile /path/to/id_rsa # The following ciphertext was generated by encoding `123456` with `tssh --enc-secret`. #!! encPassphrase 6f419911555b0cdc84549ae791ef69f654118d734bb4351de7e83163726ef46d176a # Configure the Passphrase corresponding to the private key ~/.ssh/id_ed25519 in ~/.ssh/config # The wildcard * can be added to prevent the filename from appearing in the tssh server list. Host id_ed25519* # The following ciphertext was generated by encoding `111111` with `tssh --enc-secret`. #!! encPassphrase 3a929328f2ab1be0ba3fccf29e8125f8e2dac6dab73c946605cf0bb8060b05f02a68 # If configured in ~/.ssh/password, the wildcard * is not required and will not appear in the server list. Host id_rsa Passphrase 111111 # supports plain text, but it is recommended to encrypt with `tssh --enc-secret`.Still ask for password after
Remember Password? Maybe it'skeyboard interactive authentication, please refer toRemember Answersbelow.
External Password Manager
For any secret configuration (e.g.
Password,Passphrase,QuestionAnswer1,TotpSecret1), you can use an external command to retrieve the secret at runtime by adding aCommandsuffix to the key name. The command's stdout (trimmed) is used as the secret value.The following tokens are supported in the command and will be expanded before execution:
Token Expansion %nHost alias (the Hostvalue in ssh config)%hRemote hostname ( HostName)%rRemote username ( User)%pRemote port ( Port)%%Literal %Priority:
enc{Key}(encrypted) >{Key}Command(external command) >{Key}(plain text).Examples with various password managers:
# gopass (https://github.com/gopass-io/gopass)
Host server1
    #!! PasswordCommand gopass show -o ssh/%n
    #!! PassphraseCommand gopass show -o ssh/%n/passphrase

# pass (https://www.passwordstore.org)
Host server2
    #!! PasswordCommand pass show ssh/%n

# 1Password CLI
Host server3
    #!! PasswordCommand op read "op://Vault/ssh-%n/password"

# macOS Keychain
Host server4
    #!! PasswordCommand security find-generic-password -a %r -s %n -w

# Bitwarden CLI
Host server5
    #!! PasswordCommand bw get password ssh-%n

# HashiCorp Vault
Host server6
    #!! PasswordCommand vault kv get -field=password secret/ssh/%n

# Use for all hosts with a single command
Host *
    #!! PasswordCommand gopass show -o ssh/%n
Remember Answers
In addition, there is a keyboard interactive authentication. The server returns some questions, and log in by providing the correct answers. Many custom one-time passwords are implemented by it.
For those with one question and a fixed answer, just configure
QuestionAnswer1. For those with multiple questions, the answer to each question can be configured by serial number, or by the hex code of the question.Login with
tssh --debug, the hex code of the questions will be output, so that you will know how to configure with the hex code. For example:# If configured in ~/.ssh/config, add `#!!` prefix to be compatible with openssh. Host test1 # The following ciphertext was generated by encoding `TheAnswer1` with `tssh --enc-secret`. encQuestionAnswer1 4f6b79d0e4e48fc56ee29c61bd19559a322cd07f7d27f2a7f33978671be1b522d549252b22ee Host test2 # The following ciphertext was generated by encoding `TheAnswer1` with `tssh --enc-secret`. encQuestionAnswer1 09d6936c104f7bbd62e3b4dc43d746496a368776b85d37b1ce8cecc2ace1b920af0ca5a1812b QuestionAnswer2 TheAnswer2 # supports plain text, but it is recommended to encrypt with `tssh --enc-secret`. QuestionAnswer3 TheAnswer3 Host test3 # The `6e616d653a20` is the hex code of `name: `, the `enc` prefix indicates that it's ciphertext. # The following ciphertext was generated by encoding `my_name` with `tssh --enc-secret`. enc6e616d653a20 775f2523ab747384e1661aba7779011cb754b73f2e947672c7fd109607b801d70902d1 636f64653a20 my_code # The `636f64653a20` is the hex code of `code: `, `my_code` is plain answer.For
totp2FA code, you can configure them as follows (configure by serial number or hex code of the question):Host totp TotpSecret1 xxxxx # Configure the secret (plain text) of totp by serial number totp636f64653a20 xxxxx # Configure the secret of totp by the hex code of the question `code: ` that is `636f64653a20` # The following ciphertext was generated by encoding the secret of totp with `tssh --enc-secret`. Add the `enc` prefix for configuration. encTotpSecret2 8ba828bd54ff694bc8c4619f802b5bed73232e60a680bbac05ba5626269a81a00b enctotp636f64653a20 8ba828bd54ff694bc8c4619f802b5bed73232e60a680bbac05ba5626269a81a00bFor one-time password that can be obtained by the command line, you can configure them as follows (configure by serial number or hex code of the question):
Host otp
    OtpCommand1 oathtool --totp -b xxxxx  # Configure the command line to obtain the one-time password by serial number
    otp636f64653a20 oathtool --totp -b xxxxx  # Configure the command line by the hex code of the question `code: ` that is `636f64653a20`
    # The following ciphertext was generated by encoding `oathtool --totp -b xxxxx` with `tssh --enc-secret`. Add the `enc` prefix for configuration.
    encOtpCommand2 77b4ce85d087b39909e563efb165659b22b9ea700a537f1258bdf56ce6fdd6ea70bc7591ea5c01918537a65433133bc0bd5ed3e4
    encotp636f64653a20 77b4ce85d087b39909e563efb165659b22b9ea700a537f1258bdf56ce6fdd6ea70bc7591ea5c01918537a65433133bc0bd5ed3e4
You can write a program to obtain the one-time password. Specify the
%qargument if you want to get the question. Just output the one-time password to stdout and exit with 0, and the debugging information can be output to stderr (you can see it when runningtssh --debug). Configuration example (the serial number represents the number of questions, generally there is only one question, just configureOtpCommand1):Host custom_otp_command #!! OtpCommand1 /path/to/your_own_program %q #!! OtpCommand2 python C:\your_python_code.py %qIf
ControlMastermultiplexing is enabled, or in older versions of theWarpterminal, you will need to use theAutomated Interactionmentioned earlier to achieve remembering answers.Host ctrl_totp #!! CtrlExpectCount 1 # Configure the number of automated interactions #!! CtrlExpectPattern1 code: # Configure the matching expression for the password prompt (totp 2FA) #!! CtrlExpectSendTotp1 xxxxx # Configure the secret (plain text) of totp, generally obtained by scanning the QR code #!! CtrlExpectSendEncTotp1 622ada31cf... # Or configure the encrypted secret of totp encoded using `tssh --enc-secret` Host ctrl_otp #!! CtrlExpectCount 1 # Configure the number of automated interactions #!! CtrlExpectPattern1 token: # Configure the matching expression for the password prompt (one-time password) #!! CtrlExpectSendOtp1 oathtool --totp -b xxxxx # Configure the command line to obtain the one-time password #!! CtrlExpectSendEncOtp1 77b4ce85d0... # Or configure the encrypted command line encoded using `tssh --enc-secret`
Custom Configuration
The following custom configurations are supported in
$XDG_CONFIG_HOME/tssh/tssh.conf( or~/.tssh.conf,C:\Users\your_name\.tssh.confon Windows):# SSH configuration path, the default is ~/.ssh/config ConfigPath = ~/.ssh/config # Extended configuration path, the default is ~/.ssh/password ExConfigPath = ~/.ssh/password # The default path of the file dialog for trz uploading, the default is empty which opening the last path. DefaultUploadPath = ~/Downloads # The automatically save path for tsz downloading, the default is empty which poping up a folder dialog. DefaultDownloadPath = ~/Downloads # The directories allowed for automatic upload (without popping up a file selection dialog). You can configure one or multiple paths separated by spaces. If a path contains spaces, wrap the entire path in single or double quotes. The configured paths must be absolute paths or start with `~/`. # ⚠️ Security Warning: Please use this feature with caution. If you log into a malicious server, the server could stealthily steal all files under the configured directories without your confirmation. AllowedAutoUploadDirs = ~/Downloads/ '/Users/username/My Documents/' # The global drag file upload command, note that the priority configured in ~/.ssh/config is higher. DragFileUploadCommand = trz -y # The trzsz progress bar will gradient from the first color to the second color. Don't include `#`. ProgressColorPair = B14FFF 00FFA3 # Whether to automatically rename files on name conflicts during Zmodem (rz/sz) transfers. ZmodemAutoRename = no # When searching and selecting servers with tssh, the theme and colors. PromptThemeLayout = simple PromptThemeColors = {"active_host": "magenta|bold", "inactive_host": "magenta"} # When searching and selecting servers with tssh, the number of records displayed on each page, the default is 10. PromptPageSize = 10 # When searching and selecting servers with tssh, default is normal mode similar to vim. Configure to search mode as follows: PromptDefaultMode = search # When searching and selecting servers with tssh, the items displayed in details. The default is as follows: PromptDetailItems = Alias Host Port User GroupLabels IdentityFile ProxyCommand ProxyJump RemoteCommand UdpMode TsshdPath # When searching and selecting servers with tssh, you can customize the cursor and selected icon: PromptCursorIcon = 🧨 PromptSelectedIcon = 🍺 # The cursor style of the search input when searching and selecting a server in tssh. # Set to 'pipe' to display a vertical bar (|). The default is a solid block (█): PromptSearchPointer = pipe # Auto set terminal title after login. It will not be reset after exiting. Please set PROMPT_COMMAND in local shell. # Set this to rtt to display the current connection RTT in the title (e.g. server 12ms). SetTerminalTitle = yes # Use `ssh -G` to evaluate OpenSSH config, including `Match` blocks. # The login prompt evaluates every alias, including commands in `Match exec`. UseOpenSSHConfig = yes # Enable fuzzy host selection for partially matched destinations. # This option is enabled by default. When enabled, tssh displays a selection menu for possible matching hosts. FuzzyHostSelection = yes
Comments of Config
The comments in the
tsshconfiguration are basically the same asopenssh, with some additional extended support, see the following table for details:Comments openssh tssh Starting with #Is a comment Is a comment Starting with #!!Is a comment Not a comment Key Value # CommentIt depends Is a comment Key=Value # CommentIt depends Not a comment Configuration starting with
#are always considered byopensshto be a comment;tsshconsiders configuration starting with#!!not to be a comment, and other configurations starting with#are comments.Key Value # Commentconfiguration (without=sign),opensshconsiders the content after#to be a comment in some cases, and considers it not to be a comment in some other cases;tsshalways considers the content after#to be a comment.Key=Value # Commentconfiguration (with=sign),opensshconsiders the content after#to be a comment in some cases, and considers it not to be a comment in some other cases;tsshalways considers the content after#not to be a comment.
Wayland Integration
In the
~/.ssh/configorExConfigPathconfiguration file, configureEnableWaypipetoyesto enable the Wayland (waypipe) integration feature.Host xxx # If configured in ~/.ssh/config, add `#!!` prefix to be compatible with openssh. EnableWaypipe yesOnce Wayland (waypipe) integration is enabled, there is no need to explicitly use the waypipe program any more, tssh will automatically run the waypipe program in the background.
If the waypipe program cannot be found in the PATH on the client-side, you can specify the path to the waypipe program using the
WaypipeClientPathconfiguration.If the waypipe program cannot be found in the PATH on the server-side, you can specify the path to the waypipe program using the
WaypipeServerPathconfiguration.You can configure certain options for the waypipe program using
WaypipeClientOptionandWaypipeServerOptionas needed. Note that you should not specify the options-s,--socket,--login-shell,--display,client, orserver. Configuration example:Host xxx #!! EnableWaypipe yes #!! WaypipeClientPath /usr/bin/waypipe #!! WaypipeServerPath /usr/bin/waypipe #!! WaypipeClientOption -c lz4 #!! WaypipeServerOption -c lz4
Clipboard Integration
In the
~/.ssh/configorExConfigPathconfiguration file, configureEnableOSC52toyesto enable the clipboard integration feature.Host * # If configured in ~/.ssh/config, add `#!!` prefix to be compatible with openssh. EnableOSC52 yesClipboard integration allows remote servers to write to the local clipboard via OSC52 sequences.
On Linux, clipboard integration requires
xcliporxselcommand to be installed.
SSH Console
The
tsshconsole is similar to OpenSSH escape sequences, and is planned to provide more user-friendly and powerful SSH control features. Currently supported features include:- Send the escape character '~' ( ~ : equivalent to typing
~, can be used as a remedy after accidentally triggering the console). - Suspend the current SSH process ( ^Z : equivalent to
Ctrl + Z, but it applies totsshitself, not the process on the remote server). - Terminate the current SSH session ( . : equivalent to Exit / Kill, can be used to kill the
tsshprocess when it freezes due to network issues or other reasons).
- Send the escape character '~' ( ~ : equivalent to typing
The character between
(and:are shortcuts, compatible with OpenSSH escape sequences. For example, typing~.quickly after a newline will quickly terminate the current SSH session.The escape character for entering the SSH console can be configured via the
EscapeCharoption (default is~). The argument should be a single character, ‘^’ followed by a letter, and it should not conflict with other shortcut keys.The
ConsoleEscapeTimeoption configures how many seconds after pressing theEnterkey should the~key be pressed to enter the SSH console. The default value is1second, which can be configured to0to disable the console feature:Host xxx #!! ConsoleEscapeTime 1
Other Features
Run
tssh --enc-secret, enter the password or answer, and you can get the ciphertext for configuration (the encryption result for the same password is different each time):- The
remember passwordandremember answermentioned above can be configured as ciphertext by addingencprefix to prevent screen snooping. - If the password contains special characters such as
#, you have to configure it with ciphertext.
Host server2 # If configured in ~/.ssh/config, add `#!!` prefix to be compatible with openssh. encPassword de88c4dbdc95d85303682734e2397c4d8dd29bfff09ec53580f31dd40291fc8c7755 encQuestionAnswer1 93956f6e7e9f2aef3af7d6a61f7046dddf14aa4bbd9845dbb836fe3782b62ac0d89f- The
Run
tssh --new-hostto easily add SSH configuration in the TUI interface, and you can log in immediately after completion.Run
tssh --install-trzszto install trzsz to the server automatically.- It is installed to the
~/.local/bin/directory by default. You can specify the installation directory through--install-path /path/to/install. - If the
--install-pathinstallation directory contains~/, single quotes must be added, such as--install-path '~/path'. - If obtaining the latest version of
trzszfails, you can specify it through--trzsz-version x.x.x. - If downloading the
trzszinstallation package fails, you can download and specify it through--trzsz-bin-path /path/to/trzsz.tar.gz. - Note:
--install-trzszdoes not support Windows server, and does not support jump server (unless usingProxyJump).
- It is installed to the
Run
tssh --install-tsshdto install tsshd to the server automatically.- It is installed to the
~/.local/bin/directory by default. You can specify the installation directory through--install-path /path/to/install. - If the
--install-pathinstallation directory contains~/, single quotes must be added, such as--install-path '~/path'. - If obtaining the latest version of
tsshdfails, you can specify it through--tsshd-version x.x.x. - If downloading the
tsshdinstallation package fails, you can download and specify it through--tsshd-bin-path /path/to/tsshd.tar.gz. - Note:
--install-tsshddoes not support Windows server, and does not support jump server (unless usingProxyJump).
- It is installed to the
If
SetTerminalTitle = rttis set in$XDG_CONFIG_HOME/tssh/tssh.conf( or~/.tssh.conf), the terminal title will display the current connection RTT (round-trip time), for example: server 12ms. For non-UDP mode,ServerAliveIntervalmust also be configured for RTT to be displayed.About changing the terminal title, it can be achieved without
tssh. It only needs to be configured in the server's shell configuration file (such as~/.bashrc):# Set fixed server title PROMPT_COMMAND='echo -ne "\033]0;Fixed server title\007"' # Dynamically changing title based on environment variables PROMPT_COMMAND='echo -ne "\033]0;${USER}@${HOSTNAME}: ${PWD}\007"'- If
SetTerminalTitle = yesis set in$XDG_CONFIG_HOME/tssh/tssh.conf( or~/.tssh.conf), the terminal title is automatically set after login, butPROMPT_COMMANDon the server overrides the title set bytssh. tsshdoes not reset to the original title after exiting, you need to setPROMPT_COMMANDin the local shell so that it overrides the title set bytssh.
- If
DNS SRV: Say you have a home network with multiple hosts, but you only have one external IP address. Set up SRV records as follows, and make similar configurations in
~/.ssh/config:$ dig +short _ssh._tcp.myhost.mydomain.com SRV 1 1 22029 gateway.mydomain.com.Host xxx #!! DnsSrvName myhost.mydomain.comCustom DNS Server:
tsshcan use a custom DNS server instead of the system resolver. This is useful when connecting through a VPN, testing internal DNS, or using public DNS services.Configure a default DNS server in
$XDG_CONFIG_HOME/tssh/tssh.conf(or~/.tssh.conf):CustomDnsServer = 1.1.1.1You can also specify it for a single connection:
tssh --dns 8.8.8.8 serverYou can also specify a custom port or use DNS over TCP:
CustomDnsServer = tcp://1.1.1.1:5353tssh --dns tcp://1.1.1.1:5353 serverIf no port is specified, port
53is used by default. The--dnsoption overridesCustomDnsServer.
Reconnect Mode
In foreground mode (not
-f), use--reconnectto be prompted to restart the tssh process and log in to the remote server when it exits.In background mode (use
-f), use--reconnectto automatically restart the tssh process and log in to the remote server when it exits.Note:
--reconnectonly restarts the tssh process and logs in; it does not resume the previous SSH session. To resume an existing session, please use UDP mode described below.
UDP Mode
Install tsshd on the server, use
tssh --udp xxxto log in (latency-sensitive users can specify--kcpoption), or configure as follows in~/.ssh/configto omit--udpor--kcpoption:Host xxx #!! UdpMode ( yes | QUIC | KCP )The
tsshplays the role ofsshon the client side, while thetsshdacts assshdon the server side.The
tsshfirst logs in to the server normally as an ssh client, and then starts a newtsshdprocess on the server, where each session has its owntsshdprocess.The
tsshdprocess listens on a random UDP port in the range 61001–61999 (configurable viaTsshdPort), and sends the port number and session secret keys back to thetsshprocess through the SSH channel. The SSH connection is then closed, andtsshcommunicates withtsshdover UDP.

UDP Configurations
Host xxx
    #!! UdpMode yes
    #!! TsshdPort 61001-61999
    #!! TsshdPath ~/go/bin/tsshd
    #!! UdpAliveTimeout 1w3d
    #!! UdpHeartbeatTimeout 3
    #!! UdpReconnectTimeout 15
    #!! UdpReconnectExitKey ^d
    #!! ShowNotificationOnTop yes
    #!! ShowFullNotifications yes
    #!! UdpProxyMode UDP
    #!! UdpMTU 1400
    #!! UdpSessionAttach no
    #!! UdpSessionName xxx
    #!! UdpCompression zstd
UdpMode:no(the default: tssh works in TCP mode),yes(default protocol:QUIC),QUIC(QUIC protocol: faster speed),KCP(KCP protocol: lower latency).TsshdPort: Specifies the port range that tsshd listens on, default is [61001, 61999]. You can specify multiple discrete ports (e.g.,6022,7022) or multiple discrete ranges (e.g.,8010-8020,9020-9030,10080); tsshd will randomly choose an available port. You can also specify the port on the command line using--tsshd-port.TsshdPath: Specifies the path to the tsshd binary on the server, lookup in $PATH if not configured. You can also specify the path on the command line using--tsshd-path.UdpAliveTimeout: If the disconnection lasts longer than the time specified byUdpAliveTimeout, tssh and tsshd will both exit, and no longer support reconnection. Supported units:wfor weeks,dfor days,hfor hours,mfor minutes,sfor seconds. The default is1w3d(10 days).UdpHeartbeatTimeout: If the disconnection lasts longer than the time specified byUdpHeartbeatTimeout, tssh will try to reconnect to the server by a new path. The default is 3 seconds.UdpReconnectTimeout: If the disconnection lasts longer than the time specified byUdpReconnectTimeout, tssh will display a notification indicating that the connection has been lost. The default is 15 seconds.UdpReconnectExitKey: Specifies the shortcut key to exit (or detach) while waiting for reconnection. It acceptsnone,ctrl+<letter>, and^<letter>. The default is^d(Ctrl+D).ShowNotificationOnTop: Whether the connection loss notification is displayed on the top. The default is yes, which may overwrite some of the previous output. Set it tonoto display notifications on the current line of the cursor.ShowFullNotifications: Whether to display the full notifications or a brief notification. The default is yes, which may output several lines to the screen. Set it tonowill output only one line.UdpProxyMode: The default transport protocol isUDP. IfUDPtraffic is blocked by firewalls in your network environment, you can set it toTCPto work around the restriction, though this may introduce additional latency.UdpMTU: Sets the maximum transmission unit (MTU) for UDP packets. Default is 1400.UdpSessionAttach: Defaults tono. When set toyes, it allows attaching to an existing session on the server. Meanwhile, the current session will also be made attachable, allowing you to re-attach to it later when logging in from other devices or networks.UdpSessionName: Customizes the session name. This only takes effect whenUdpSessionAttachis set toyesor when logging in with the--attachargument. If a session with this name already exists on the server, it will attach directly; if not, a new session with this name will be created for automatic attachment in future logins.UdpCompression: Set tozstdto enable Zstandard compression for UDP session output. Defaults tozstdwhen supported by the server. Set tononeto disable compression.
UDP Multiplexing
In UDP mode,
tsshitself acts as theControlMaster(OpenSSH is not involved), so later logins reuse the established UDP connection without a new SSH login or a newtsshdprocess:tssh --udp -M -S ~/.ssh/ctl-%C xxx # the master: logs in normally and listens on the control socket tssh -S ~/.ssh/ctl-%C xxx # further sessions, commands, -L / -R / -D forwards reuse the UDP connection tssh -O check -S ~/.ssh/ctl-%C xxx # check | exit | stop are supported for tssh and OpenSSH mastersOr configure
ControlMaster autoandControlPathtogether withUdpModein~/.ssh/config: the firsttssh xxxbecomes the master, the following ones are multiplexed automatically.When the shell of the master exits while multiplexed clients are still connected, the master keeps running until they exit (press
Ctrl+Cto force exit).tssh --udp -M -N xxxkeeps a master running without a shell.ControlPersistis not supported in UDP mode yet.Only
tsshcan connect to a UDP master (mux proxy mode). OpenSSH clients such asssh -S,scpandrsync(mux passenger mode) are not supported yet. X11 forwarding, agent forwarding, UDP port forwarding and-Rwith port0are not supported through the control socket.
UDP Port Forwarding
When running in UDP mode, UDP port forwarding is supported.
Command-line
-L/-Roptions are extended with audp/prefix (the/can also be replaced with:,_, or-):-L udp/[bind_address:]port:host:hostport -L udp:[bind_address:]port:/remote_socket -L udp_/local_socket:host:hostport -L udp-/local_socket:/remote_socket -R udp/[bind_address:]port:host:hostport -R udp:[bind_address:]port:/local_socket -R udp_/remote_socket:host:hostport -R udp-/remote_socket:/local_socketConfiguration is similar to
LocalForwardandRemoteForward, with an addedUDPprefix (case-insensitive):UdpLocalForward [bind_address:]port host:hostport UdpLocalForward [bind_address:]port /remote_socket UdpLocalForward /local_socket host:hostport UdpLocalForward /local_socket /remote_socket UdpRemoteForward [bind_address:]port host:hostport UdpRemoteForward [bind_address:]port /local_socket UdpRemoteForward /remote_socket host:hostport UdpRemoteForward /remote_socket /local_socketForwardUdpTimeout: Sets the idle timeout for UDP forwarding sessions; the corresponding forwarding session will be cleared automatically if no data is sent or received within this period to free resources. Default is 5 minutes.
Trouble shooting
In older versions of the Warp terminal, the features like blocks requires renaming
tsshtossh. It is recommended to create a soft link (friendly for updates):sudo ln -sv $(which tssh) /usr/local/bin/sshAfter the soft link,
ssh -Vshould outputtrzsz sshplus the version number. If not, it means that the soft link is unsuccessful, oropensshhas a higher priority inPATH, and you need to soft link to another path or adjust the priority ofPATH.In order to make
tsshsearch login also support the blocks feature, you need to create atsshfunction in~/.bash_profile( bash ) or~/.zshrc( zsh ):tssh() { if [ $# -eq 0 ]; then ssh FAKE_DEST_IN_WARP else ssh "$@" fi }The
--dragfileargument may disable the Warp features, please refer to the previous section to configureEnableDragFileto enable the drag and drop to upload feature.
In the Warp terminal, after dragging files and directories into the Warp terminal, the upload may not be triggered immediately. You need to press the
Enterkey once to make it upload.If you are using Windows7 or an older version of Windows10, and getting an error
enable virtual terminal failed.If the
tsshspecific configuration items are configured in~/.ssh/config, and openssh report an errorBad configuration option.- You can add
#!!prefix to the items, openssh will treat it as a comment, whiletsshwill treat it as one of the valid configurations.
- You can add
Contact
Feel free to email the author [email protected], or create an issue. Welcome to join the QQ group: 318578930.
Sponsor
❤️ Sponsor trzsz ❤️, buy the author a drink 🍺 ? Thank you for your support!
Explore related projects
codecrafters-io/build-your-own-x
Master programming by recreating your favorite technologies from scratch.
561,189 starspublic-apis/public-apis
A collective list of free APIs
497,401 starsmorluto/rea
Reverse engineer anything with agents, from app behavior down to native binaries.
445,051 starsopenclaw/openclaw
The AI that really does things. Any OS. Any Platform. The lobster way. 🦞
394,225 stars