
sPappalard/SwishAI
sPappalard/SwishAI has 108 GitHub stars and 17 forks. GitHot measured 0 stars in 24 hours. Last checked 2026-11-16 19:44 UTC. Last push 2026-08-16.
What you can do
- Advanced Object Detection: Detects 5 distinct classes: Ball, Ball in Basket, Player, Basket, and Player Shooting.
- Smart Scoring System: Automatically counts shots attempted vs. made to calculate real-time Field Goal Percentage (FG%).
- Visual FX: Renders dynamic "pulse" animations and overlays when a basket is scored.
- Configurable AI: Users can adjust Confidence Thresholds for each class via the UI to adapt to different lighting conditions.
Measured star growth
- in 24h
- 0
- in 7 days
- Collecting history
- in 15 days
- Collecting history
- in 1 month
- Collecting history
Net star changes over overlapping periods, not daily totals. Missing measurements are left blank. Stars measure attention, not software quality.
About
Computer Vision app designed to analyze basketball shots from video footage using YOLOv11 finetuned with a custom dataset.
Creative & MediaREADME.md
Original
🏀 SwishAI - Basketball Shot Analysis & Tracking
SwishAI is a Computer Vision application designed to analyze basketball shots from video footage automatically. Powered by YOLOv11 and a modern React + FastAPI stack, it tracks players, basketballs, and hoops in real-time, calculating shooting percentage and visualizing successful shots with dynamic overlays.
📖 Read the full case study → Design decisions, architecture and what I learned building this.
Support my work
If you find SwishAI useful, please consider supporting the development! 💙

📋 Table of Contents
- Key Features
- Screenshots
- Usage Guide
- Tech Stack
- Project Architecture
- Installation & Setup
- Technical Logic & AI
- Model Training & Performance
- Credits
- License
✨ Key Features
- Advanced Object Detection: Detects 5 distinct classes: Ball, Ball in Basket, Player, Basket, and Player Shooting.
- Smart Scoring System: Automatically counts shots attempted vs. made to calculate real-time Field Goal Percentage (FG%).
- Visual FX: Renders dynamic "pulse" animations and overlays when a basket is scored.
- Configurable AI: Users can adjust Confidence Thresholds for each class via the UI to adapt to different lighting conditions.
- Processing Modes - the video can be processed with 3 different modes:
- Full Tracking: Bounding boxes + Visual Effects + HUD.
- Stats & Effects: Clean view with only scoring effects and HUD.
- Stats Only: Minimalist overlay.
- Performance Optimization: Includes a "Test Mode" (processes only the first 15s) and auto-cleanup mechanisms to manage server storage.
📸 Screenshots
Main Interface
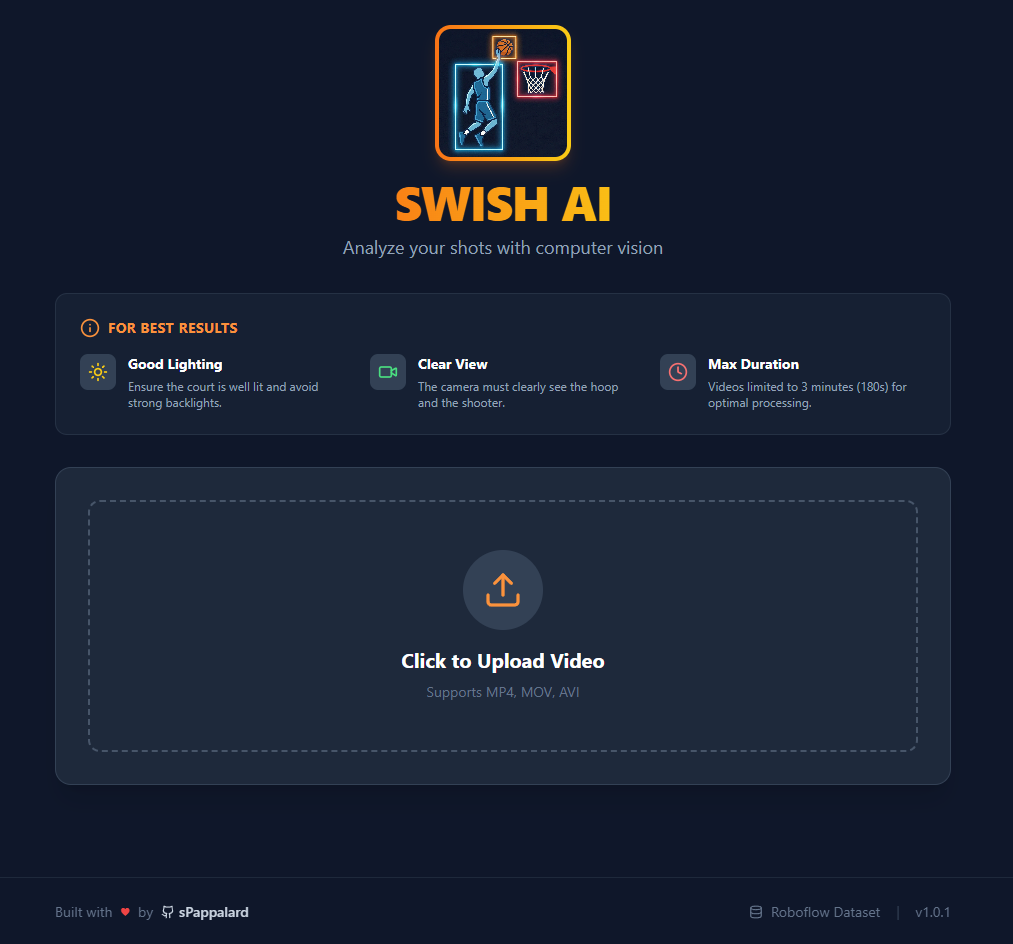
Upload interface with processing mode selection
Advanced Model Settings
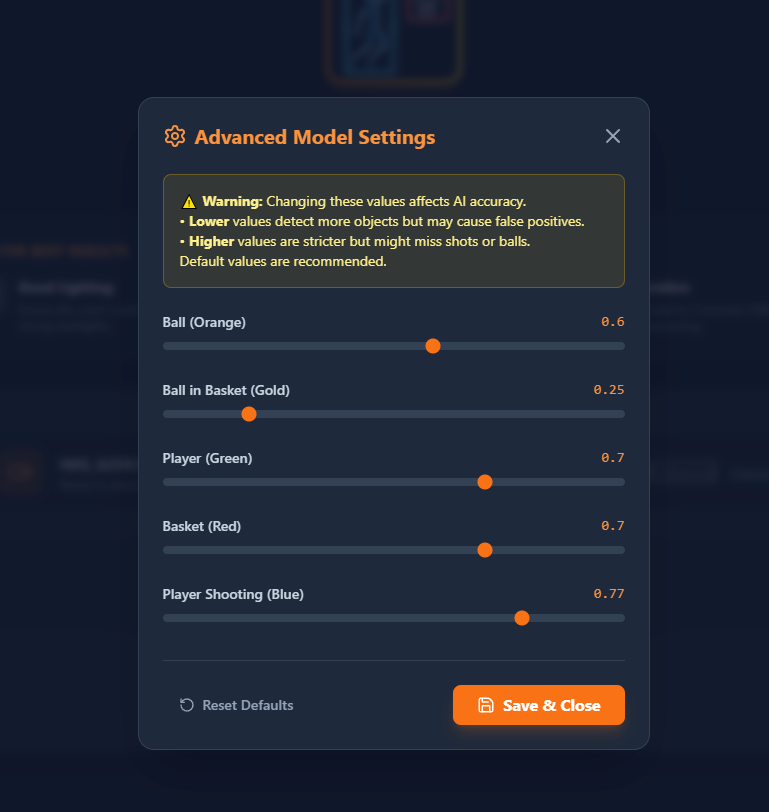
Fine-tune confidence thresholds for each detection class
Ready to Process
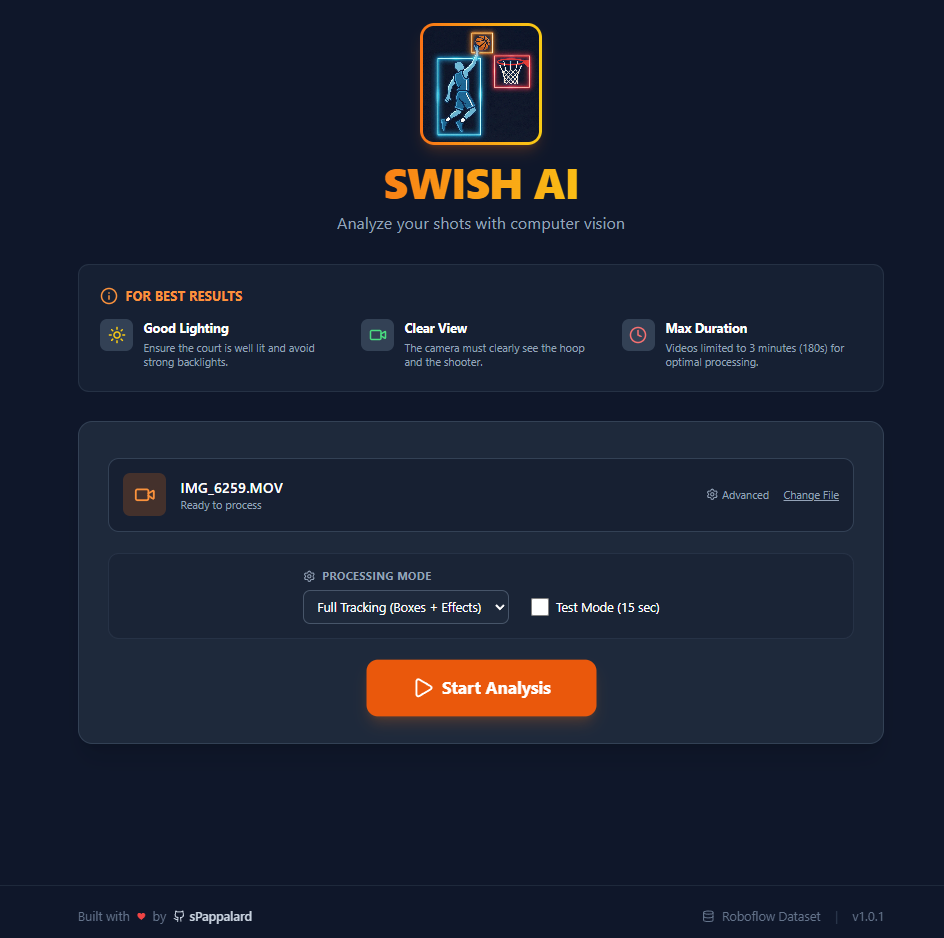
Video uploaded and ready for analysis
Processing in Progress
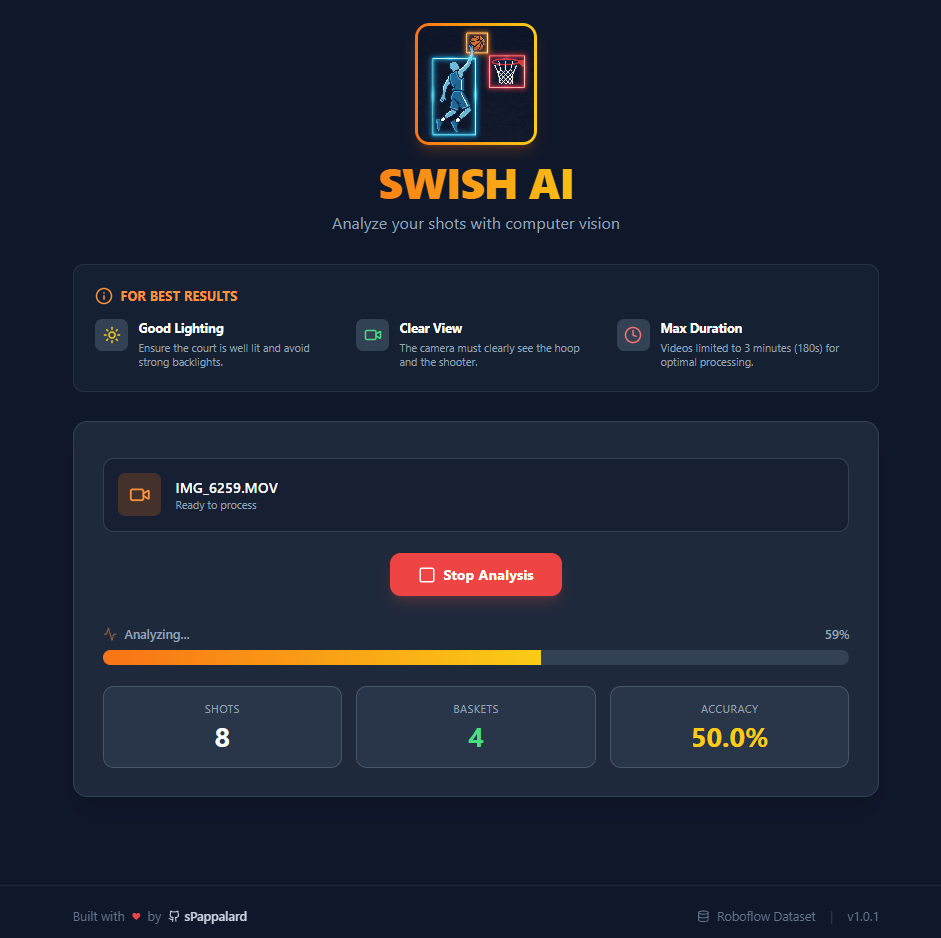
Real-time progress tracking with live statistics updates
Processing Complete
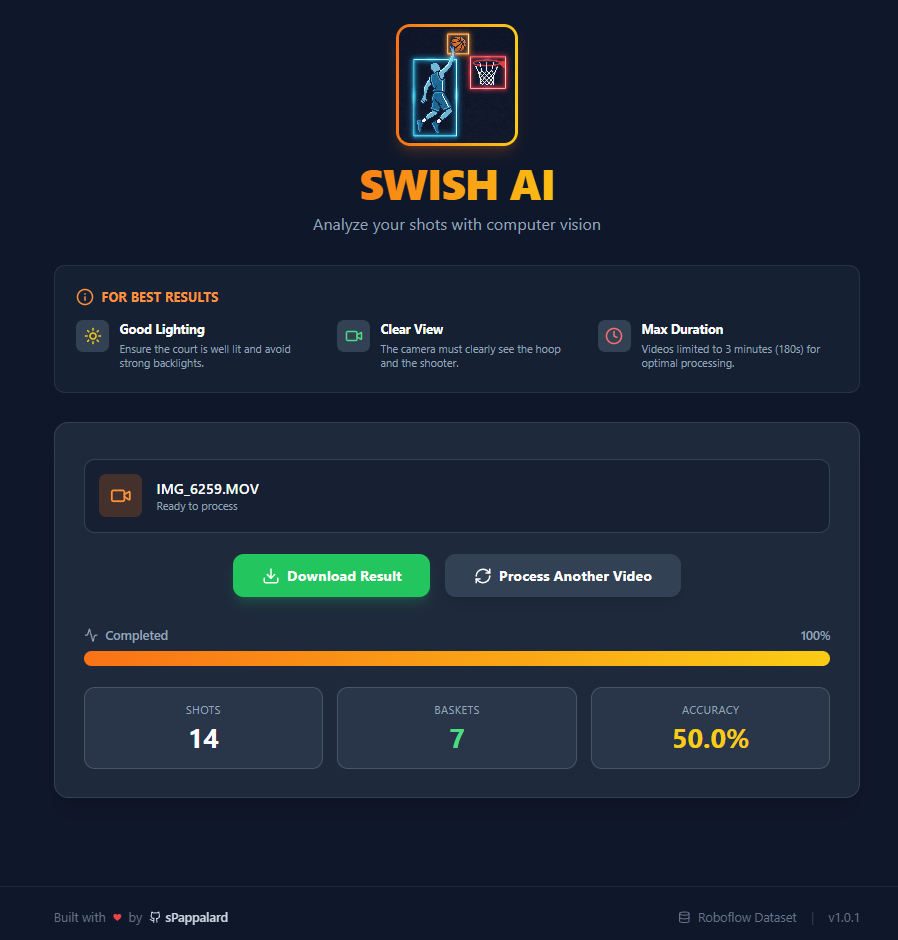
Analysis finished - ready to download the processed video
Output Example
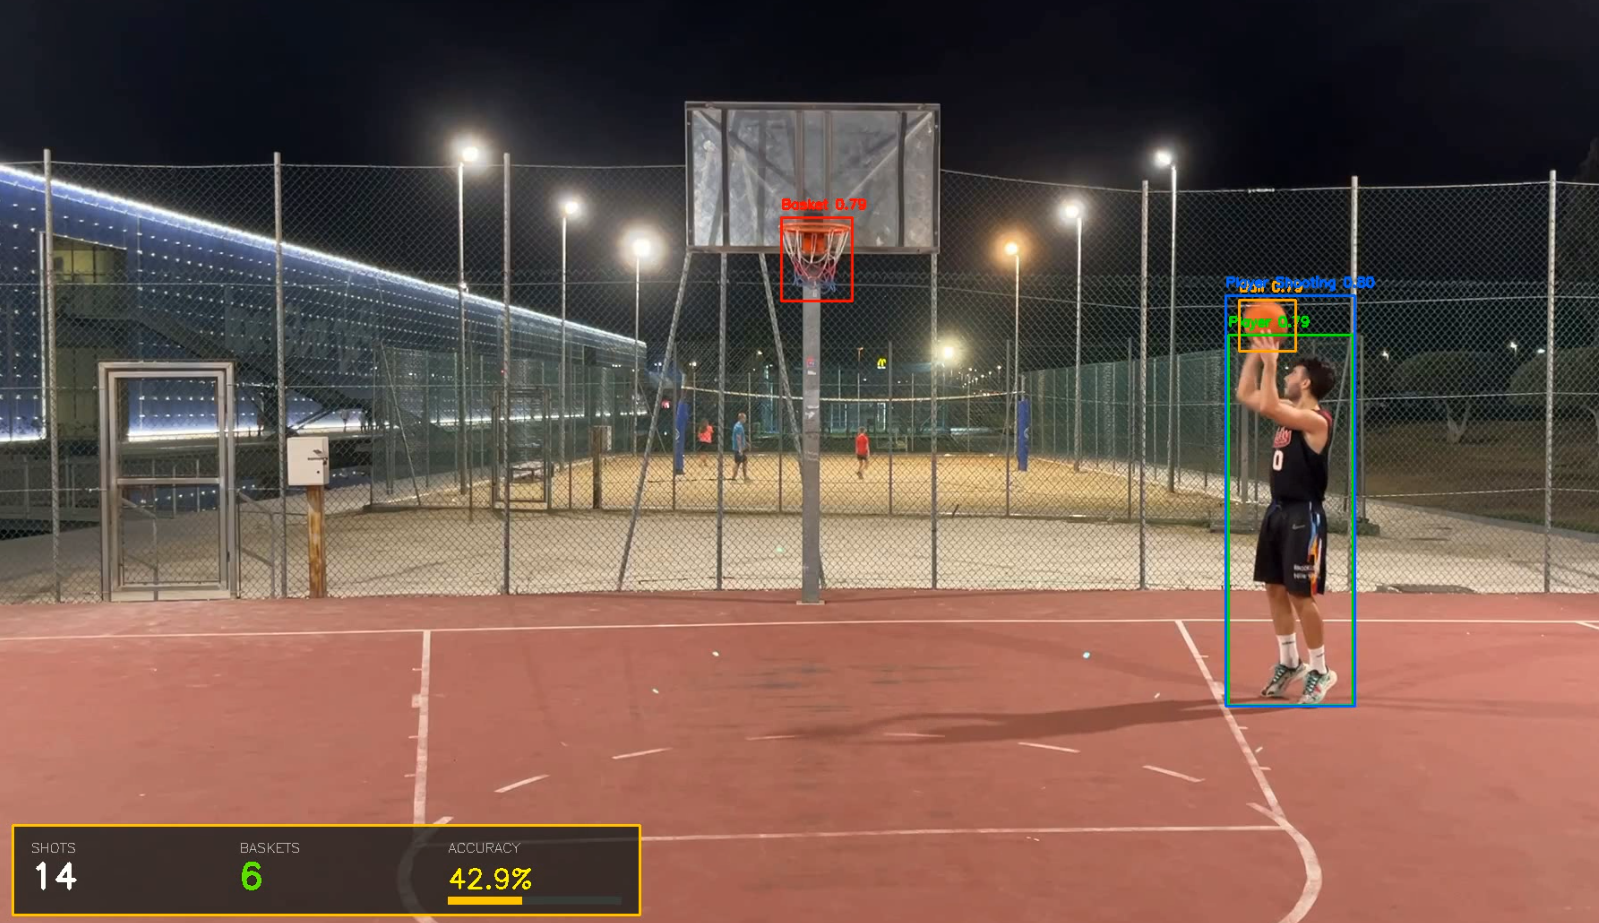
Example of processed video with tracking overlays and statistics
🎥 Sample Output Video
Watch a full demonstration of SwishAI in action:
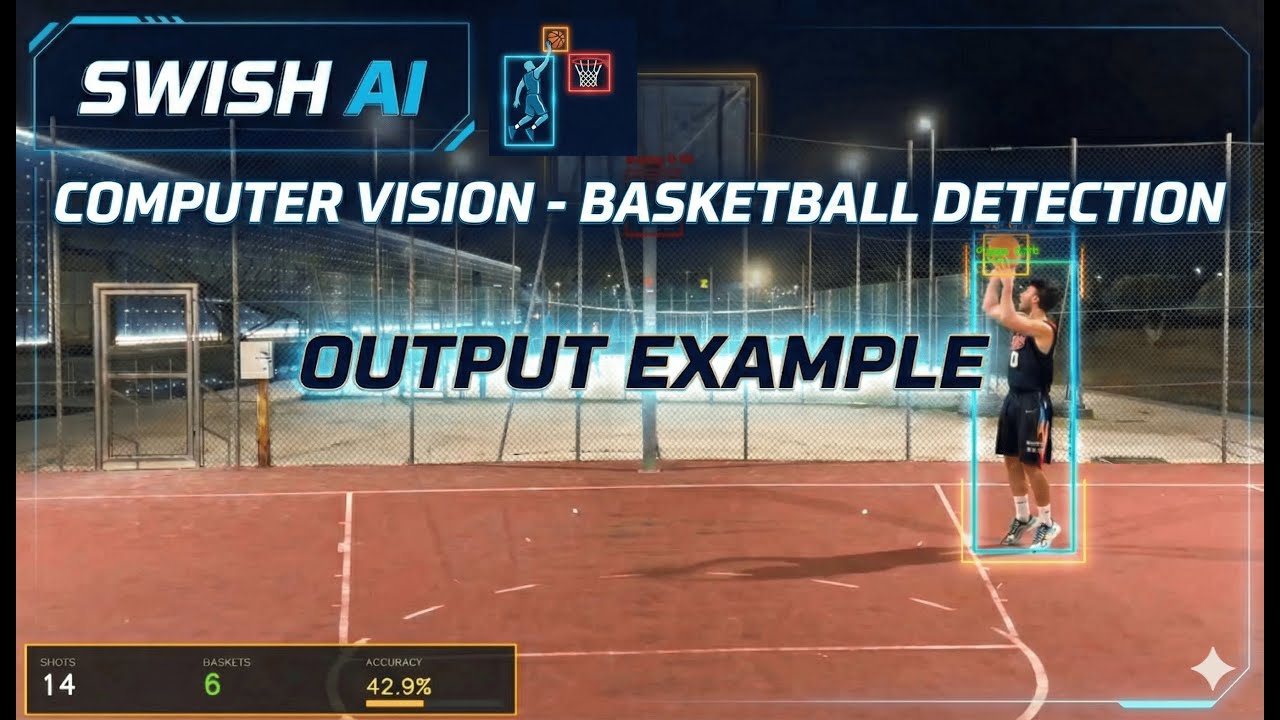
Click the image above to watch the full video output on YouTube
🚀 Usage Guide
- Open the App: Go to the local frontend URL.
- Upload Video: Click the upload area to select a basketball video (MP4, MOV, AVI).
- Configure Settings (Optional):
- Processing Mode: Choose between Full Tracking, Stats & Effects or Stats Only.
- Advanced Settings: Click "Advanced" to tweak confidence thresholds for specific classes (e.g., lower "Ball" threshold for dark videos).
- Test Mode: Check "Test Mode" to process only the first 15 seconds. Useful to check if the model works properly.
- Start Analysis: Click the Start Analysis button. You will see a real-time progress bar and stats updating as the backend processes the video.
- Download: Once complete, download the rendered video with overlays.
🛠 Tech Stack
Computer Vision & AI Core
- YOLOv11s (Ultralytics): Latest SOTA object detection model
- PyTorch: Deep learning framework
- OpenCV (cv2): Video processing and drawing logic
- NumPy: Matrix operations for game logic
Backend (BE)
- FastAPI: High-performance, asynchronous Python web framework
- Uvicorn: ASGI server implementation
- Threading: Background video processing handling
Frontend (FE)
- React 18: UI Library
- Vite: Next-generation frontend tooling
- Tailwind CSS: Utility-first CSS framework for styling
- Lucide React: Modern icon set
📂 Project Architecture
SwishAI/
├── BE/                           # Backend (Python)
│   ├── basketball_training/      # Training scripts & artifacts
│   │   ├── weights/              # Stores best.pt after training
│   │   └── data_basketball.yaml  # Dataset configuration
│   ├── processed/                # Output videos (Auto-cleaned)
│   ├── uploads/                  # Raw user uploads (Auto-cleaned)
│   ├── app.py                    # FastAPI Server & Business Logic
│   ├── train_model.py            # YOLO Training Script
│   └── requirements.txt          # Python dependencies
├── FE/                           # Frontend (React)
│   ├── src/                      # Source code
│   │   └── App.jsx               # Main UI Component
│   ├── public/                   # Static assets
│   ├── tailwind.config.js        # Tailwind configuration
│   └── package.json              # Node dependencies
└── README.md
⚙️ Installation & Setup
Prerequisites
- Python 3.10+
- Node.js 18+ & npm
- NVIDIA GPU (Optional but highly recommended for training/inference)
1. Backend Setup
Navigate to the backend directory:
cd BE
Create and activate a virtual environment:
python -m venv venv

# Windows:
.\venv\Scripts\activate

# Mac/Linux:
source venv/bin/activate
Install dependencies:
pip install -r requirements.txt
Start the API server:
python app.py
Server will run at http://localhost:8000.
2. Frontend Setup
Navigate to the frontend directory:
cd FE
Install packages:
npm install
Start the development server:
npm run dev
Client will run at http://localhost:5173.
3. Dataset & Model Training
Before running the app, you need to train the model (or use pre-trained weights).
Download Dataset: Get the basketball detection dataset from Roboflow Universe.
Configure Training:
- Ensure the dataset is extracted into
BE/basketball-detection-srfkd-1 - Check
train_model.pyconfig class (the script is tailored for my hardware: GTX 1060 6GB - i7 6700k - 16gb ram):
DATASET_DIR = Path("basketball-detection-srfkd-1")
EPOCHS = 200
BATCH_SIZE = 8  # Adjust based on your VRAM
Run Training:
cd BE
python train_model.py
This script handles auto-validation, GPU checks, and custom augmentation.
🧠 Technical Logic & AI
Physics & Cooldowns
To prevent double-counting, the system implements physics-based cooldown logic (app.py):
- Shot Cooldown (1.5s): Prevents the model from registering multiple shots for a single throwing motion.
- Basket Cooldown (2.0s): Ensures the ball swishing through the net isn't counted twice in consecutive frames.
Custom Augmentation Strategy
The training script (train_model.py) uses specialized augmentation for sports footage:
- HSV Saturation (0.7): Helps detect orange balls in varied lighting.
- Shear (2.0°): Improves robustness against camera angles.
- Mixup (0.15): Helps separating players in crowded scenes.
Detection Classes
| ID | Class Name | Default Confidence |
|---|---|---|
| 0 | Ball | 0.60 |
| 1 | Ball in Basket | 0.25 |
| 2 | Player | 0.70 |
| 3 | Basket | 0.70 |
| 4 | Player Shooting | 0.77 |
📊 Model Training & Performance
Dataset Information
SwishAI uses a custom-trained YOLOv11s model trained on the Basketball Detection Dataset from Roboflow Universe.
- Dataset Source: Roboflow Universe - Basketball Detection
- Dataset Size: ~10,000 annotated images
- License: CC BY 4.0
- Classes: 5 (Ball, Ball in Basket, Player, Basket, Player Shooting)
- Training Date: March 17, 2025
Training Configuration
The model was trained using a custom training script (train_model.py) specifically optimized for consumer-grade hardware:
Hardware Specifications:
- GPU: NVIDIA GTX 1060 6GB
- CPU: Intel i7-6700K
- RAM: 16GB DDR4
- Training Duration: ~48 hours continuous
Training Parameters:
- Model: YOLOv11s (small variant for efficiency)
- Epochs: 200
- Batch Size: 8 (optimized for 6GB VRAM)
- Image Size: 640x640
- Optimizer: AdamW
- Learning Rate: 0.001 (with cosine decay)
Model Performance Metrics
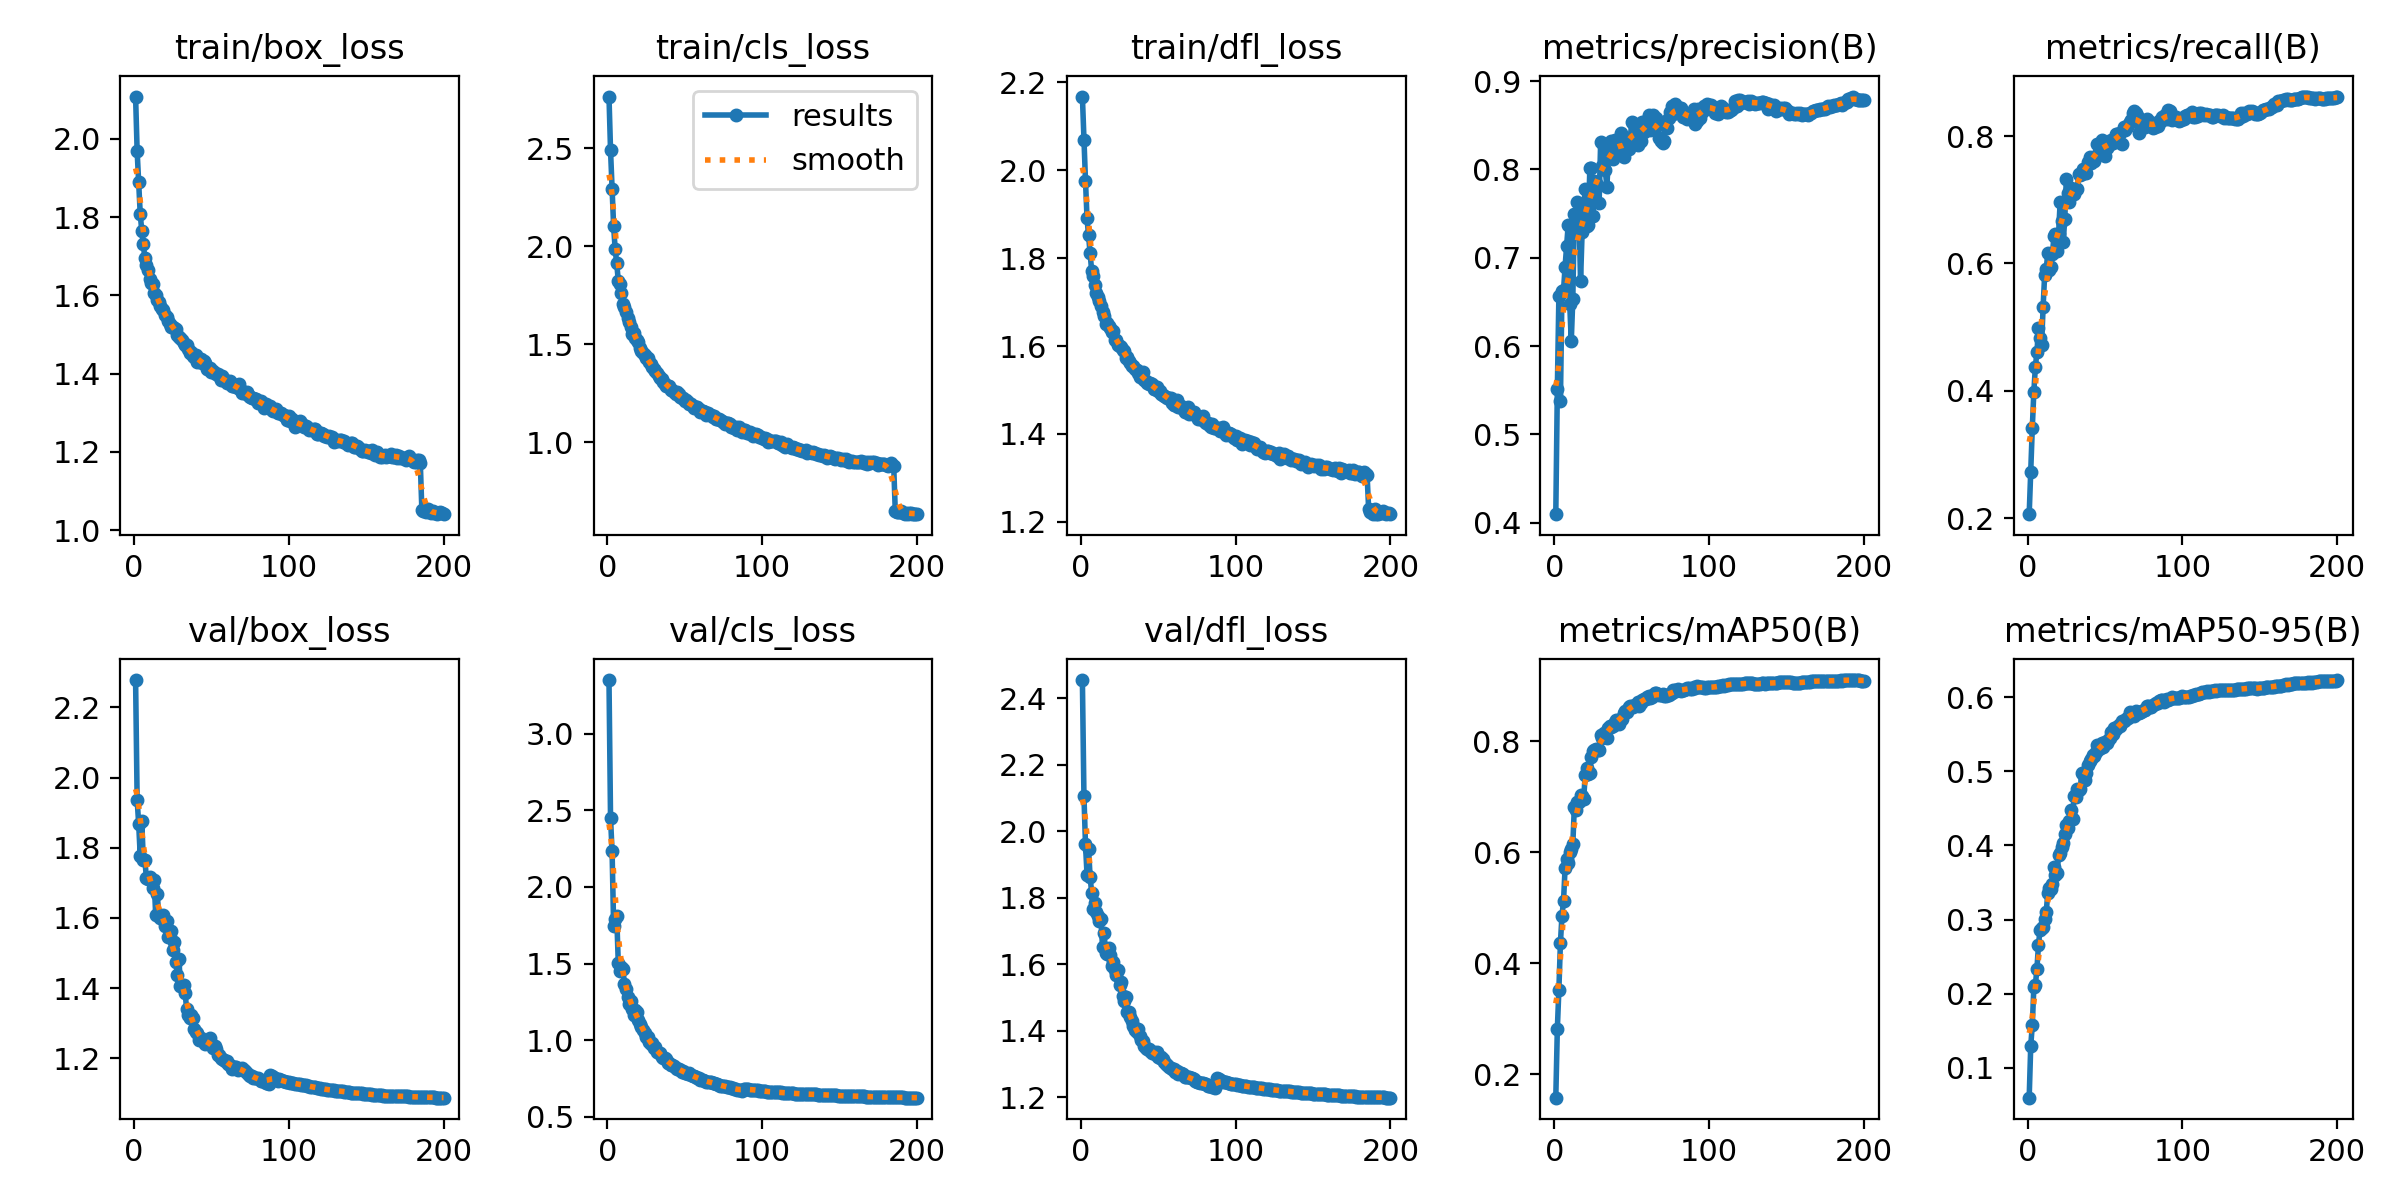
Training & Validation Loss Curves
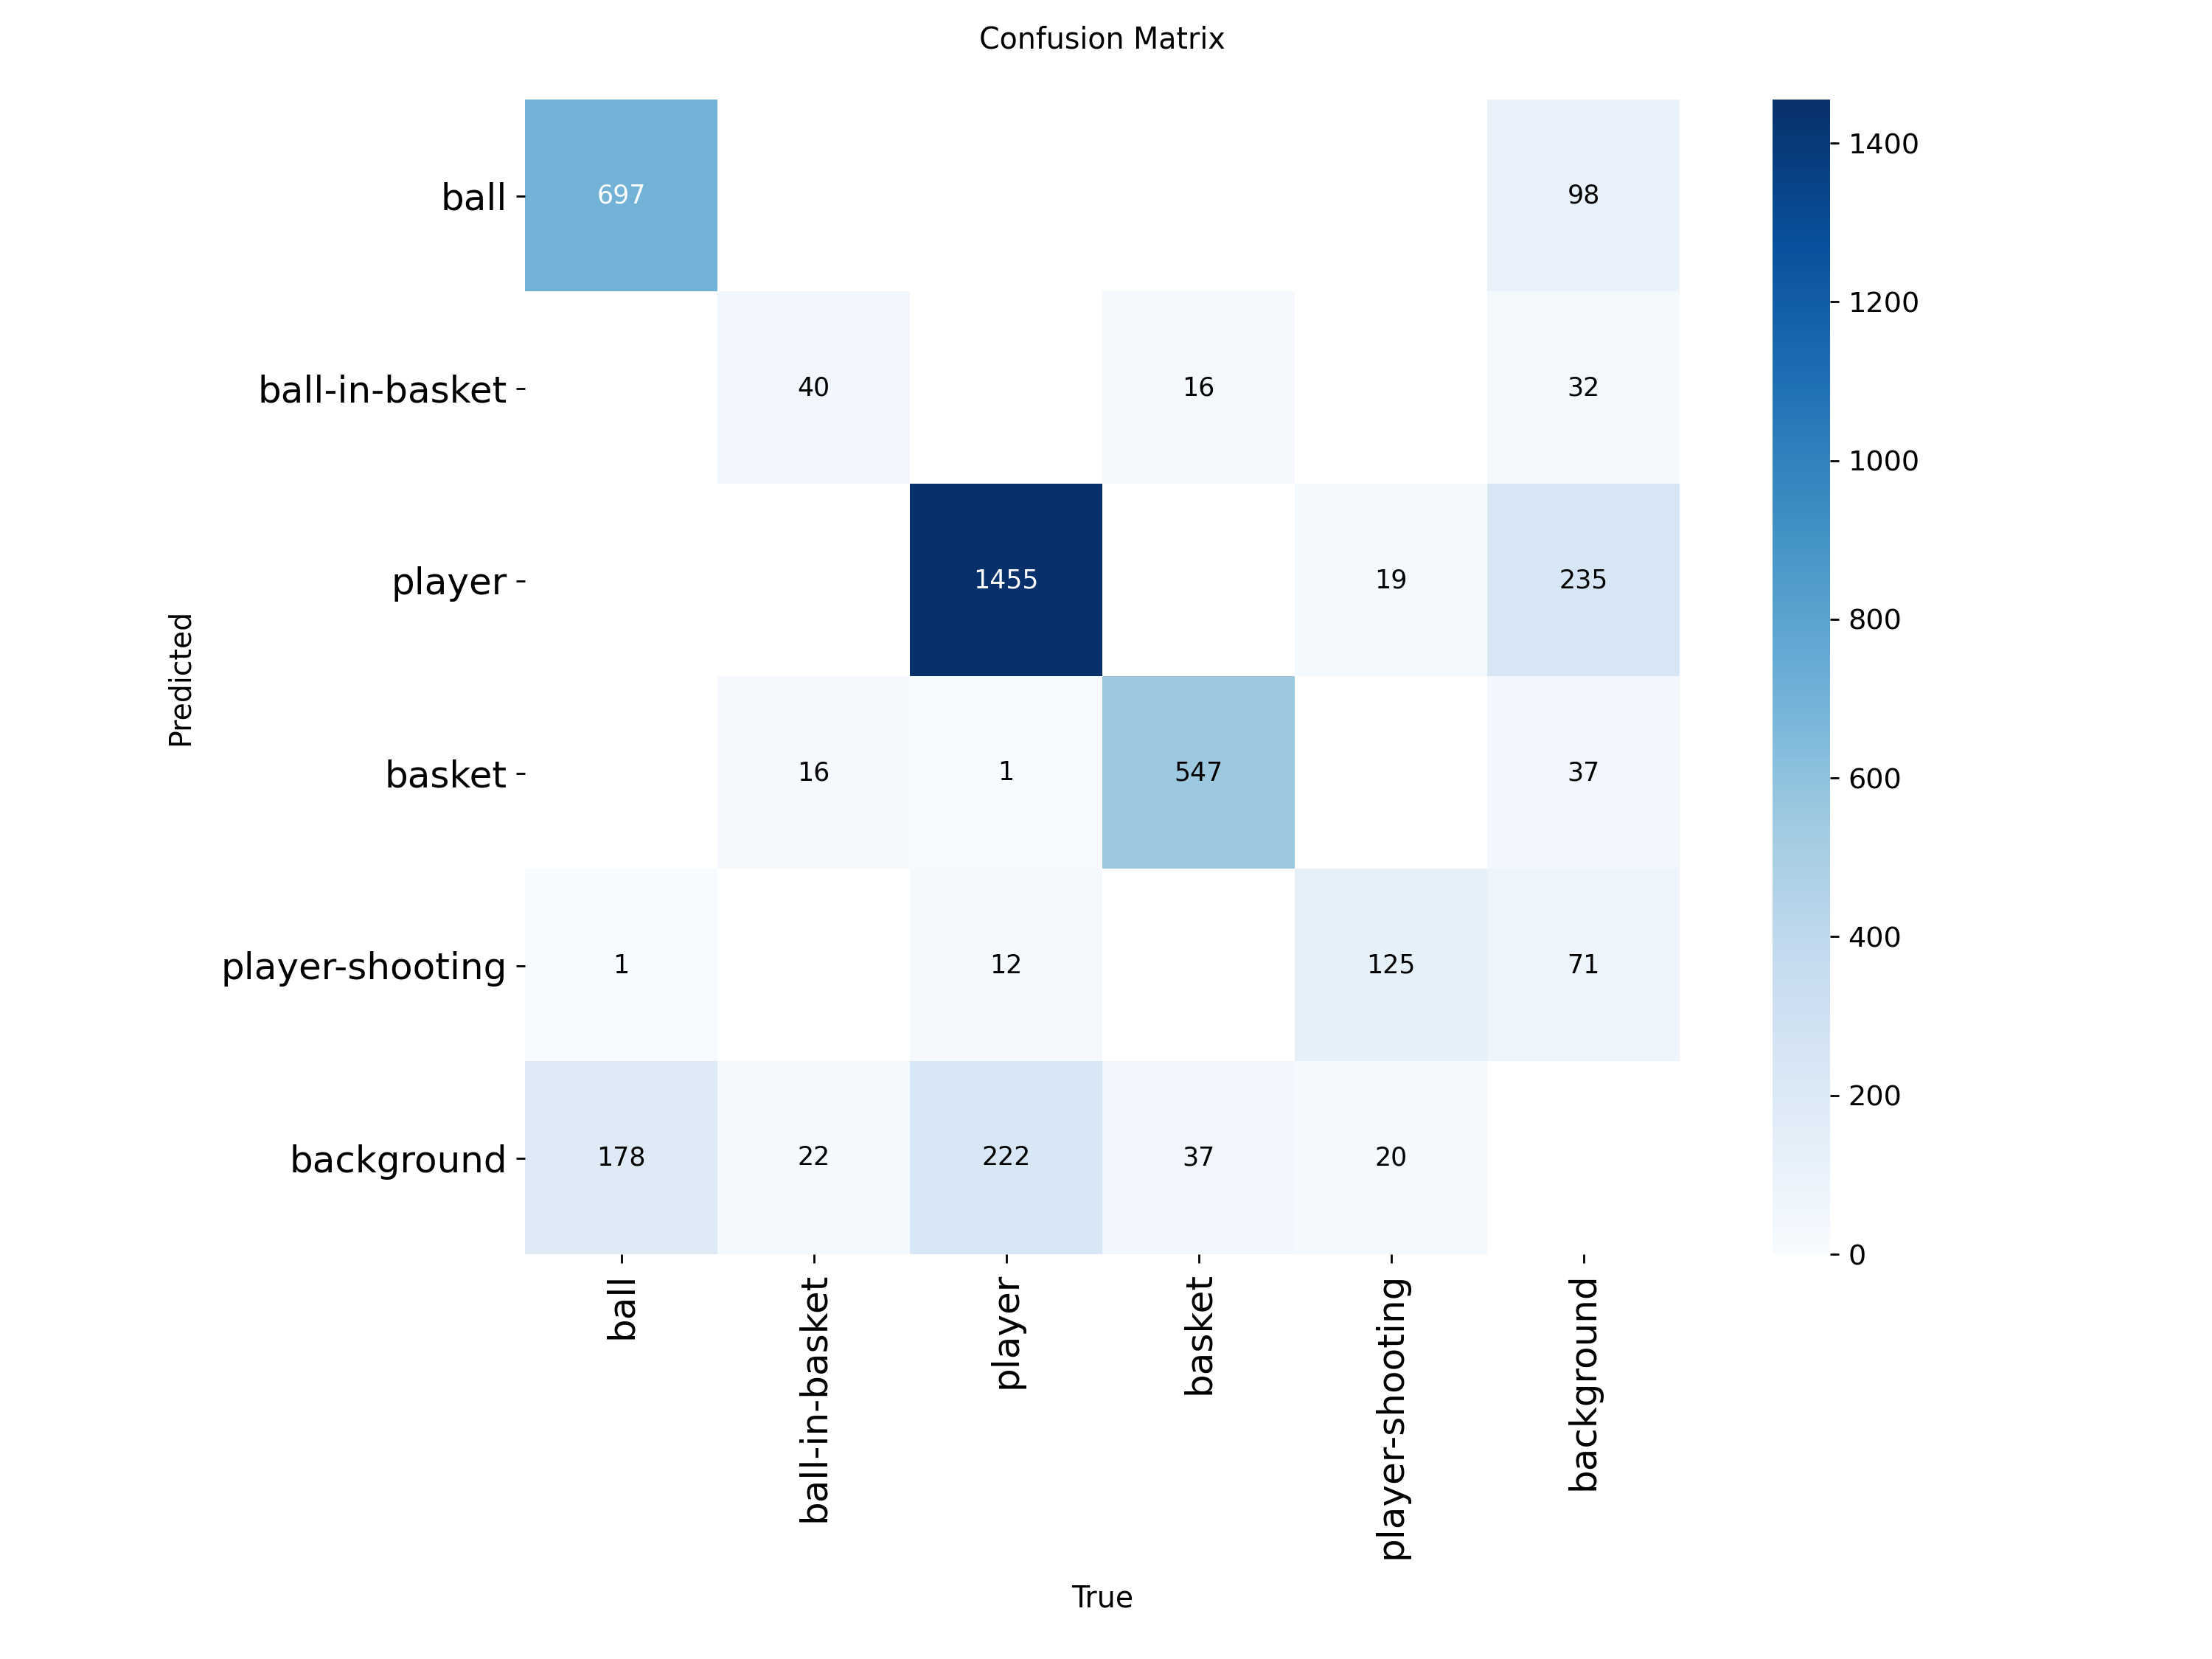
Confusion Matrix
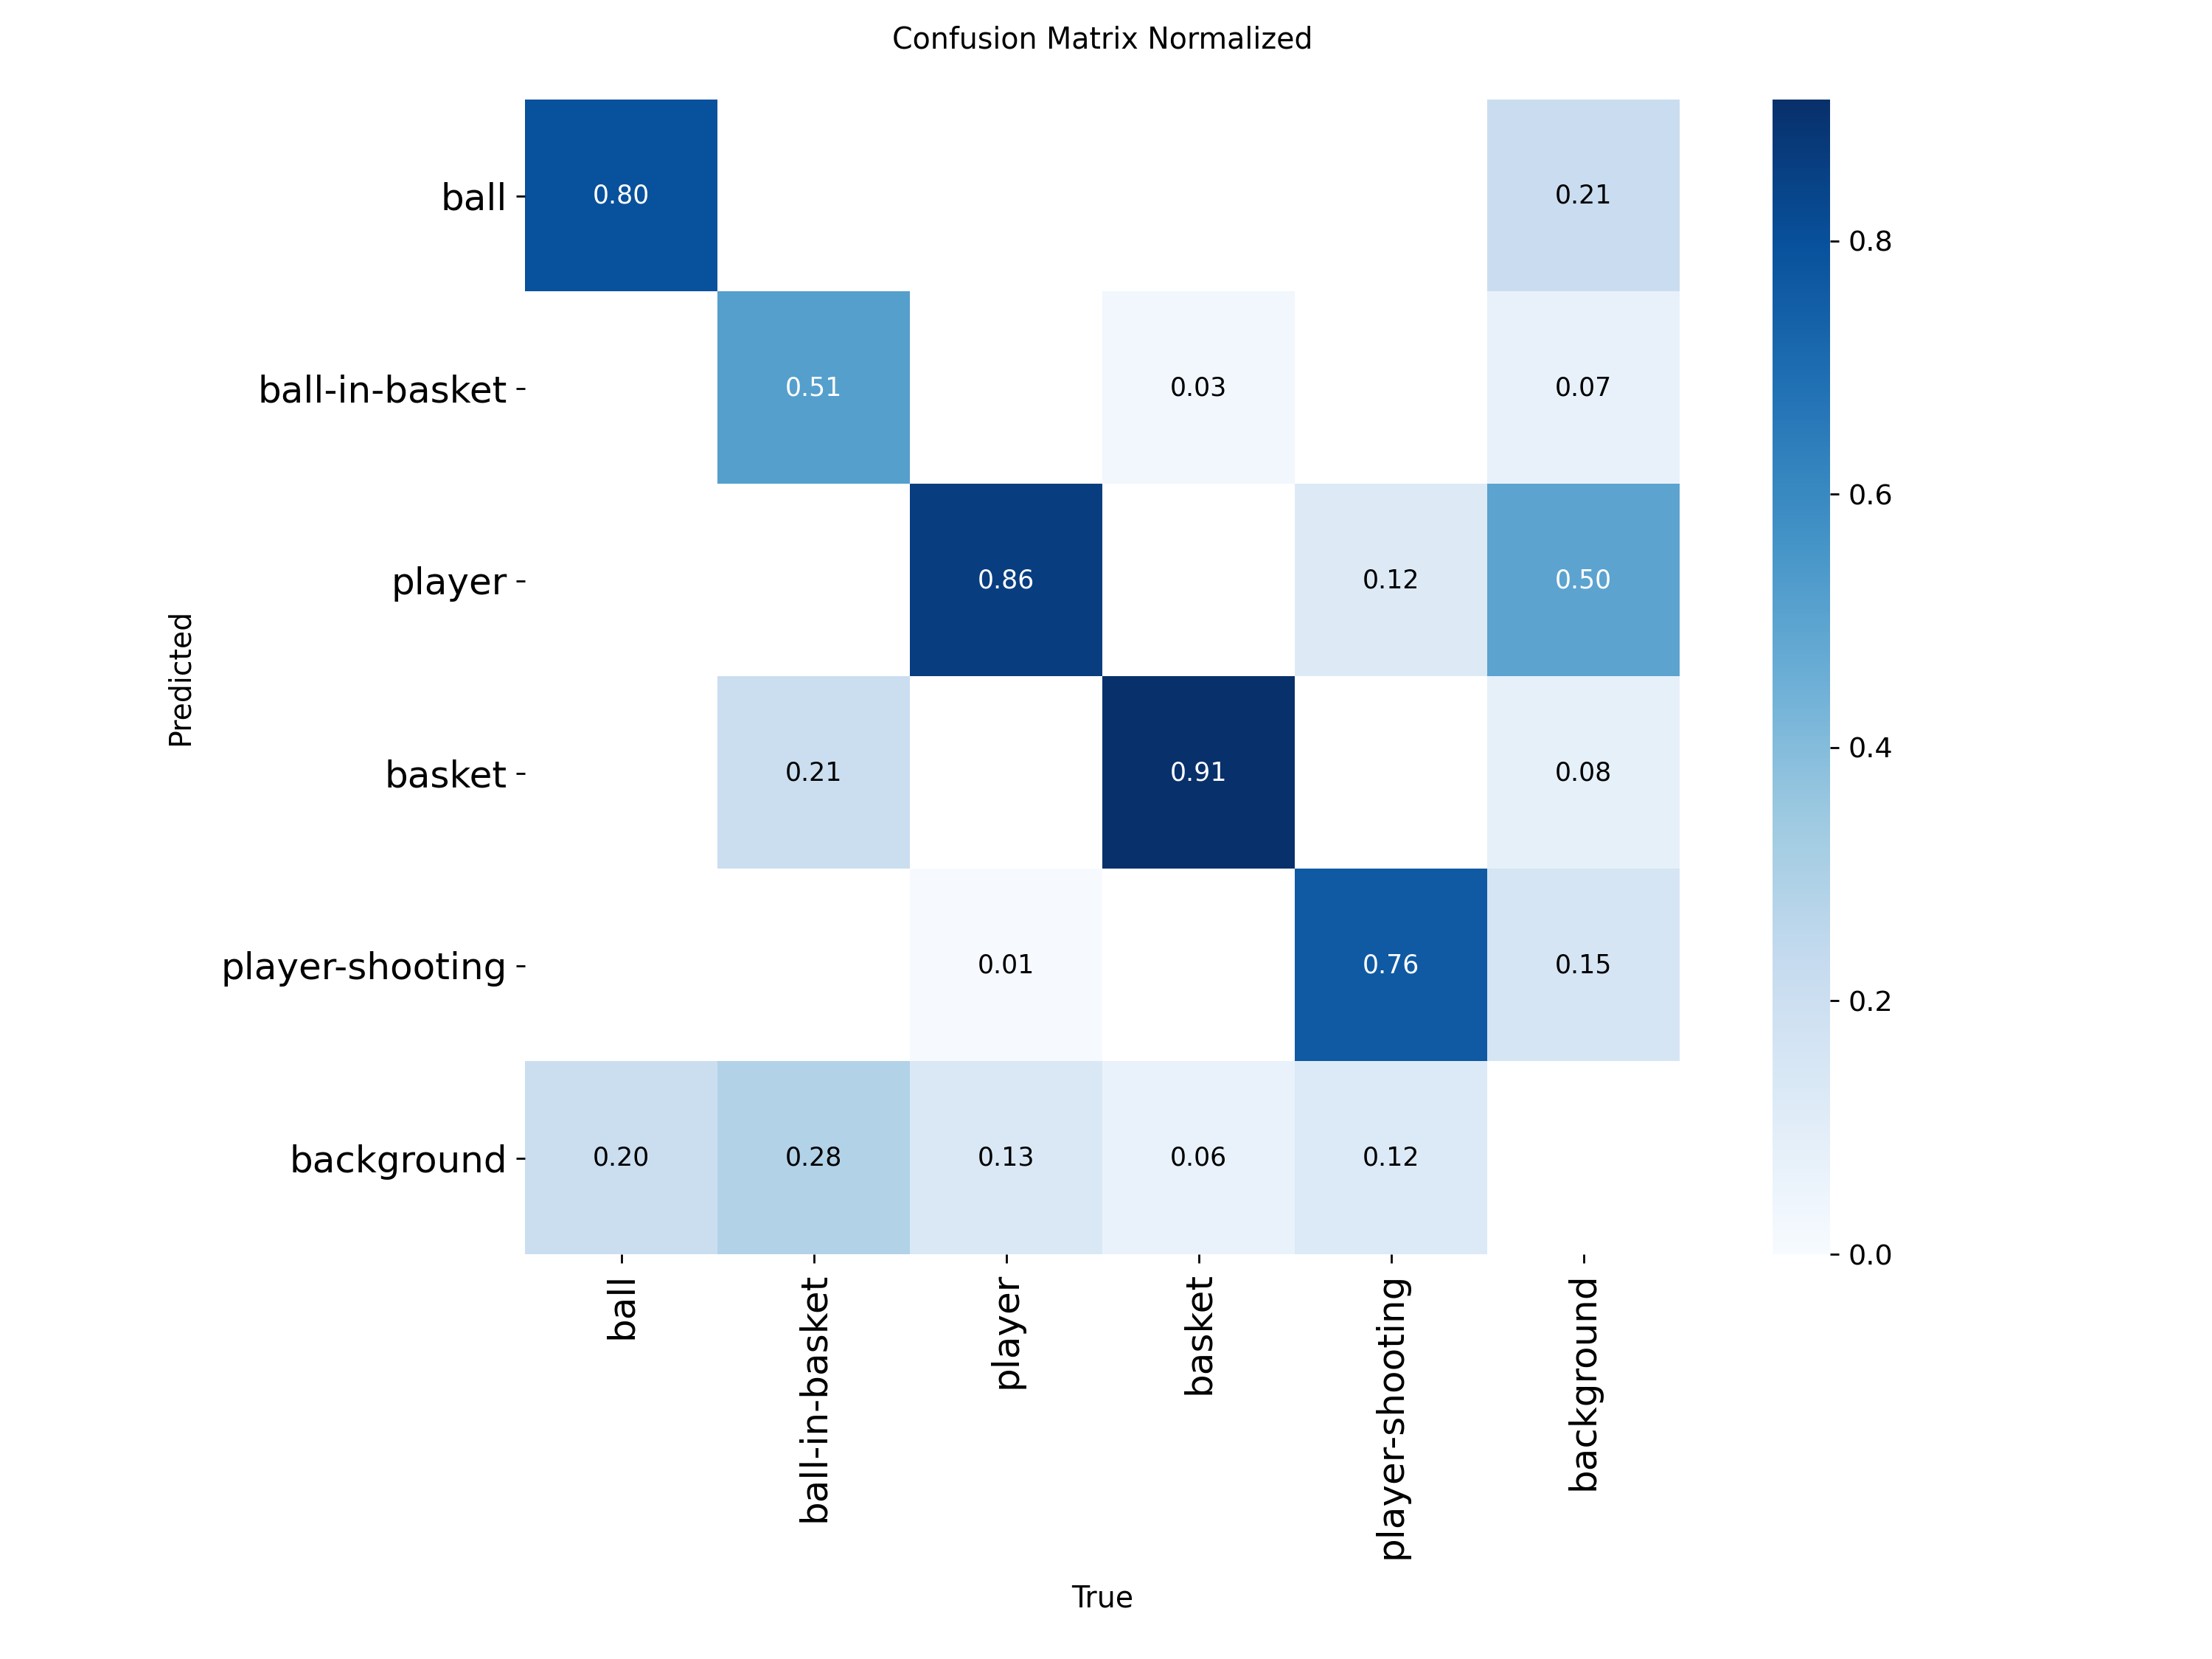
Normalized Confusion Matrix
Key Performance Indicators (Final Model - Epoch 200):
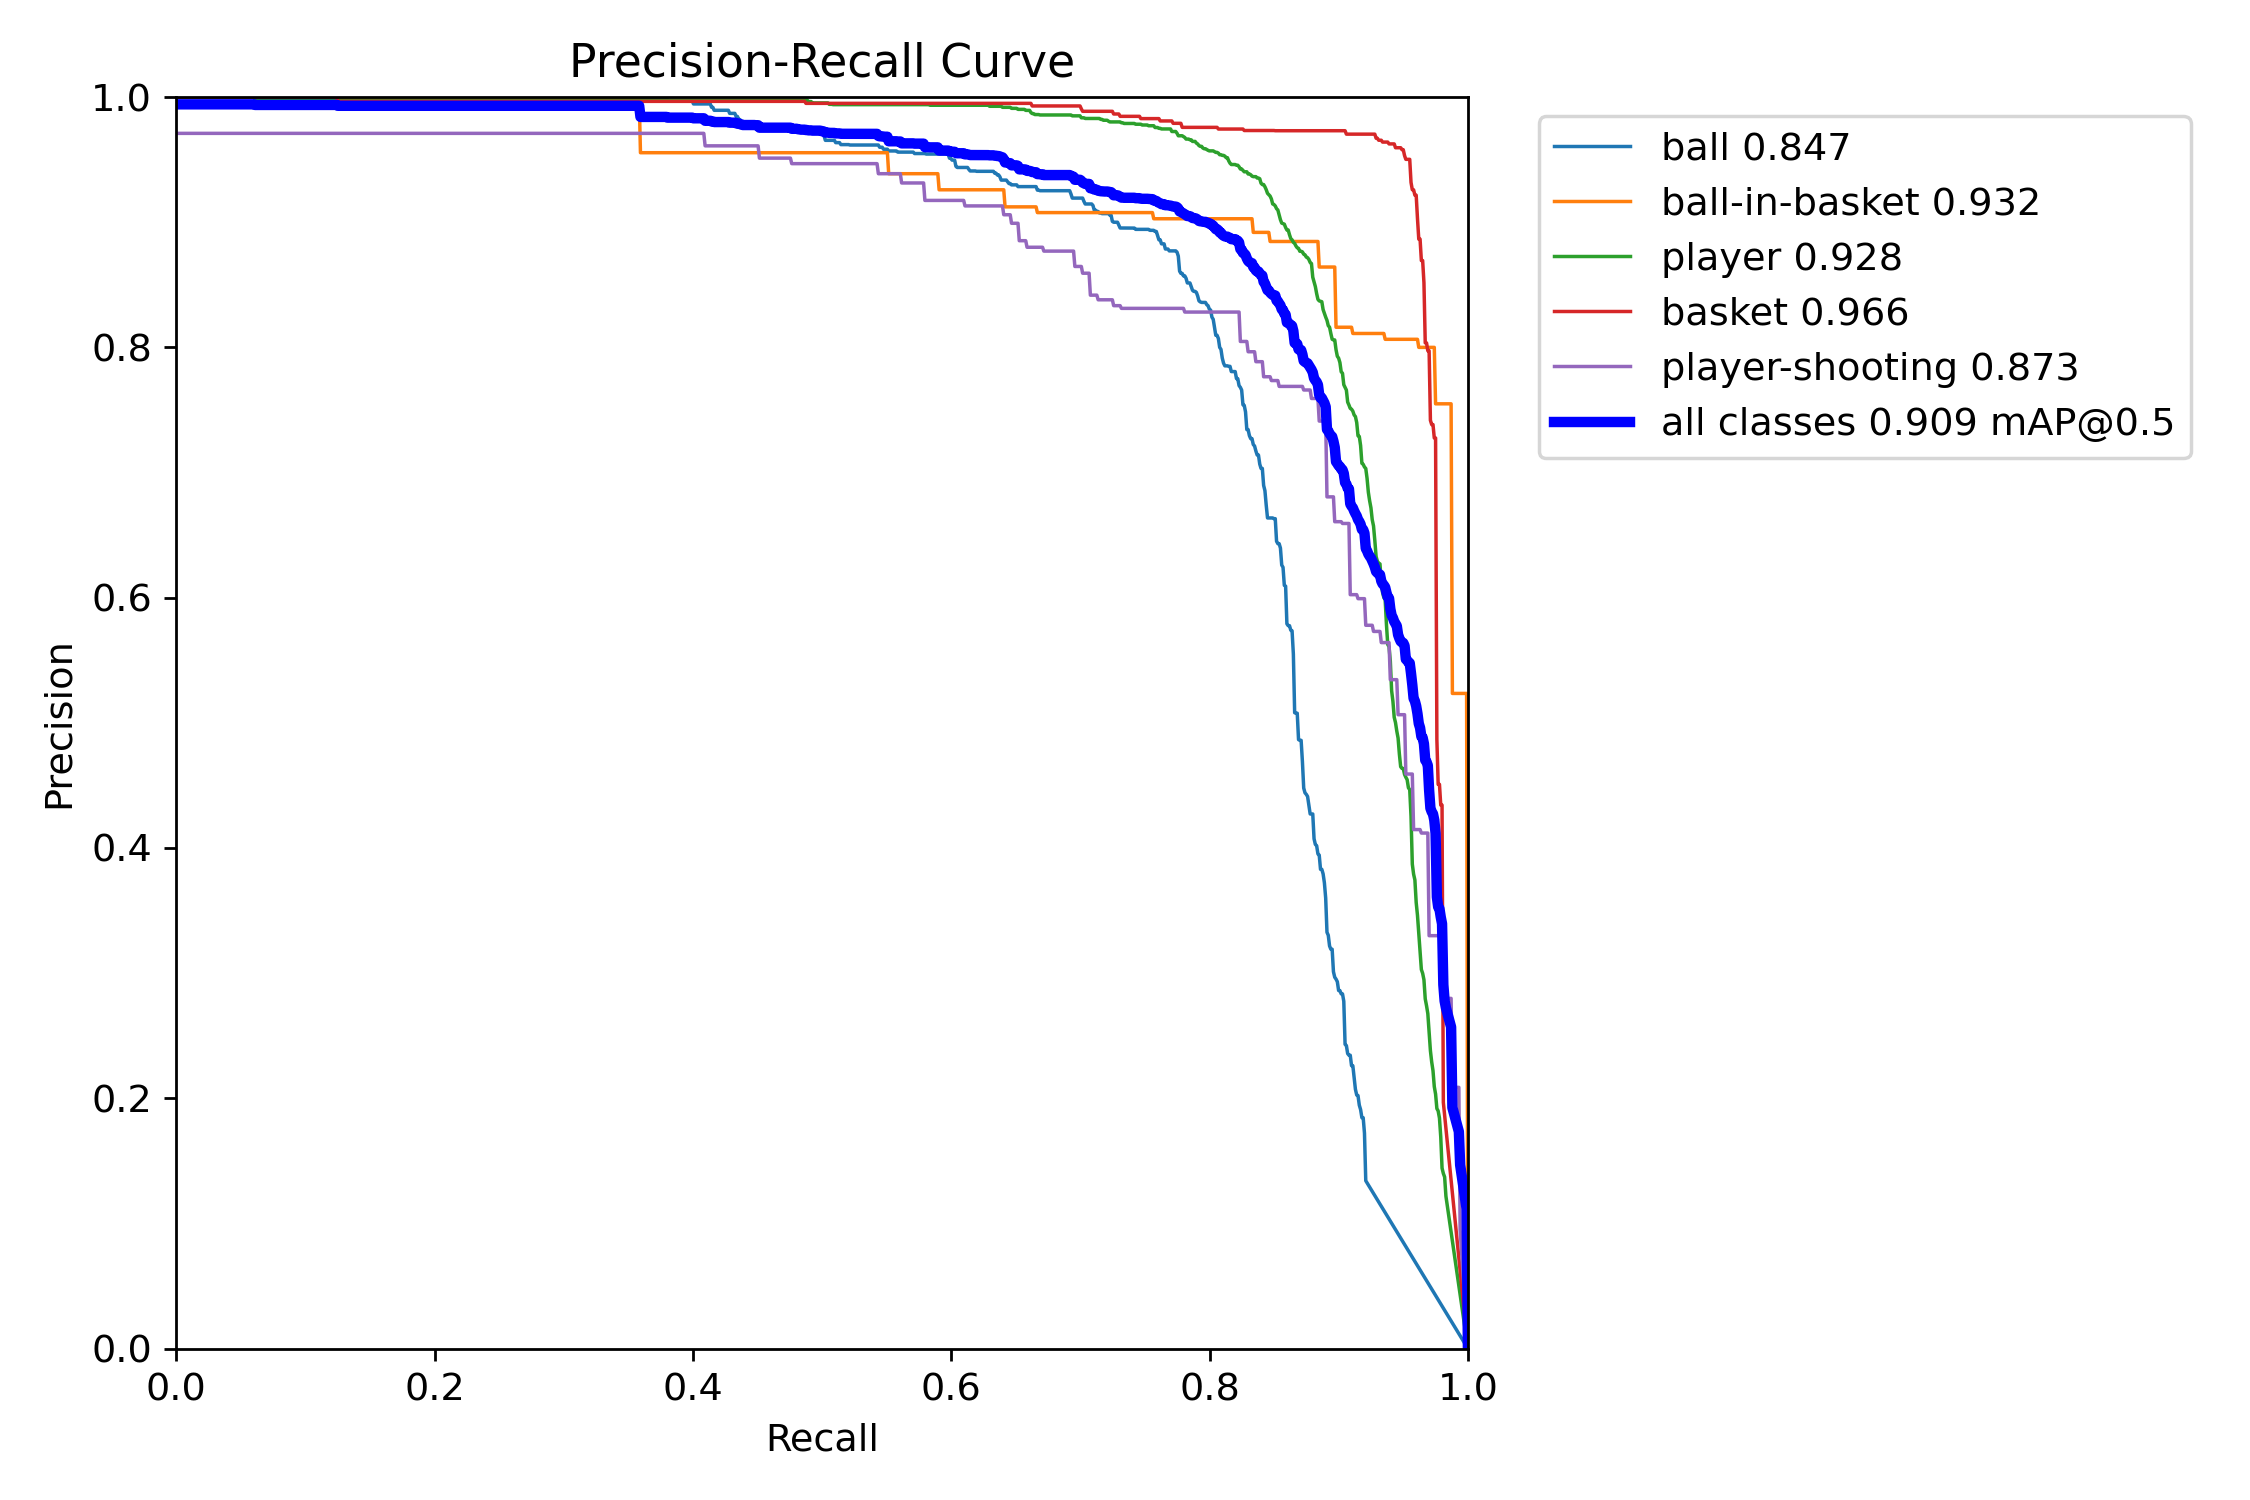
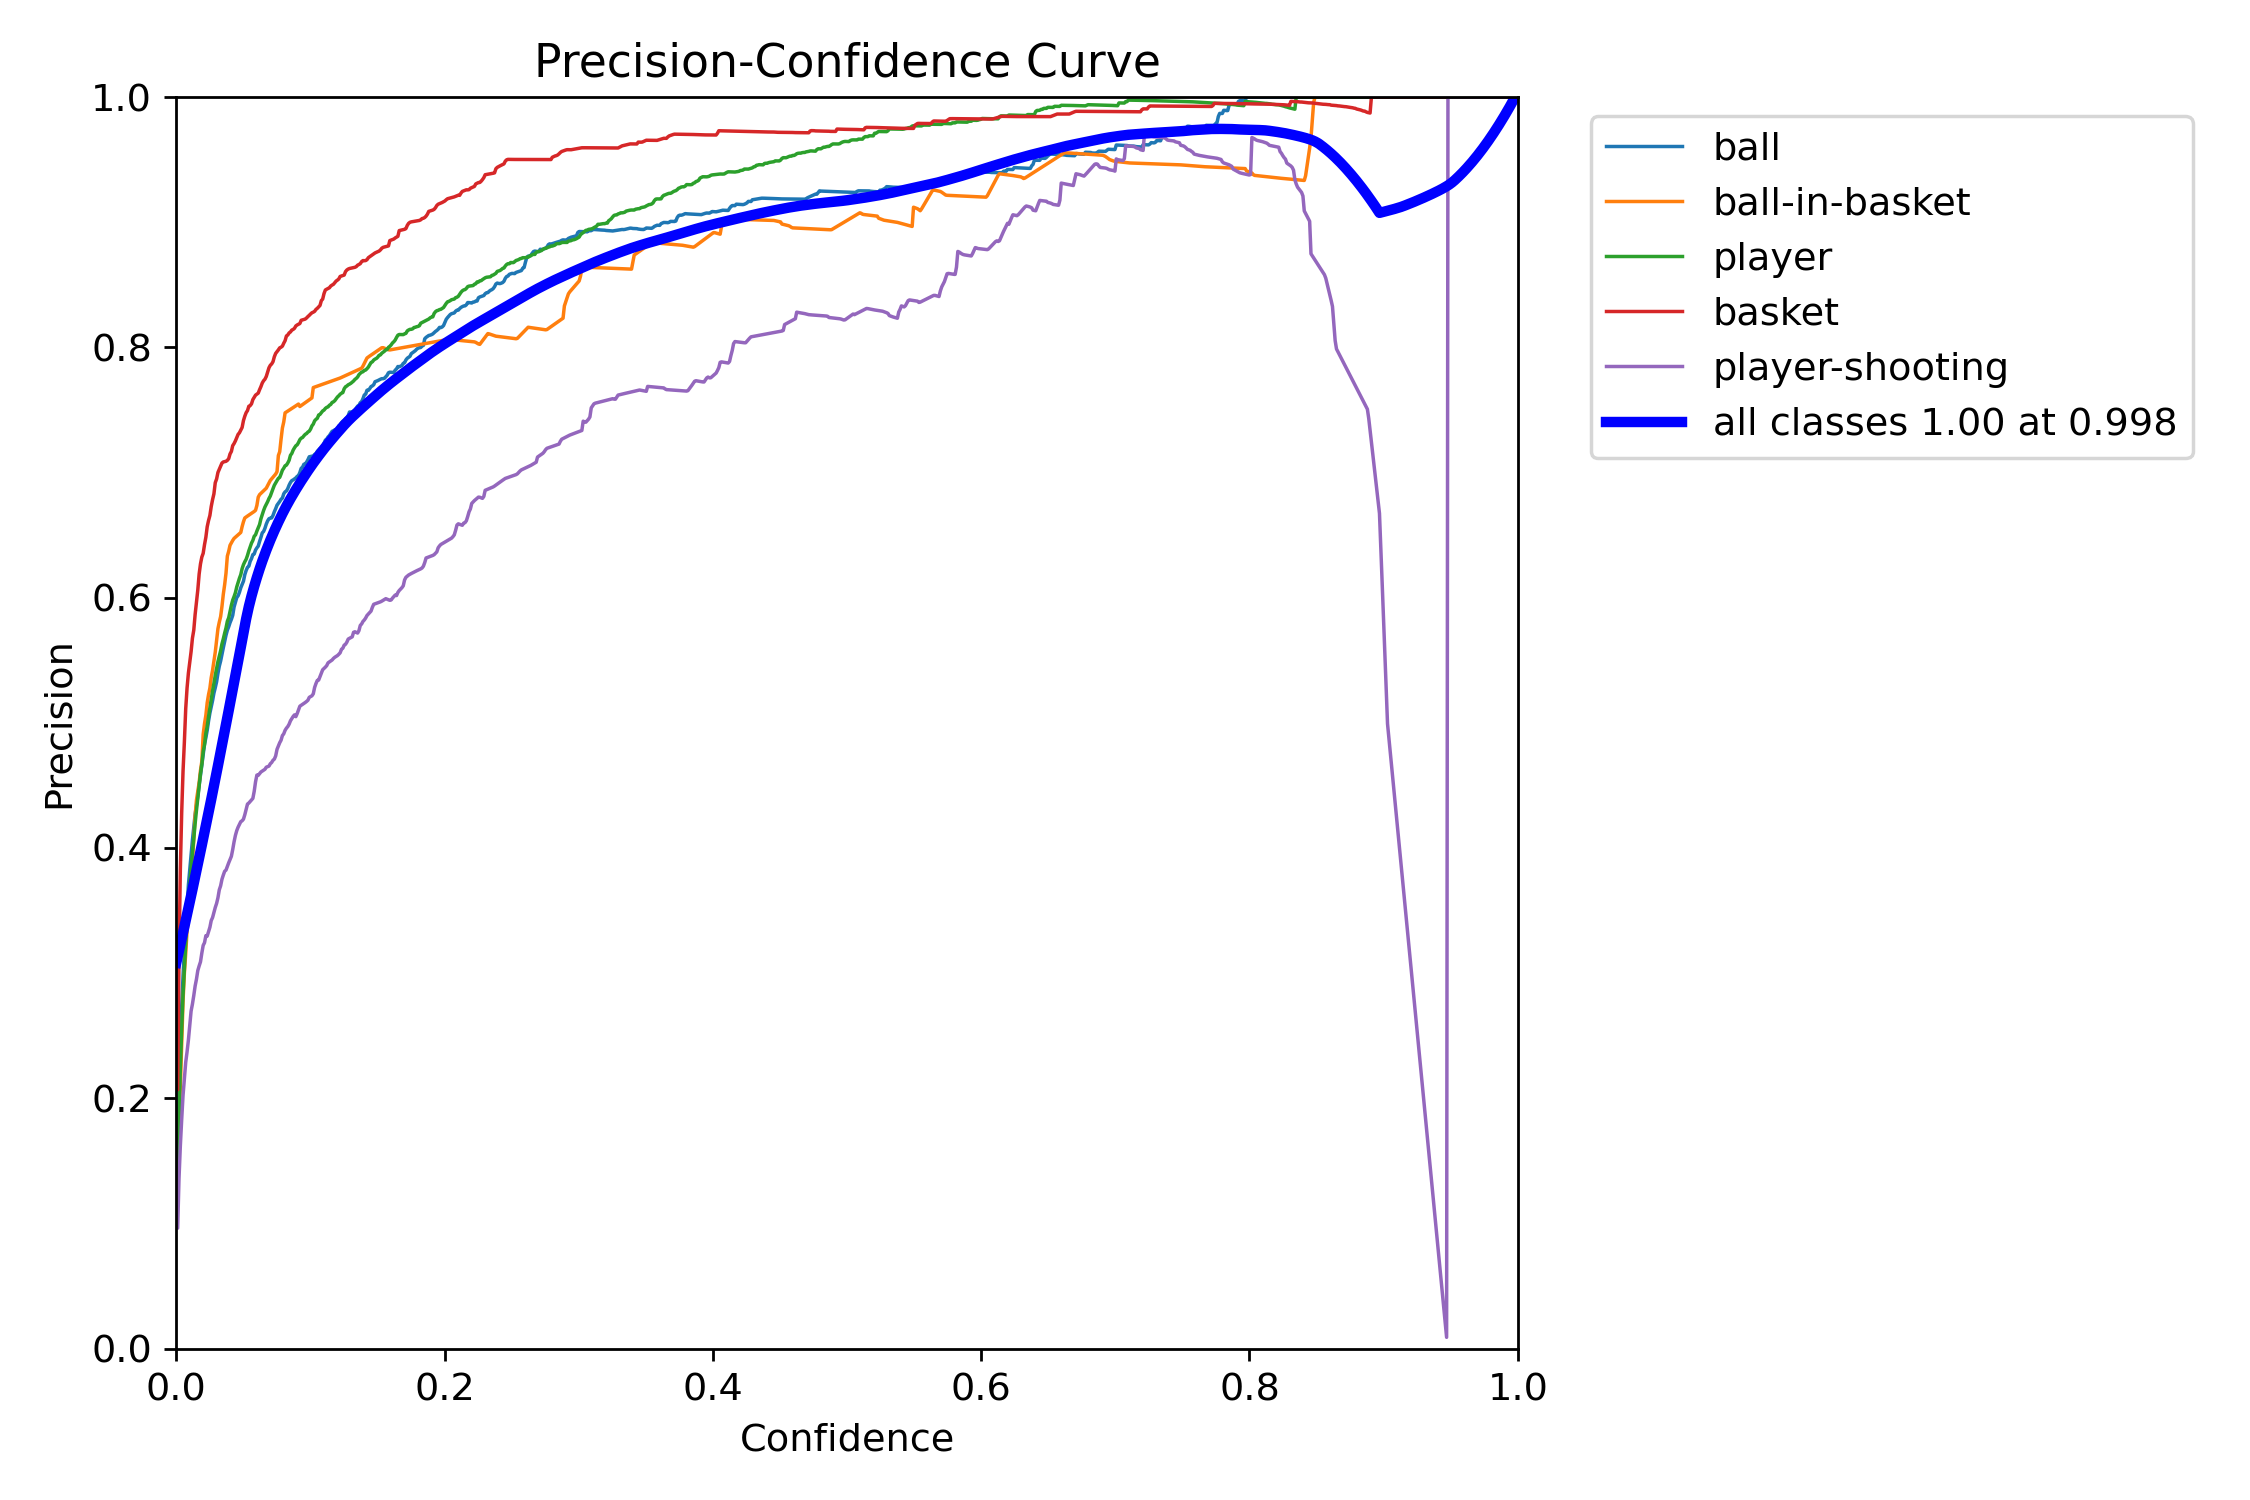
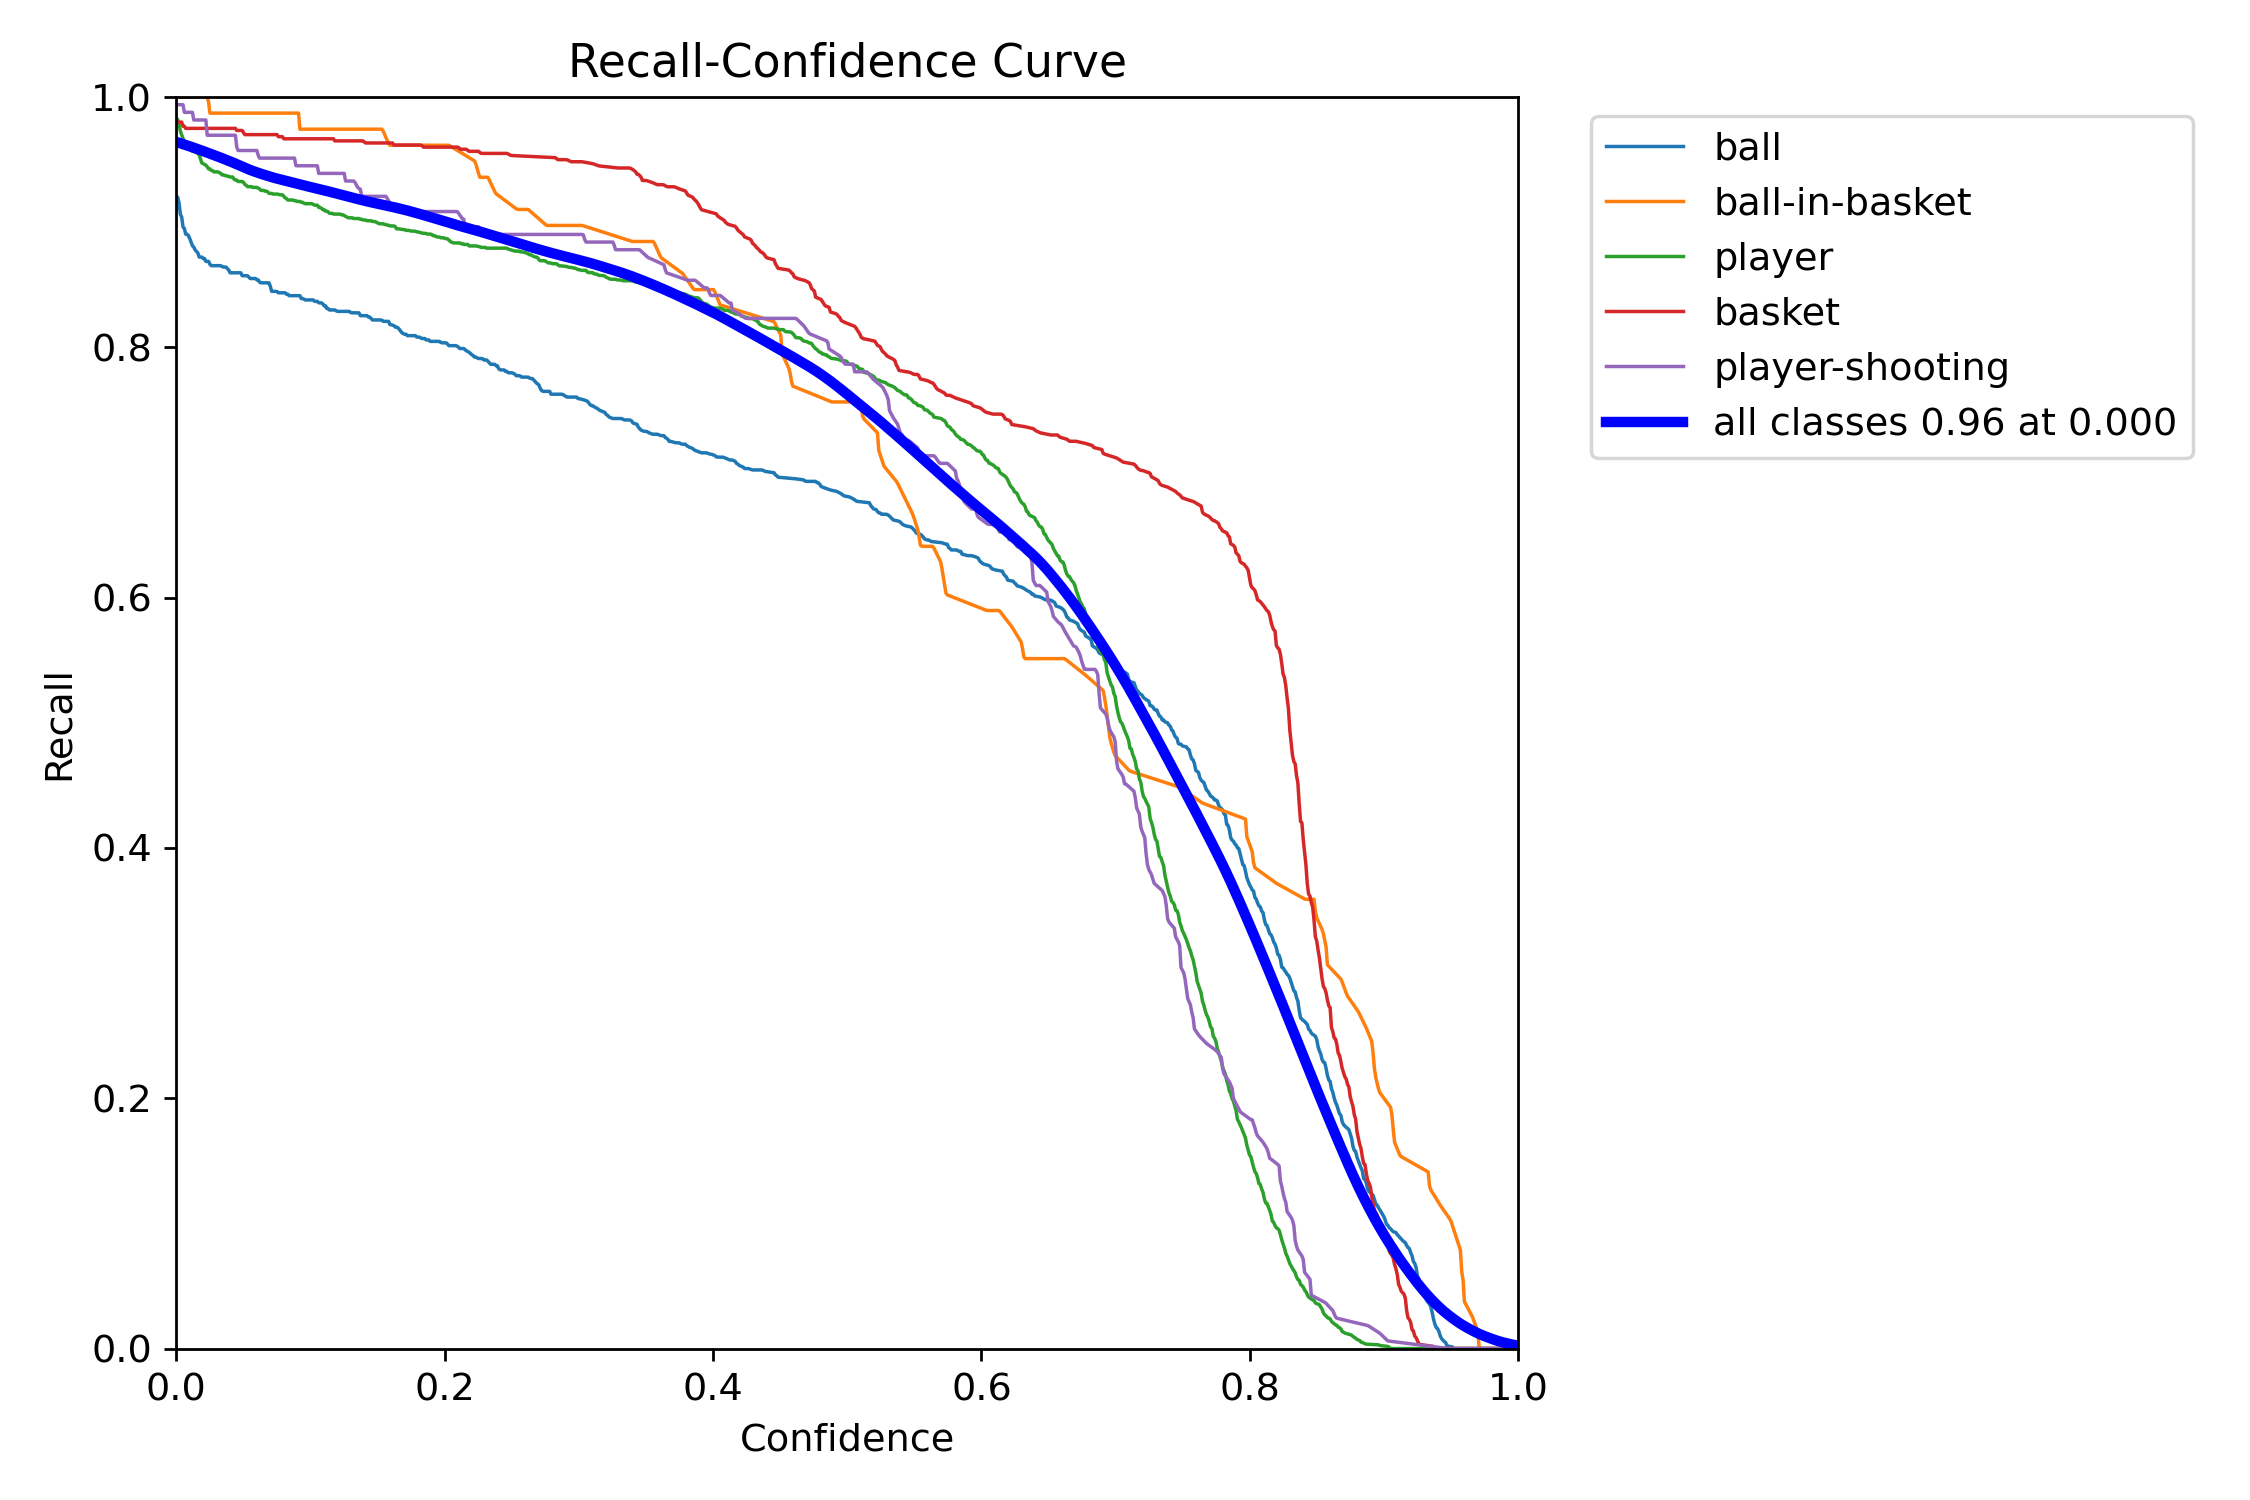
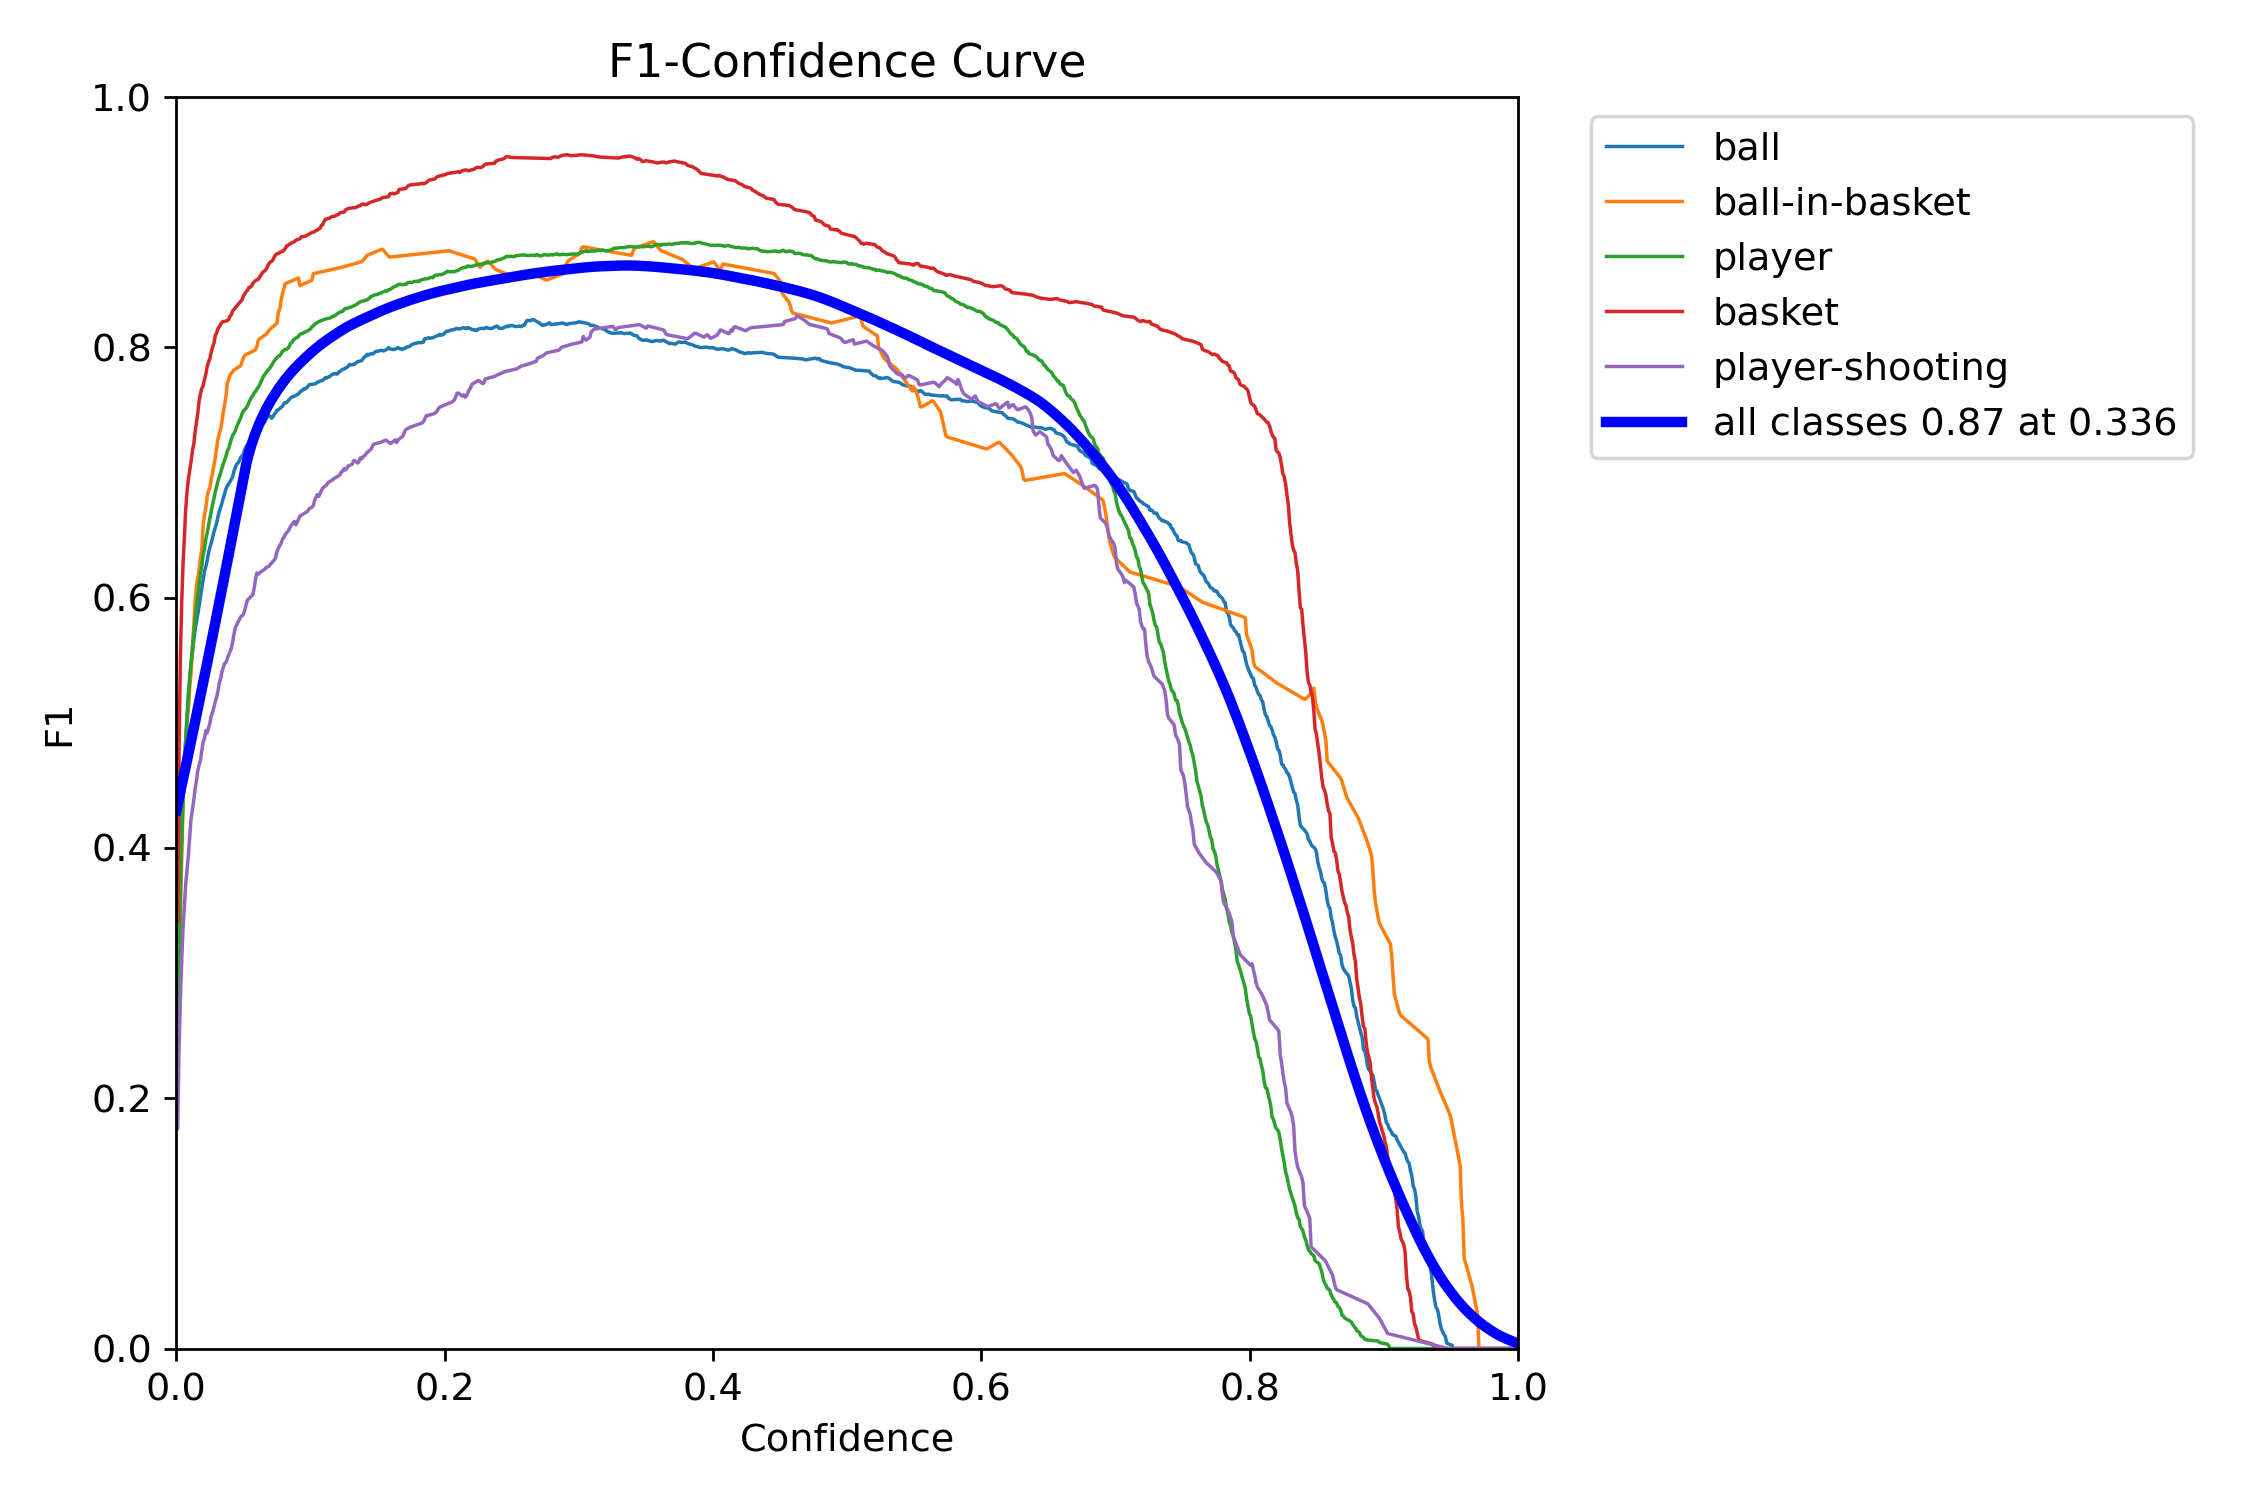
- mAP50: 0.909 (Mean Average Precision at IoU 0.5)
- mAP50-95: 0.623 (Mean Average Precision from IoU 0.5 to 0.95)
- Overall Precision: 0.878
- Overall Recall: 0.861
Per-Class Performance:
| Class | Precision | Recall | mAP50 |
|---|---|---|---|
| Ball | 0.80 | 0.88 | 0.847 |
| Ball in Basket | 0.51 | 0.36 | 0.932 |
| Player | 0.86 | 0.85 | 0.928 |
| Basket | 0.91 | 0.91 | 0.966 |
| Player Shooting | 0.76 | 0.34 | 0.873 |
Precision-Recall Curves
Training Script Details
The train_model.py script includes:
- Hardware-specific optimizations for GTX 1060 6GB (batch size, workers, memory management)
- Custom augmentation pipeline tailored for basketball footage (HSV saturation, shear, mixup)
- Automatic validation split (80/20 train/val)
- Early stopping and checkpoint saving
- Mixed precision training (FP16) for faster training on lied VRAM
Note on Model Improvement: The current model achieves strong performance for real-time basketball analysis. However, further improvements are possible through:
- Extended training (300+ epochs)
- Larger model variants (YOLOv11m or YOLOv11l)
- Additional data augmentation techniques
- Fine-tuning on specific court environments
- Ensemble methods or model fusion
Users with more powerful hardware (RTX 3080+, 24GB+ VRAM) can modify the training parameters in
train_model.pyto achieve higher accuracy.
📜 Credits
- Developer: sPappalard
- Dataset: Roboflow Universe - Basketball Detection
- Frameworks: Ultralytics YOLO, FastAPI, React
Dataset Citation
@misc{
    basketball-detection-srfkd_dataset,
    title = { Basketball detection Dataset },
    type = { Open Source Dataset },
    author = { basketball },
    howpublished = { \url{ https://universe.roboflow.com/basketball-6vyfz/basketball-detection-srfkd } },
    url = { https://universe.roboflow.com/basketball-6vyfz/basketball-detection-srfkd },
    journal = { Roboflow Universe },
    publisher = { Roboflow },
    year = { 2025 },
    month = { mar },
    note = { visited on 2025-11-30 },
}
📄 License
This project is released under the GNU Affero General Public License v3.0 (AGPL-3.0).
Why AGPL-3.0? This project integrates Ultralytics YOLO, which is licensed under AGPL-3.0. As a derivative work, RotoAI inherits this license to ensure full compliance with the open-source terms of its dependencies.
What this means for you:
- ✅ Use: You can use this software for personal, research, or commercial purposes.
- ✅ Modify: You can modify the source code.
- 🔄 Share: If you distribute this software or host it as a network service (SaaS), you must disclose the source code of your modified version under the same AGPL-3.0 license.
Copyright (c) 2025 sPappalard.