
mpnvdlee/next-hmi
mpnvdlee/next-hmi has 28 GitHub stars and 12 forks. GitHot measured +1 stars in 24 hours. Last checked 2026-11-15 02:59 UTC. Last push 2026-11-13.
Measured star growth
- in 24h
- +1
- in 7 days
- Collecting history
- in 15 days
- Collecting history
- in 1 month
- Collecting history
Net star changes over overlapping periods, not daily totals. Missing measurements are left blank. Stars measure attention, not software quality.
About
The open alternative to traditional HMI/SCADA panels — browser-based, self-hosted, OPC-UA. In-browser page editor. Built on FastAPI + React.
ProductivityREADME.md
OriginalNEXT HMI
Your plant deserves better than a panel from 2009.



NEXT HMI replaces proprietary HMI/SCADA panels with one self-hosted server: your PLCs on OPC-UA in, live operator screens in any browser out, and the whole project as plain JSON and CSV your team can diff, review and version.
No per-seat pricing. No tag counts. No feature paywall — historian, alarms with acknowledgement, recipes, users and permissions are all in this build.
Get it running
⬇ Download the latest release
A portable zip for Windows, Linux and Apple-silicon Macs. You do not need an installer, admin rights, Python or Node on the host.
- Download
nexthmi-community-windows-x64-<version>.zip,nexthmi-community-linux-x64-<version>.zipornexthmi-community-macos-arm64-<version>.zipfrom the latest release. For Docker without a registry, takenexthmi-community-docker-linux-<arch>-<version>.zipand run itsinstall.sh. - Unzip anywhere you can write, and double-click
nexthmi.exeornexthmi.command, or run./nexthmion Linux. A terminal opens and prints the URL to visit. - Open that URL and set the device-admin password. The form asks for the
one-time setup code the terminal prints next to the URL (with Docker:
docker logs nexthmi). The password gates the whole installation — the dashboard, and every project's runtime and editor. Then Start the seeded example project and open its runtime or its editor. You have something to click before a PLC is connected.
These builds are unsigned, so the OS asks once — Gatekeeper on macOS,
SmartScreen on Windows. The
one-time steps are two
lines each. The zip also carries the full guide as an offline HTML site in
docs/ beside the executable.
A new project carries no accounts of its own beyond the anonymous guest, and
nothing ships with a default credential. Add real users when you want them,
from the editor's Users area.
Docker — Linux, servers and anything with a container runtime
Same runtime, same project folder, same seeded example. No registry access? Take the offline installer zip from step 1 instead.
docker run -d --name nexthmi -p 8000:8000 -p 8443:8443 \
  -v nexthmi-data:/data ghcr.io/mpnvdlee/next-hmi:latest
Open http://localhost:8000 and continue at step 3 above. The image is
multi-arch (linux/amd64 + linux/arm64); swap :latest for a version tag
such as :1.0.0 to pin a release.
Both ports are published on purpose: turning on HTTPS in Settings moves the app
to 8443 and leaves 8000 redirecting there. Map them one-to-one.
With compose instead — docker-compose.yml at the repo root binds
./project-data to /data:
docker compose up -d
Build from source — for development
Requirements: Python 3.14 (>=3.14.2, <3.15) and Node 22+.
git clone https://github.com/mpnvdlee/next-hmi.git
cd next-hmi

python3 -m venv .venv && source .venv/bin/activate
pip install -r backend/requirements.txt
cd frontend && npm install && cd ..

python start-dev.py       # app on :8000 (Vite with HMR), API on :8001
Stop with Ctrl-C, or python start-dev.py --stop to free :8000/:8001 from
another shell. Tests and linters:
pytest backend/tests, ruff check backend, and npm test / npm run lint /
npm run build from frontend/.
Full install reference — runtime home, HTTPS, environment variables, upgrades:
docs/user/install.md.
Want to hear when a new version ships? Subscribe to release announcements — or just watch this repository.
What it looks like
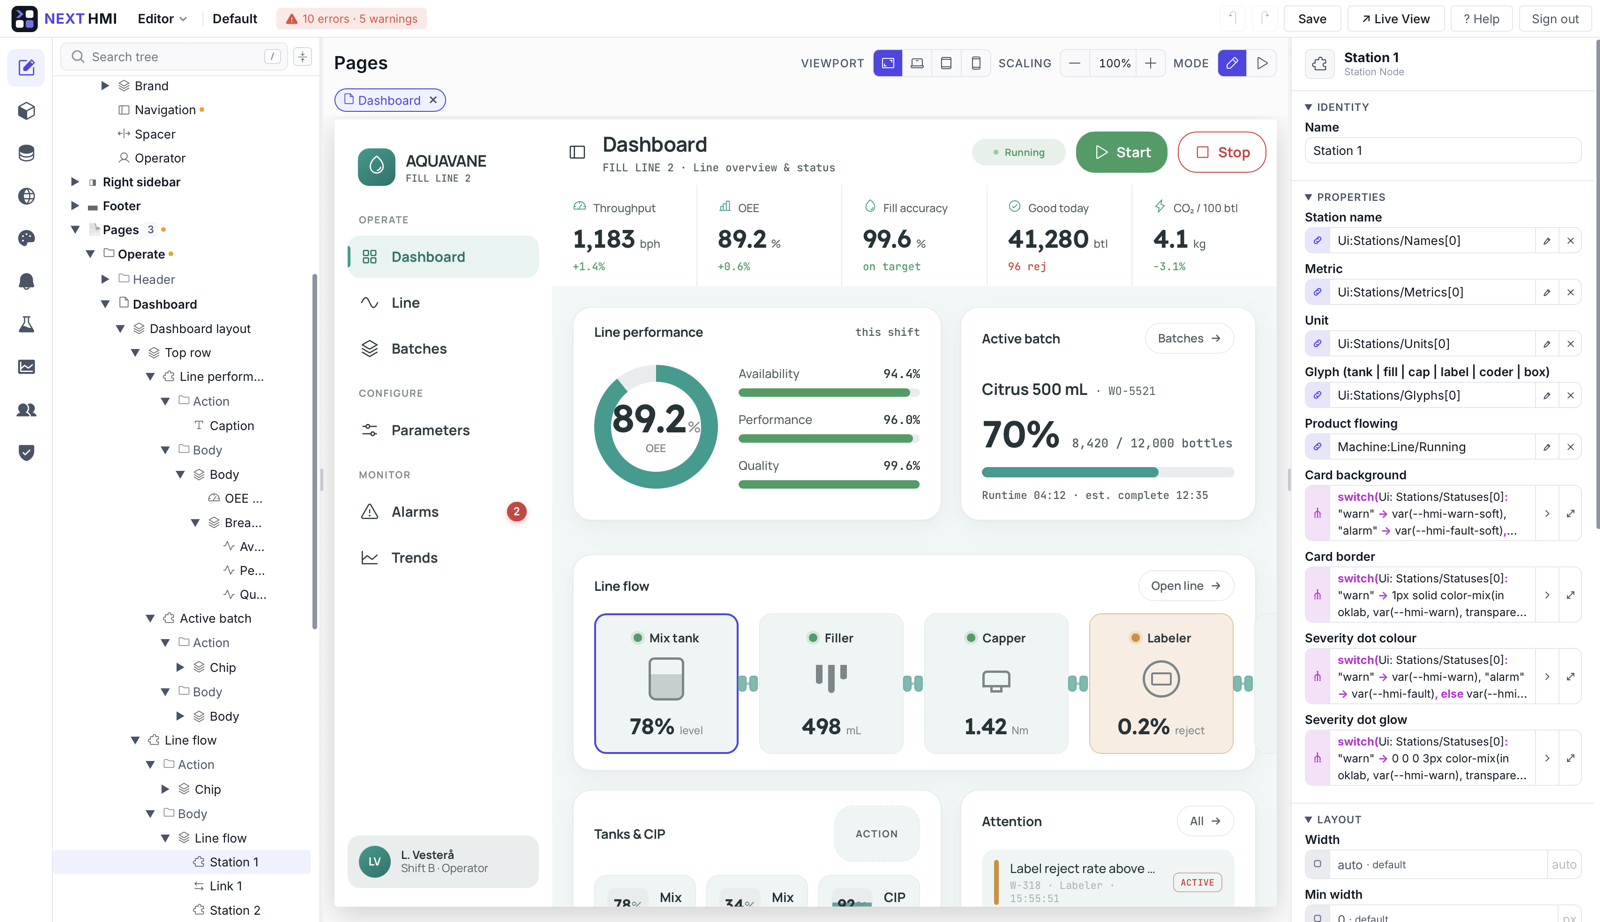
One project — a bottling line — from the screens an operator touches back to the editor that builds them. Click any shot for full size.
 One page, every screen — laptop, panel PC, tablet and phone off the same layout. No second project for mobile. |
 Themeable to the token — every built-in widget reads its colour, radius and spacing from theme tokens. Swap the theme, not the pages. |
 Widget catalogue — built-ins, your own custom widgets and reusable components, searchable in one picker. |
 Alarm authoring — the popup and detail dialog preview live beside the definition driving them. |
 Project manager — many projects per server, each a folder you can export, transfer to another box or pull from a peer. |
 Variable picker — browse the live node tree, filtered to the types the field accepts, wherever a binding is asked for. |
The longer walkthrough — the editor, the property panel and its 27 sources, the OPC-UA wizard, recipes, translations and theming — is at next-hmi.com/tour.
What you get
- In-browser editor — pages, datasources, alarms, translations and users at
/editor/<project>/, with a live preview. No engineering workstation, no dongle. - OPC-UA out of the box — an
asyncuaclient pool subscribes, writes and browses, viewport-aware so the tags on screen update first. - Git-native projects — every artifact is JSON or CSV on disk, so your change control already works and a project moves as a folder or a zip.
- Property sources — 27 composable sources (
$var,$if,$switch,$loc,$viewport, …) that nest, so no property needs a script. - Custom widgets — drop a
.tsxintocustom-widgets/and it hot-compiles. No Node toolchain, no rebuild of the core. - AI-driven engineering — a built-in MCP server exposing 30+ read/write tools, with dry-run diffs guarding every destructive change.
- Responsive by project — one project branches layout by viewport class, so the maintenance engineer's phone is not a second project to keep in step.
One binding language covers every property on every widget:
// colour the gauge from the live motor temperature
"color": {
  "$if": {
    "cond": { "$compare": [ { "$var": "PLC1:motor1.temp" }, ">", 120 ] },
    "then": "#e5484d",
    "else": "#2563eb"
  }
},
"label": { "$loc": "MotorSpeed" },
"value": { "$var": "PLC1:motor1.speed" }
Built on FastAPI · React · OPC-UA · asyncua · Python 3.14 · Node 22+.
Documentation
- User guide (
docs/user/) — building dashboards, connecting OPC-UA, alarms, theming. Also shipped behind the editor's Help button. - Contributor reference (
docs/dev/) — architecture, REST and WebSocket protocols, the custom-widget SDK, theming tokens, and the MCP server.
Contributing
Fork, branch, keep the diff focused and tested, then git commit -s — the
sign-off is how you accept the CLA, and it is the only step. Open a pull request
describing the why. Details in CONTRIBUTING.md;
participation is governed by the
Code of Conduct. Bugs and ideas belong in a
GitHub issue.
Security
NEXT HMI writes to PLCs and is meant to run on a trusted OT network behind a VPN, never exposed to the public Internet — read Network placement and threat model before putting it on any network. Report vulnerabilities privately via SECURITY.md; never open a public issue for one.
Licence
AGPL-3.0-or-later across the whole repository — no dual-licensed core, no
per-file carve-outs, no licence check in the build. Run it at any scale,
commercially, for as many operators and tags as the plant has.
The project content you author — pages, themes, translations, datasources, custom widgets — is your own work and is not covered by the copyleft; that is written down in LICENSE-EXCEPTION.md rather than left to interpretation. Hand a build to someone outside your organisation and the AGPL asks you to offer them the corresponding source; a commercial licence is the alternative to doing that. A separate proprietary enterprise build adds an audit trail for regulated plants — see next-hmi.com/licensing.