
kostas2370/Video-Creator
kostas2370/Video-Creator has 28 GitHub stars and 4 forks. GitHot measured 0 stars in 24 hours, 0 in 7 days, and 0 in 15 days. Last checked 2026-11-14 02:42 UTC. Last push 2026-11-02.
What you can do
- AI-assisted videos: draft a storyboard, review dialogue and visual prompts, then generate images, clips, and narration with your chosen providers.
- Long video → Shorts: find transcript-based highlights in uploaded videos or YouTube interviews, podcasts, and talks, then trim, frame, caption, and export portrait clips.
- Projects from your own media: upload images, video, and audio, or reuse items from your media library.
- Scene-by-scene edits: rewrite dialogue, replace visuals, insert and reorder scenes, adjust timing, and preview the result before exporting.
Measured star growth
- in 24h
- 0
- in 7 days
- 0
- in 15 days
- 0
- in 1 month
- Collecting history
Net star changes over overlapping periods, not daily totals. Missing measurements are left blank. Stars measure attention, not software quality.
About
This project is to automate the video creation.
ProductivityREADME.md
OriginalViddie
Turn an idea into an editable video.
Viddie is a self-hosted video creation app. Start with an AI-generated storyboard or build a project from your own media, edit each scene, and export a finished video. The workflow brings scripts, visuals, narration, captions, music, and publishing into one place.
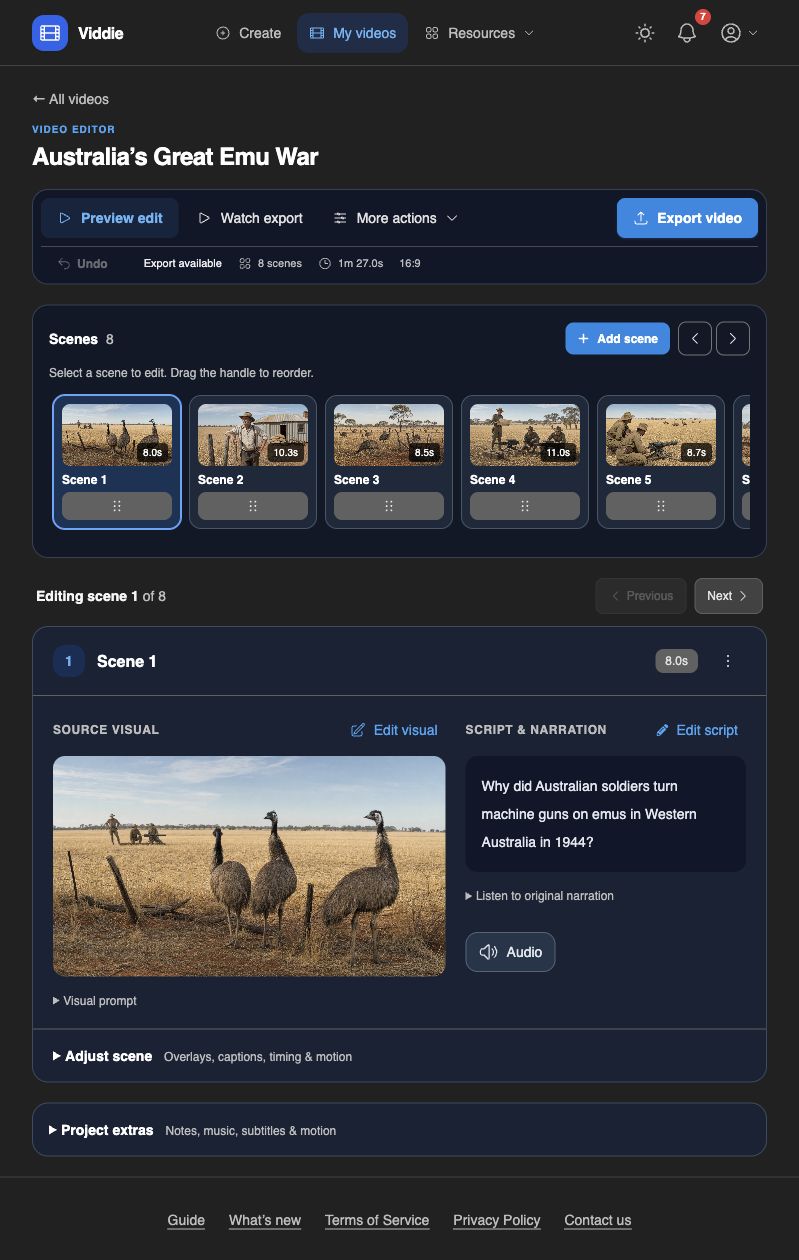
Explore the dark-theme screenshot gallery for more of the app.
What you can make
- AI-assisted videos: draft a storyboard, review dialogue and visual prompts, then generate images, clips, and narration with your chosen providers.
- Long video → Shorts: find transcript-based highlights in uploaded videos or YouTube interviews, podcasts, and talks, then trim, frame, caption, and export portrait clips.
- Projects from your own media: upload images, video, and audio, or reuse items from your media library.
- Scene-by-scene edits: rewrite dialogue, replace visuals, insert and reorder scenes, adjust timing, and preview the result before exporting.
- Finished productions: add image motion, transitions, captions, overlays, background music, intro and outro clips, and an optional SadTalker presenter.
- Ready-to-share exports: render landscape, portrait, or square videos, download subtitles, create covers, and prepare titles, descriptions, and tags.
- Connected publishing: upload exports to YouTube, TikTok, or Instagram professional accounts after configuring the platform integrations.
Save generation templates and reusable assets to speed up your next project. AI video and series creation forms also recover unfinished work automatically in the same browser and account. Reopen the page to return to your step, prompts, settings, character profiles, completed AI proposals and selected reference files. Unsaved series setup opens again from Series; saved-series edits recover in their own workspace. Cancel keeps the draft, while Start over discards it after confirmation. Successfully saving a series clears its browser draft.
Character image requests resume checking their existing progress. A video that already has a queued storyboard shows Open saved project, so returning to the form does not start another paid request. Draft recovery does not sync between browsers or devices and depends on browser storage. If an uploaded reference cannot be recovered, reattach or explicitly remove it before generating.
Use Delete draft project on AI creation or storyboard review to remove a saved draft after confirmation. Your creation settings stay in this browser so you can draft again. Draft projects can also be deleted from My videos. Active generation and exports must finish before deletion; reusable library media and usage history are preserved. Start over only discards the browser draft and keeps saved projects.
Accounts can use shared service credentials or encrypted personal provider keys. AI generation requires access to the selected providers and may incur API charges. AI creation estimates scenario costs before drafting. Storyboard review includes the scenario already drafted alongside planned media costs, and scene generation controls show estimates before paid requests. Usage shows costs from recorded requests; Project extras → Generation costs compares these with the project's original estimate. Unknown prices remain unavailable. See cost coverage and rate configuration.
For lower-cost new OpenAI images and starting frames, choose Generation mode → Economy in creation review, storyboard review, or project settings. This optional mode trades image detail for cost; Standard remains the default. Saved media is kept, and animation and narration prices are unchanged.
Quick start with Docker
Install Docker with Docker Compose. Run these commands from the repository root:
cp backend/.env_example backend/.env
Edit backend/.env and add credentials for the providers you want to use. For an
OpenAI-based workflow, set OPEN_API_KEY (the variable is named exactly this).
Leave ENV blank for local development.
cd backend
docker compose up --build
Open localhost:3000 when the services are ready.
| Service | Local address |
|---|---|
| App | localhost:3000 |
| API | localhost:3000/api/ |
| Django admin | localhost:3000/admin/ |
| Interactive API documentation | localhost:3000/swagger/ |
| ReDoc | localhost:3000/redoc/ |
The stack starts the React frontend, Django API, Redis, Celery worker, Celery Beat, and MySQL. Local settings use SQLite by default; MySQL is used with production settings. nginx serves the frontend and media and proxies API requests on the same origin.
The API applies migrations, loads the voice catalogue, and prepares bundled media
on startup. The worker downloads SadTalker and GFPGAN weights before accepting jobs.
The first startup can take several minutes; downloaded weights and generated media
are retained under the mounted backend/ directory.
Create your local account
Sign up through the app and follow the verification link printed in the API logs (local email is written to the console). To create an administrator instead, open another terminal and run:
cd backend
docker compose exec video_creator python manage.py createsuperuser
An administrator also needs email verification to sign in through the app. For a
local account, replace YOUR_USERNAME below with the username you just created:
docker compose exec video_creator python manage.py shell -c "from apps.usermanagement.models import User; User.objects.filter(username='YOUR_USERNAME').update(is_verified=True)"
Use localhost consistently when opening the frontend and API so authentication
cookies stay on the same site.
Create your first video
- Choose a starting point. AI creation uses Idea → Look & sound → Review: enter a prompt, choose visuals/voice and frame, then review before drafting. Optional providers, presenter and advanced settings stay folded away. Back preserves your choices. You can also start a manual project with your own media.
- Review the storyboard. Edit the dialogue and visual prompts before generating media. For AI visuals, refine each shot's framing, camera direction, subject action, and target duration. You can save a draft and return to it from My videos.
- Generate or add media. Create visuals and narration, upload replacements, or select existing assets. Optional references and continuity guidance help keep generated scenes visually consistent.
- Refine the edit. Reorder scenes, adjust audio and pauses, choose transitions and image motion, and add captions or overlays. Preview the timeline as you work.
- Export and share. Choose Draft, Standard, or High export quality and 24 or 30 fps in the render dialog. Render the video, create a cover, and edit its metadata. Download the result or use Publish with a configured destination account.
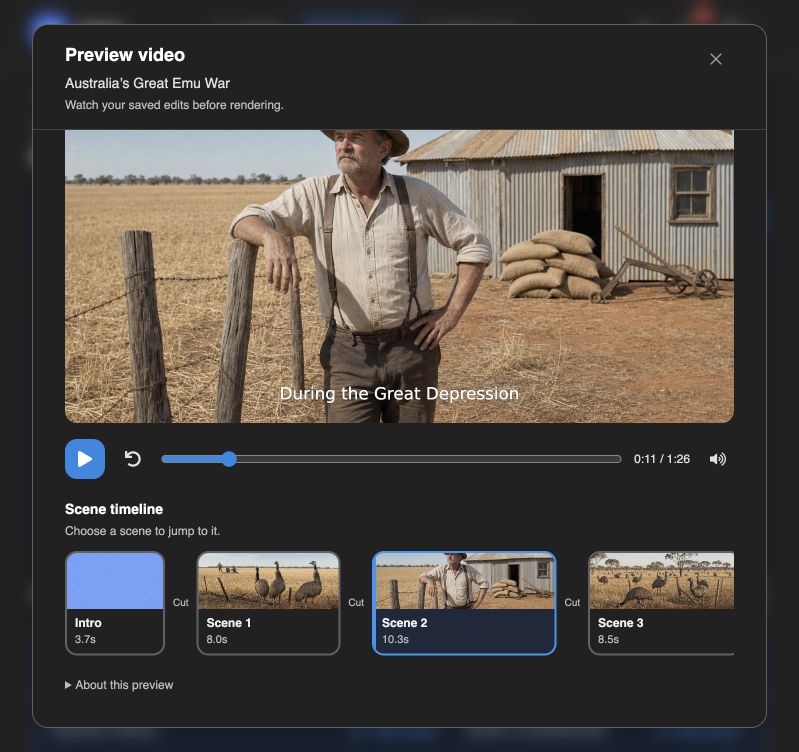
Export choices are remembered per project. Standard at 24 fps matches previous exports. Draft favors faster encoding and more compression; High preserves more source detail with longer encoding and usually larger files. Frame rate applies to the full export, including motion and transitions. These settings keep your project dimensions and do not regenerate or improve the source media.
Removed scenes can be restored from Project extras → Recently deleted for seven days. Reusable scene assets remain in the media library after their project is deleted; assets still used by a scene cannot be deleted from the library.
Animate photo scenes
Open a scene's Animation control to preview Playful, Dramatic, Calm, or Explainer. Presets combine camera movement with entrances for text overlays; Playful, Dramatic, and Calm also offer optional decorative particles. Adjust the intensity, save, and render again to include the animation in the downloaded video. Use Text & logos to add titles, labels, or an arrow and set when they appear. Watermarks stay static. The sample label in the animation picker is for preview only.
Under Project extras → Photo animations, choose Animate all photos to apply a preset across existing image scenes. Video clips keep their appearance. Choose Camera only for individual zoom/pan controls (or varied Auto movement when applying to all photos). Existing projects keep their current appearance until a preset is saved. These effects reuse the existing photos and do not request AI video generation. Moving separate character/object cutouts is not included in this version.
Plan visual storytelling from the script
Enable AI visual planning in the advanced settings when creating an AI video. The storyboard request then suggests varied framing, each shot's role in the story (such as a hook, comparison, reveal, or payoff), what the viewer should notice, a photo animation, and up to two short emphasis labels per shot. Review or edit these choices before pressing Proceed. Camera movement for generated video clips stays with the visual provider; photo animation presets apply to images.
Label timing is an approximate percentage of each finished scene. After media generation, the app converts those percentages to editable seconds using the actual scene duration. These labels are not synchronized to individual spoken words. Labels, animation, and timing can be adjusted in the scene editor; resuming generation preserves your edits, including labels you removed. Existing drafts without visual plans still work. Planning uses the existing storyboard request and does not add AI video generation requests.
When updating an already running installation, apply the database migrations and restart the API and Celery workers as well as rebuilding the frontend. The API must load the new scene fields before animation settings can be saved.
Provider configuration
Both Docker and manual installations read backend/.env.
The environment template lists available settings. Blank
values generally use application defaults; credentials are required for whichever
providers you select.
YouTube clipping projects first check for suitable captions. When captions cannot
be used, audio transcription defaults to OpenAI (whisper-1) and requires a service
or personal API key. See transcription setup for the optional local
Whisper service.
| Purpose | Service credentials |
|---|---|
| OpenAI scripts, images, speech, and Sora | OPEN_API_KEY |
| Anthropic scripts | ANTHROPIC_API_KEY |
| Gemini scripts and video | GEMINI_API_KEY |
| ElevenLabs speech | XI_API_KEY |
| 60dB speech | SIXTYDB_API_KEY |
| Google image search | API_KEY and SEARCH_ENGINE_ID |
| Kling through fal.ai | FAL_KEY |
| Runway video | RUNWAY_API_KEY |
The app's API keys page manages personal credentials and custom voice, image, and video providers. Personal keys are encrypted in storage and masked in API responses. When service keys are disabled, an empty personal key does not fall back to the server's credential.
The initial catalogue includes OpenAI voices. To import additional voices after
setting their service credentials, run the relevant command from backend/:
docker compose exec video_creator python manage.py setup_elevenlabs
docker compose exec video_creator python manage.py setup_60db
Text and image model settings include DEFAULT_GPT_MODEL, MAX_TOKENS,
REASONING_TOKEN_ALLOWANCE, IMAGE_MODEL, IMAGE_QUALITY, and IMAGE_SIZE.
Scene images automatically follow the project frame: GPT Image 2 generates
864 × 1536 for portrait (9:16), 1536 × 864 for landscape (16:9), and 1024 × 1024
for square projects. Reference-image edits and scene regeneration use the same
sizing. Older GPT Image models use their supported 1024 × 1536 portrait and
1536 × 1024 landscape presets, so the renderer may still crop those images.
IMAGE_SIZE remains the fallback for standalone image requests, including covers.
Choose image quality and fallback size values supported by the configured model.
Existing scene images are retained until you regenerate them; restart the general
worker to apply the new sizing to newly generated scenes.
See the guides for AI video providers, visual continuity, and AI usage tracking.
Local development
Frontend with hot reload
With the Docker backend running, stop the container using port 3000:
cd backend
docker compose stop frontend
In another terminal, from the repository root:
cd frontend
npm ci
npm start
Node.js 22.12 or later is required. Vite serves the app on port 3000 and proxies backend requests to port 8000. See the frontend README for build and test commands.
Backend without Docker
Use Python 3.11, Redis, and FFmpeg with ffprobe and the subtitles filter
(libass). Install a subtitle font such as DejaVu Sans. On Debian or Ubuntu, Python
dependencies also require default-libmysqlclient-dev and pkg-config, along with
the system libraries listed in the Dockerfile.
Create backend/.env from the example if you have not already done so, then set:
CELERY_BROKER_URL=redis://localhost:6379/0
From the repository root, create an environment and install dependencies using the same CPU-only PyTorch versions as Docker and CI:
python3.11 -m venv .venv
source .venv/bin/activate
cd backend
python -m pip install --upgrade pip
pip install torch==2.14.1 torchvision==0.29.1 --index-url https://download.pytorch.org/whl/cpu
pip install -r requirements/build.txt
PIP_CONSTRAINT=requirements/constraints.txt pip install --no-build-isolation -r requirements/requirements.txt
python manage.py migrate
python manage.py loaddata fixtures/fixtures.json
python manage.py setup_media
python manage.py createsuperuser
uvicorn video_creator.asgi:application --host 0.0.0.0 --port 8000 --lifespan off
Verify the local account as described above, omitting the Docker command prefix. If you plan to use a SadTalker presenter, download its model weights first:
python manage.py setup_checkpoints
With Redis running, start each of the following in a separate terminal, using the
same virtual environment and backend/ working directory:
celery -A video_creator worker --loglevel=info --pool=solo -Q celery -n general@%h
celery -A video_creator worker --loglevel=info --pool=solo -Q renders -n renders@%h
celery -A video_creator beat --loglevel=info
The worker handles generation and rendering. Beat runs scheduled maintenance,
including cleanup of expired deleted scenes. Start the frontend separately with
npm ci and npm start from frontend/.
Deployment and publishing
The quick start is a local development configuration. For a deployment, set
ENV=prod, a unique SECRET_KEY, explicit ALLOWED_HOSTS, FRONTEND_URL, SMTP
settings, and MySQL credentials. Serve the app over HTTPS; production authentication
uses secure cookies.
Set a persistent FIELD_ENCRYPTION_KEY before storing user credentials and back it
up securely. If unset, it is derived from SECRET_KEY; changing that secret then
makes existing provider keys unreadable. Preserve the database, media storage, and
private publishing snapshots across deployments.
Set the database port explicitly for your installation. The supplied MySQL container
listens on port 3306, which is also the production default. Host connections use
port 3307 through the 3307:3306 mapping. For an API container
connecting to the Compose database, use MYSQL_HOST=db and MYSQL_PORT=3306.
Review database persistence and exposed ports before deploying the Compose stack.
Creator publishing requires registered developer applications and platform-specific
configuration. The publishing guide covers credentials,
redirect URLs, account requirements, and private export snapshots. It also explains
local HTTPS testing with scripts/local-tunnel.py.
When updating an installation, apply migrations, restart the API, worker, and Beat, and rebuild the frontend. Back up persistent data before upgrading.
Troubleshooting
- Generation stays queued: check that Redis and the Celery worker are running. On the first Docker startup, the worker must finish downloading model weights.
- App login fails for an administrator: verify the account and use
localhostconsistently. Admin access alone does not verify an account for frontend login. - A provider request fails: check the selected credential mode, model access, and provider balance. Review provider status before retrying paid jobs.
- Captions fail to render: confirm FFmpeg includes libass and the configured
SUBTITLE_FONTis installed (the default isDejaVu Sans). - Frontend changes are missing in Docker: rebuild the frontend image and recreate its container, or use Vite for development.
API errors include an X-Request-ID reference. To find matching API and worker logs,
run this from the repository root, replacing REFERENCE with that value:
docker compose -f backend/docker-compose.yml logs video_creator celery | rg 'REFERENCE'
Application logs include request and task identifiers to help trace background failures. Keep logs private because provider errors may contain sensitive details.
Documentation and contributing
| Guide | Contents |
|---|---|
| Contributing | Development conventions, checks, tests, and pull requests |
| Architecture | API and worker responsibilities, generation, and rendering |
| Rendering | Timing, composition, export quality, scene caching, and failure recovery |
| Frontend | Development server, builds, and frontend checks |
| AI video providers | Provider setup, references, timing, and limitations |
| Prompting | Storyboard and visual prompt assembly, with complete GPT request examples |
| Visual continuity | References and consistency across generated scenes |
| Long video → Shorts | Uploads, highlight suggestions, clip editing, exports, and recovery |
| AI usage | Usage records and cost estimates |
| Creator publishing | Social platform integrations and deployment setup |
| Performance checks | Measuring application performance |
| Dependency security | Dependency audit procedure |
The repository contains the Django backend in backend/, the React frontend in
frontend/, and supporting guides in docs/. Third-party code lives in
backend/vendor/.
To report a bug, open an issue with reproduction steps and relevant error references. For security-sensitive reports, email [email protected]. Contributors follow the Code of Conduct.
License
Viddie is licensed under AGPL-3.0. Vendored components retain their respective licenses.
Updating scene generation and export recovery
Apply migration 0046_scene_identity_and_render_error before starting updated services.
Script entries now keep separate scene identities even when dialogue repeats. Existing
scene rows acquire identities on the next generation/resume; completed media is reused.
Docker runs two workers: celery handles generation, scene edits and other background
jobs on the celery queue; celery-render handles video exports on renders.
The render worker downloads missing presenter weights. Rebuild the backend images and
restart the API, both workers and Beat together so routing and consumers change together.
For manual installations, run both worker commands above. Older workers that consume
only the default queue cannot process the new export queue.
Failed exports show a saved message and reference in the editor, with Retry export. The reference can be searched in worker logs. Errors do not expose provider responses, file paths or tracebacks. Ordinary exports retain the one-per-day limit; failed export retries have a separate limit of three per hour. Generation failures retain the existing resume flow. The existing timeout cleanup also marks stalled exports as retryable.
Series mode
Choose Create a series from the creation tools. Save a series name, premise, recurring cast/world, visual style, narrator, frame, captions and optional intro/outro. Series setup uses Idea → Cast → Finish, with style presets and optional advanced settings. Choose General, Animated character story or Serial drama. Before drafting a story, use Create characters with AI to propose profiles from your premise and style, then review and accept the cast. For each character, generate an image with AI or upload one and choose Use this look. Save the setup after approving the cast. You can also use Write description with AI on a single character to draft its appearance, wardrobe, personality and relationships from a short idea. Review and apply that draft without replacing the character's identity or image. Story formats require characters with approved images before drafting an episode. You can also upload one shared PNG, JPEG or WebP style/world reference (up to 10 MB). Choose a supported built-in AI visual provider; a reference requires a provider with reference-image support. References guide appearance, but do not promise identical characters across generations.
Character images run through the configured OpenAI image model in the general worker; uploaded references do not make an AI request. Each episode gets its own copied cast sheet. When using a video provider, each shot first generates a starting image from that sheet through OpenAI and then animates it, using image and video generation credits. Later cast edits do not change existing episode references. See visual continuity for the full workflow.
Generated images, character references, shared references, covers and scene logos are saved in the media library. If video generation fails after the starting image is created, the scene keeps that image for retry. Character video shots now stop after preparing their starting images. In each scene, review the characters and composition, edit the description and regenerate if needed, or upload a PNG, JPEG or WebP replacement (up to 10 MB). Choose Approve starting image, then Animate approved image to start that shot's paid animation request. Image preparation and animation are separate requests; approving an image makes no AI request. A failed animation offers Retry animation using the approved image. Click the Starting image heading to hide or reopen the review controls; your choice is remembered for each scene in this browser. Existing clips remain until their replacement succeeds. Resume prepares missing images without starting animations. Changed shot guidance or frame settings invalidate image approval and require preparing and reviewing a new image. Restart the API and general worker and rebuild the frontend together when upgrading to this workflow; no new database migration is required.
After upgrading, apply the included migrations, restart the API and workers, and
rebuild the frontend. Run python manage.py archive_reference_images to add older
reference images and project image files to the library; this makes no AI requests.
Use Draft next episode with a new idea. Drafting uses the configured text model and opens a normal video project. Review and edit its storyboard before approving narration and visual generation. Each episode snapshots the saved series setup and copies its reference image, so profile edits apply to future episodes. Finish the current episode's review and media preparation before starting another episode. The workspace links to that active episode even when browsing older episode pages.
The AI also drafts an episode memory of up to 800 characters. Open Episode memory in the series workspace to correct the events, discoveries and ending after editing the story. Once its media is prepared, that memory can guide later episodes. A changed storyboard, dialogue or visual prompt marks its memory Needs review. Use Update memory from current script to draft an update with your existing corrections, then review and save it. You can undo the draft; generating it does not change saved memory. Manual review and save also clears the warning. Stale and unapproved memories are excluded from new drafts. Context considers the latest ten prepared episodes with nonempty memories. This is bounded story context, not guaranteed long-term recall or a check against every earlier episode. Memories remain in the series when an individual video is deleted. Deleting the series removes its setup and memories while preserving the videos in My videos.
If a draft cannot be queued or fails before saving a storyboard, use Retry draft in the series workspace. It reuses the same episode number and saved setup. Once a storyboard exists, open the episode to review or resume it in the editor. Series drafting and retry share the existing generation allowance (two per hour, with the existing superuser exemption). Normal generation, export and provider costs apply.
Series lives in the apps.series Django app and reuses video management for
storyboards, editing and rendering. Run python manage.py migrate and restart the
API and general worker when deploying. The app split preserves the existing series
tables, episode links and permission grants; the /api/series/ routes stay the same.
Existing memories without a recorded script version need one review and save.
Memory-save API requests must include previous_summary and script_hash from the
episode response, alongside summary, so stale edits are rejected.
Explore related projects
n8n-io/n8n
Fair-code workflow automation platform with native AI capabilities. Combine visual building with custom code, self-host or cloud, 400+ integrations.
210,453 starslanggenius/dify
Build Agentic workflows, RAG pipelines, with rich AI model and tool support on one collaborative workspace. Deploy on cloud, VPC, or self-hosted, so teams move from prototype to production without rebuilding the stack.
161,141 starsmicrosoft/PowerToys
Microsoft PowerToys is a collection of utilities that supercharge productivity and customization on Windows
140,970 starsstablyai/orca
Orca lets you run a fleet of coding agents (e.g. Claude Code, Codex) with your own subscription. Available on desktop, mobile and remote runtime.
124,610 stars