
igorls/comfyui-h3-editor
igorls/comfyui-h3-editor has 65 GitHub stars and 9 forks. GitHot measured +24 stars in 24 hours. Last checked 2026-11-16 03:00 UTC. Last push 2026-11-13.
What you can do
- Write shots, not graphs. Describe what happens and what is said. The editor builds the ComfyUI graph, queues it, and shows the clip moving, with sound, while it samples.
- Keep people and places the same. Add their pictures to the cast, up to 8 per member, and write @Name in a shot or drag the member into the text. Give them a voice, or add a narrator who is only a voice.
- Join shots without a visible cut. Extend a clip forward or back, bridge two clips, or merge a join. A new clip carries on from real frames and sound of the clips it joins.
- Edit as in any editor. Trim, split, move, change speed, add transitions, flip between takes, file clips in bins, bring in your own footage and pictures, and export one video.
Measured star growth
- in 24h
- +24
- in 7 days
- Collecting history
- in 15 days
- Collecting history
- in 1 month
- Collecting history
Net star changes over overlapping periods, not daily totals. Missing measurements are left blank. Stars measure attention, not software quality.
About
A timeline video editor for MiniMax H3 inside ComfyUI: write shots, render them on your own GPU, cut picture and sound together, or let an agent make the video.
AIREADME.md
OriginalH3 Editor
A timeline video editor for MiniMax H3, inside ComfyUI. Write your shots, render them on your own GPU, and cut them together, picture and sound.
Project site: watch a cut made with it, shot by shot.
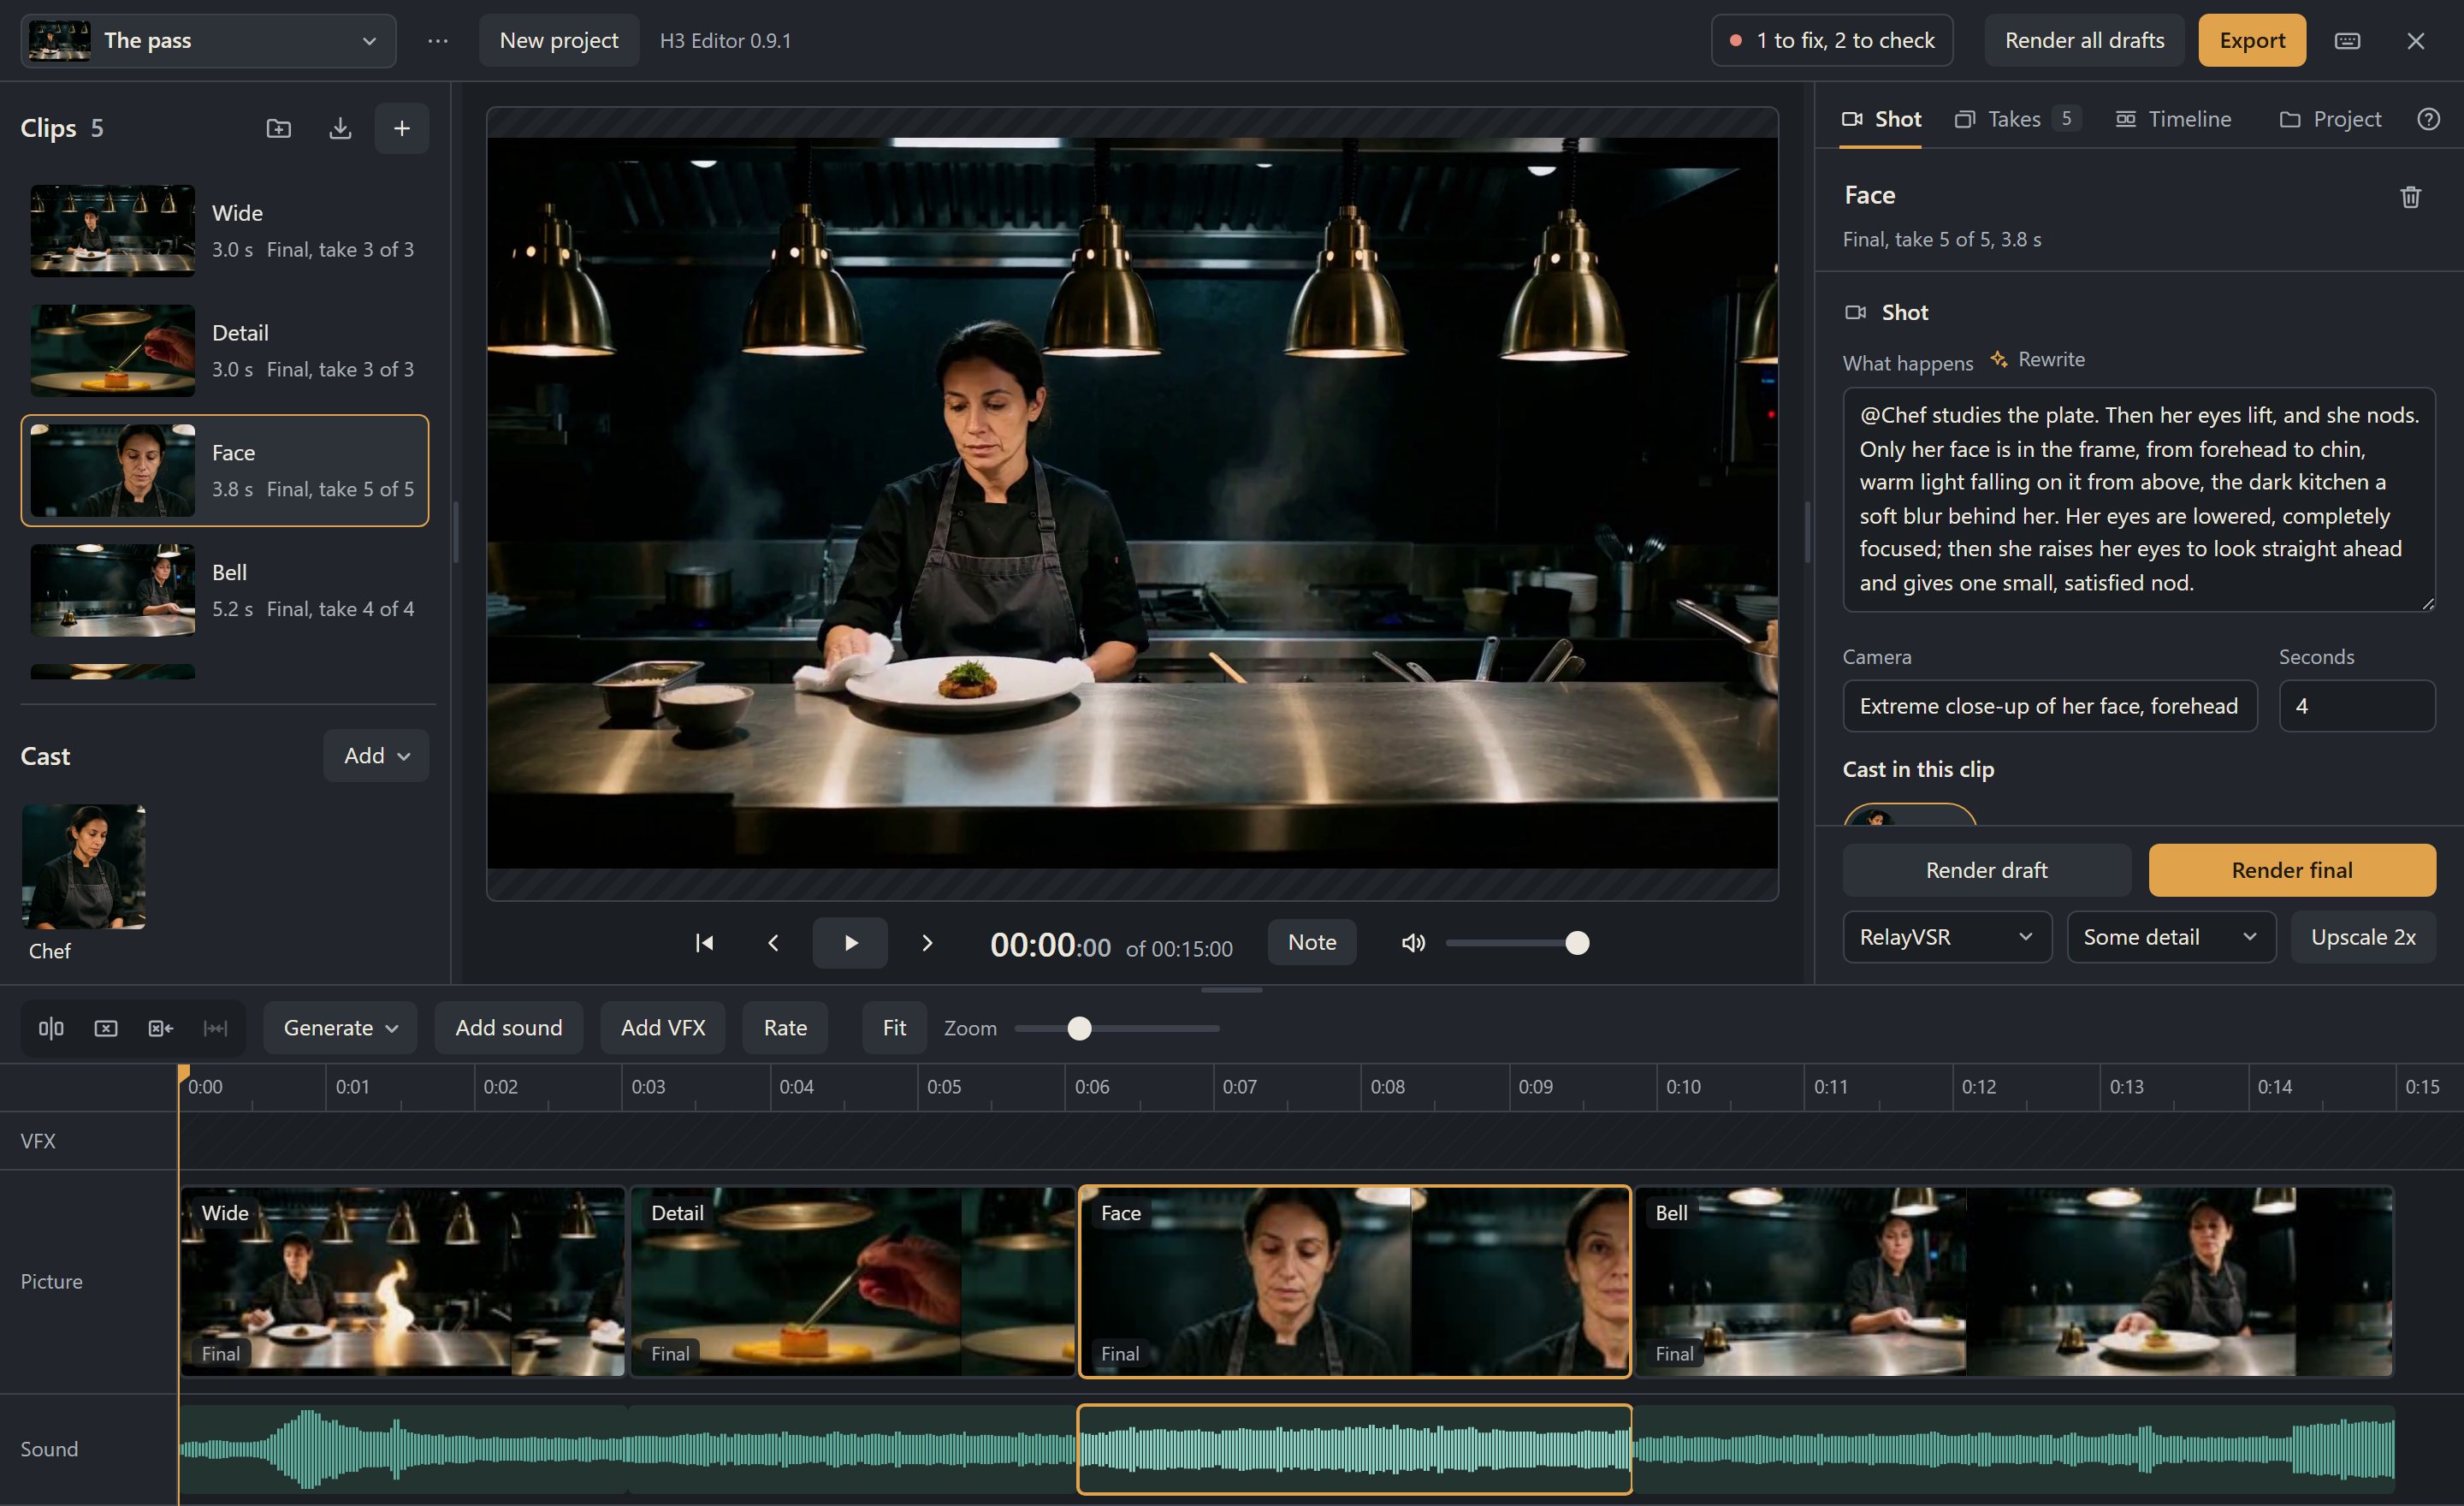
What you can do
- Write shots, not graphs. Describe what happens and what is said. The editor builds the ComfyUI graph, queues it, and shows the clip moving, with sound, while it samples.
- Keep people and places the same. Add their pictures to the cast, up to 8 per member, and write @Name in a shot or drag the member into the text. Give them a voice, or add a narrator who is only a voice.
- Join shots without a visible cut. Extend a clip forward or back, bridge two clips, or merge a join. A new clip carries on from real frames and sound of the clips it joins.
- Edit as in any editor. Trim, split, move, change speed, add transitions, flip between takes, file clips in bins, bring in your own footage and pictures, and export one video.
- Add music and narration. Lay sound files under the cut on lanes of their own, trim them and set their volume. The export mixes them in.
- Try fast, finish large. Drafts are small and quick. Finals are refined at up to 1920 pixels, with a realism LoRA for natural skin.
- Pick the model, per project or per clip. HyperFlow H3 Flash, MiniMax H3, its Turbo LoRA, Singularity, DaSiWa, 10Eros Max and PRISM are built in, and a clip can render on a different one than the rest of the project. Any other H3 checkpoint works too: pick its file, set its steps, sampler and scheduler, and save it as a preset for every project.
- Let a language model write. Describe the video and it writes the shots as clips, or rewrites one clip from what you ask for. It is sent the cast's pictures, and any picture you add, such as a place or a frame of the cut, so a model that can see writes from them. It uses the model you name: a text model run by ComfyUI itself, or any OpenAI-compatible endpoint, Anthropic, Gemini or Ollama.
- Bring your LoRAs. Add LoRAs trained on MiniMax H3 to a project, or to one clip, set each one's strength, and choose whether it runs on every step or only after the first ones have set the framing.
- Generate to a recorded voice. Give a clip a recorded track, such as an approved narration, and its picture is generated to it.
- Let an agent make the video. Everything the editor does is an HTTP call, and an agent skill teaches the whole workflow.
- RefMods, if you use them. With the ComfyUI-MiniMaxH3Mod pack installed, a cast member can carry a RefMod, and the editor can make one from the member's pictures. This is the one optional extra that needs another custom node pack.
Everything else needs no other custom node pack.
Quick start
1. Install
You need a recent ComfyUI with its built-in MiniMax H3 support: 0.43 or newer.
The pack is tested on 0.44. In ComfyUI's custom_nodes folder:
git clone https://github.com/igorls/comfyui-h3-editor
pip install -r comfyui-h3-editor/requirements.txt
On the Windows portable build, run the second step as
..\python_embeded\python.exe -m pip install -r comfyui-h3-editor\requirements.txt.
The requirements bring ffmpeg, for importing and exporting video, and the gguf
reader for HyperFlow's GGUF models.
Restart ComfyUI. H3 Editor appears in the sidebar.
2. Download the models
The pack does not download models. These are the ones a first video needs, about 54 GB:
| File | Folder | Size | Where to get it |
|---|---|---|---|
qwen3vl_32b_minimax_h3_nvfp4_awq.safetensors |
models/text_encoders |
15.7 GB | Comfy-Org/MiniMax-H3, text_encoders/ |
minimax_h3_video_vae_fp16.safetensors |
models/vae |
5.2 GB | Comfy-Org/MiniMax-H3, vae/ |
minimax_h3_audio_vae_fp32.safetensors |
models/vae |
0.6 GB | Comfy-Org/MiniMax-H3, vae/ |
minimax_h3_ref2va_hyperflow_flash_14b-int8_convrot.safetensors |
models/diffusion_models/hyperflow |
16.4 GB | VideoRebirthAI/hyperflow-h3-flash, ref2va_int8_convrot_comfyui/ |
minimax_h3_fl2va_hyperflow_flash_14b-int8_convrot.safetensors |
models/diffusion_models/hyperflow |
16.0 GB | VideoRebirthAI/hyperflow-h3-flash, fl2va_int8_convrot_comfyui/ |
HyperFlow's model page recommends these INT8 files on RTX GPUs with 24 GB or
more. On a smaller GPU, take its GGUF files in their place, from Q8_0 at 15.2 GB
down to Q3_K_M at 7.2 GB, anywhere in models/diffusion_models; see
models and quality.
The text encoder and the video VAE also come in other precisions in the same
repository: qwen3vl_32b_minimax_h3_int8_convrot.safetensors (25 GB) and
qwen3vl_32b_minimax_h3_bf16.safetensors (48 GB), and
minimax_h3_video_vae_int8_convrot.safetensors (2.6 GB). Any one of each is
enough: the editor renders with what it finds, and with more than one installed
you pick in the Project tab.
These are optional, and worth having:
| File | Folder | Size | Where to get it | For |
|---|---|---|---|---|
minimax_h3_latent_upscaler_3d_conv_v1_bf16.safetensors |
models/latent_upscale_models |
0.7 GB | LBH-123-AI/Minimax_h3_latent_Upscaler | Finals at up to 1920 pixels |
MMH3-Realism-V2.safetensors |
models/loras |
71 MB | Civitai model 3041489 | Natural skin in finals |
taeh3.safetensors |
models/vae_approx |
23 MB | OzzyGT/taeh3 | The moving live preview |
Other H3 checkpoints work as well; see models and quality.
3. Make your first video
- Open H3 Editor from the ComfyUI sidebar. It starts you on a first project.
- In the Project tab on the right, choose the format: 16:9, 9:16 or 1:1.
- Press New clip, write what happens in What happens, and press Render draft. The viewer shows the clip taking shape.
- When the draft lands, press Space to play it. Not right? Change the text and render again: each render becomes another take.
- Press Generate, then Extend forward, to carry the shot on, or add another clip.
- Press Render final for the takes you keep, then Export. The video is
saved in ComfyUI's output folder, under
h3take_projects/<project>/exports.
Using the editor
The panel on the right. Select a clip and it shows the clip in tabs: Shot for what happens, the cast, sound and model, Takes for its renders, and Timeline for its speed and transition. The Project tab is always there, with the look, format, model and LoRAs that every clip shares. Esc selects nothing.
Clips and takes. Every render of a clip is a take with its own seed and the
prompt that made it. Run the pointer across a take's picture to look through
it, flip between takes with [ and ], keep a seed to render variations of
one result, or restore a take's prompt. Rendered clips stay on disk: moving,
trimming or splitting them never renders anything again. Render all drafts
renders every clip that has no take yet, the ones that share a model one after
another.
Cast and voices. Add in the Cast panel adds a reference picture or a voice. Choose who is in each clip, and write @Name in What happens to place them, or drag their card into the text. Write @Name in Who speaks to use their voice. A voice can be uploaded, or taken from a clip on the timeline.
Joining shots. Select a clip on the timeline, open Generate and choose Extend forward or Extend back to generate what happens next or before. Bridge to next generates what connects it to the following clip, and Merge with next replaces the join between two clips with a generated crossing. These clips hold 39 real frames and their sound from the clips they join, so the cut does not show. If a clip they join changes, they are marked: render them again. An empty space between two rendered clips shows a plus that generates the bridge.
First and last frames. Give a clip an exact first or last frame by dropping a picture on it, uploading one, or pressing Use playhead frame.
Picture to a track. A clip can hold a recorded sound, and its picture is generated to it. Extend forward carries on with the next part of the same track, so a long talking performance can be built from short shots.
Your own footage. Import brings in a video or a picture, fitted to the project's format. You can trim it, and extend or bridge from it like a render.
Music and narration. Add sound on the timeline lays a sound file under the cut at the playhead, on a lane of its own. Drag it to move it, up or down to change its lane, and drag its ends to trim it; its volume is in the panel on the right. The export mixes it under the clips' own sound.
Notes on frames. Stop on a frame and press N, or Note under the viewer. Pin a spot, drag a box or draw on the picture, and write what should change. With a range marked by I and O, the note covers the range. Notes show on the ruler and in the Project tab, stay on their frame when clips move, and are how you tell an agent exactly what to fix: it reads each note with a picture of its frame.
Checks. The editor measures every rendered cut from its pictures: jump cuts, takes that cut, fade, freeze or go still inside, clips that are soft next to the rest, and extensions that drift from where their shot began. Each finding is marked on the timeline, and the chip at the top counts them and lists them, worst first; click one to go to it.
Right-click. A clip on the timeline or in the Clips panel, a VFX clip, a sound, a cast member and the viewer each have a menu of what can be done to them, such as render, rewrite, extend, split or use the frame as a first frame.
Help in the panel. The ? at the end of the panel's tabs shows the explanations under each setting; with it off, each one is the setting's tip.
The Clips panel. Click a clip to play it on its own, whether or not it is on the timeline; click the timeline to go back to the cut. File clips in bins with the folder button and drag clips onto them. Delete a clip with the trash button in its panel, or with Delete in the Clips panel.
Models and LoRAs. Models and their settings in the Project tab lists every model the project can render with, and adds your own checkpoints. The LoRAs section adds LoRAs for the whole project; a clip's Shot tab has LoRAs for this clip. See models and quality.
Projects. Projects live in h3take_projects in ComfyUI's output folder.
The menu beside the project list renames, duplicates or deletes the open one; a
deleted project is moved to a .trash folder there, never erased. Download
as zip in the same menu packs a project into one file, with every take, only
the takes the cut uses, or no renders, and Open a project zip opens it as a
new project, here or on another machine such as a cloud GPU. Renders run
on the server, so closing the editor never loses one. Every change is a
revision you can go back to, and two editors, or an editor and an agent, can
work on one project at once.
| Key | Does |
|---|---|
| Space | Play or pause |
| Left, Right | Move one frame. Hold Shift for one second |
| Up, Down | Jump to the previous or next edit |
| Home, End | Go to the start or end |
| S | Split at the playhead |
| Esc | Select nothing |
| Tab, Enter | Reach a clip or a sound on the timeline, and select it |
| Delete | On the timeline, remove a clip from it, or close a selected gap. In the Clips panel, delete the clip or bin |
| Shift+Delete | Remove a clip from the timeline and close the space |
| [ , ] | Flip between takes of the selected clip |
| , . | Slip the selected clip: show an earlier or later part of its take without moving it. With Shift, half a second |
| Alt+drag | Slip a clip on the timeline |
| Ctrl+wheel, \ | Zoom at the pointer, fit the whole scene |
| Ctrl+Z, Ctrl+Shift+Z | Undo, redo |
Press ? in the editor for this list.
Going further
- Models and quality: every checkpoint the editor can render with, how finals are refined, and how LoRAs land.
- The nodes: H3 Take and the other nodes, for building your own ComfyUI workflows.
- For agents: a skill that teaches an agent to
plan shots, render, review and export through the editor's HTTP API, with
scripts/h3.py, a client that needs only Python. Copyskills/h3-editorinto an agent's skills folder to install it. The full API is in references/api.md.
Troubleshooting
| You see | Do |
|---|---|
| A model in the Model menu says "not installed" | Its hint names the missing file, and so does the Models dialog. Put it in the folder from the tables above, then reload the editor |
| "ffmpeg is missing" | Install the requirements, step 1 above, and restart ComfyUI |
| "HyperFlow H3 Flash GGUF files need the gguf Python package" | The same |
| Finals come out at 768x1344 or 1344x768 | Add the latent upscaler. The Model hint says so too |
| The live preview is a still | Add taeh3.safetensors |
| ComfyUI runs out of memory | Pick a smaller Final size in the Project tab, try one of HyperFlow's GGUF files, which come in smaller sizes, or render the finals on a Colab GPU with colab/h3_editor.ipynb. So far the editor has been tested on one 96 GB GPU only |
Develop
python -m unittest discover -s tests runs from the repo root. The writer,
LoRA and HyperFlow tests need torch and ComfyUI, with PYTHONPATH set to
ComfyUI's folder, and the GGUF tests need gguf too. They skip without them.
tools/deploy.sh copies the repo into a running container, runs the tests
there, and reloads the pack in place, so models stay loaded. Refresh the browser
afterwards. --restart restarts ComfyUI instead. tools/run_take.py queues a
real take, and tools/compare_takes.py measures how closely a span matches its
source.
Credits and license
GNU General Public License v3.0, in LICENSE. Parts are adapted from ComfyUI-HyperFlow-Flash, ComfyUI-GGUF and ComfyUI-MiniMax-H3-Turbo, and keep their own licenses; NOTICE lists them. Model files come under their own licenses, which this pack's license does not change.