
iMicknl/LoctekMotion_IoT
iMicknl/LoctekMotion_IoT has 1,034 GitHub stars and 101 forks. GitHot measured +1 stars in 24 hours and +2 in 7 days. Last checked 2026-11-11 02:19 UTC. Last push 2026-11-02.
Learn how to connect your Flexispot (LoctekMotion) desk to the internet. This repository contains a collection of scripts to get your started, combined with research and instructions.
What you can do
- Control your desk (up, down, stop) using a cover entity
- Manage 4 presets with button entities
- Monitor desk height with a sensor entity
- Adjust desk height in cm using a number entity (experimental)
Measured star growth
- in 24h
- +1
- in 7 days
- +2
- in 15 days
- Update delayed
- in 1 month
- Update delayed
Net star changes over overlapping periods, not daily totals. Missing measurements are left blank. Stars measure attention, not software quality.
README.md
Original (image source: Windows Central)
[!WARNING] Be careful. Tinkering with electronics can be risky. Use this guide at your own risk.
Turn your LoctekMotion/FlexiSpot desk into a smart desk
When I assembled my FlexiSpot standing desk, I noticed the control panel had an RJ45 cable and a second RJ45 port. This sparked my interest: can I connect my desk to the internet?
Most Flexispot models utilize components from LoctekMotion, a manufacturer specializing in lifting columns for height-adjustable desks. Although LoctekMotion previously advertised a Bluetooth receiver for their control boxes, I haven't been able to obtain one.
This repository will guide you on connecting your desk to Home Assistant and other systems using the serial communication ports (RJ45). Imagine controlling your desk with your voice or receiving notifications when you've been sitting too long. Or, just do it because it's cool 🤓.
Features
- Control your desk (up, down, stop) using a cover entity
- Manage 4 presets with button entities
- Monitor desk height with a sensor entity
- Adjust desk height in cm using a number entity (experimental)
Known issues
- Number entity may overshoot. The desk moves until the height sensor matches the requested height, which may cause overshooting due to reporting delays. Use the desk controller presets for accurate positioning.
- Down does not work or the height looks too low? Your control panel may display inches. Set
unit_of_measurement: "in"andmin_height/max_heightin inches in the package substitutions.
Packages
| Name | Description |
|---|---|
| ESPHome | Control your desk via an ESP32 module connected to Home Assistant. Can be adapted to ESP8266 or other ESP32 variant. |
| ESPHome Pass-through | Control desks which have only one RJ45 port using passthrough configuration via an ESP32 module connected to Home Assistant. |
For v1 packages (Arduino, Raspberry Pi, older ESPHome packages, and different pin-outs), visit the archive directory. For alternative solutions, see similar projects.
Getting started
Please follow the ESPHome documentation for the basics of ESPHome. You can use the provided office-desk-esp32.yaml as a boilerplate for your own implementation. This implementation has been created for the ESP32 nodemcu, but can easily be adopted for other platforms and boards.
Pin-out
| RJ45 pin (T-568B) | Name | ESP32 |
|---|---|---|
| 8 🟫 | +5V (VDD) | VIN |
| 7 ⬜🟫 | GND | GND |
| 6 🟩 | TX | TX2 (GPIO17) |
| 5 ⬜🟦 | RX | RX2 (GPIO16) |
| 4 🟦 | PIN 20 | D23 (GPIO23) |
| 3 ⬜🟩 | (unknown) | |
| 2 🟧 | SWIM | |
| 1 ⬜🟧 | RES |
You can use other GPIO pins (e.g. on an ESP32-C3) by changing the tx_pin, rx_pin and screen_pin substitutions in the package.
This pin-out should be compatible with all control panels featuring an RJ45 port for serial communication. If it doesn't work for your setup, consider trying an alternative pin-out from the archive.
Use the provided pin-out to connect your ESP32 to the desk controller's RJ45 port using an ethernet cable. If your control box has two RJ45 jacks for the control panel (labelled HS), plug the ESP32 into the spare one and leave the control panel connected to the other. Do not plug into a motor (M) port. If you're not experienced with electronics and soldering, consider using an RJ45 Adapter Board from sites like Aliexpress, connected with Dupont cables to your ESP32.

Pass-Through Configuations
If your desk controller lacks an extra RJ45 port, you'll need a pass-through solution. This requires connecting the RJ45 of the keypad to the pins below.
| KeyPad RJ45 pin | Name | Connection |
|---|---|---|
| 8 | +5V (VDD) | VIN (Split) |
| 7 | GND | GND (Split) |
| 6 | TX | RX0 (GPIO3) |
| 5 | RX | RX2 (Split) |
| 4 | PIN 20 | (Not Required) |
| 3 | (unknown) | (Not Required) |
| 2 | SWIM | (Pass-Through) |
| 1 | RES | (Pass-Through) |
The pins marked 'split' are to be connected to the ESP32 pin, the desk controller and to the keypad. The pins marked pass-through are to be connected directly between the controller and the keypad.
Note: the current implementation does not utilize PIN20 however, this could be utilized to sense if the screen is on if desired.

Optional: Custom Enclosure for a Clean Setup
To keep your setup clean and well-protected, a custom enclosure for the ESP32 DevKit with Ethernet breakout is available. It ensures secure housing, optimal cable management, and a stable wired connection.
Features ✅:
- Secure housing – Protects the ESP32 and Ethernet breakout
- Optimized cable management – Keeps wiring neat and organized
- Ventilation slots – Prevents overheating
- Easy mounting – Designed for a hassle-free installation
- Compact design – Fits seamlessly into any setup

🔗 Download the enclosure model at makerworld.com.
Optional: Enclosure for a Pass-Through Setup
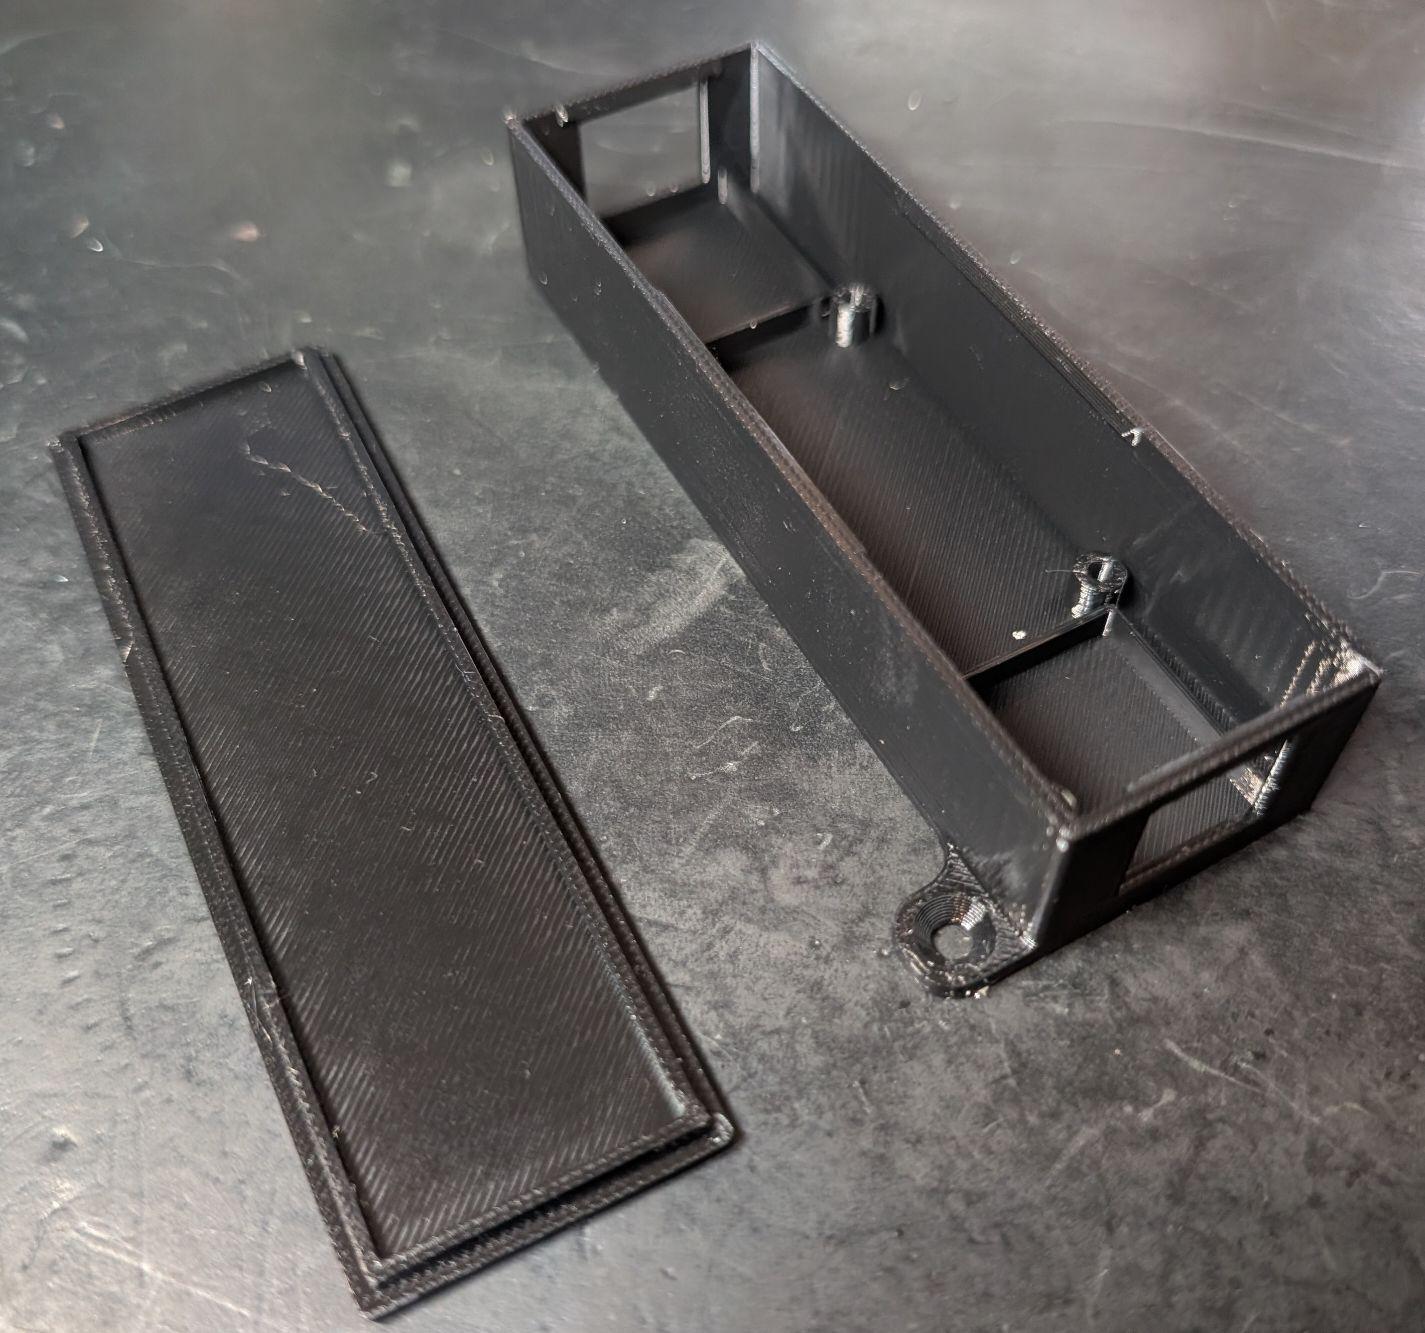
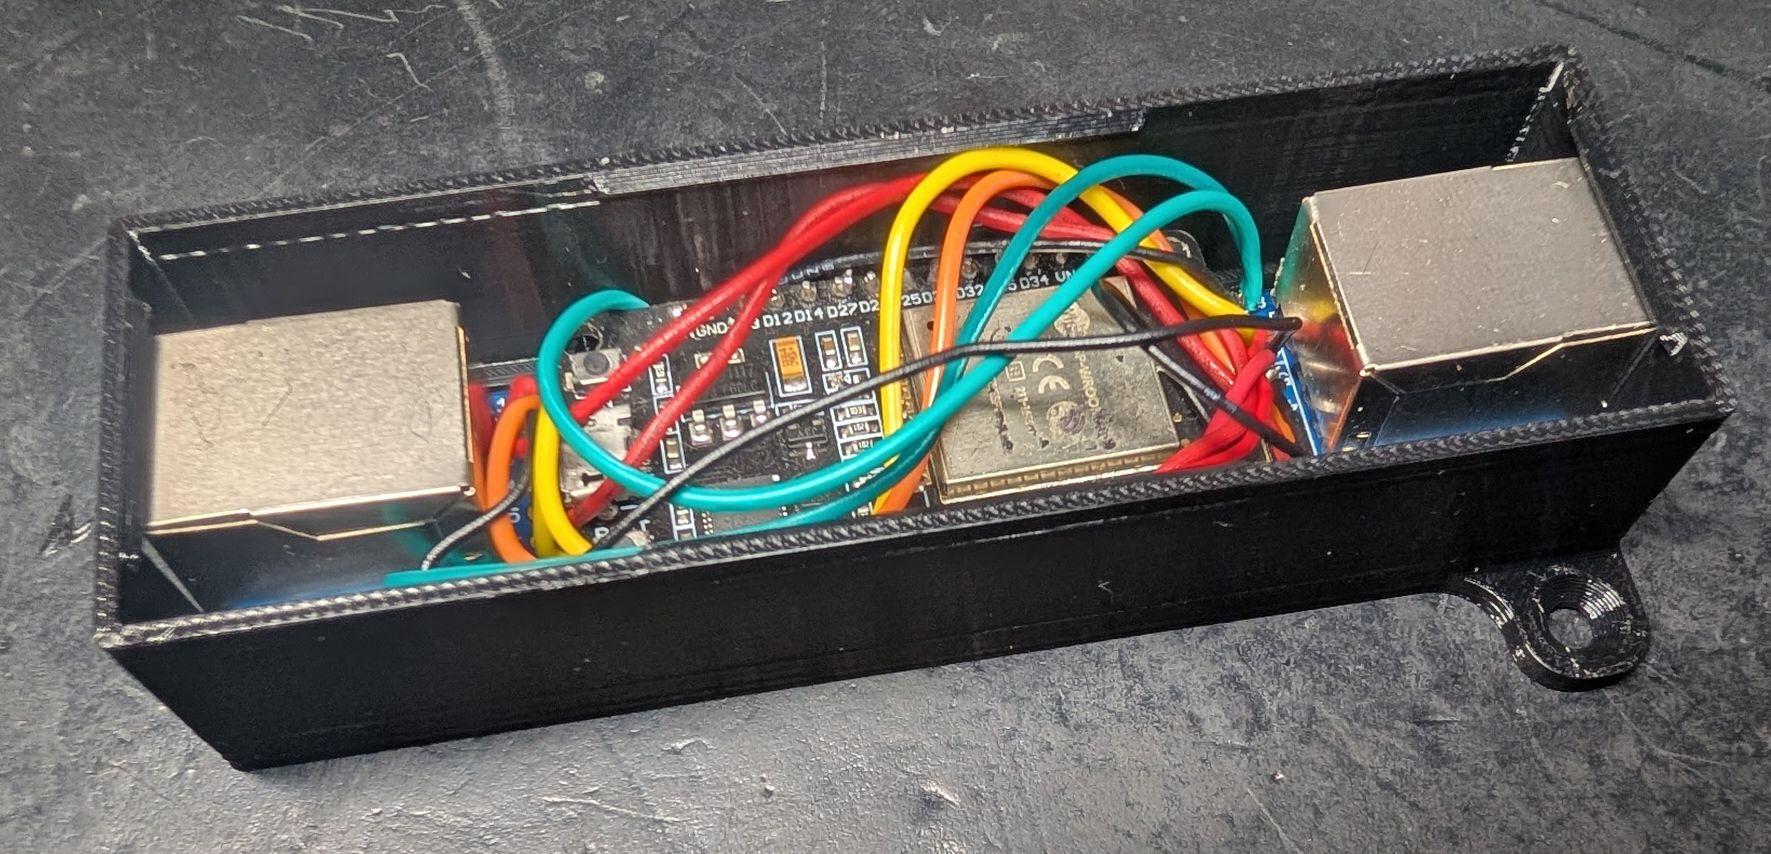
A pass-through configuration needs two RJ45 jacks, which the enclosure above does not have. This case fits an ESP32 DevKit between two RJ45 breakout boards — desk controller on one side, keypad on the other.
| Enclosure | Assembled |
|---|---|
 |
 |
🔗 Models (STL + Fusion 360 source): models/passthrough-case
Troubleshooting
My height sensor is not providing the correct value
- Uncomment the debug line for UART in the ESPHome configuration to see the raw data coming from the desk controller. This will help you collect information to troubleshoot the issue. See debugging UART.
- If your cover entity has up/down buttons grayed out due to height sensor issues, you can change the internal parameter for the up/down switch from
truetofalsein the YAML configuration.
Research
If you are interested in the internals of the LoctecMotion desk system, have a look at the research below which is composed of my own findings combined with findings of similar projects.
Full research
Control Panels
At the time of writing, LoctekMotion sells 11 different control panels. The features can differ per model, but it looks like the serial interface is pretty similar for the more advanced models.
The tables below will show a mapping of the RJ45 pinout to the pinout used by the control panel. Please note that all RJ45 pins are described in the following way:

The most common color convention for wiring RJ45 for network cables is:

In order to connect the control box to a Raspberry Pi and ESP32/ESP8266 chip I used a RJ45 to RS232 adapter with DuPont cables (jump wires), but you simply can cut and split an ethernet cable as well.
Supported Control Panels
HS13B-1 |
HS13A-1 |
HS01B-1 |
[!NOTE] Eventually, we discovered that a single pin-out should work for all control panels. It seems multiple mappings can be used, but the most common one is the one used for the HS13B-1 control panel.
Other combinations confirmed working by the community:
| Control panel | Control box | Desk model | Source |
|---|---|---|---|
| HS13M(-1C0) | CB38M2L | Flexispot E7 Pro (Plus), E7Q | #66 |
| HS36B-1 | CB38M2L(IB)-1 | Flexispot E2Q, E5Q | #102 |
| HS11A-1C0 | CB38M2H(PB)-1 | Flexispot EC5 | #81 |
| HS11B | #125 |
HS13B-1
- Desk model: Flexispot E7, Flexispot E1L
- Tested with control box: CB38M2J(IB)-1
- Source: Printed on the PCB of the control box.
| RJ45 pin | Name | Original Cable Color | Ethernet cable color (T568B) |
|---|---|---|---|
| 1 | RESET | Brown | White-Orange |
| 2 | SWIM | White | Orange |
| 3 | EMPTY | Purple | White-Green |
| 4 | PIN 20 | Red | Blue |
| 5 | RX | Green | White-Blue |
| 6 | TX | Black | Green |
| 7 | GND | Blue | White-Brown |
| 8 | +5V (VDD) | Yellow | Brown |
Note that RX and TX is defined like this on receiver (control panel) side. So the custom controller also uses RX to receive data and TX to send data.
HS13A-1
- Desk model: Flexispot EK5
- Tested with control box: CB38M2B(IB)-1
- Source: Printed on the PCB of the control box.
| RJ45 pin | Name | Original Cable Color | Ethernet cable color (T568B) |
|---|---|---|---|
| 1 | RESET SWIM | Brown | White-Orange |
| 2 | PIN 20 | White | Orange |
| 3 | RX | Purple | White-Green |
| 4 | TX | Red | Blue |
| 5 | GND1 | Green | White-Blue |
| 6 | +5V (VDD) | Black | Green |
| 7 | 29V+ | Blue | White-Brown |
| 8 | 29V- | Yellow | Brown |
Note that RX and TX is defined like this on receiver (control panel) side. So the custom controller also uses RX to receive data and TX to send data.
HS01B-1
- Desk model: Flexispot E5B
- Tested with control box: CB38M2A-1
- Source: nv1t/standing-desk-interceptor
| RJ45 pin | Name |
|---|---|
| 8 | +5V (VDD) |
| 7 | GND |
| 6 | TX |
| 5 | RX |
| 4 | PIN 20 |
| 3 | (unknown) |
| 2 | SWIM |
| 1 | RES |
Note that RX and TX is defined like this on receiver (control panel) side. So the custom controller also uses RX to receive data and TX to send data.
Other control panels / control boxes could be supported in the same way, but you would need to figure the RJ45 pinout mapping. Most control boxes have an extra RJ45 port for serial communication, but otherwise you would need to place your device in between the control panel and the control box.
Retrieve current height
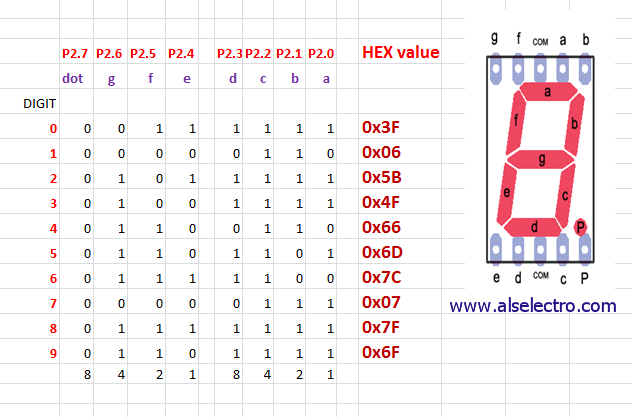
Based upon the great work of minifloat, it became clear that the control panel utilises a 7-segment display. Fortunately, this is very common in such devices and thus there is a lot of documentation on this topic.
The control box sends the height as 4-bit hexadecimal, which is decoded in the control panel to drive the 7-segment display. The second number on the display also supports an optional decimal point ("8 segment").
Make sure you set the baud rate to 9600. How often the height is sent depends on the control box and on which jack you are connected to. For most LoctekMotion desks, the control box only broadcasts the current height for a few seconds after you sent the Wake Up command. Otherwise you will receive 0x00 0x00 0x00 as payload. On the spare jack of the CB38M2J(IB)-1 the height is not broadcast at all, see the note below.
A height frame looks like 9b 07 12 <digit 1> <digit 2> <digit 3> <checksum> <checksum> 9d. The three payload bytes are the 7-segment patterns of the digits, with 0x80 set for the decimal point; for example 9b 07 12 07 cf 6d 64 b1 9d is 73.5. The two checksum bytes of every frame, height frames and commands alike, are CRC16-Modbus over the bytes from length to the end of payload, transmitted high byte first (unlike Modbus RTU). This matches the command list below and lets you construct arbitrary frames.
[!NOTE] Observations on the spare RJ45 jack of the CB38M2J(IB)-1. Made on a Flexispot E1L (control box listed under HS13B-1) with an ESP32 in the spare HS jack, wired as in the pin-out, and the original control panel in the other HS jack. Last tested in October 2026. Not yet confirmed on other control boxes, on the panel's jack, or in pass-through setups.
- Not a parallel tap. Commands sent by the control panel do not appear on the spare jack; only frames the control box sends to this jack are seen. What the box sends to the panel cannot be observed from here.
- Height is sent on wake and on command, not continuously. About 0.5 s after the box is woken (
PIN 20HIGH, from either jack) it sends one height frame. Each Wake Up command we sent was answered within about 0.1 s with the acknowledgement9b 04 15 bf c2 9dfollowed by one or more height frames; the earlier tests showed the same acknowledgement after other commands. Nothing is sent while idle, and in the earlier tests nothing was sent during autonomous preset travel either. To follow the height during a move, send Wake Up about once per second: it is the "no button pressed" command (payload00 00), does not move the desk, and did not prolong the wake session or the display.9b 04 81 10 c3 9dwas also seen in the earlier tests, meaning unknown.- Heartbeat. While
PIN 20is HIGH, from either jack, the box streams9b 04 11 7c c3 9don this jack at roughly 5 Hz (period 200 to 220 ms). It depends only onPIN 20: not on commands being sent, and not on the display, which turned off about 9 s after the box was woken whether or not Wake Up polls were being sent (other commands not tested). No further heartbeat was seen oncePIN 20went LOW.- Detecting use of the physical panel. The control panel keeps
PIN 20HIGH for about 10 s after a key press, so a heartbeat session that your controller did not start means the panel is in use. This only works if your controller keepsPIN 20LOW while idle; ifPIN 20is held HIGH permanently, as the provided package does, the heartbeat never stops. Polling with Wake Up during such a session is answered normally and did not change its length; in the earlier tests it also did not interfere with a physically held panel button, which allows tracking the height while the panel moves the desk.- Expect a few stray bytes, mostly
00, on the line whenPIN 20changes level. They do not form a valid frame.
source: alselectro
Execute a command
The control box only accepts commands when the 'screen is active'. To activate the screen, PIN 20 needs to be set to HIGH for about 1 second. The screen gets disabled automatically again after some amount of time receiving no commands.
The wake state is shared between both RJ45 jacks: once the box is awake, it accepts commands on either jack regardless of which one woke it (verified on the CB38M2J(IB)-1, see the note under Retrieve current height).
Command list
| Command name | Start | Length | Type | Payload | Checksum | End |
|---|---|---|---|---|---|---|
| Wake Up | 9b |
06 |
02 |
00 00 |
6c a1 |
9d |
| Up | 9b |
06 |
02 |
01 00 |
fc a0 |
9d |
| Down | 9b |
06 |
02 |
02 00 |
0c a0 |
9d |
| M | 9b |
06 |
02 |
20 00 |
ac b8 |
9d |
| Preset 1 | 9b |
06 |
02 |
04 00 |
ac a3 |
9d |
| Preset 2 | 9b |
06 |
02 |
08 00 |
ac a6 |
9d |
| Preset 3 (stand) | 9b |
06 |
02 |
10 00 |
ac ac |
9d |
| Preset 4 (sit) | 9b |
06 |
02 |
00 01 |
ac 60 |
9d |
All bytes combined will become the command to send to the control box. See the packages for sample code.
Similar projects
While working on this project, I found that many others have done similar work. Several GitHub repositories with great research have been very helpful in starting this project. ❤️
- grssmnn / ha-flexispot-standing-desk - Home Assistant integration via MQTT (micropython)
- Dude88 / loctek_IOT_box - Arduino code to control via Alexa and MQTT
- nv1t / standing-desk-interceptor - Research on intercepting commands from Flexispot desks
- VinzSpring / LoctekReverseengineering - Research and Python samples
Special thanks to the Tweakers.net community (Dutch) for helping kickstart this project.
Contributions
We welcome contributions from the community! If you have ideas, suggestions, or improvements, please feel free to open an issue or submit a pull request.
Support
Join our Discord channel for a chat with like-minded people or to get help with your project.
Explore related projects
codecrafters-io/build-your-own-x
Master programming by recreating your favorite technologies from scratch.
561,858 starspublic-apis/public-apis
A collective list of free APIs
498,211 starsmorluto/rea
Reverse engineer anything with agents, from app behavior down to native binaries.
452,515 starsopenclaw/openclaw
The AI that really does things. Any OS. Any Platform. The lobster way. 🦞
394,367 stars