
USBridge-Technologies/USBridge-KVM-2.0
USBridge-Technologies/USBridge-KVM-2.0 has 34 GitHub stars and 1 forks. GitHot measured 0 stars in 24 hours. Last checked 2026-11-14 19:41 UTC. Last push 2026-11-13.
Measured star growth
- in 24h
- 0
- in 7 days
- Collecting history
- in 15 days
- Collecting history
- in 1 month
- Collecting history
Net star changes over overlapping periods, not daily totals. Missing measurements are left blank. Stars measure attention, not software quality.
About
IP-KVM firmware for Sipeed NanoKVM, Radxa Zero 3W/3E and Radxa Cubie A7Z, plus the turnkey USBridge KVM 2.0: Moonlight low-latency streaming, BIOS over SSH with OCR, virtual ISO media, Btrfs snapshots, Tailscale.
Self-hostedREADME.md
OriginalUSBridge KVM 2.0 | Ultra-Low Latency IP KVM
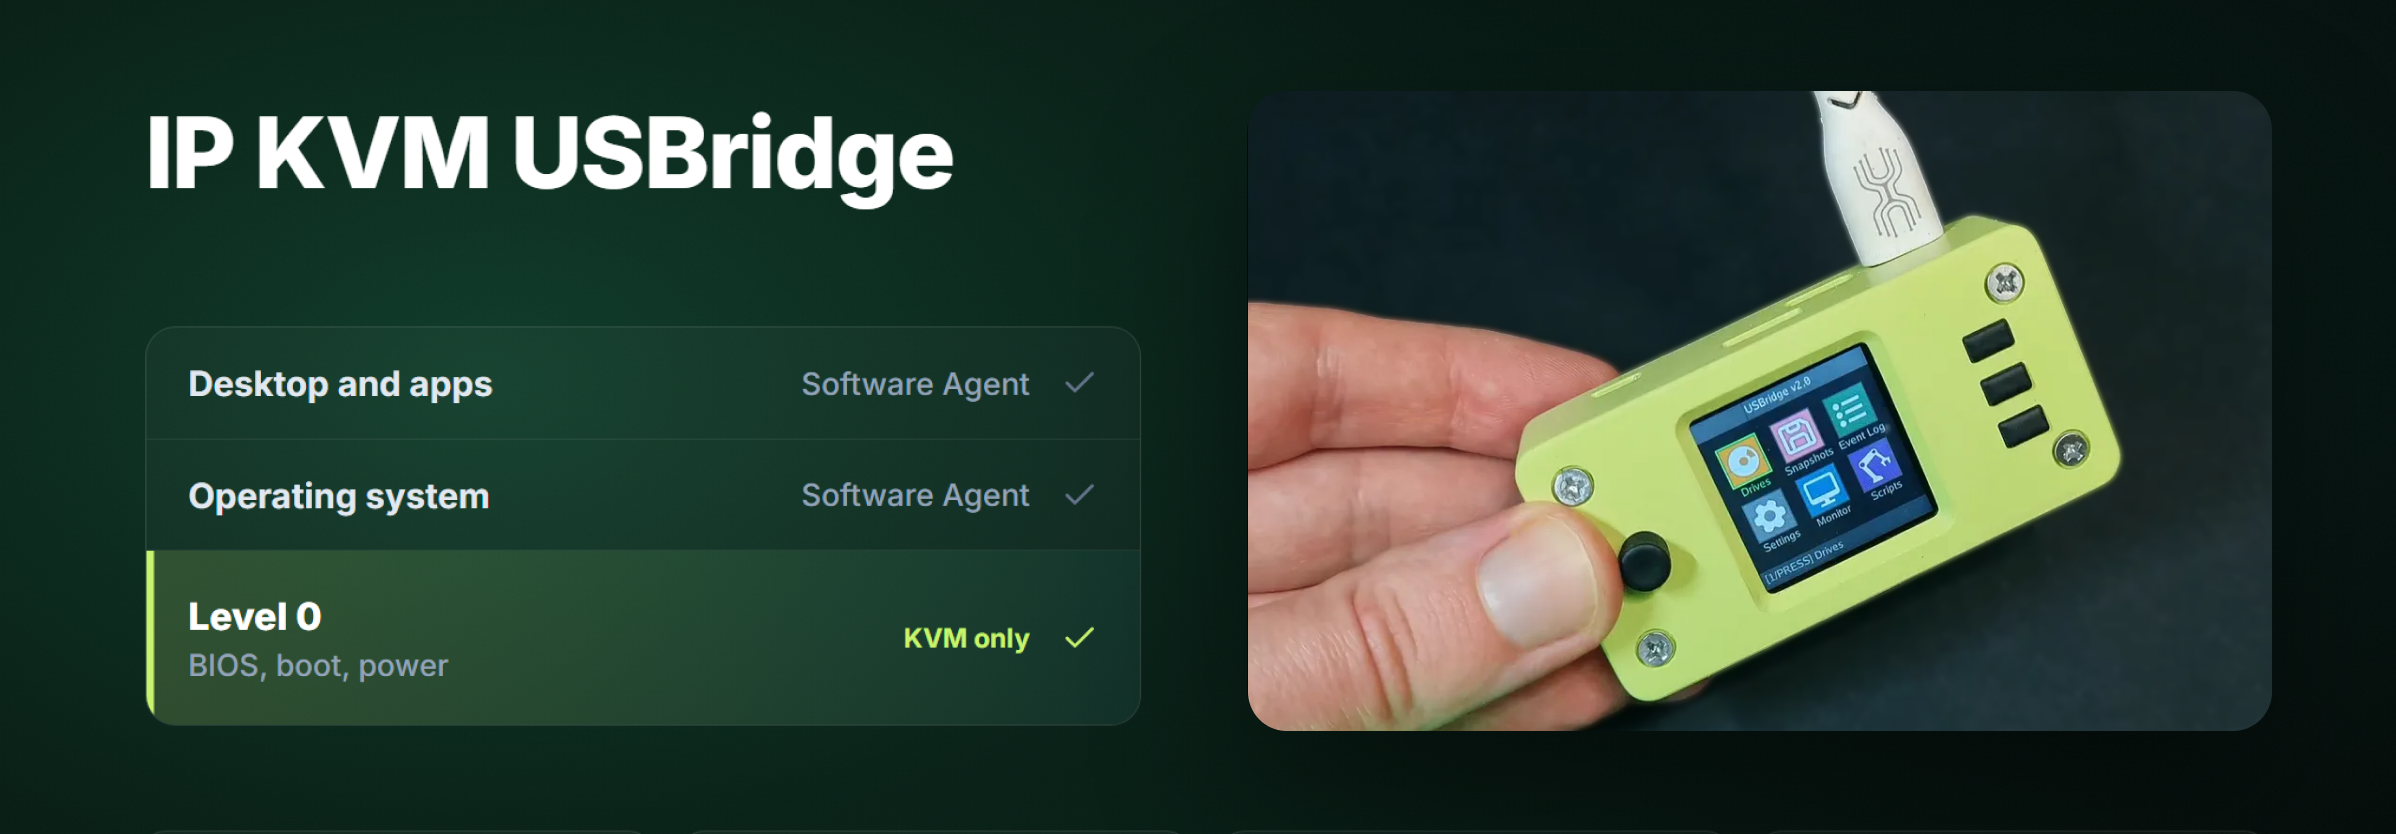
Remote access at Level 0. Zero latency. Absolute hardware autonomy.
The Software Agent works while the system is alive. KVM 2.0 goes below it — all in one unified USBridge Client.







Overview
System frozen or won't boot? The KVM is still there.
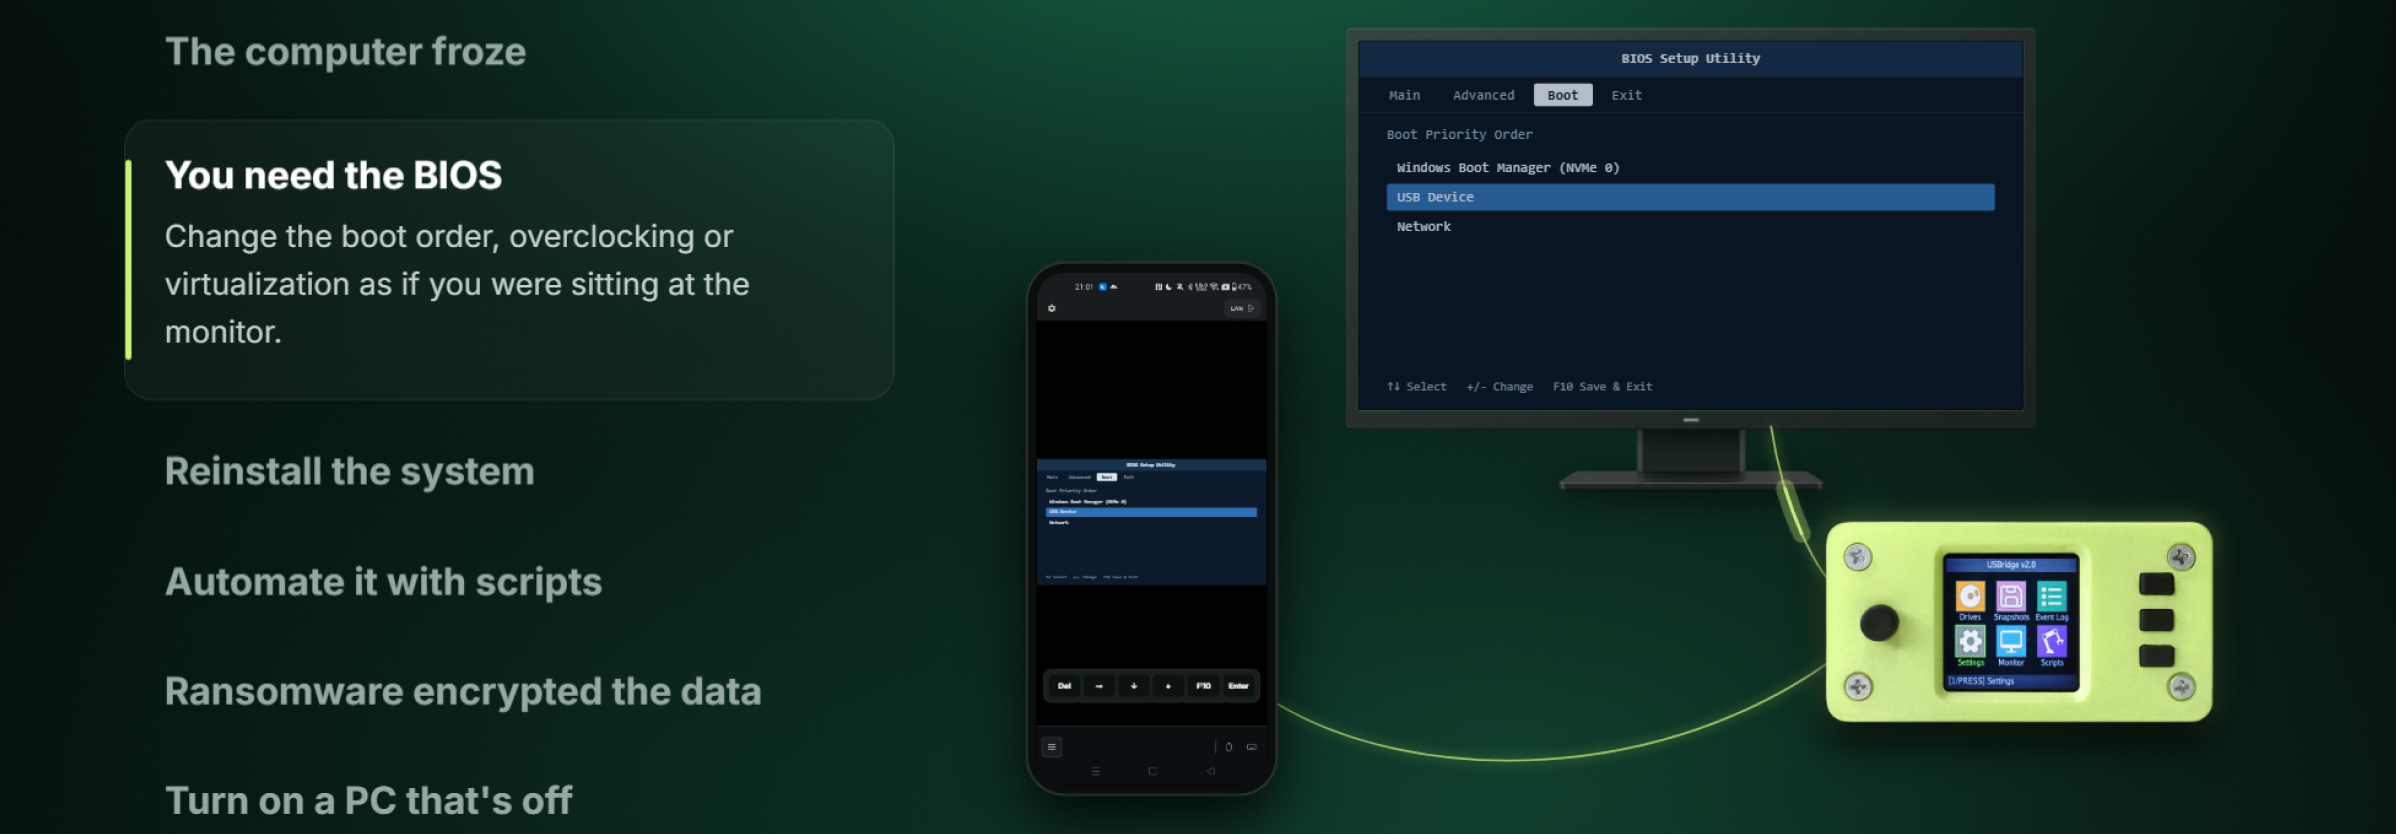
The USBridge KVM 2.0 is an out-of-band remote management appliance operating at hardware Level 0. Whether you need BIOS/UEFI setup, boot-loader rescue, an OS reinstallation, or remote reboot of an unresponsive bare-metal server, USBridge KVM bypasses the host operating system entirely.

Engineered with the Moonlight streaming protocol, it delivers smooth 1080p @ 60 FPS with ~45 ms ultra-low latency, peripheral passthrough, hardware-isolated immutable Btrfs storage snapshots, and an on-device OCR engine with an MCP server for autonomous AI administration.
Choose Your KVM: Four Devices, One KVM OS
Every edition runs the same unified USBridge KVM OS with regular OTA updates, REST API, Moonlight engine, and client compatibility.
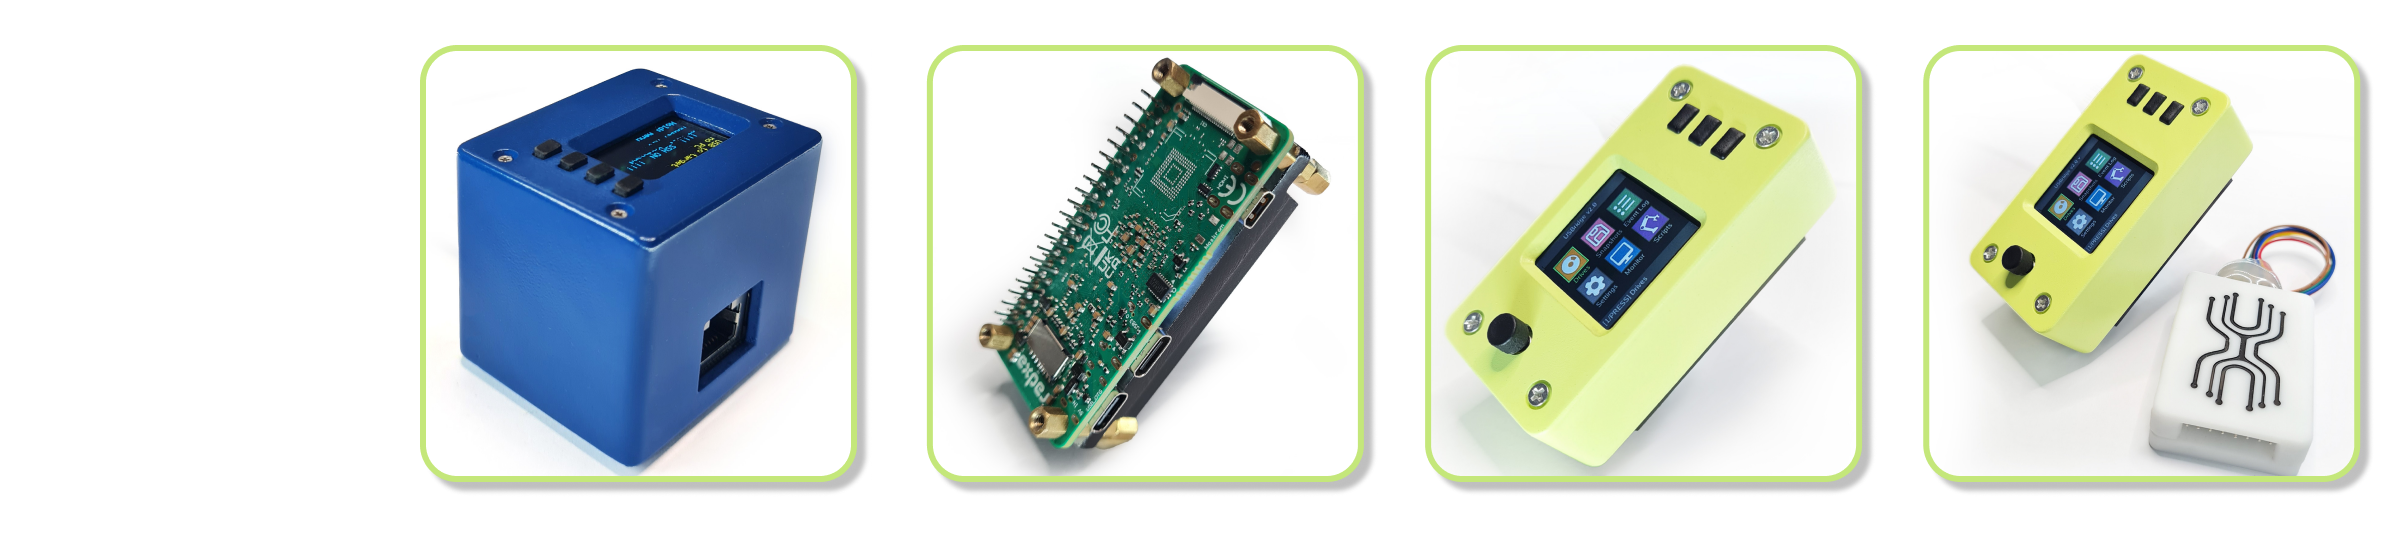
| Feature | USBridge Nano | USBridge KVM 2.0 Low | USBridge KVM 2.0 Standard | USBridge KVM 2.0 Full |
|---|---|---|---|---|
| Price | $89 | $99 | $117 | $139 |
| Target Use | Ultra-compact pocket KVM | Minimalist board for server racks | Complete ready-to-run desktop kit | Ultimate Pro kit with ATX & screen |
| Base Board | Sipeed NanoKVM (SG2002) | Radxa Zero 3W | Radxa Zero 3W | Radxa Zero 3W |
| Processor | 1 RISC-V core @ 1.0 GHz | 4 Cortex-A55 cores @ 1.6 GHz | 4 Cortex-A55 cores @ 1.6 GHz | 4 Cortex-A55 cores @ 1.6 GHz |
| RAM | 256 MB DDR3 | 1 GB LPDDR4 | 1 GB LPDDR4 | 1 GB LPDDR4 |
| Video Capture | Built-in HDMI (MIPI CSI) | USB 3.0 Dongle (1080p 60 FPS) | USB 3.0 Dongle (1080p 60 FPS) | USB 3.0 Dongle (1080p 60 FPS) |
| Video Stream | 1080p @ 60 FPS | 1080p @ 60 FPS | 1080p @ 60 FPS | 1080p @ 60 FPS |
| Network | Ethernet port (RJ45) | Wi-Fi 6 (Ethernet via USB hub) | Wi-Fi 6 (Ethernet via USB hub) | Wi-Fi 6 (Ethernet via USB hub) |
| Status Screen | 128×64 Mono OLED | — | 240×240 IPS Color Display | 240×240 IPS Color Display |
| Enclosure | Custom compact case | Bare board + Heatsink | Custom case | Custom case |
| Dimensions | 49 × 41 × 41 mm | Minimal footprint | 69 × 36 × 34 mm | 69 × 36 × 34 mm |
| ATX Power Control | — | Optional expansion | Optional expansion | Included (ATX board + wires) |
| MicroSD with OS | Included | Optional | Included | Included |
| Lifetime OS License | Included | Included | Included | Included |
Already Have a Board? Install USBridge Firmware
Turn standard off-the-shelf single-board computers into an enterprise-grade out-of-band management appliance. Flash USBridge onto a board you already have — same client apps, same API, and same OTA updates on every one.
| Radxa Zero 3W / 3E | Radxa Cubie A7Z | Sipeed NanoKVM | |
|---|---|---|---|
| What it is | SBC + USB 3.0 capture card | SBC + USB 3.0 capture card | Off-the-shelf KVM, reflashed |
| SoC | Rockchip RK3566, 4 cores | Allwinner A733, 8 cores | SOPHGO SG2002, 1 RISC-V core |
| Video capture | USB 3.0 (UVC) · MIPI coming | USB 3.0 (UVC) · MIPI coming | MIPI CSI (built-in HDMI) |
| Video | 1080p60 | 1080p60 · up to 4K30 on MIPI (coming) | 1080p60 |
| Codecs | H.264, HEVC | H.264, HEVC | H.264, HEVC |
| Latency | USB: +10–15 ms vs MIPI · MIPI: lowest | USB: +10–15 ms vs MIPI · MIPI: lowest | Lowest (MIPI) |
| BIOS-in-Terminal (OCR) | ✅ NPU | ✅ CPU | — |
| Status display | 3W: ✅ 240×240 color LCD + monitor mode · 3E: not yet | ✅ 240×240 color LCD + monitor mode | ✅ built-in 128×64 mono OLED, status only |
| Get it | Download firmware ➔ | Download firmware ➔ | Download firmware ➔ |
Full side-by-side — latency, audio, codecs, storage, every feature: NanoKVM vs Radxa Zero 3W vs Cubie A7Z ➔
Raspberry Pi and Banana Pi support is in development.
👉 Flashing guides: Flashing & Recovery Guide · Flash-Tool Directory
Connecting After Flashing:
- Default USB Gadget IP:
10.55.0.1
Connect the board to your PC via USB. Openhttp://10.55.0.1in any browser for immediate pairing, setup QR code, Moonlight PIN, and Wi-Fi configuration. - Auto-Discovery: In the desktop USBridge Client, click
+➔ Over USB to pair with the board automatically.
Key Features
Zero Latency Streaming
- 45 ms latency: Sub-frame hardware encoding guarantees an imperceptible delay between physical input and visual response.
- 60 FPS stream: High-refresh-rate remote rendering for precise cursor control and fluid UI navigation.
- Zero dropped frames: Hardware-level network optimization ensures continuous frame delivery even under high bandwidth loads.
Access From Anywhere
One client on every device: a computer, a phone or just a browser.
- Cross-platform native apps for Windows, macOS, Linux, iOS, and Android.
- Browser access: via web.usbridge.io, or directly from the web client hosted on the KVM itself — fully operational offline.
- Built-in Tailscale: reach your machine from anywhere across encrypted peer-to-peer mesh with no port forwarding or public IP required.
- Unified control: the same client also runs USBridge software agents for computers without dedicated KVM hardware.
Virtual Media
No more USB sticks: an image connects to the computer as a real USB drive.
- ISO mounting as CD/DVD drive: install any operating system straight from BIOS/UEFI.
- Direct disk booting: mount IMG, VDI, VMDK images and entire host drives as bootable physical storage.
- Zero pre-upload delay: streams directly from your computer with high-speed RAM caching for instant boot times.
- Write protection: Overlay mode redirects every write operation to a separate temporary layer, keeping your source image pristine and untouched.
Peripheral Emulation
The computer sees ordinary USB devices, with no drivers or setup.
- Immediate keyboard response: works from the first second in BIOS, UEFI, and bootloader environments.
- Precise mouse control: absolute 1:1 pointer tracking, relative mode for legacy systems, plus multi-touch and stylus support.
- Gamepad passthrough: emulates standard Xbox 360 controller (XInput) or generic DirectInput.
- Audio & Network: host sound forwarded to your side (audio redirection), microphone passthrough to the host, and USB gadget Ethernet when an OS installer lacks native NIC drivers.
Storage with Snapshots
Images and files on the microSD inside the KVM are safe from deletion and ransomware.
- Automated snapshots: 30 seconds after file write activity stops, the KVM takes a read-only snapshot autonomously.
- Hardware-isolated immutability: even with host
rootprivileges, compromised systems cannot alter or erase completed snapshots (security reference). - Instant rollback: need an older file? Mount any snapshot directly to copy data; the integrated log shows exact change history.
- Standard Btrfs filesystem: any Linux workstation can read the microSD card directly.
BIOS as Text Over SSH
The KVM reads the screen on the device itself and shows the BIOS in a normal terminal.
- Direct SSH access: connect via
ssh user@<kvm-ip>— no browser, no heavy video stream required. - Plain text clipboard: copy POST codes, hardware serial numbers, and MAC addresses straight from the console.
- Keyboard navigation: browse menus using standard arrow keys, Enter, and Esc just like a physical serial console.
- 100% on-device OCR: optical character recognition executes entirely on local KVM hardware without cloud dependencies.
Scripts & AI Agents
Scripts and AI see the screen as text, so BIOS chores can be automated.
- Starlark scripting (Python syntax): write straightforward automation scripts that wait for target screen text and trigger deterministic keystrokes.
- Flexible execution: trigger scripts directly from the client interface, on-device display, or over the REST API.
- Built-in MCP server: integrate external AI models (such as Claude) via the Model Context Protocol (MCP) to visually inspect screens, navigate BIOS menus, and mount rescue ISOs autonomously.
- Unattended end-to-end workflows: automated OS deployments from initial boot-override selection through partition setup to final reboot without human intervention.
Power Control
Power on, power off and hard reset, even when the computer is completely frozen.
- Direct motherboard integration: dedicated ATX board bridges directly into motherboard Front Panel Power and Reset headers.
- Status telemetry: real-time Power LED and HDD activity LED feedback inside the client UI.
- Galvanic isolation: rated up to 3.75 kV isolation to shield the KVM from ground loops, electrical surges, and motherboard noise.
- Accidental trigger safety: actions require hold-to-confirm in the UI, ensuring production servers never reboot by accident.
Client Downloads
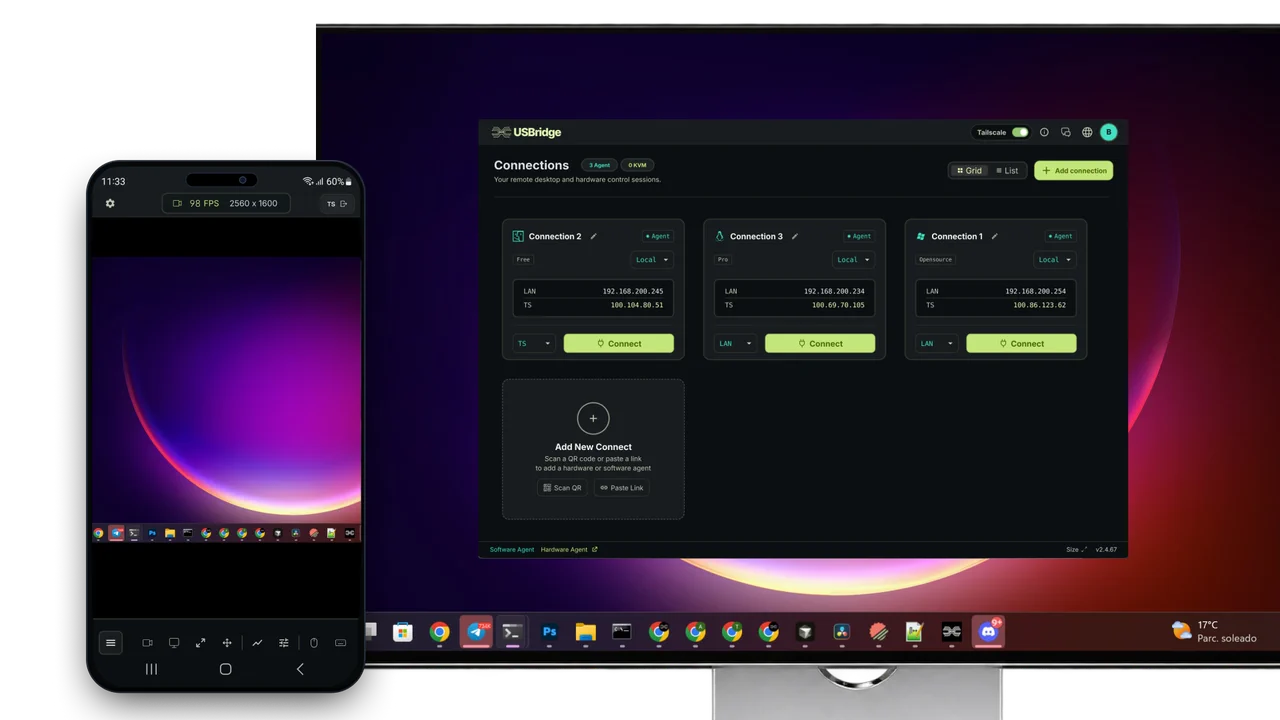
Manage your hardware KVMs and software agents from a single unified application.
Unified Installer (Client + Software Agent):
Windows Setup (.exe) · macOS Apple Silicon (.dmg)
| Platform | Installer | Portable / Alternative | Store / Package Manager |
|---|---|---|---|
| Windows (x86_64) | Setup (.exe) | Portable (.zip) | — |
| macOS (Apple Silicon) | Disk Image (.dmg) | — | — |
| Linux (x86_64) | Debian / Ubuntu (.deb) Fedora / RHEL (.rpm) Arch (.pkg.tar.zst) |
AppImage | APT / DNF / pacman repo Snap Store |
| Android (ARM64) | APK (self-updating) | — | Google Play |
| iOS / iPadOS | — | — | Apple App Store |
| Web Browser | — | Open web.usbridge.io | Works in Chrome, Edge, Safari, Firefox |
For terminal install commands and headless deployment, see the USBridge-Remote Repository.
Comparison: USBridge KVM 2.0 vs Other IP KVM Solutions
| Feature | JetKVM Mini | USBridge KVM 2.0 | PiKVM V4 Mini | TinyPilot Voyager 3 |
|---|---|---|---|---|
| Price | $39 | from $99 | from $252 | $399 |
| Video Resolution & Rate | 1080p @ 30 / 720p @ 60 | 1080p @ 60 FPS | 1920 × 1200 @ 60 FPS | 1920 × 1200 @ 60 FPS |
| Video Latency | Not stated | ~45 ms (Moonlight) | Not stated | 80–100 ms |
| Network Interfaces | 100 Mbps Ethernet / Wi-Fi | Wi-Fi 6, Ethernet via USB | Gigabit Ethernet | Gigabit Ethernet |
| ATX Power Control | ❌ | ✅ Included in Full (Isolated) | ✅ | ❌ |
| Virtual Media (ISO/IMG) | ✅ | ✅ Fast RAM cache + Overlay | ✅ | ✅ |
| On-Device Status Screen | ✅ | ✅ 240×240 IPS Color | ✅ | ✅ |
| Immutable Storage Snapshots | ❌ | ✅ Btrfs Read-Only Snapshots | ❌ | ❌ |
| BIOS-in-Terminal & AI (OCR, MCP) | ❌ | ✅ Local OCR + MCP Server | ❌ | Paid license |
[!NOTE] What about the USBridge Nano? The USBridge Nano ($89) is an ultra-compact pocket appliance based on the Sipeed SG2002 RISC-V SoC with native MIPI CSI HDMI capture. It is intended for administrators seeking the smallest form factor with built-in Ethernet, running the same USBridge OS streaming core.
Technical Specifications & Quick Start Guides
1. USBridge Nano — Setup & Specifications (Ultra-Compact Pocket KVM)
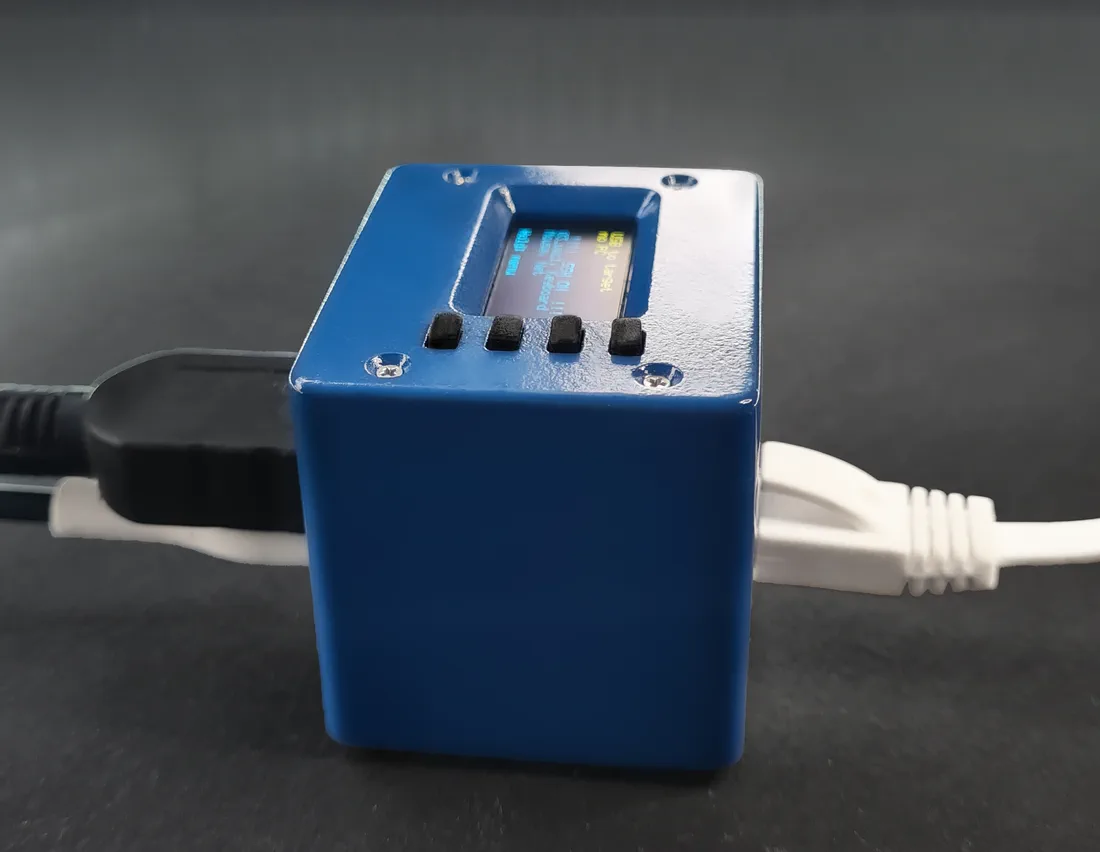
Technical Specifications
| Specification | Details |
|---|---|
| Board | Sipeed NanoKVM (SG2002) |
| Processor | RISC-V C906, 1 core, 1 GHz |
| Memory | 256 MB DDR3 |
| Video | HDMI capture, 1080p 60 FPS |
| Control | USB HID keyboard and mouse, virtual ISO drive, gamepads |
| Audio | Audio output and microphone in both directions |
| Network | 100 Mbit Ethernet port |
| Remote Access | USBridge Client, web interface, Tailscale P2P, Moonlight |
| Power | USB-C |
| Screen | 128×64 Mono OLED |
| Dimensions with Case | 49 × 41 × 41 mm |
| System | USBridge OS on the included MicroSD card |
Set Up in 3 Steps
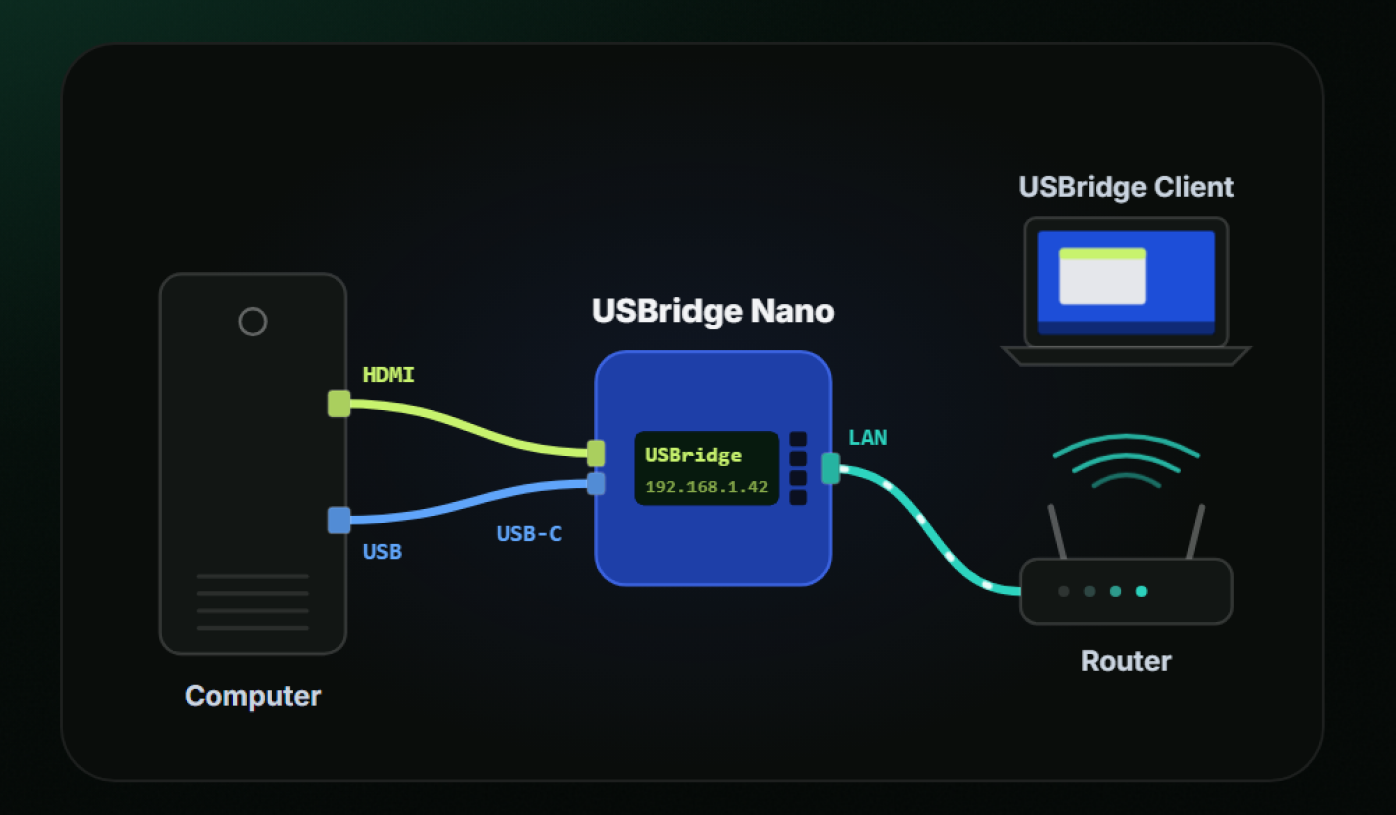
- HDMI: Connect HDMI cable from target computer video out directly to the Nano HDMI port.
- USB-C: Connect USB-C cable from Nano to the computer. It powers the Nano and emulates keyboard, mouse, and virtual media.
- Ethernet: Plug network cable from your router/switch into the 100 Mbit Ethernet port.
2. USBridge KVM 2.0 Low — Setup & Specifications (Minimalist Board for Server Racks)
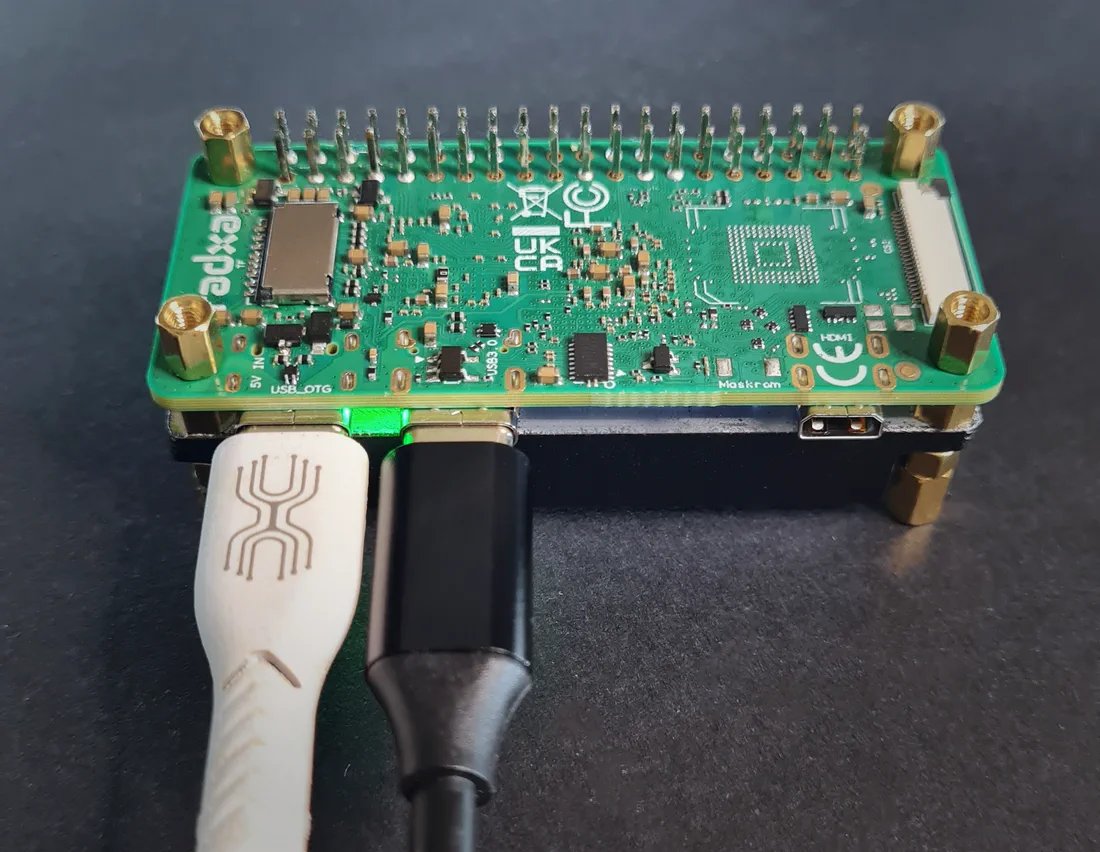
Technical Specifications
| Specification | Details |
|---|---|
| Board | Radxa Zero 3W |
| Processor | Rockchip RK3566, 4 Cortex-A55 cores up to 1.6 GHz |
| Memory | 1 GB LPDDR4 |
| Video | HDMI capture, 1080p 60 FPS, about 45 ms latency |
| Control | USB HID keyboard and mouse, gamepads, virtual drive for ISO, IMG, VDI, VMDK |
| Audio | Audio from the computer |
| Network | Onboard Wi-Fi 6 and Bluetooth. Ethernet through a USB hub with a network port (hub not included) |
| Remote Access | USBridge Client, web interface, Tailscale P2P |
| Power | USB-C |
| Ports | USB-C 2.0 (to the computer), USB-C 3.0 (capture dongle), Micro HDMI |
| Case | No case, bare board with heatsink |
| Cooling | Passive, aluminum heatsink |
| MicroSD Card | Not included, +$5 optional |
| System | USBridge KVM OS, Btrfs snapshots, over-the-air updates |
Set Up in 3 Steps
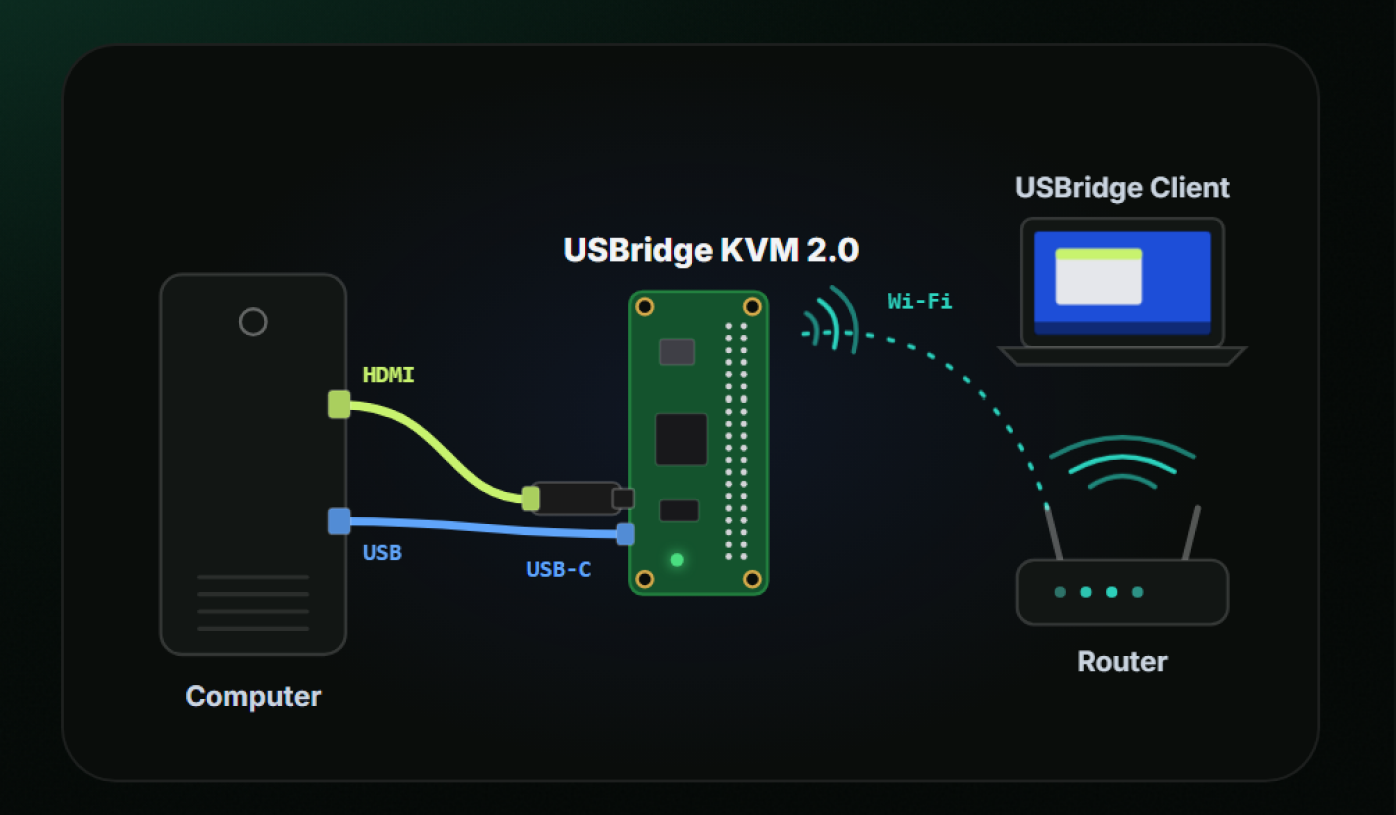
- HDMI: HDMI cable from the computer to the video capture dongle on the KVM.
- USB-C (OTG): Connect USB-C cable to the target computer for power and peripheral emulation.
- Network: Connect via Wi-Fi 6, USB Ethernet adapter, or USB gadget mode (
10.55.0.1).
3. USBridge KVM 2.0 Standard — Setup & Specifications (Complete Desktop Kit)
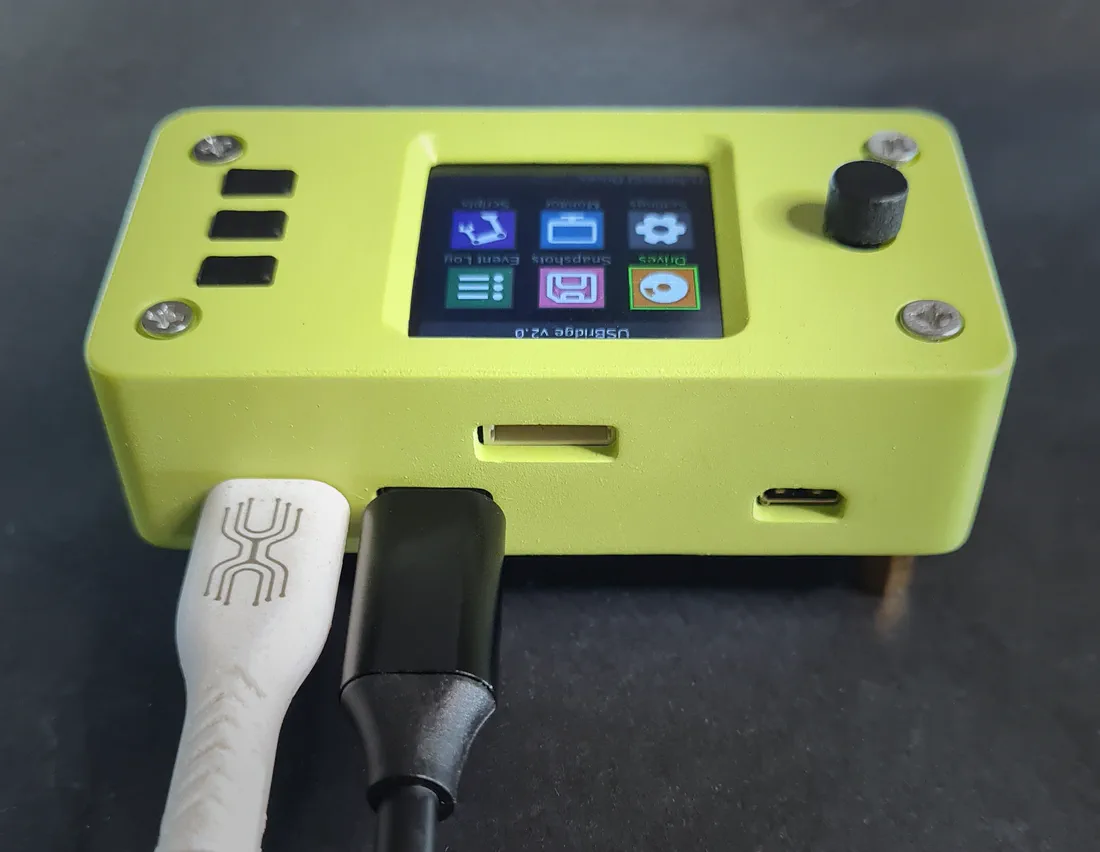
Technical Specifications
| Specification | Details |
|---|---|
| Board | Radxa Zero 3W |
| Processor | Rockchip RK3566, 4 Cortex-A55 cores up to 1.6 GHz |
| Memory | 1 GB LPDDR4 |
| Video | HDMI capture, 1080p 60 FPS, about 45 ms latency |
| Control | USB HID keyboard and mouse, gamepads, virtual drive for ISO, IMG, VDI, VMDK |
| Audio | Audio from the computer |
| Network | Onboard Wi-Fi 6 and Bluetooth. Ethernet through a USB hub with a network port (hub not included) |
| Remote Access | USBridge Client, web interface, Tailscale P2P |
| Power | USB-C |
| Ports | USB-C 2.0 (to the computer), USB-C 3.0 (capture dongle), Micro HDMI, 8-pin header for the ATX board |
| Case | Custom case |
| Screen | 1.3" full-color IPS, 240×240 (ST7789, SPI), 3 buttons and a 5-way joystick |
| Dimensions with Case | 69 × 36 × 34 mm |
| MicroSD Card | With USBridge KVM OS, included |
| System | USBridge KVM OS, Btrfs snapshots, over-the-air updates |
Set Up in 3 Steps
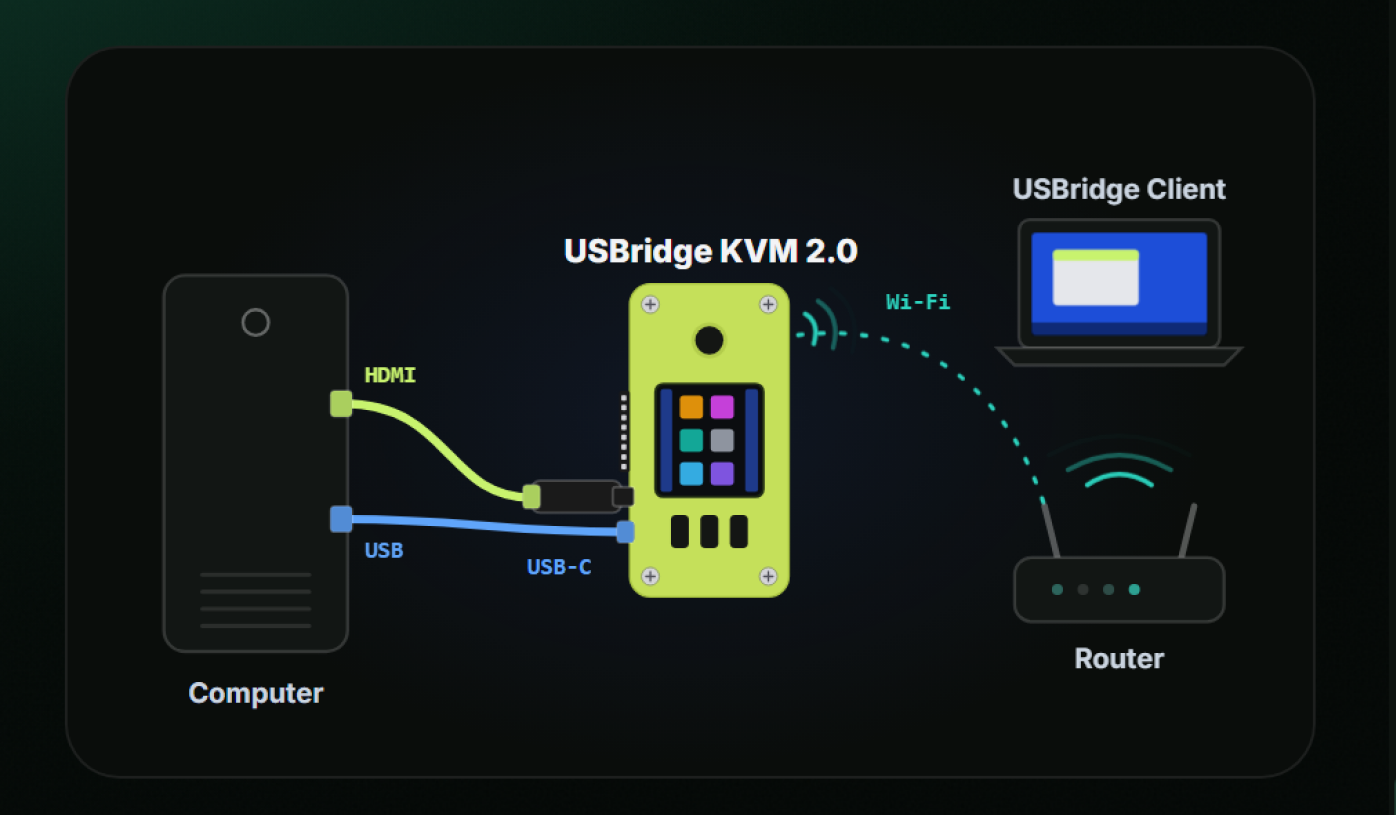
- HDMI: Connect HDMI cable from computer GPU output to the included capture dongle.
- USB-C (Port 1): Link Port 1 to the host computer for power, keyboard, mouse, and virtual drives.
- Network: Pair via onboard Wi-Fi 6 using the interactive status screen or connect over USB (
10.55.0.1).
4. USBridge KVM 2.0 Full — Setup & Specifications (Ultimate Pro Kit + ATX)
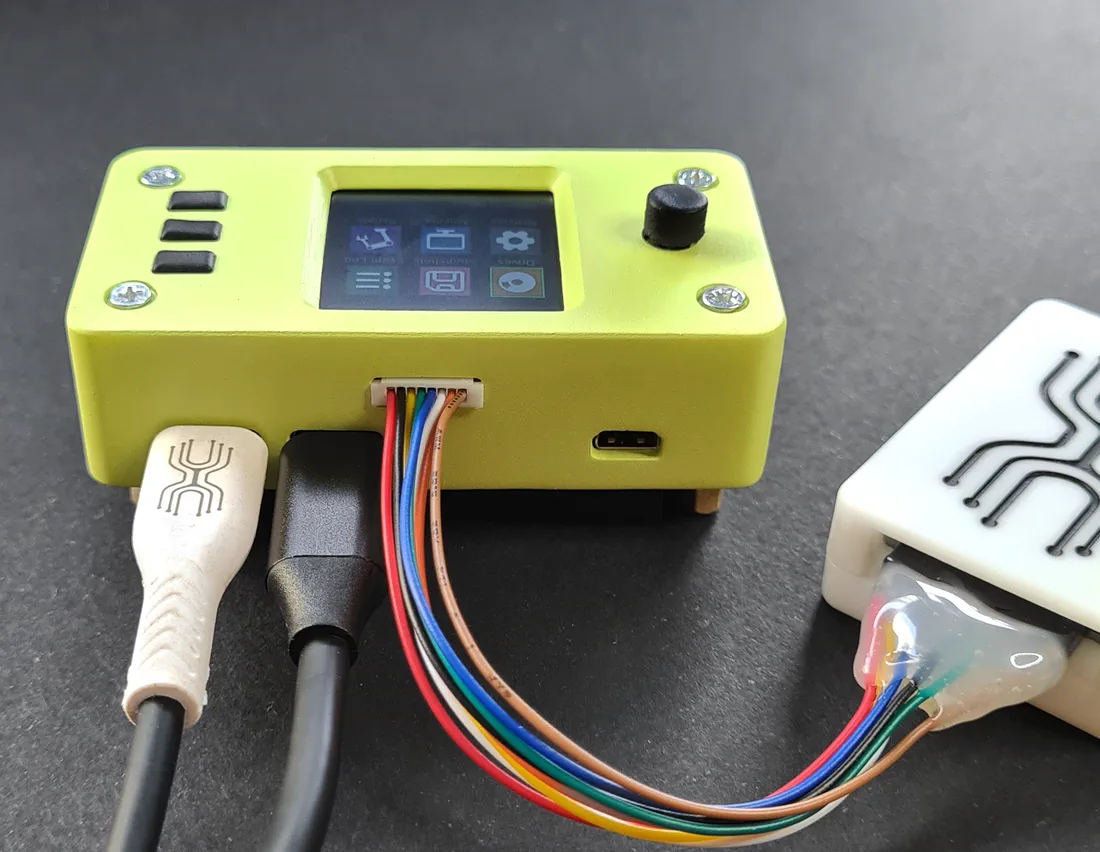
Technical Specifications
| Specification | Details |
|---|---|
| Board | Radxa Zero 3W |
| Processor | Rockchip RK3566, 4 Cortex-A55 cores up to 1.6 GHz |
| Memory | 1 GB LPDDR4 |
| Video | HDMI capture, 1080p 60 FPS, about 45 ms latency |
| Control | USB HID keyboard and mouse, gamepads, virtual drive for ISO, IMG, VDI, VMDK |
| Audio | Audio from the computer |
| Network | Onboard Wi-Fi 6 and Bluetooth. Ethernet through a USB hub with a network port (hub not included) |
| Remote Access | USBridge Client, web interface, Tailscale P2P |
| Power | USB-C |
| Ports | USB-C 2.0 (to the computer), USB-C 3.0 (capture dongle), Micro HDMI, 8-pin header for the ATX board |
| Case | Custom case |
| Screen | 1.3" full-color IPS, 240×240 (ST7789, SPI), 3 buttons and a 5-way joystick |
| ATX Power | Power on, power off (normal and forced), reset. Optocoupler (galvanic isolation). ATX, Micro-ATX, Mini-ITX |
| Dimensions with Case | 69 × 36 × 34 mm |
| Cooling | Passive, aluminum heatsink |
| MicroSD Card | With USBridge KVM OS, included |
| System | USBridge KVM OS, Btrfs snapshots, over-the-air updates |
Set Up in 4 Steps
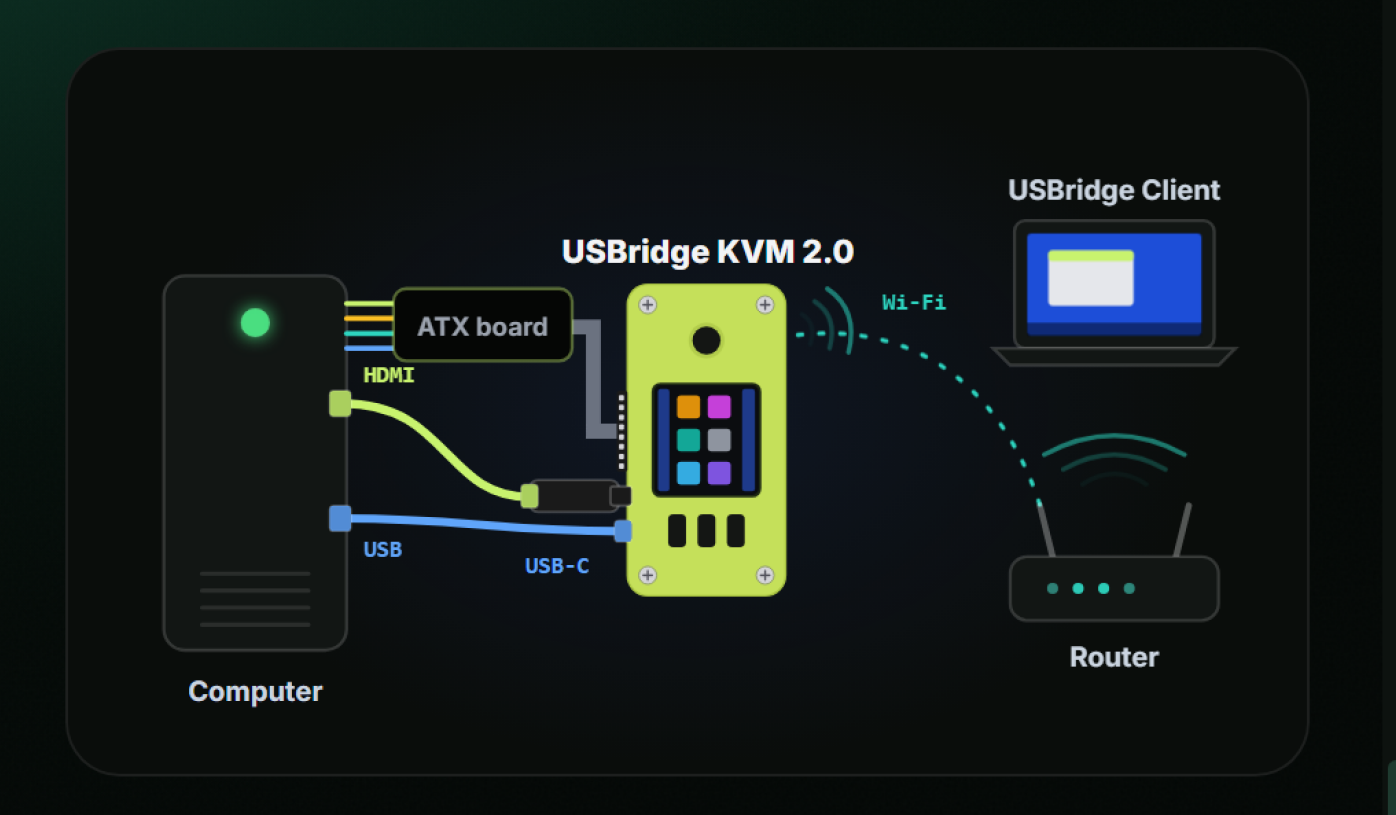
- HDMI: Connect HDMI cable from target computer GPU/motherboard to the capture dongle.
- USB-C (Port 1): Connect Port 1 to computer USB port for power, input emulation, and virtual storage.
- ATX Control Board: Plug the ribbon cable into KVM 8-pin GPIO, then bridge jumper wires to motherboard Front Panel (
PWR_SW,RESET,P_LED,H_LED). - Network: Configure Wi-Fi 6 via the on-device display/joystick or connect directly over USB gadget mode.
DIY KVM Setup: Full BIOS Control in 3 Minutes
Provision a supported SBC, flash the firmware image, and connect a standard USB capture interface to deploy your own IP-KVM.
1. Hardware Checklist (Bill of Materials)
| Component | Description |
|---|---|
| Supported SBC | Radxa Zero 3W / 3E, Radxa Cubie A7Z; also the off-the-shelf Sipeed NanoKVM (HDMI capture built in). Which to pick: board comparison. |
| HDMI-to-USB Capture Card | Generic MS2109 (7–12$), or standard UVC dongle. |
| MicroSD Card (2GB+) | Standard 2GB+ capacity. Class 10 or higher recommended for fast boot times. |
| Optional: Status Screen | 1.3" 240×240 LCD: the USBridge 1.3" LCD Flip-HAT (mirrored pinout, SoC stays against the heatsink) or the standard Waveshare 1.3" LCD HAT. Fits both the Radxa Zero 3W and the Cubie A7Z; not supported on the Zero 3E yet. Fully optional: the system runs headless via a single config file. |
2. 3-Minute Flashing Guide (Video Tutorial)
Watch the complete guide on how to flash the firmware and perform the first boot.
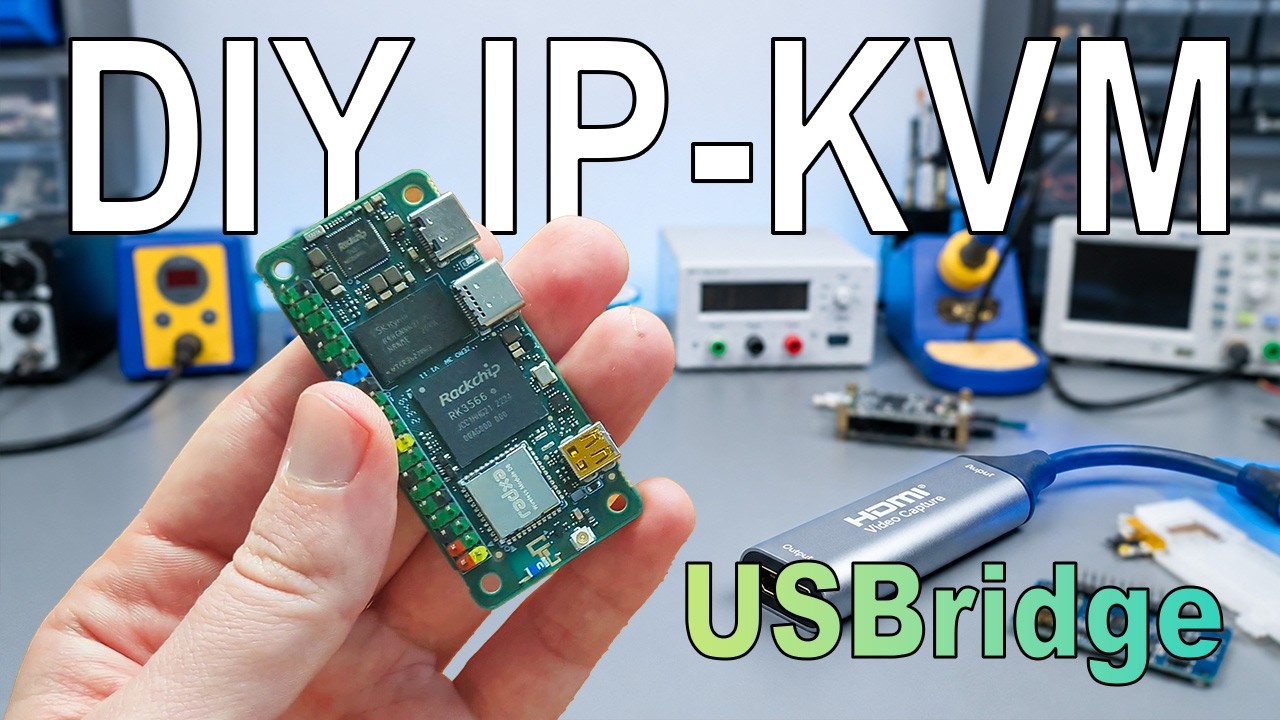
Quick Links for Setup:
Accessories
| Accessory | Description | Details |
|---|---|---|
| Screen Module (Flip-HAT 1.3" LCD) | 240×240 IPS status screen designed specifically for Zero-factor boards. Mounts on the back of the PCB so the CPU remains open for large heatsinks and active cooling. | LCD Flip-HAT Specs |
| Power Control Board (ATX) | Galvanically isolated (up to 3.75 kV) front-panel adapter board for Power, Reset, Power LED, and HDD LED headers. | ATX Board Guide |
| HDMI Capture Dongle (1080p @ 60 FPS) | High-throughput UVC video capture card optimized for USB 3.0 [5G] mode and sub-frame hardware encoding. |
Capture Dongle Specs |
Unified Ecosystem: USBridge-Remote
Control your entire infrastructure from a single point using USBridge-Remote — our dedicated cross-platform agent application. It enables a hybrid access approach within a single interface, combining hardware and software-level management:
- Hardware Level (Layer 0): Add USBridge-KVM devices for direct BIOS access, virtual media mounting, and bare-metal recovery of unresponsive machines.
- Software Level (OS-level): Deploy this lightweight software agent inside an already booted operating system for high-performance desktop management without KVM hardware dependency.
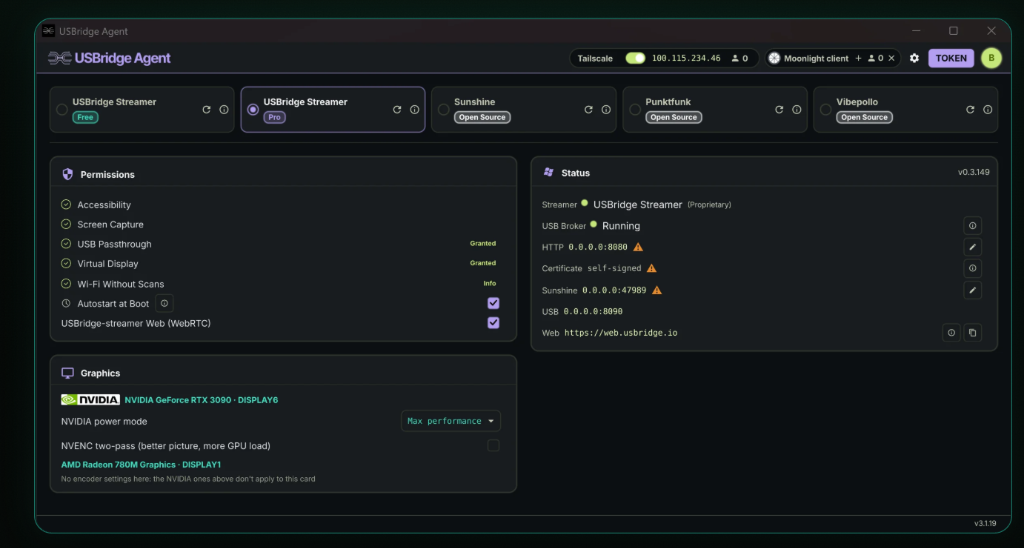
Multi-Protocol & Streamer Engine Support
The USBridge Agent features a modular streaming architecture allowing you to switch between streaming engines on the fly based on your latency, hardware encoder, and workflow requirements:
- USBridge Streamer (Free & Pro): Our proprietary ultra-low latency engine optimized for NVENC/VAAPI/Apple Silicon hardware encoding, virtual displays, seamless USB device passthrough, and WebRTC browser streaming.
- Sunshine: Native support for the popular open-source GameStream host implementation.
- Punktfunk: High-speed, lightweight open-source remote access protocol.
- Vibepollo: Optimized protocol for specialized streaming pipelines and low-overhead control.
Agent Download Matrix
The agent runs as a background service on your target OS (servers, remote workstations, or headless nodes) to stream the desktop and execute system-level commands.
| Platform | Downloads | Store / Package Manager |
|---|---|---|
| Windows (x86_64) | Setup (.exe) Portable (.zip) |
Windows Service background autostart |
| macOS (Apple Silicon) | Disk image (.dmg) | macOS background daemon |
| Linux (x86_64) | Debian / Ubuntu (.deb) Fedora / RHEL (.rpm) Arch (.pkg.tar.zst) AppImage (portable) |
Systemd service |
More on the Agent: USBridge-Remote Repository.
Documentation & Hardware Reference
Complete technical guides are located in the docs/ directory:
- Getting Started & Provisioning — Quick start, network configuration, and headless bulk setup.
- BIOS-in-Terminal & OCR — Local OCR engine, SSH terminal access, and Starlark scripting.
- Snapshots & Storage Management — Btrfs snapshots, rollback, and security.
- Virtual Media Mounting — Mounting ISOs, bootable disks, and RAM cache.
- Hardware Reference & Pinouts — Architecture, board comparison, and power thermal guidelines.
- Developer REST API — Full API reference for headless integrations and custom scripting.
- Hardware Models & Schematics — PCB files and 3D printable STL/STEP enclosures.
Community & Independent Reviews
| Creator / Channel | Review / Tutorial | Link |
|---|---|---|
| Learn To HomeLab | Is This The Best KVM On The Market? | Watch Review |
| Barmine Tech | The Best KVM I've Used? USBridge KVM 2.0 (Independent Review) | Watch Review |
| Jonatan Castro | Unboxing & What's in the box (Spanish) | Watch Review |
| USBridge Official | NanoKVM with USBridge firmware: 60 FPS instead of lag | Watch on YouTube |
| USBridge Official | Official Overview & Feature Walkthrough | Watch on YouTube |
| USBridge Official | Assembly & Packaging of USBridge KVM 2.0 | Watch on YouTube |
Join our community on Discord and Reddit to discuss homelab setups, custom automation scripts, and firmware updates!