
SailingLoong/LoongPort
SailingLoong/LoongPort has 138 GitHub stars and 3 forks. GitHot measured 0 stars in 24 hours. Last checked 2026-11-16 18:51 UTC. Last push 2026-11-15.
Measured star growth
- in 24h
- 0
- in 7 days
- Collecting history
- in 15 days
- Collecting history
- in 1 month
- Collecting history
Net star changes over overlapping periods, not daily totals. Missing measurements are left blank. Stars measure attention, not software quality.
About
cc-switch 中转站的专用增强版(cc-switch for API relay providers),免去配置各种 密钥 endpoint 的烦恼。
Developer Toolsdocs/guide/README.en.md
OriginalLoongPort User Guide
From your first installation to connecting services, switching models, automatic failover, checking usage, and restoring your configuration.
Applies to stable v6.26.2. ZCode is covered separately and marked v6.26.3-beta.2 only. This guide follows the controls available in those releases; planned features are not described as available.
All services, accounts, balances, and usage shown in the images are demonstration data. The screenshots render real interface components from the corresponding released versions in an isolated demo environment. They do not prove that an actual account signed in, a paid request completed, or a native configuration was written successfully.
example.comis a reserved example domain and cannot be used to call models. On your own computer, use the address and credentials supplied by a trusted service provider.
The screenshots show the Chinese interface. This guide explains their numbered callouts in English and includes key Chinese labels so you can find the matching controls. The English control names below match the English interface. You can change the interface language in Settings (设置) → General (通用) → Language (界面语言). 中文版
Choose your route
- First time using LoongPort: complete a real conversation by following chapters 1 and 2, then decide whether to enable automatic failover in chapter 3
- Already able to chat: chapters 3 and 4 cover switching, models, failures, and costs
- Want to generate images, install tools, or manage history: go straight to the relevant section in chapter 5; you do not need to reconnect your services
- Moving to another computer, upgrading, or troubleshooting: see chapter 6
- Looking for the old tutorial's “Easy Mode” (省心模式): first read the version note at the start of chapter 3
Contents:
- Before you install
- Get your first app working
- Switch to a backup tier automatically after a failure
- Switch models and manage services
- Images, history, usage, and extensions
- Settings, backups, updates, and troubleshooting
- Beta appendix: ZCode
1 Before you install
1.1 Understand these three things first
- App: the tool you actually use to talk to AI, such as Codex or Claude Code
- Service and account: the service that provides model access, and your account with that service; it may be an official API or a compatible relay service
- Tier: one available access configuration under that account; tiers can differ in models, prices, billing multipliers, and limits
LoongPort helps manage these configurations and, when needed, forwards requests through a local router running on your computer. It is not a model and does not buy service access for you. Accounts, quotas, and terms of use remain the responsibility of the respective service providers.
The minimum you need: a supported computer, an AI app you have installed and run at least once, and service access you are authorized to use. Installing LoongPort does not install Codex or Claude Code.
1.2 Download the right installer
Download from the official LoongPort download page or official GitHub Releases. Choose the stable release for your first installation. A larger beta version number is not a reason to choose it.
| Your system | v6.26.2 file | How to choose |
|---|---|---|
| Windows 10 or later, standard Intel/AMD computer | LoongPort-v6.26.2-Windows-Setup.exe |
Recommended installer; follow the setup wizard |
| Windows ARM64 computer | LoongPort-v6.26.2-Windows-arm64-Setup.exe |
Do not select the standard x86_64 package |
| Windows, when you specifically need a portable build | Windows-Portable.zip for your architecture |
Extract and run; download a new archive to update |
| macOS 12 or later | LoongPort-v6.26.2-macOS.dmg |
Universal Intel and Apple Silicon build; drag it to Applications |
| Linux x86_64, Ubuntu 22.04 or a comparable recent distribution | LoongPort-v6.26.2-Linux-x86_64.AppImage |
Make it executable before launching; the environment must support FUSE |
| Linux with a distribution package manager | The appropriate .deb or .rpm |
Install with the package manager; in-place updates within the app are not used |
The Linux desktop build requires WebKitGTK 4.1 and a suitable glibc version. For headless servers or older systems such as Ubuntu 20.04, see the LoongPort CLI guide (Chinese) instead of repeatedly trying the desktop installer on a server.
The macOS build is currently not signed or notarized by Apple. If macOS blocks it, first verify the download source, file integrity, and official release notes, then follow the specific instructions on the download page. Do not disable security protections for the entire computer or run “repair” scripts from unfamiliar websites.
You have completed this step when: LoongPort opens a window without installation or runtime-library errors. The first launch may ask you to unlock credential protection; see 6.1.
1.3 Initialize the app you want to use
- Install Codex or Claude Code using that app's official instructions
- Open a new terminal and run
codex --versionorclaude --versionto check that a version is displayed - Launch the app once in a folder you allow AI to access, and complete its own initialization
- Exit that app for now, then open LoongPort
Do not use another tool's folder or a company project as a practice directory. A new empty folder of your own is a good place for the first test.
If the app is missing or its configuration directory has not been initialized, LoongPort may say that no app configuration was found and ask you to launch the app first. This does not mean you need to buy API access again or delete configuration files.
1.4 Find your way around the main window
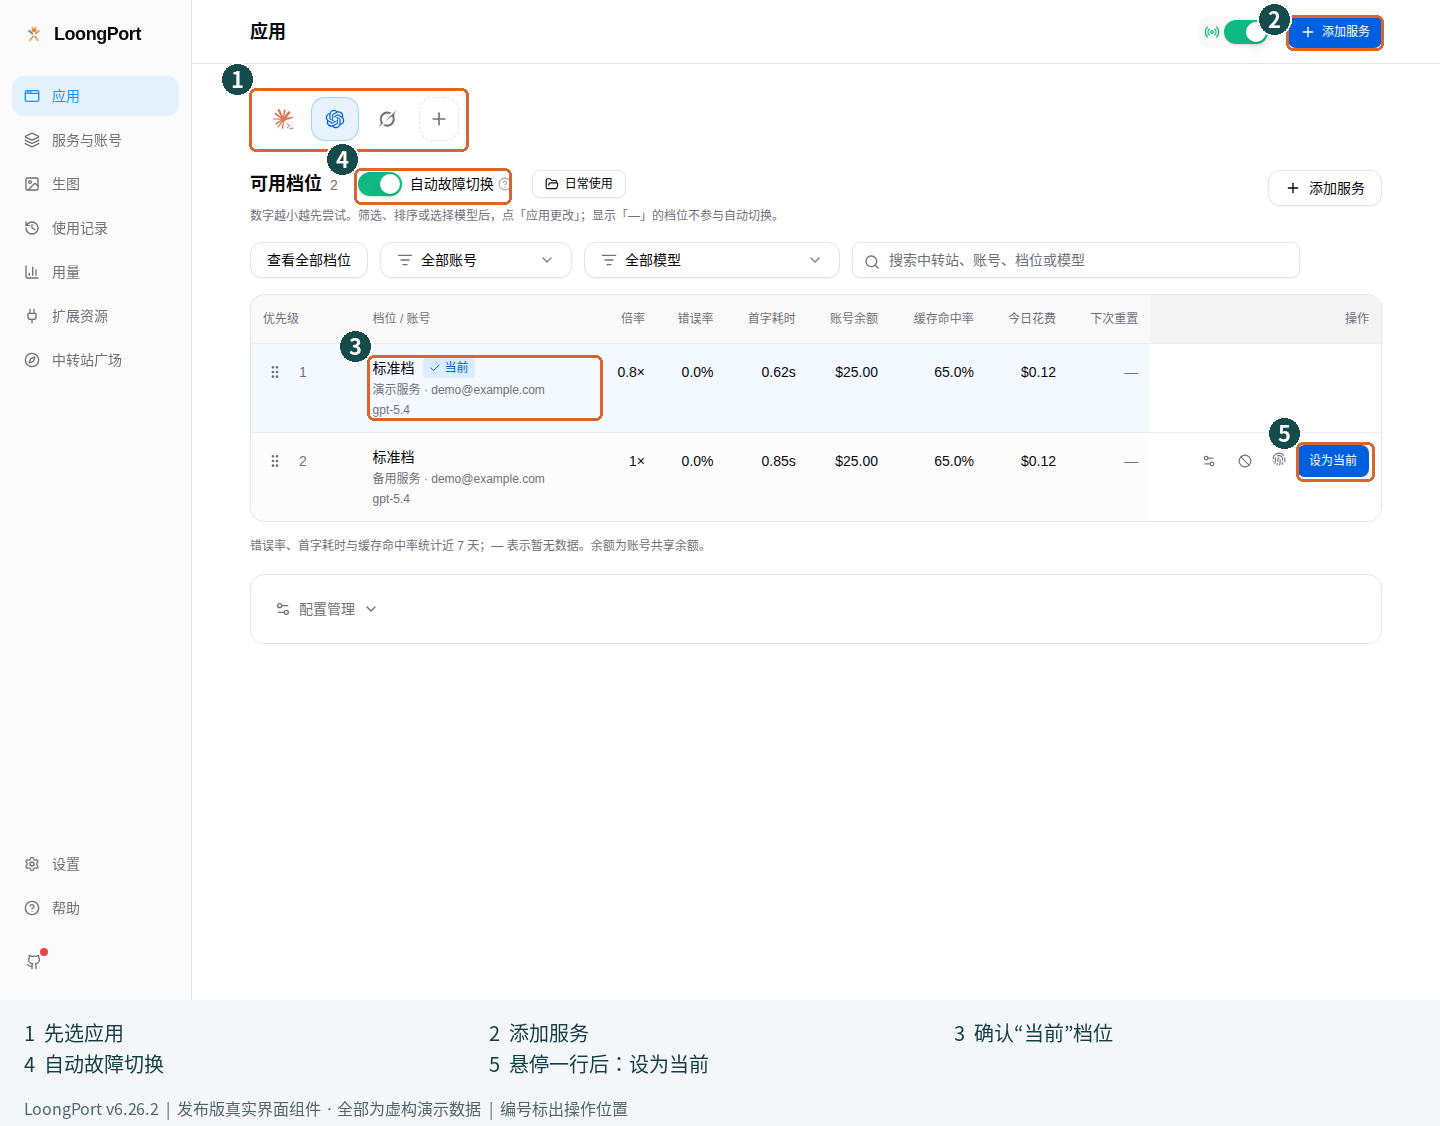
In the image: ① choose the app to manage; ② add a service (添加服务); ③ check the current tier (当前); ④ automatic failover (自动故障切换); ⑤ hover over a tier row to choose “Use tier” (设为当前).
- Applications (应用): choose which app to manage, check its current tier, switch tiers, and arrange backup priorities
- Services & accounts (服务与账号): view connected services and manage sign-in, refresh, balances, and account settings
- Images (生图): generate images using image tiers, or configure the image tool for a CLI
- Activity / Usage (使用记录 / 用量): view conversation history, or requests and costs, respectively
- Resources (扩展资源): MCP, Skills, Prompts, universal providers, and app-specific workspace tools
- Relay directory (中转站广场): browse services you can connect or enter your own service URL. Settings control the recommended list; they do not remove the directory entry or the ability to enter a URL
- Settings (设置): language, visible apps, connections, authentication, backups, and updates
If your tool is missing from the app bar, open “More applications” (更多应用) or its add button. You can also enable it under Settings → General → Homepage Display (主页面显示). Showing an app entry does not install the app.
2 Get your first app working
The goal is to get one app, one service, and one tier working first. Add a second service and automatic failover later.
2.1 Choose how to connect
Click Add service (添加服务) and choose a route based on what you already have:
| What you have | Choose |
|---|---|
| A relay service URL and an account on that site | Relay (中转站); follow 2.2 |
| An official API account with DeepSeek, Zhipu BigModel, or opencode | Official API (官方 API); follow 2.3 |
| An API address, API key, and model ID from a provider | Manual (手动添加); follow 2.4 |
| A working cc-switch setup you want to migrate | Back it up first, then see 6.3 |
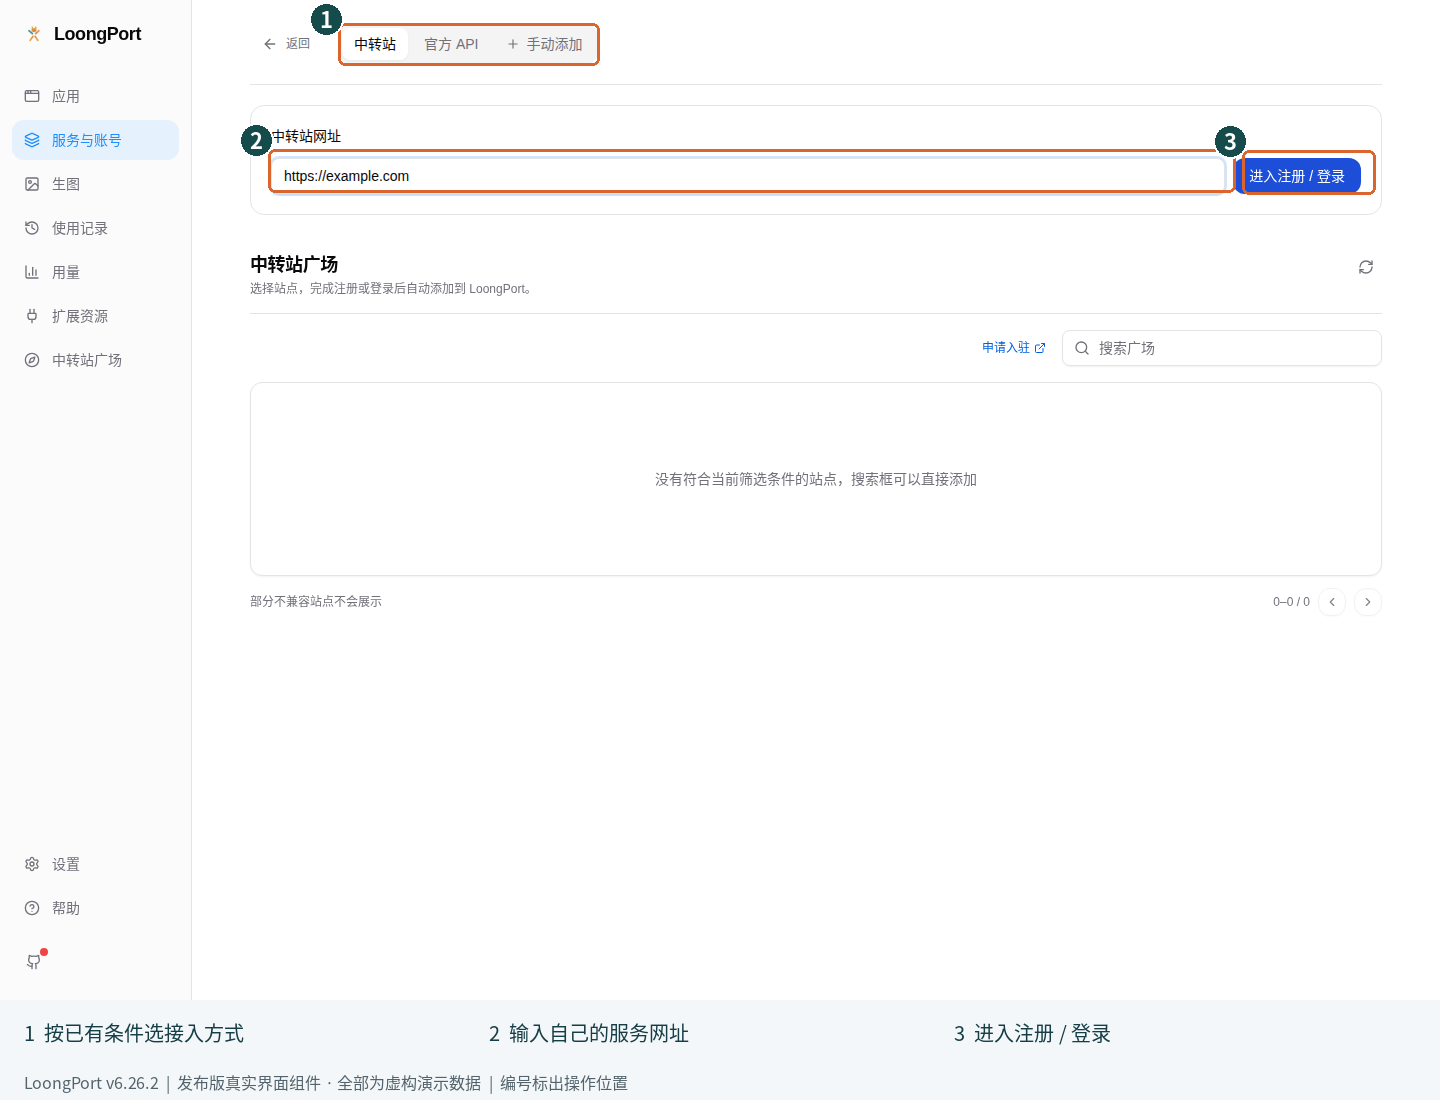
In the image: ① choose a connection method for your existing account or key; ② enter the service URL; ③ open that service's registration or sign-in page.
2.2 Connect with a relay account
Have these ready: a trusted provider's URL, your account on that site, and at least one tier with available quota that you are allowed to use.
- The first-run wizard is called Connect your first service (连接你的第一个服务). Enter the service address under “Relay URL” (中转站网址). The demonstration uses
https://example.com; replace it with your own service address - Click Go to sign-up / login (进入注册 / 登录)
- Check that the opened page's domain really belongs to the selected service. Sign in if you already have an account; otherwise register according to that service's rules
- After signing in, return to LoongPort's Confirm application setup (确认应用配置) page
- Choose an available configuration for the app you want to use now, leaving the others on Leave unchanged (暂不配置)
- Read “Share service usage and measurements to improve compatibility and view community results” (分享服务使用与实测数据,帮助完善适配并查看社区实测) and “What is shared” (了解分享内容). Sharing is optional; the app works without it. Make your own choice
- Click Finish setup (完成设置)
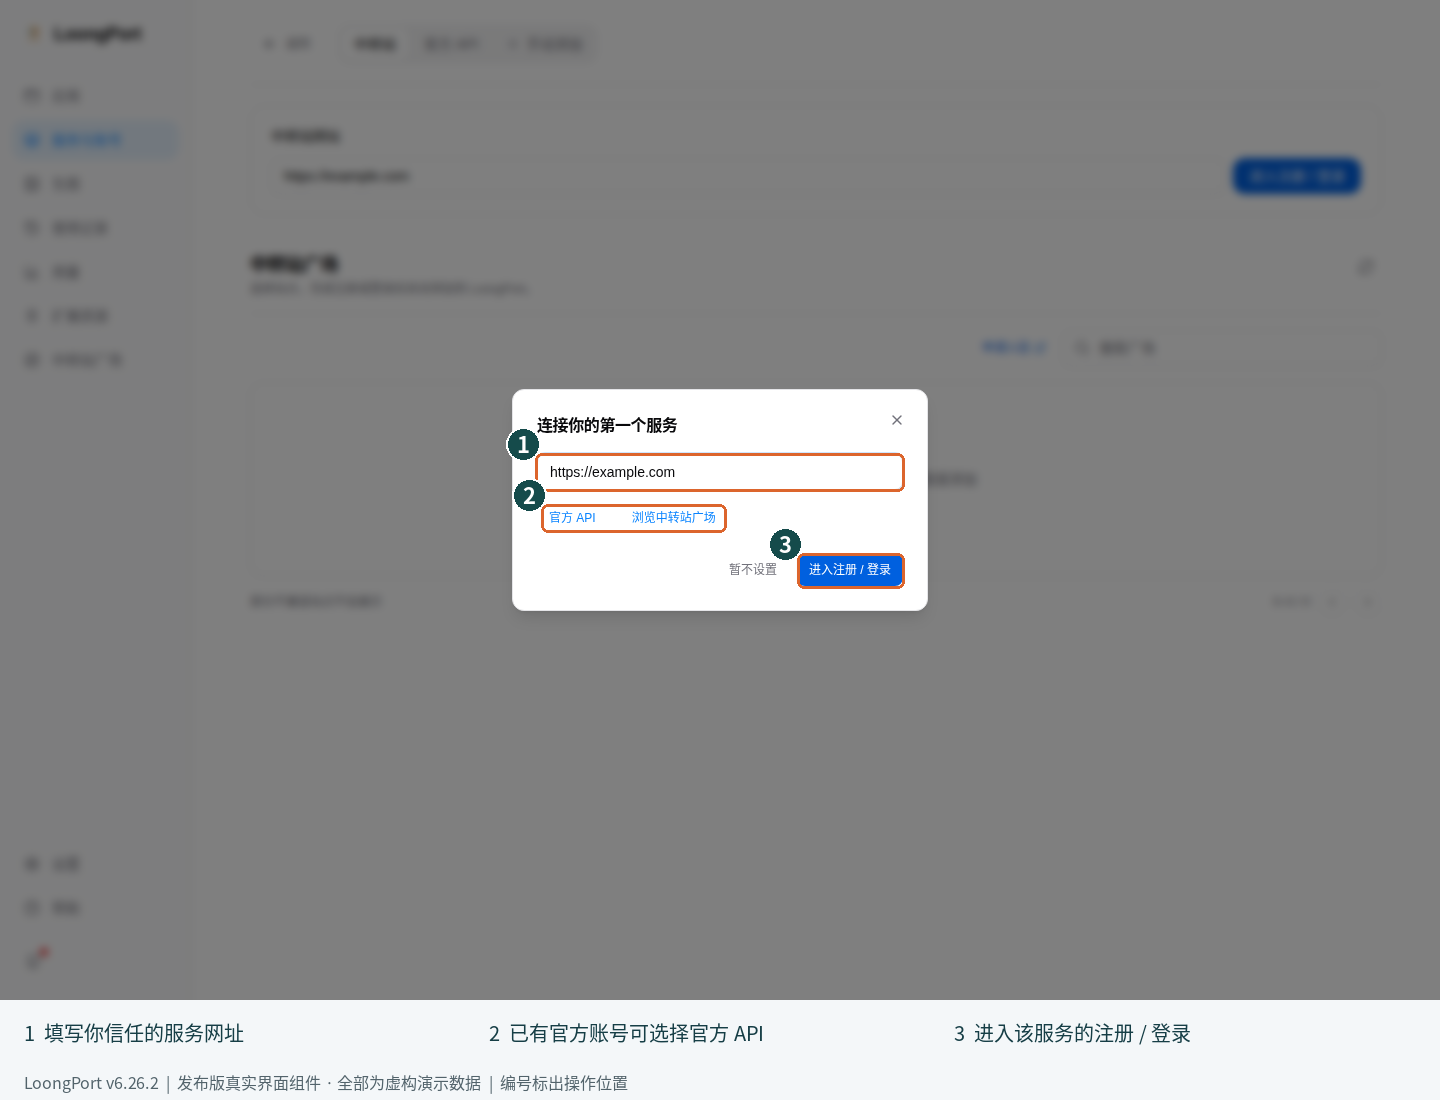
In the image: ① service URL; replace example.com with your actual service; ② optional official API and directory entries; ③ open the selected site.
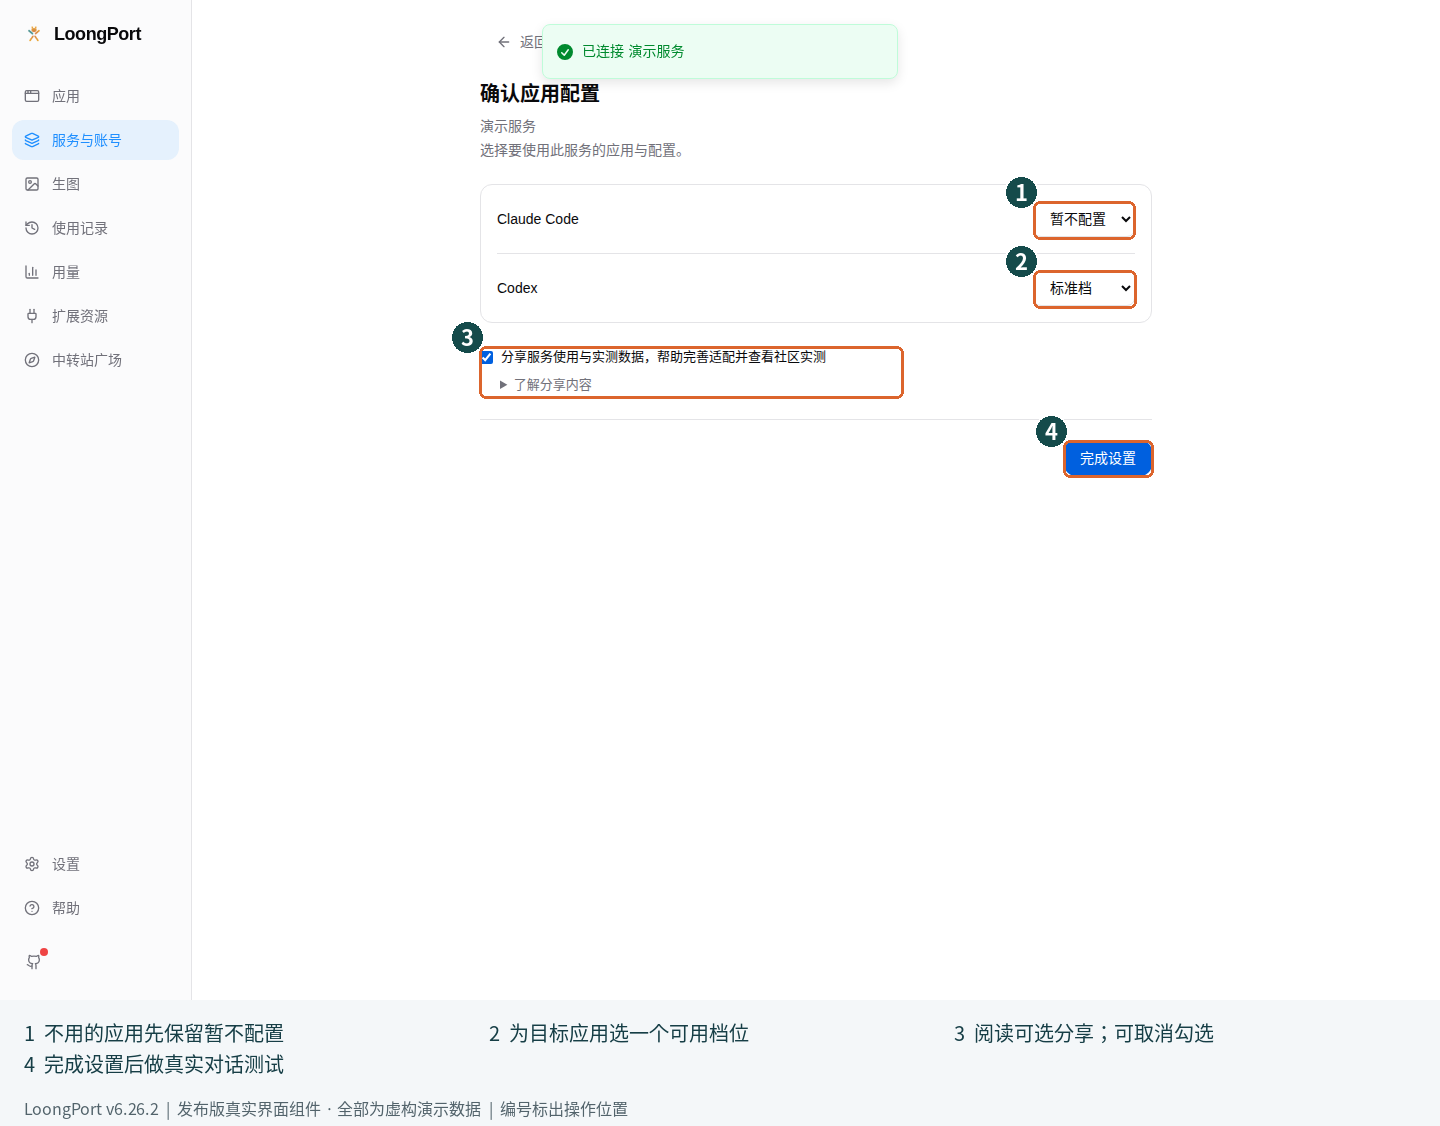
In the image: ① leave unused apps on “Leave unchanged” (暂不配置); ② select a tier for your target app; ③ read the optional data-sharing information and choose for yourself; ④ finish setup (完成设置).
LoongPort retrieves available tiers from the information supplied by the service and writes the selected apps' configurations in supported formats. Some services require creating or reusing API keys; these actions always concern the service account you selected.
Signs of success: the account appears in “Services & accounts,” and the “Applications” page shows its tiers and current configuration. You must still complete the real conversation test in 2.5.
If it did not work:
- Closed the sign-in window: click Go to sign-up / login again; do not register duplicate accounts
- Account saved but no configurations available: check the service's quota, subscription, group permissions, and model support, then refresh the account
- Site reported as incompatible: check whether it is a supported sub2api / new-api service. If you already have an API key, consider whether manual setup fits; automatic sign-in cannot be guaranteed for arbitrary websites
- Signed in but still marked expired: sign in to that account again from “Services & accounts.” Never post passwords, cookies, or sign-in responses in a public issue
2.3 Connect with an official API account
- Click Add service → Official API
- Select a provider actually listed on the page: DeepSeek, Zhipu BigModel, or opencode
- Complete sign-in on that provider's own page
- Return to Confirm application setup, choose a configuration for the target app, then click Finish setup
- Test it using 2.5
“Official API” means the provider's API service, not a subscription to a chat product such as ChatGPT or Claude. API billing, plans, and available models depend on the account's actual access rights. An opencode account may show different plan configurations; choose one you are entitled to use.
2.4 Only have an API key? Add it manually
Prepare these four items first. If any are missing, ask the provider:
| Field | Example | What to enter |
|---|---|---|
| Name | Demo service |
A name you will recognize |
| API address | https://api.example.com/v1 |
The complete Base URL supplied for the target app; do not add /v1 by guesswork |
| API key | REPLACE_WITH_YOUR_API_KEY |
A key generated by that service; do not save the example text as your key |
| Model ID | MODEL_ID_FROM_YOUR_PROVIDER |
The exact ID from the provider's model list; a display name may differ from the ID |
- First select the app to configure in the app bar, such as Codex
- Click Add service → Manual
- If the “About Common Config” (关于通用配置) explanation appears for the first time, read it and click Got it (我知道了). Choose a matching preset if available; otherwise choose Custom Configuration (自定义配置)
- Fill in the name, API address, API key, and model information. Forms differ between apps
- Check which API protocol the service supports. OpenAI Responses, Chat Completions, and Anthropic Messages are not interchangeable just because their names sound related
- Save, return to “Applications,” and click Use tier (设为当前) on the new tier
- Restart the target app and test it as described in the next section
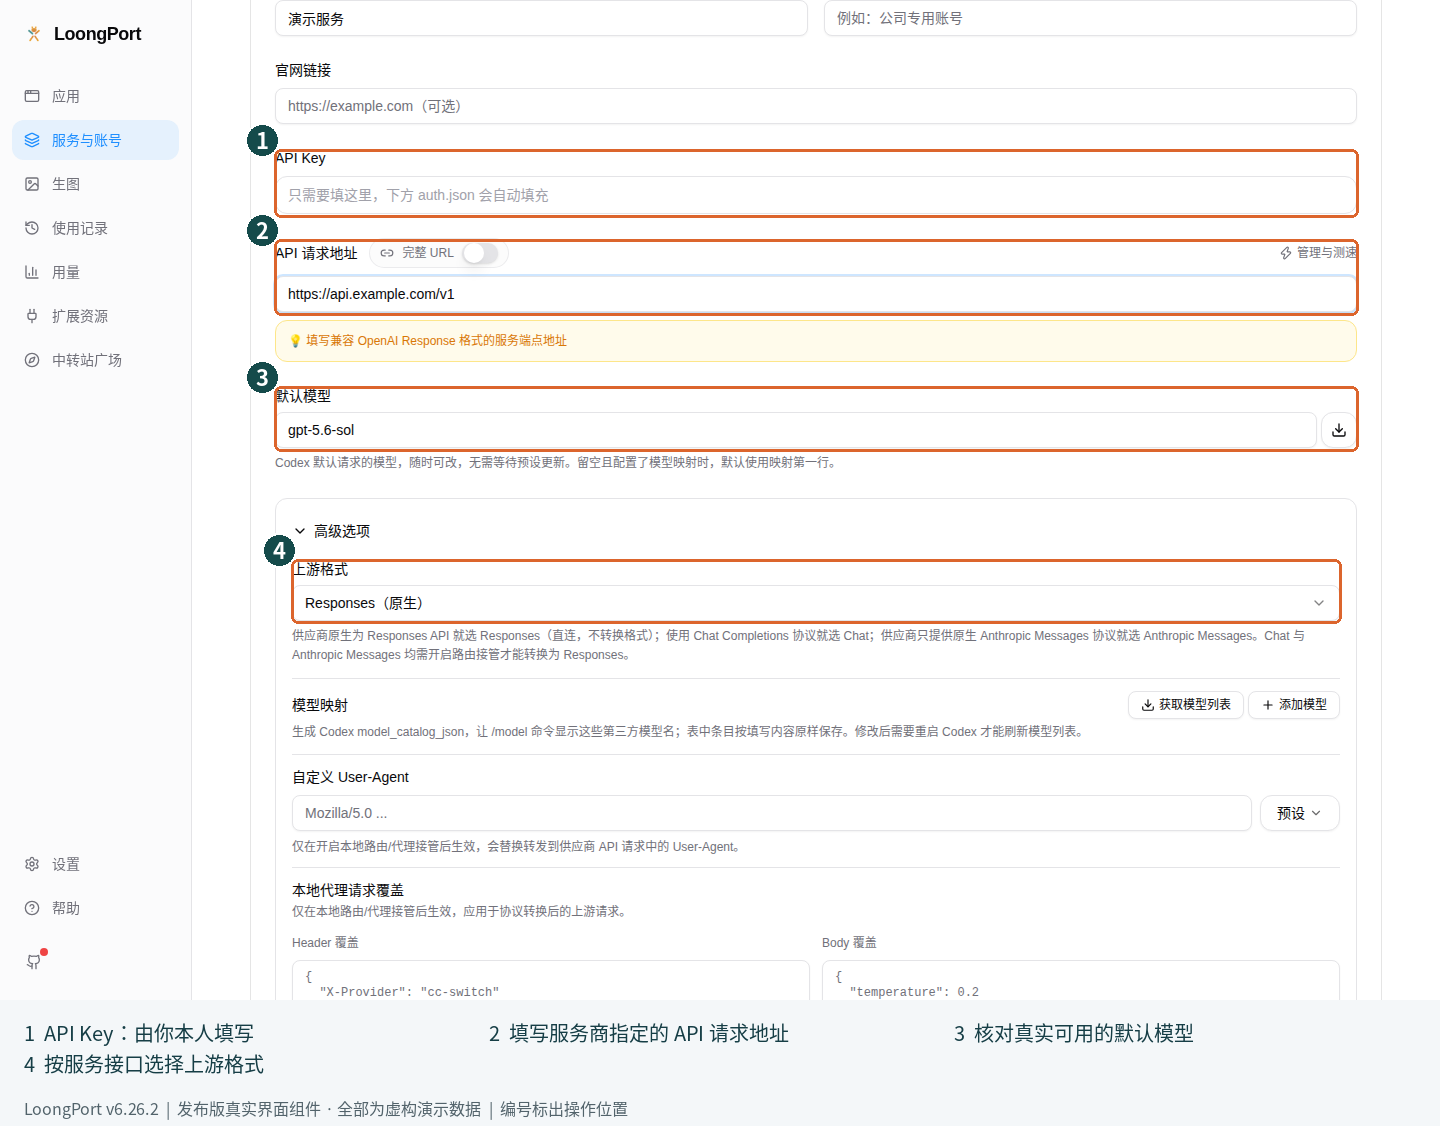
In the image: ① enter the key yourself, rather than the placeholder in the screenshot; ② check the API request address; ③ use a model the service actually supports; ④ the upstream format must match the service's API. No key was entered and no service was saved or called for this screenshot.
Avoid these mistakes: do not overwrite an existing configuration file with an entire tutorial JSON example. Never paste real keys into public chats, screenshots, or Git. A “Config Content” field does not mean beginners must hand-write JSON; use the existing form and presets first.
2.5 Check that it really works
- Return to Applications, check that the app name is correct, and confirm the intended tier is marked Current (当前)
- Exit and restart the target CLI. Codex configuration changes may also affect desktop apps that share its configuration. If an exit/restart confirmation appears, save your work first, then follow the prompt
- Send the target app a message without private information, such as:
Describe what you can do in one sentence - Wait for a normal reply before starting your own task
- If local routing is enabled, you can also check the corresponding request under “Usage.” This is an additional check, not a substitute for an actual reply
None of these alone proves success: successful sign-in, a “Saved” message, a “Current” badge, or a nonzero balance. Each confirms a different stage. Working access still depends on the target app sending and completing a request.
For 401/403, a missing model, or a connection failure, go straight to the troubleshooting table in 6.6. Do not create many new keys in succession while troubleshooting.
3 Switch to a backup tier automatically after a failure
3.1 Check what this version supports
In v6.26.2, the feature is called “Automatic failover” (自动故障切换). You decide which tiers may be tried and their priority. When the current request fails, the system tries other available tiers according to the applied list.
This version has no “Easy / Self-managed” (省心 / 自主) mode switch and does not offer “Cheapest / Fastest” (价格最低 / 响应最快) automatic selection strategies. Those retired features described in older material are not the same as current automatic failover. You can still use the table's billing multipliers, error rates, and time-to-first-token measurements to arrange priorities yourself.
This applies to Claude Code, Codex, Gemini, and Grok Build, which have full local-routing support. Native sign-in, some official accounts, and configurations that do not support this routing method do not participate; the interface explains why. Being able to add an app does not mean it supports every feature.
3.2 Enable it for the first time
Prerequisites: chapter 2 is working, the target CLI is initialized, and you have at least two compatible tiers for the same model that you are willing to use. With only one tier, the switch cannot create a backup service for you.
- Open Applications and select the target app
- Turn on Automatic failover (自动故障切换) next to “Available tiers” (可用档位)
- Resolve any initialization, connection, or configuration prompts first. Successful activation requires the local router to run and manage this app's connection
- Check the list's priorities, current tier, and explanations for tiers excluded from failover
- Send another test message in the target app to confirm it still works after activation
In the image: ① choose the app to manage; ② add a service (添加服务); ③ check the current tier (当前); ④ automatic failover (自动故障切换); ⑤ hover over a tier row to choose “Use tier” (设为当前).
Signs of success: the switch stays on, no “Automatic failover is paused” notice appears, and the target app's requests still work. To inspect the connection, open Settings → Connection settings (连接设置) → Local Routing (本地路由) and check the running status and whether routing is enabled for the app.
3.3 Arrange backups, then click Apply changes
- After enabling automatic failover, click Show all tiers (查看全部档位) and find the configurations you want to include
- To use a specific model, select it under Tier model (档位模型); you can also filter by account or search
- Drag to reorder, or click a metric column to sort. Lower numbers are tried first. Tiers showing “—” do not participate in automatic failover
- When Changes not applied yet (更改尚未生效) appears, review each item in the currently visible list
- Click Apply changes (应用更改), or Cancel (取消) if you do not want to change the active configuration
- Confirm that the pending-changes notice disappears, then make another real request
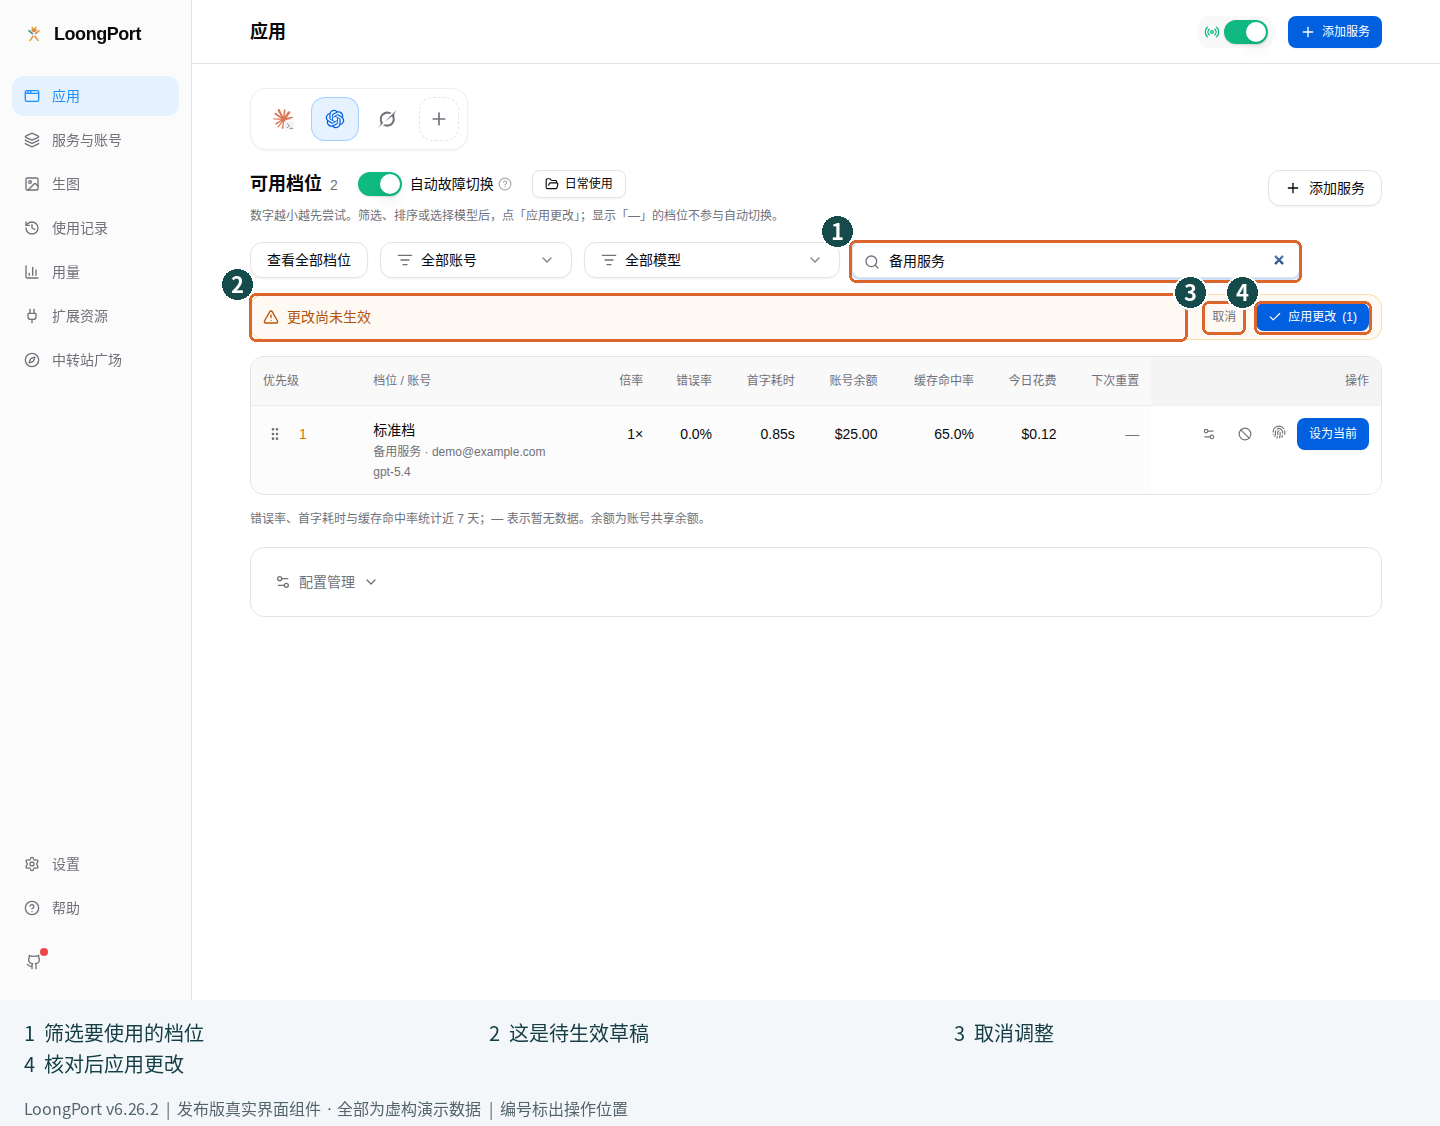
In the image: ① current filters; ② changes are still a draft (更改尚未生效); ③ discard this adjustment (取消); ④ apply after checking (应用更改).
An important distinction: with automatic failover enabled, filtering, sorting, and choosing a model can create pending changes. Merely inspecting the table does not change the active list. Clicking “Apply changes” can also apply the selected model and, when needed, choose a tier that supports it. Check the model, account, and list scope before applying.
A “—” in a metric column means no data or not applicable. It does not mean a zero price, no failures, or unlimited balance. Several rows may show a balance shared by the same account; do not add those balances together.
3.4 Save a frequently used order
Order profiles (配置档) next to “Available tiers” save tier order, not a complete backup of the application.
- Arrange the list as you want it
- Open the profile menu, click Save current order… (保存当前顺序…), and enter a name such as “Everyday use”
- Later, select a saved profile and check the pending list
- Click Apply changes as prompted
Saving with the same name overwrites that order profile. Importing or exporting order profiles transfers priorities; it does not create service accounts, keys, or available quota for someone else. A full restoration is not possible without the same tiers.
3.5 Where to look when a request fails
- Temporarily skipped: waiting for connection recovery (暂时跳过:等待连接恢复): check recent errors, service quota, and network status first; do not repeatedly click retry
- Skipped: selected model is not supported (已跳过:不支持当前选择的模型): choose a model this tier actually supports, or choose another tier
- Blocked (已屏蔽): you excluded this tier; unblock it only when you want to use it again
- Automatic failover is unavailable while using the current official sign-in. (当前使用官方登录,不进行自动故障切换): keep using official sign-in, or deliberately choose an API configuration that supports routing
- Automatic failover is paused (自动故障切换已暂停): click Resume connection (恢复连接), then check connection settings. An enabled switch does not prove requests are passing through the router
“Clear error history” does not mean an upstream problem has been fixed, nor does it replace changing a key. Keep error information until you have identified the cause, then clear it if needed.
3.6 Disable failover or return fully to direct connections
These three actions have different effects:
| What you want | Action | Result |
|---|---|---|
| Stop switching tiers after failures | Turn off Automatic failover on the Applications page | Stops automatic tier changes; local routing and app connection management may remain enabled |
| Remove only one app from local routing | Under Settings → Connection settings → Local Routing → Routing Enabled (路由启用), turn off the app | Restores that app's direct configuration; other apps can keep using routing |
| Stop the entire local router | Turn off the Routing Master Switch (路由总开关) in the same settings | Stops the service and restores the configurations it managed; affects every app that depends on it |
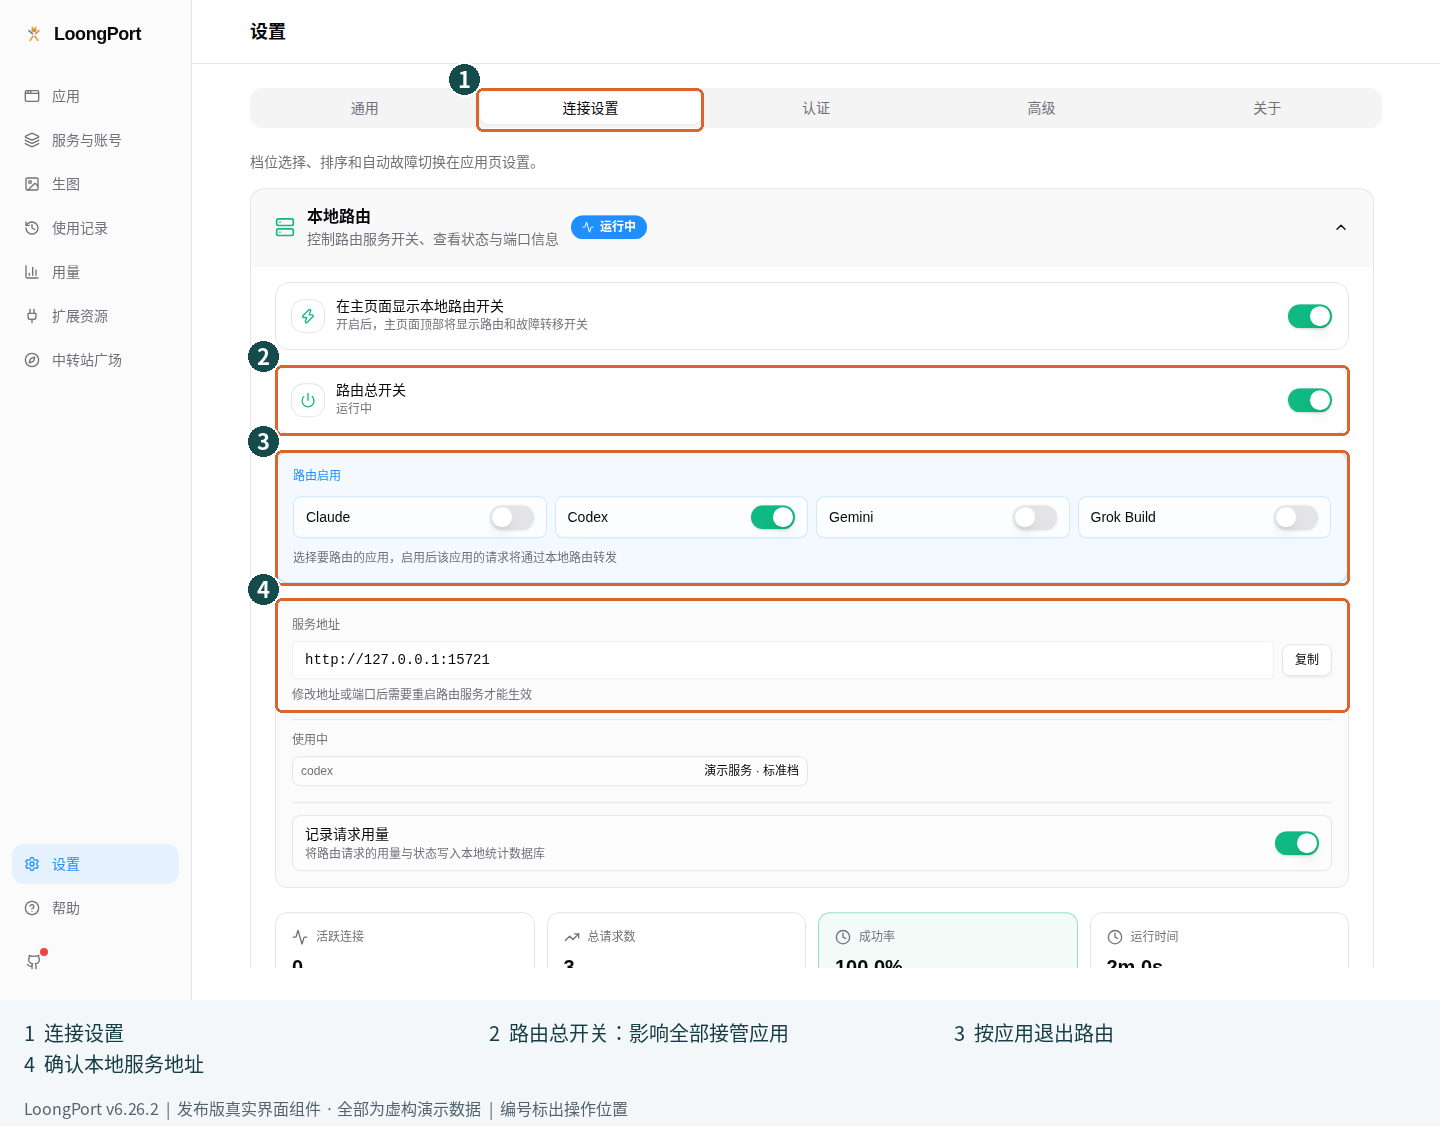
In the image: ① connection settings (连接设置); ② the main routing switch shared by all apps (路由总开关); ③ enable or disable routing for individual apps (路由启用); ④ local service address and port.
After restoring direct configuration, restart the target app and test it. Do not simply quit the background service, delete configuration, or change ports manually while routing still manages the app; the app may keep pointing to a local address that has stopped running.
4 Switch models and manage services
4.1 Switch tiers manually
- Select the target app under Applications
- Find the tier you want and check its service, account, and model
- Click Use tier (设为当前)
- If an exit/restart confirmation appears, take care of your work in progress before choosing the appropriate action
- Restart the target app and send a test message
Selecting a new tier may send subsequent requests to another service provider. First confirm that you are allowed to send the conversation, code, or attachments to that service.
4.2 Change models only after checking service support
- Select the model you need in the Tier model (档位模型) filter. This filter does not appear when there is only one model in total
- Use only tiers that explicitly support the model. If you do not recognize a model name, check the provider's model list first
- With automatic failover off: filtering only changes what you see. Click Use tier on the target tier to apply that tier and the selected model
- With automatic failover on: check the pending model and tier list, then click Apply changes. Filter results are not an already-applied configuration
- Confirm the active model in the target app, then send a short test message
Search helps find configurations; it does not purchase access or make an unsupported model available. Model catalogs may lag behind. If the server returns “model not found,” use the provider's actual supported-model list as the reference.
4.3 Connection testing and model verification are different
- Connectivity / speed tests: help determine whether a request can complete and how long it takes; the test itself may incur charges
- Model verification: uses limited evidence on supported managed tiers to help check whether model behavior matches its stated identity; it is not official certification or a definitive identification
To verify a model:
- Open Model verification (模型验证) in a supported tier's actions
- Select a model offered by that tier
- Read the notice, start verification, and wait for the result. Do not submit the same task repeatedly
- Read the conclusion and evidence, and check with the provider if you have questions. Use the cancel control if you need to stop
An absence of warning markers does not mean verification has passed. “No data” does not mean poor service quality. Do not make definitive accusations based on a single verification report.
4.4 Expired sign-in, refreshing, topping up, and reconciling charges
- Click Services & accounts and select the account to manage
- Sign in again if the session has expired. If sign-in is still valid but tiers have changed, refresh the account
- If you need credit, use that account's top-up entry and check the opened page's domain, amount, and plan
- To check spending, review local “Usage,” then the site's usage/billing page or Billing reconciliation (扣费对账)
An expired sign-in session is different from an invalid API key. Some accounts' existing keys continue to work after the session expires, so do not delete every configuration as soon as you see an expired-login notice.
Local cost estimates and actual provider charges may use different price lists or time ranges. Align the time window when reconciling and account for top-ups, requests from other devices, plans, multipliers, caching, and pricing differences. A single ratio does not prove overcharging.
4.5 Custom configurations, universal providers, and official sign-in
- Edit or duplicate a custom configuration: expand Manage configurations (配置管理) on the Applications page and find the item. Manage configurations generated from a service account in that account's details under “Services & accounts,” so a refresh does not appear to have “lost” your changes
- Universal providers (统一供应商): open Resources → Universal providers to maintain provider configurations for multiple apps. Check each target app, protocol, and model; do not copy one app's format to every app
- Switch to an existing official configuration: choose the app's existing official configuration and restart when prompted. Codex's official-credential protection switch is under “Settings → General.” This is different from the “Restore official sign-in” reset described below
- Desktop apps: Claude Desktop and Claude Code use different configuration formats. Select the correct app before using its direct-connection or model-mapping form. Model mapping requires local routing; not every CLI instruction applies to a desktop app
OpenCode, OpenClaw, Hermes, and Pi use their own native configuration methods and may allow multiple providers at once. “Enable” does not always mean selecting a single global provider. The app's own interface determines the final model selection.
4.6 Manage subscription-authorized accounts in the OAuth center
Settings → Auth (认证) → OAuth Authentication Center (OAuth 认证中心) has three account areas: GitHub Copilot, ChatGPT (Codex OAuth), and xAI (Grok OAuth). This capability is marked Beta in the interface. It is separate from “Official API” accounts and does not guarantee that any subscription can be used with any app.
- First confirm that your subscription, intended use, and target app comply with the platform's terms, then open the relevant account area
- Click sign in/add account and complete authorization on the platform's own page. Do not enter the platform password on a third-party page
- Return to LoongPort and confirm the correct account is shown. If you have several accounts, set a default as needed
- Select the account in a provider form that supports this authorization method. Setting a default account does not itself switch the target app's provider
- If the account is marked “Sign-in required,” use its sign-in entry. Before removing an account you no longer need, check which configurations depend on it
Success means the authorized account is recognized, the target configuration is correctly linked, and a real request completes. A row in the account list alone does not prove all calls will work. Never share authorization responses, cookies, tokens, or recovery codes.
4.7 Return to ChatGPT native sign-in when needed
Use this only when you deliberately want to remove LoongPort's Codex routing and establish official sign-in again. Ordinary tier switching does not require it.
- Save work in progress in ChatGPT
- Open Settings → Auth → ChatGPT (Codex OAuth)
- Click Restore official sign-in (恢复官方登录) and read the confirmation: the app will close ChatGPT, remove LoongPort routing, and delete the current Codex sign-in state after backing it up
- After confirming, reopen ChatGPT, sign in to your official account again, and test it
Windows warning: this action forcibly closes ChatGPT without a save reminder. Backing up sign-in state does not mean you will be signed in automatically later. Make sure you can complete official sign-in yourself.
5 Images, history, usage, and extensions
5.1 Generate images in LoongPort
Have this ready: a service account with an available image-generation group and quota. A regular chat tier does not necessarily support image generation.
- Add or refresh the service account so its image tiers appear on the Images (生图) page
- Open Images. To manage tiers, choose Profiles (接入配置) and enable the tier you want
- Return to Generate (生成) and check Current profile (当前接入配置)
- Describe the image and choose a supported size, quality, and image count. Start with one image for your first test
- Click Generate and wait for the result under History (生成记录)
- Use Reveal in folder (在文件夹中显示) to find the actual file
Image count affects cost, and concurrent submissions may issue several requests at once. Wait when a request is slow instead of repeatedly clicking Generate. If only some images succeed, keep those results before handling the failed portion.
If no connection configuration appears, check whether the service actually offers an image-generation group. Renaming a chat model to an image model will not make image generation work.
5.2 Use the image tool from a CLI conversation
- Select an image connection configuration as described above
- On the “Images” page, check Offer the image tool in Codex / Claude chats (在 Codex / Claude 对话中提供生图工具). This is enabled by default in this release. If it has been disabled and you need it, turn it on again
- This release registers the tool for Codex, Claude Code, and Gemini CLI. After the first configuration write or after re-enabling it, restart the CLIs you actually use so they reload tool settings
- Explicitly ask to use the image tool in your conversation, and check the tool confirmation and result shown by the CLI
Image configuration is independent of the chat tier; you do not need to replace a working chat tier to generate images. Whether the CLI invokes the tool, its permission prompts, and the output location depend on the current CLI and the page's displayed information.
5.3 Check usage and request errors
- Click Usage (用量) in the left navigation
- Select a date range, then narrow it by app, provider, or model
- Review request counts, tokens, costs, and trends, then open relevant request records to inspect errors
- For reconciliation, record the time, target app, and model. Remove keys, account details, and conversation content before sending information to a provider
If there are no records, first check the collection source, date range, and the local router's “Record Request Usage” (记录请求用量) setting. Requests from other devices, unrecorded paths, or unsupported apps may not appear here. An empty chart does not prove there was no spending.
5.4 Find and resume a conversation
- Click Activity → Session history (使用记录 → 会话历史)
- Select the app and search by title or content
- Select a session and preview it to confirm it is the one you want
- If the interface offers a resume action or command, continue using the method supported by that app
Not every app supports direct resumption. Continuing an old conversation through a different service may also fail, especially when its history contains encrypted reasoning specific to the original service. Test the current configuration with a new session first so you do not mistake a history-format issue for an invalid key.
Want to keep official and third-party Codex sessions together?
- Open Settings → General → Codex App Enhancements → Unified Codex session history (统一 Codex 会话历史)
- Read the confirmation when enabling it and decide whether to migrate existing official sessions too. A backup is created before migration
- Check the results in session history and test the current configuration with a new session
- When disabling it, you can choose to restore the sessions imported at that time if a migration backup exists. Read the restore options carefully; turning the switch off does not automatically roll back all history
Unified history cannot guarantee that encrypted reasoning will remain usable across services. If new sessions work but old ones fail, check history compatibility first.
Sessions may contain code, file paths, attachments, and personal information. Review each item before sharing screenshots or exports. Do not publish an entire session directory to “make troubleshooting easier.”
5.5 MCP: connect tools and data sources
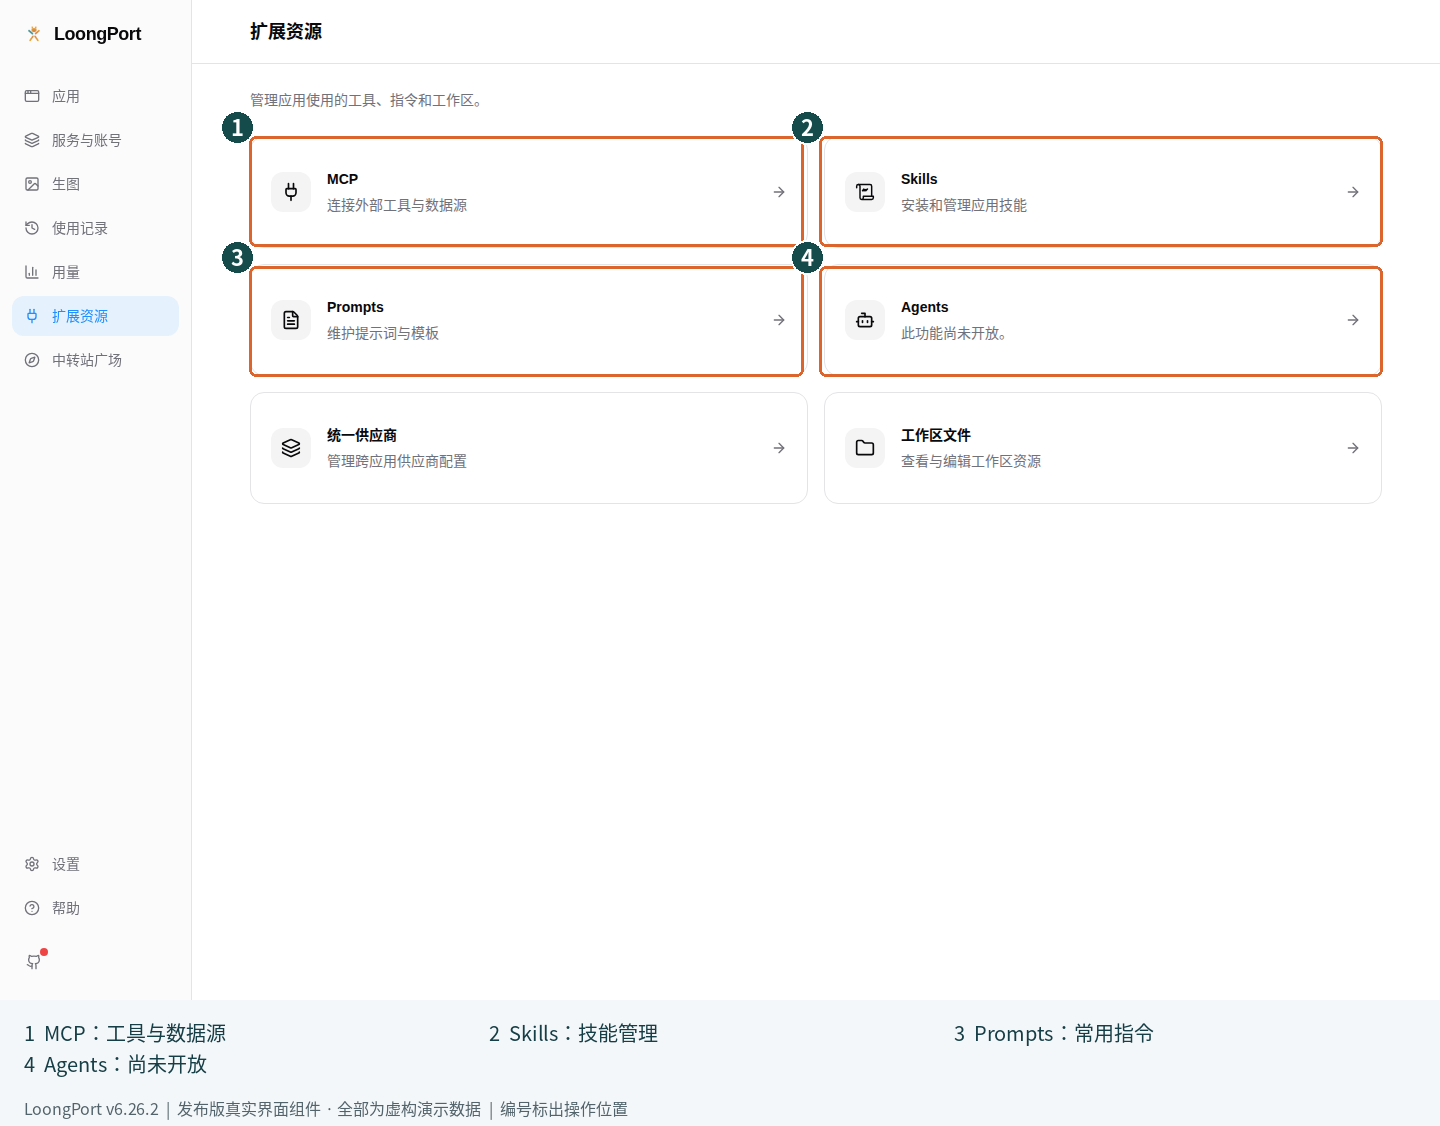
In the image: ① MCP manages tool connections; ② Skills manages skills; ③ Prompts manages reusable instructions; ④ the general Agents entry is not available yet (尚未开放).
- Select the target app, then open Resources (扩展资源) → MCP
- Add a trusted MCP service or import an existing configuration of your own
- Follow the service's official instructions to enter the launch command or connection address and required parameters
- Select the apps to sync to and save
- Restart target apps that need to reload configuration, and confirm the tools are recognized
MCP can run local programs, read files, or access external services. Understand the permissions first. Do not copy execution commands from unfamiliar configurations or put authentication information in public repositories. Pi has no equivalent native MCP registration entry; this release does not invent one for it.
5.6 Skills: install and sync skills
- Open Resources → Skills
- Discover or add skills from trusted sources, reviewing their content and origin first
- After installation, select the target app and check sync status
- Return to that app and test the skill using its own skill workflow
- Review changes before updating. When a skill is no longer needed, uninstall it from the management page and check the affected scope
Skills may include scripts, not just instructions. Appearing in search results does not make a source safe. Refer to the Skills management page for storage locations, synchronization behavior, and supported apps.
5.7 Prompts: save reusable instructions
- Select the target app, then open Resources → Prompts
- Create an entry with a name and the instructions you want to reuse
- Save and enable it. Before switching, check whether it will write to that app's instruction file
- Confirm that the target app has loaded the instructions
Apps use different instruction files and scopes. Pi also has separate entries for system prompts, project instructions, and templates. Never put personal passwords or project secrets in a template you intend to share publicly.
5.8 Project switching, workspaces, and app-specific tools
Project switching is useful for repeatedly switching a set of configurations; it is not a required first-run step.
- Enable Show project switcher (显示项目切换) under Settings → General
- Set the current app's provider, MCP, Skills, and other resources as desired. Then select New project (新建项目) from the project entry at the top, name it, and save the current snapshot
- Later, choosing a saved project from the project menu directly applies that group's snapshot. Check the current provider and resources before starting work
- To undo a switch, reapply a previously saved project. No project (不使用项目) only removes the project association; it does not restore the actual configuration to its previous state
Claude Code, Claude Desktop, and Codex are three independent groups, each saving and applying its own snapshots. Switching one does not save or switch another. A shared project name does not mean all apps have saved their own snapshots. If “Not saved for this app yet” appears, check that group's scope first. Switching saves the current configuration back to the previous project, so keep a separate backup before important experiments.
Other tools shown for specific apps:
- Workspace files (工作区文件): open from “Resources,” confirm the current app and target directory, then edit the relevant files. Understand their purpose first; do not use your entire personal directory as a workspace
- OpenClaw: after switching to OpenClaw, Resources offers dedicated entries for environment variables, tool permissions, and agent defaults. Understand the consequences before changing permissions
- Hermes: after switching to Hermes, you can view/edit persistent memory or open the local console. Deleting memory affects future behavior; keep anything you need first
- Agents: the general Agents page is still a “Not available yet” (尚未开放) placeholder. It cannot create or manage general autonomous agents
These are advanced options to use as needed. One successful conversation is enough for your first day; you do not need to open every feature.
6 Settings, backups, updates, and troubleshooting
6.1 Language, appearance, and credential protection
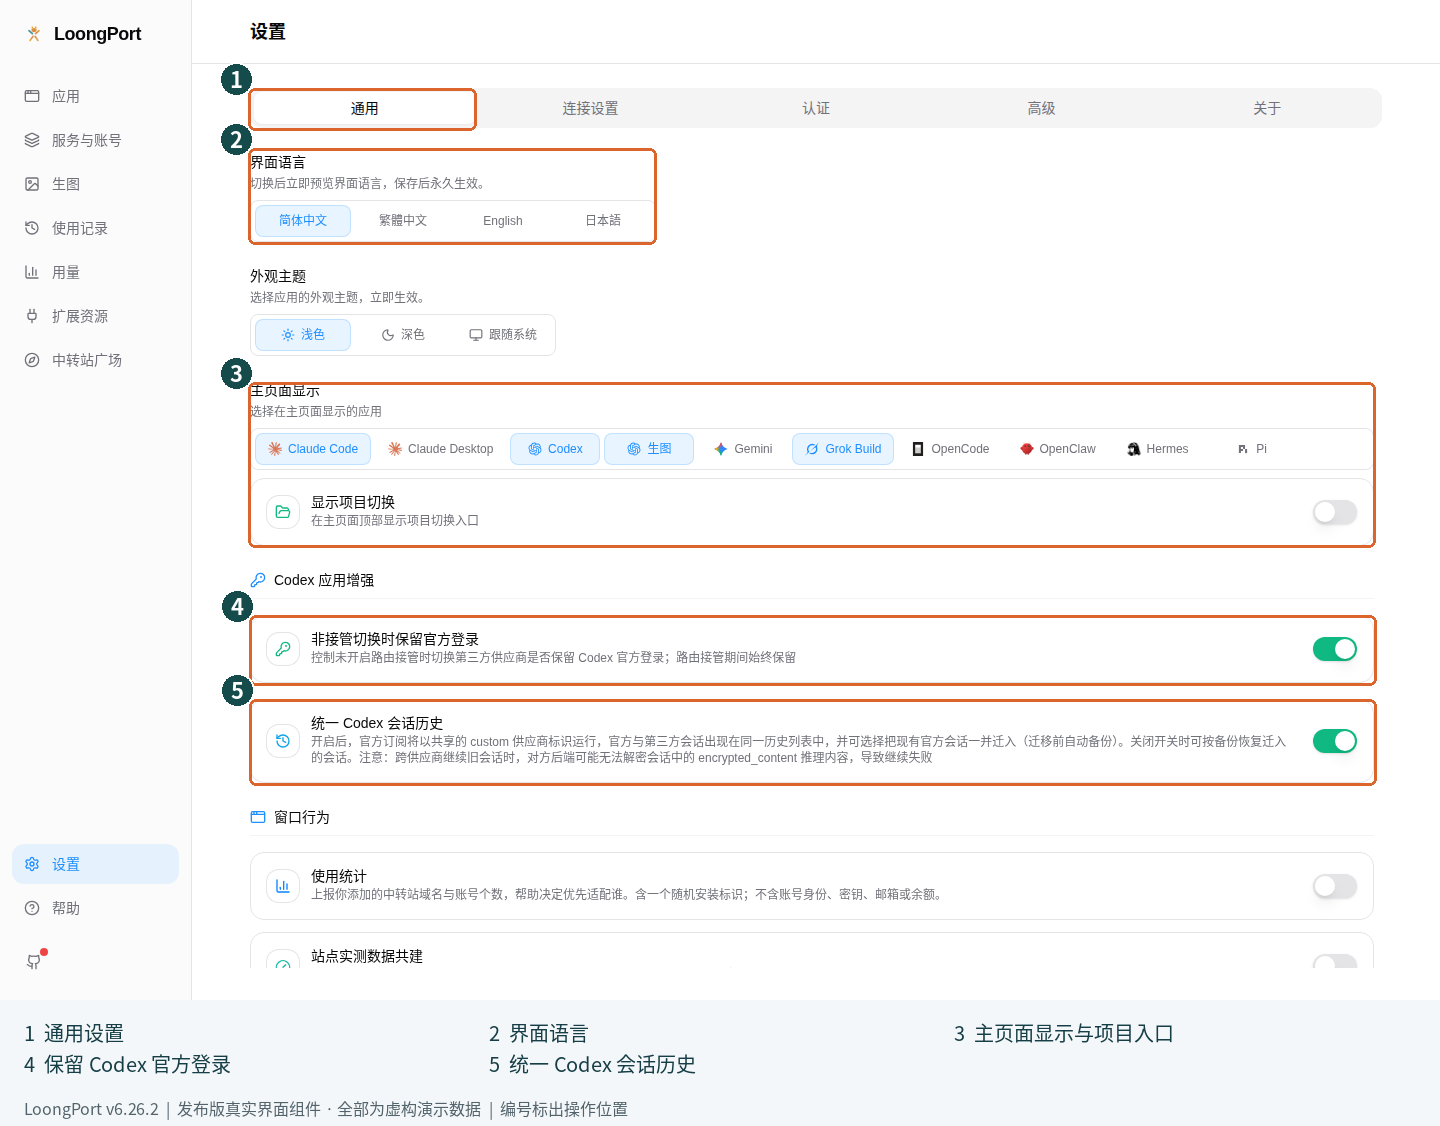
In the image: ① General (通用); ② Language (界面语言); ③ main-page app and project entries; ④ Keep official login for direct switches (非接管切换时保留官方登录); ⑤ Unified Codex session history (统一 Codex 会话历史).
- Language and theme: Settings → General lets you choose the interface language and light, dark, or system theme
- App entries: under Settings → General → Homepage Display, enable only the apps you actually use
- Credential protection: Settings → Auth. The system credential store is used by default. If it is unavailable, the first launch may ask you to set a protection password
- Protection password: set and safeguard it yourself. Never capture it in screenshots, commit it to Git, or send it in chat. You may need it when restoring on another computer; an ordinary service-account password is not a substitute
- Cloud sync: open Settings → Advanced → Cloud Sync. It supports WebDAV or S3-compatible storage. Follow the sequence in 6.4 for a first migration between computers
Change your first-run sharing choices: under Settings → General → Window Behavior, adjust Usage statistics (使用统计) and Crowd-measured site stats (站点实测数据共建) separately. These are independent switches. Disabling one stops further sharing governed by that switch; it does not automatically delete data the recipient already has.
If the first launch says “The system credential store is unavailable,” check the system's credential service or session status, or set a protection password yourself as prompted. Do not delete credential files to skip this screen.
6.2 Back up before making major changes
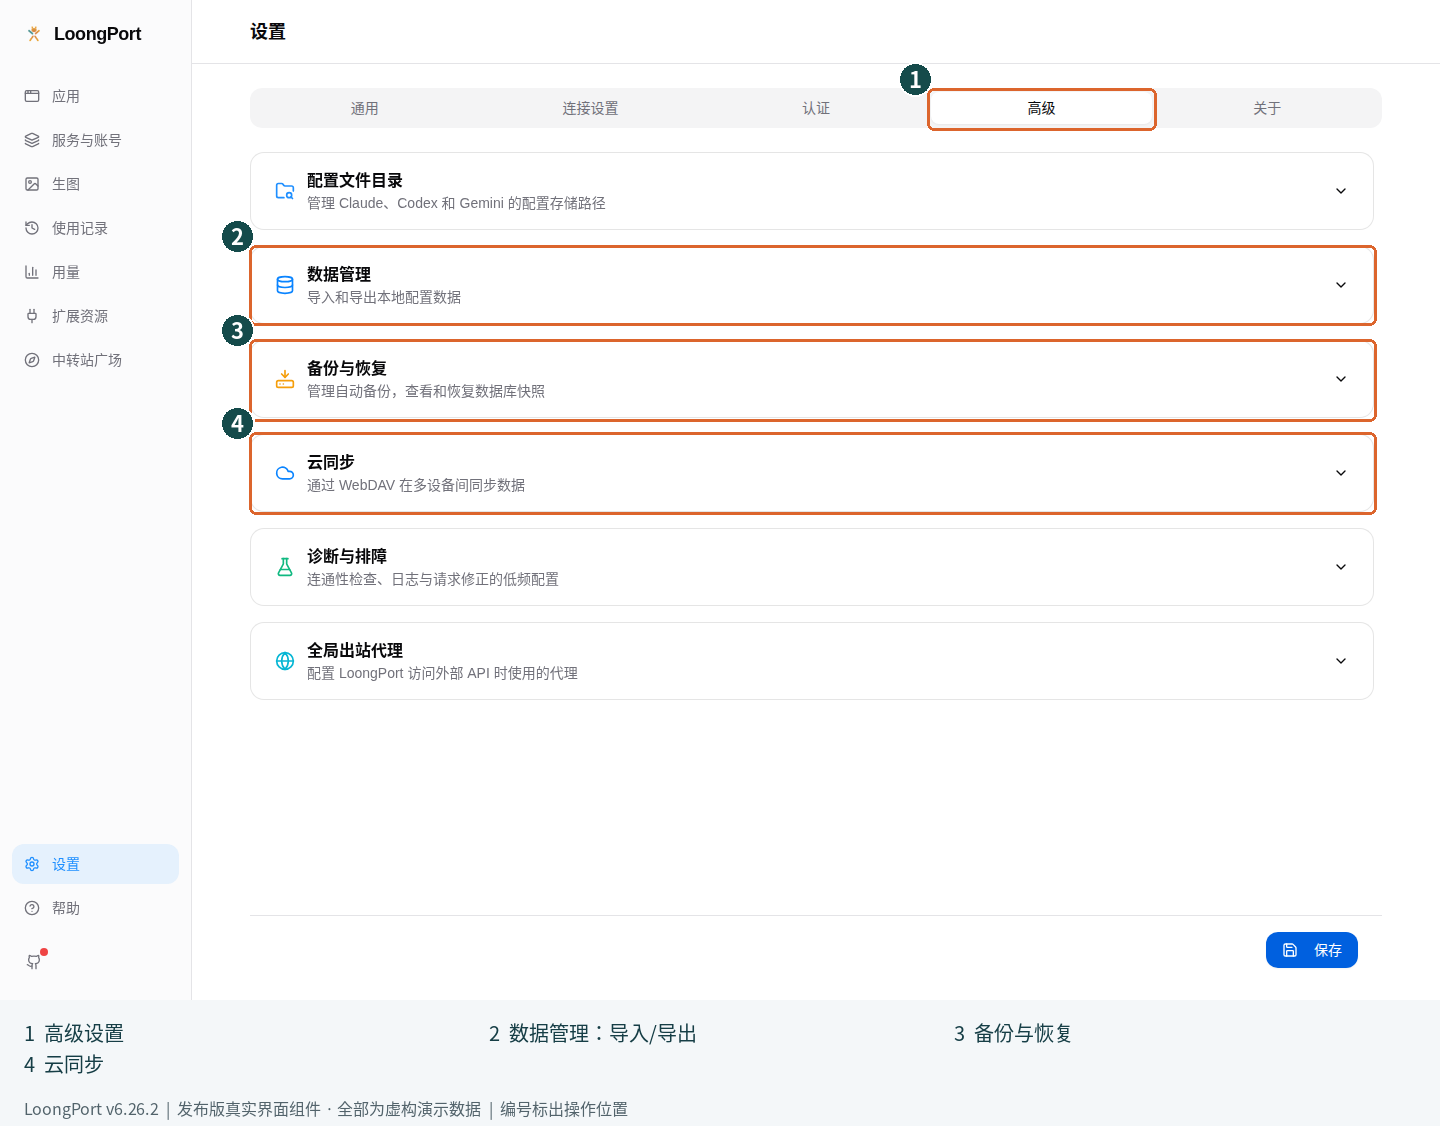
In the image: ① Advanced (高级); ② data import/export; ③ local backup and restore (备份与恢复); ④ cloud sync (云同步).
- Open Settings → Advanced (高级) → Backup & Restore (备份与恢复)
- Click Backup Now (立即备份) and confirm a new snapshot appears in the list
- Before exporting to another computer, set a protection password yourself under Settings → Auth → Credential protection (凭据保护). This is required even when the system credential store works; export is refused without a protection password
- Use Settings → Advanced → Data Management (数据管理) → Export SQL Backup (导出 SQL 备份), save it somewhere you control, and remember the protection password used to create this backup
- Check that you have both the backup and what you need to restore it before upgrading, migrating, or making broad changes
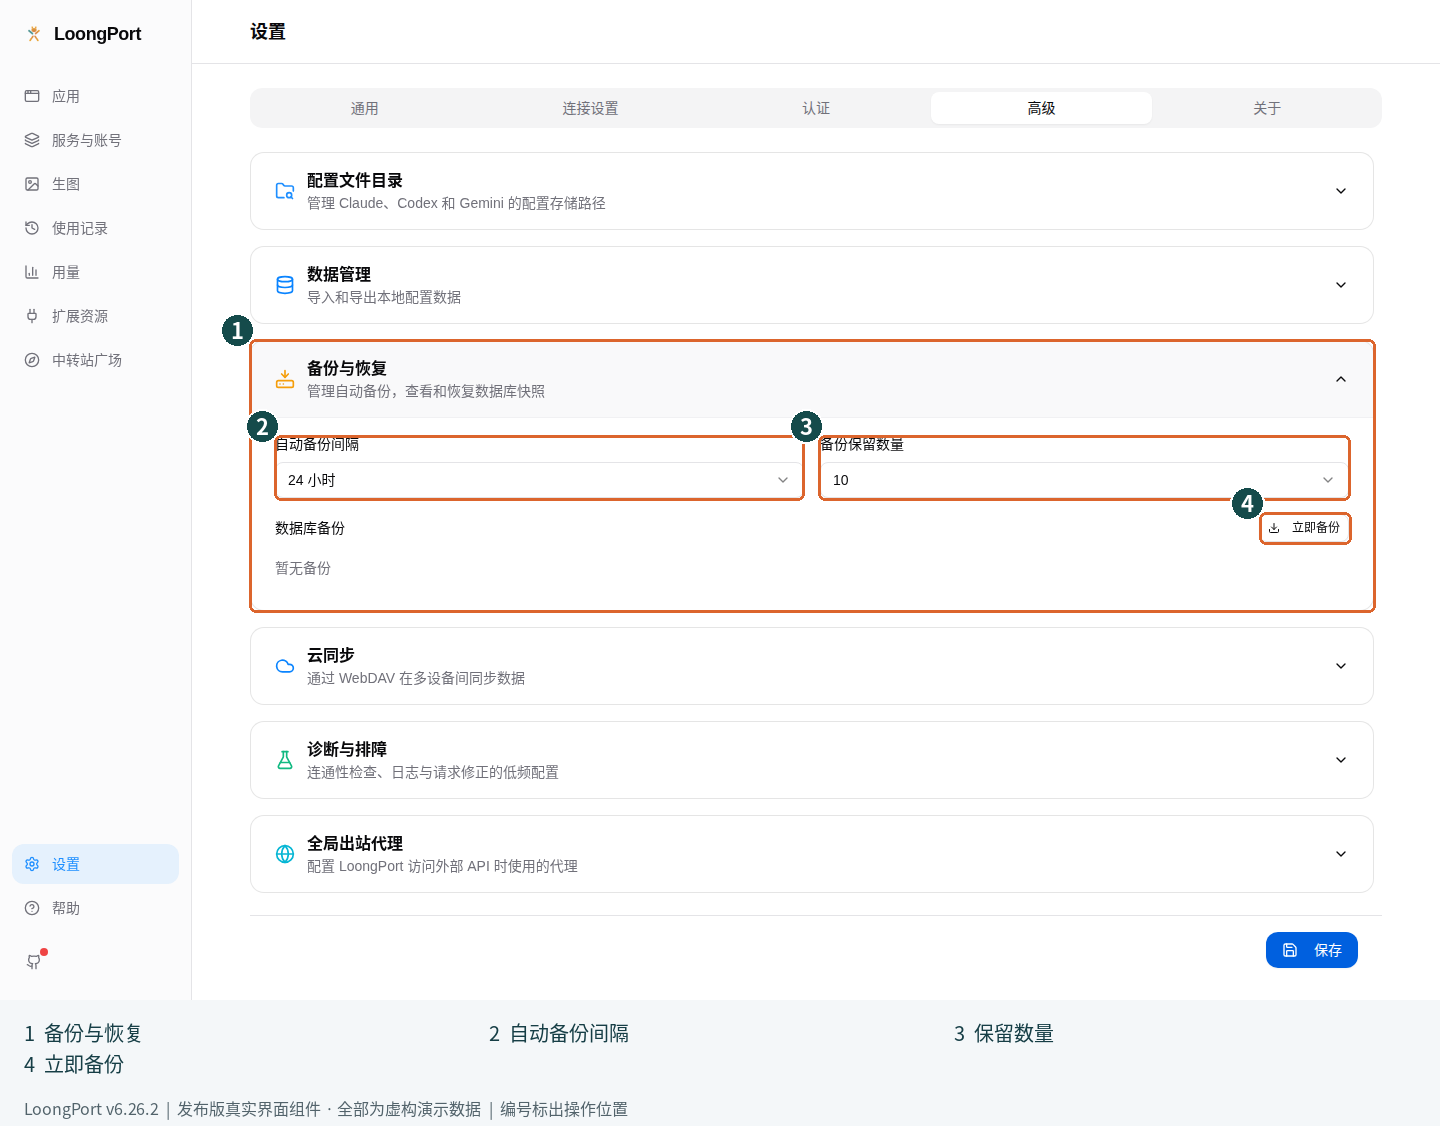
In the image: ① expand Backup & Restore (备份与恢复); ② automatic backup interval; ③ number of backups to keep; ④ Backup Now (立即备份).
Local snapshots, portable exports, and cloud sync are different things. A backup is not a sample file that is safe to share publicly: it may include service configuration, account information, and credential-related data. Restrict access even when it is encrypted.
When restoring, first back up the current state and select the correct snapshot or export file. For an encrypted backup, enter the protection password used when that backup was created. Import replaces configuration while keeping local sign-in and sync credentials; the local protection password stays unchanged. Older unencrypted backups do not require that password. Read the overwrite notice before confirming. After restoration, check services, each app's current tier, and a real request rather than relying only on “Import successful.”
6.3 Migrate from cc-switch
- Keep a backup in the original tool and close other tools that would modify the same configuration
- Open LoongPort's Settings → Advanced
- Import from cc-switch (从 cc-switch 导入) appears when importable cc-switch data is detected. Its absence is not a reason to copy database files arbitrarily
- Open the import preview, check its scope and counts, then confirm
- After import, check each app, its current provider, and resources, and complete a real request
Migration copies configuration within the existing import feature's supported scope. You do not need to delete the original cc-switch data. The entry may be absent if source data is missing or its version is too new. Do not switch the same app's configuration back and forth in both tools simultaneously.
6.4 Imports, exports, and profiles are different
| Name | Main purpose | Do not confuse it with |
|---|---|---|
| Import/export configuration in Settings | Move or restore app data | A document safe to publish |
| Backup and restore | Return to a previous local snapshot | Guaranteed compatibility with any older version |
| Order profiles next to automatic failover | Save a set of tier priorities | A full backup of service accounts and keys |
| Project-switching snapshots | Switch a set of project resources within supported scope | Changing only one sorted list |
Before using an import file or deep link from an unfamiliar source, check its target address, app, and contents. Importing configuration can change who receives your requests. Do not confirm just because someone says it will “fix things.”
Move data to another computer for the first time
- On the old computer with the complete data, make a backup and prepare the protection password needed for restoration
- Open Settings → Advanced → Cloud Sync (云同步), select WebDAV or S3 Compatible, and enter your trusted storage service's connection information, remote directory/object path, and sync profile name
- Click Test Connection (测试连接), confirm it works, then Save Config (保存配置). Check the connection-test result after saving as well. Enter credentials yourself and keep them out of screenshots and public instructions
- On the old computer, click Upload to Cloud (上传到云端) and check the destination and snapshot information. Confirming the upload overwrites existing sync data at that location
- Configure the same destination on the new computer and first choose Download from Cloud (从云端下载). Check the source device, timestamp, and contents; back up any local data before confirming restoration. Downloading and restoring replaces local data and skill configurations
- If prompted to restore cloud protection, enter the cloud snapshot's protection password and follow the restore instructions. Unlike ordinary configuration import, this cloud-restore flow may change the device to use the cloud snapshot's protection password
- Once services, resources, and real requests work, decide whether to enable Auto Sync (自动同步). Auto sync uploads after local database changes; it does not guarantee automatic conflict resolution between devices
Do not upload empty data from the new computer first. Check which sync method is enabled when switching between WebDAV and S3; they are not two simultaneous backup destinations. If the cloud has no data or the version is incompatible, stop restoration and check the target directory and versions instead of repeatedly overwriting data.
6.5 Update or roll back
- Before upgrading, keep a backup as described in 6.2 and save work in progress
- Open Settings → About (关于) and check the current version and update notice
- Stable-release users should leave beta updates off. Consider the beta channel only if you actually need a beta feature such as ZCode
- After installation, reopen the app and check the version, current configuration, and a real request
The Windows installer build, macOS, and Linux AppImage support in-app updates. Update Windows Portable and Linux .deb/.rpm builds using their respective distribution methods; do not apply the installer build's steps to them.
To roll back, close the app, choose a known-working older version from official Releases, and prepare a compatible backup. Do not let an older program directly overwrite a newer database. If you see “Database version is too new,” follow the recovery screen or version notes and preserve the existing data. Deleting the database is not a rollback procedure.
6.6 Troubleshoot by symptom
| What you see | Start here | Do not start with |
|---|---|---|
| Cannot find Codex, Claude, or another app | More applications, or Settings → General → Homepage Display | Reinstalling every program |
| App configuration not found | Install and launch the target app once; check the directory in Settings | Deleting existing configuration directories |
| Sign-in succeeds but no tiers appear | Check service groups, plans, and quota, then refresh the account | Repeatedly registering accounts or creating keys |
| Still using the old service after switching | Check the selected app and “Current” tier, restart the target app, and check for conflicting environment variables | Only refreshing the LoongPort list |
401 / 403 |
Check the service address, key permissions/validity, and matching account | Posting the key publicly for help |
| Model missing or unsupported | Check the exact model ID and protocol against the provider's list | Only changing the display name to the model you want |
Cannot connect to 127.0.0.1 |
Check whether local routing is running and still manages the app; restore the connection or remove routing as in 3.6 | Changing ports randomly or stopping the background service without restoring configuration |
| Failover is enabled but not working | Look for “Paused,” and check routing, model compatibility, and the applied list | Treating an enabled switch as proof of success |
| Reordering has no effect | Look for “Changes not applied yet,” then apply or cancel | Dragging repeatedly without applying |
| Empty usage charts | Check dates, app filters, and recording sources; enable router usage recording and test again | Assuming there has been no spending |
| No tiers on the Images page | Check whether the account provides an image-generation group, then refresh the service | Renaming a chat model to make it appear to be an image model |
| Old sessions fail to resume, but new sessions work | Check cross-provider history compatibility and keep old records | Immediately rotating every key |
| Update download fails | Check the network and official Releases; update manually with the correct package | Using a “repair package” from an unfamiliar mirror |
| Unlock or import fails | Check the protection password, system credential store, version, and file source | Deleting encrypted files or publishing the database |
If it still does not work, prepare this minimal report:
- LoongPort version, operating system, and target app version
- Where you started, what you clicked, what you expected, and what actually happened
- Error text, when it occurred, and whether it also occurs in a new session
- Screenshots with accounts, keys, domains, paths, and conversation content redacted
- If logs are needed, obtain them from diagnostics and review their contents first; do not upload your entire personal configuration directory
Use the official issue tracker for public reports. For security vulnerabilities or unredacted data, first read the security policy; do not post them publicly.
6.7 Advanced settings to adjust only when needed
- Custom configuration directories: Settings → Advanced → Configuration Directory (配置文件目录). Select the target app's actual directory, save, and restart as prompted. Change this only if the app really uses a custom directory; mismatched paths can make changes appear ineffective
- Global outbound proxy: Settings → Advanced → Global Outbound Proxy (全局出站代理). Enter a trusted proxy address, test the connection, and save. Save after clearing the address too. This affects LoongPort's outbound connections; it is separate from “Local Routing,” which forwards AI requests on your computer
- Tool versions and installation diagnostics: Settings → About shows the target CLI's version, installation status, and diagnostics. Check the advice against your operating system before installing or upgrading. Do not mistake a client installation error for a service-account error
- Diagnostics and troubleshooting: Settings → Advanced lets you adjust logs, connectivity checks, and request corrections. Leave timeouts, retries, and correction rules alone when defaults work. Keep a minimal reproduction before reporting a problem, then change settings for an identified reason
Beta appendix: ZCode
Only for v6.26.3-beta.2. Stable v6.26.2 does not have this entry. Skip this section if you do not need ZCode.
- Install and launch ZCode first, and confirm its personal configuration directory
- In the beta version of LoongPort, add ZCode from the app bar or enable it under Settings → General → Homepage Display
- Open the ZCode page and click Add provider (添加供应商) to add a personal provider
- Fill in Base URL, API Key, and Protocol: Anthropic Messages, OpenAI Chat Completions, or OpenAI Responses
- Under Models (one per line), enter the model IDs supplied by the provider, then click Save
- Return to ZCode and select and test that provider/model
Scope: this page manages only personal providers and model IDs. Account sign-in, default models, proxies, MCP, Skills, and advanced model-capability parameters remain managed in ZCode. Personal providers from other sources may be read-only.
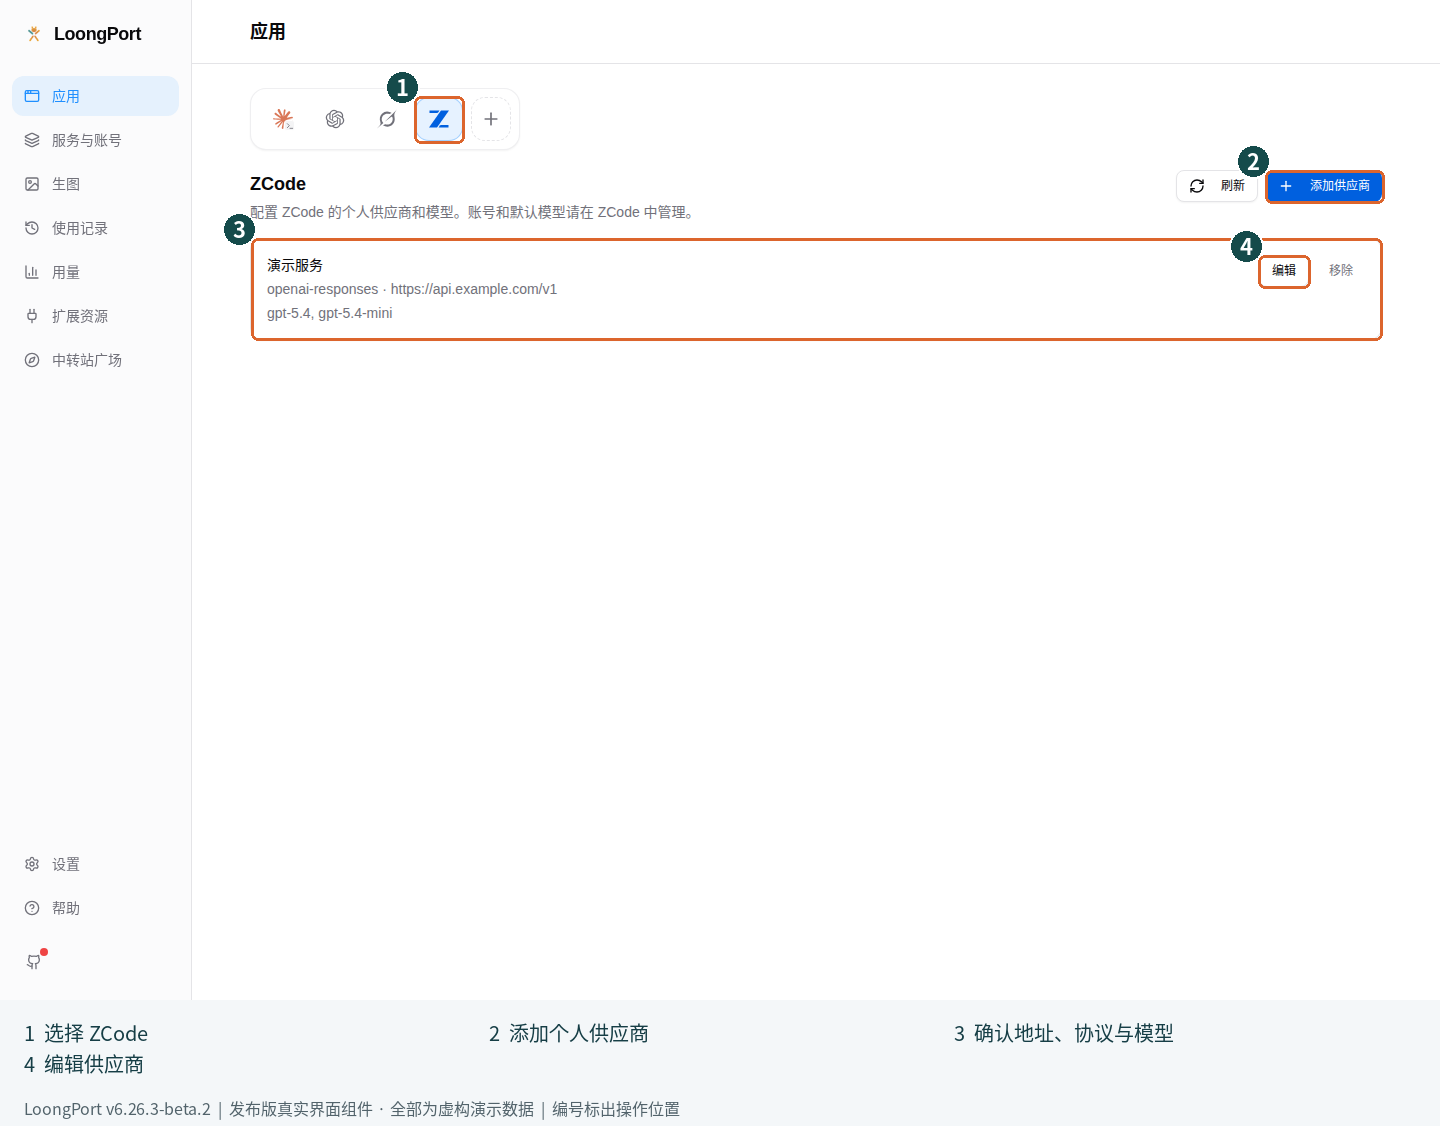
In the image: ① ZCode app; ② add a personal provider; ③ saved address, protocol, and models; ④ edit entry (编辑).
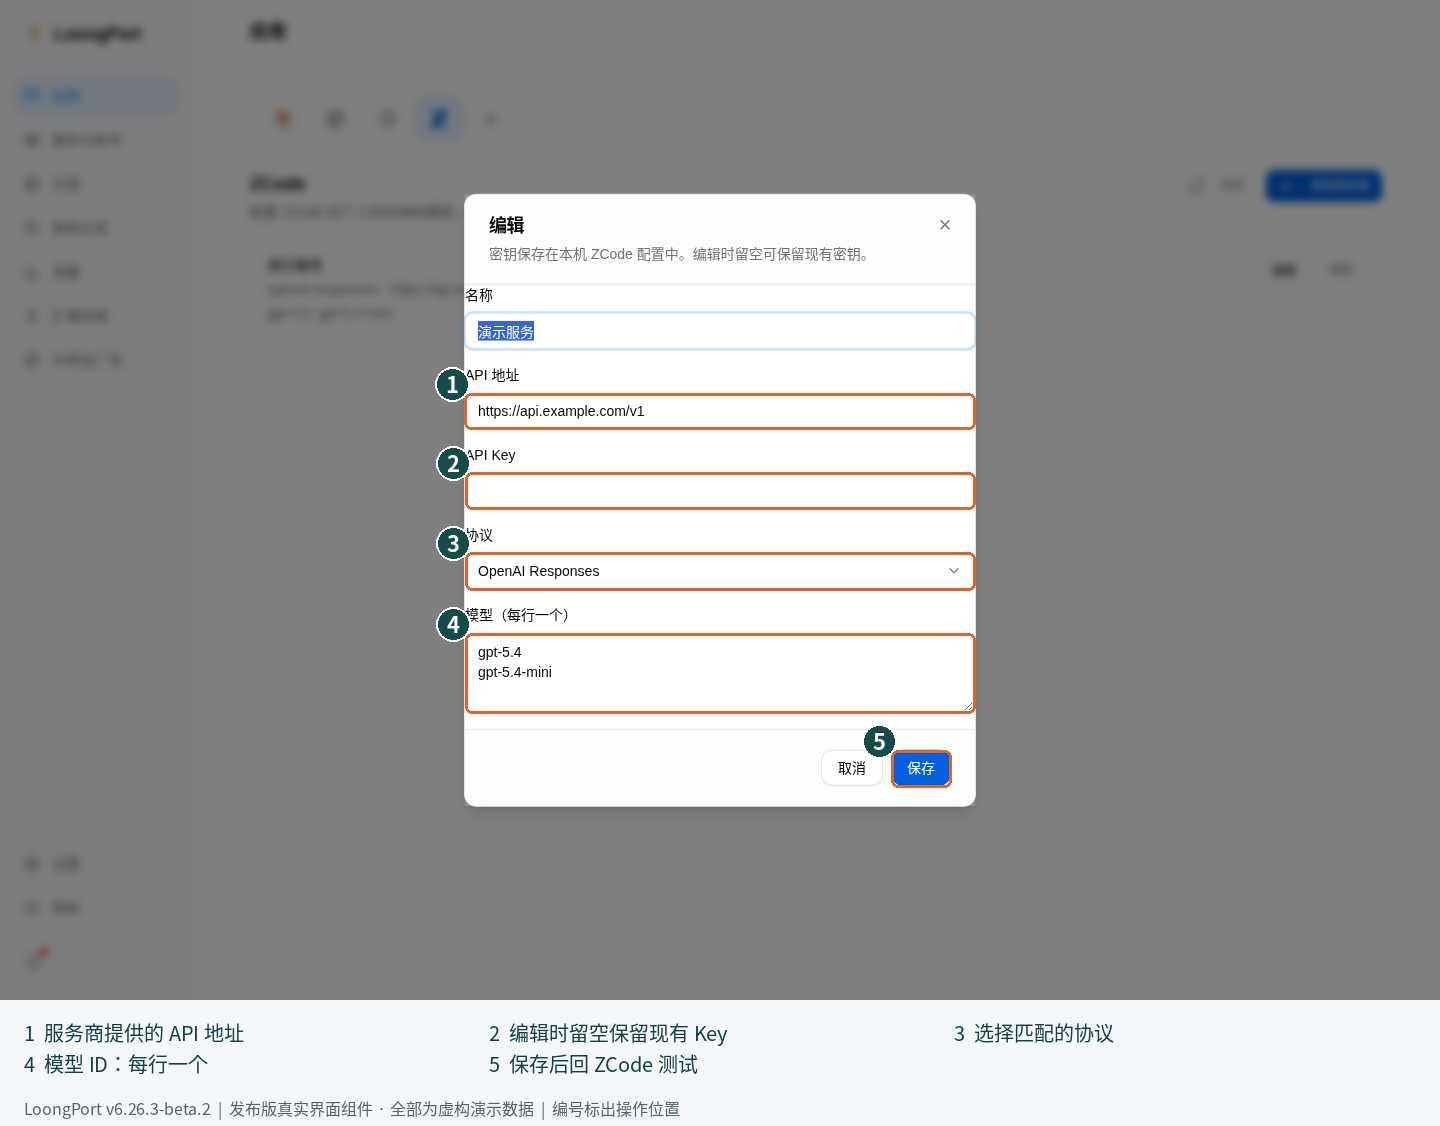
In the image: ① API address; ② leave the key blank while editing to keep the existing key; enter it yourself for a new provider; ③ protocol; ④ model IDs, one per line; ⑤ save (保存), then test in ZCode. The example model names do not mean your service necessarily provides them.
When editing an existing provider, a blank key keeps the current key; deletion asks for confirmation. If an external-edit conflict occurs, cancel, refresh, and reopen instead of forcing an overwrite. For a custom configuration directory, check the ZCode-specific guide (Chinese) rather than guessing its location.
Next steps
For a first-time user, the core setup is complete when the target app can reply normally. Add backup tiers, review usage, or connect tools as needed afterward. Make one workflow reliable before adding complexity.
See the screenshot production record for screenshot versions, source commits, and integrity records. The screenshots help you recognize the real interface. Successful connectivity must always be verified by completing a real request in your own target app.