
RizeCrime/linuxblaster_control
RizeCrime/linuxblaster_control has 39 GitHub stars and 3 forks. GitHot measured 0 stars in 24 hours. Last checked 2026-11-15 05:09 UTC. Last push 2026-10-30.
What you can do
- Saving & Loading
- Profile Save Location
- Smart Volume (incl. Night & Loud Mode)
- AutoEq Profiles
Measured star growth
- in 24h
- 0
- in 7 days
- Collecting history
- in 15 days
- Collecting history
- in 1 month
- Collecting history
Net star changes over overlapping periods, not daily totals. Missing measurements are left blank. Stars measure attention, not software quality.
About
A native Linux GUI Application to control the Creative SoundBlasterX G6 USB DAC/Amp, featuring AutoEq integration.
Creative & MediaREADME.md
OriginalLinuxblaster Control
(because it sounds mildly funny)
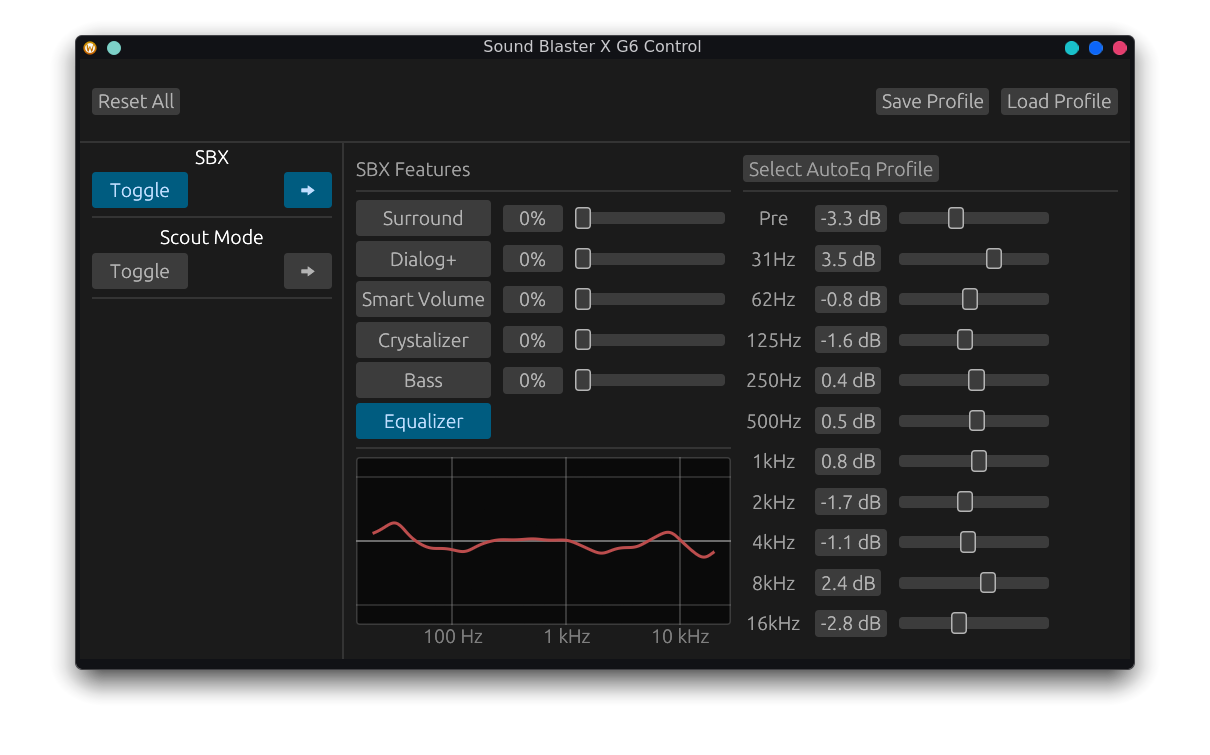
A native Linux GUI application to control the Creative Sound BlasterX G6 USB DAC/Amp, with full AutoEq integration.
Installation
You don't need to know anything about programming to use this. Download one file, install it like any other app, and you're done.
1. Download the right file
Go to the latest release and download one file from the Assets list:
| Your Linux | Download the file ending in |
|---|---|
| Ubuntu, Linux Mint, Pop!_OS, Zorin OS, elementary OS, Debian | _amd64.deb |
| Fedora, Nobara, openSUSE | .x86_64.rpm |
| Anything else (Arch, Manjaro, EndeavourOS, Bazzite, …), or if you'd rather not install anything | -x86_64.AppImage |
| NixOS | see NixOS below |
[!TIP] Almost every desktop PC and laptop needs the
amd64/x86_64files. Thearm64/aarch64files are only for ARM computers, such as a Raspberry Pi or a Snapdragon laptop.
2. Install it
.deb (Ubuntu, Mint, …): double-click the file and click Install.
If double-clicking doesn't work, open a terminal in your Downloads folder and run:
sudo apt install ./linuxblaster-control_*_amd64.deb
.rpm (Fedora, openSUSE): double-click the file and click Install, or run:
sudo dnf install ./linuxblaster-control-*.x86_64.rpm      # Fedora
sudo zypper install ./linuxblaster-control-*.x86_64.rpm   # openSUSE
AppImage: no installation needed. Right-click the file → Properties → Permissions → enable Allow executing file as program (the exact wording depends on your desktop). Then double-click it.
3. Start it
Plug in your G6 and open Linuxblaster Control from your application menu (or double-click the AppImage).
The first time you start the AppImage, the app will ask to allow access to the G6. That's a one-time setup that lets your user account control the device. Click Allow access and enter your password. The .deb and .rpm packages do this automatically during installation.
Uninstall
.deb:sudo apt remove linuxblaster-control.rpm:sudo dnf remove linuxblaster-control(orsudo zypper remove linuxblaster-control)- AppImage: delete the file. To also remove the access rule:
sudo rm /etc/udev/rules.d/70-linuxblaster-control.rules
Your saved profiles stay in ~/.local/share/linuxblaster/profiles/.
NixOS
Add the flake to your configuration; this installs the app (with menu entry) and the access rule:
{
  inputs.linuxblaster_control.url = "github:RizeCrime/linuxblaster_control";

  outputs = { self, nixpkgs, linuxblaster_control, ... }: {
    nixosConfigurations.yourhostname = nixpkgs.lib.nixosSystem {
      modules = [
        linuxblaster_control.nixosModules.default
        {
          hardware.soundblaster-g6.enable = true;
        }
      ];
    };
  };
}
Or try it without installing: nix run github:RizeCrime/linuxblaster_control
Troubleshooting
"No Sound BlasterX G6 found" Make sure the G6 is connected with a USB data cable (not a charge-only cable) and switched on. The app connects by itself as soon as the G6 shows up.
"Access is not allowed yet", even after clicking Allow access Unplug the G6 and plug it back in, then click Try again.
The AppImage doesn't start when double-clicked
Check that it's allowed to run (see step 2). On some systems AppImages also need FUSE: install libfuse2 (Ubuntu 22.04, Debian) or libfuse2t64 (Ubuntu 24.04 and newer), or use the .deb/.rpm instead.
My microphone isn't picked up Open Mixer → Recording Source and select External Mic. (The G6 starts on Line In on Linux.)
My settings changed when I switched between Speakers and Headphones That's how the G6 works: it keeps a separate set of settings for each output.
Something else is wrong
Start the app from a terminal with linuxblaster_control (or ./Linuxblaster_Control-*.AppImage) and open an issue with what it prints.
About
The app reads the current state from the G6 itself, so it always shows what the device is actually set to. The G6 has two internal settings profiles, one for Headphones and one for Speakers; the app refreshes everything when you switch the output. Changes made on the device itself (e.g. the SBX and Scout Mode buttons) and to the hardware mixer (e.g. the volume knob) show up while the app is running.
Supported Features
- State Reading
- Profiles
- Saving & Loading
- Profile Save Location
- SBX
- Surround Sound
- Dialog+
- Smart Volume (incl. Night & Loud Mode)
- Crystalizer
- Bass
- Equalizer
- PreAmp
- 10-band EQ
- AutoEq Profiles
- Playback
- Output Select
- DAC Filter
- Recording
- Mic Recording Volume & Monitoring
- Mic Boost
- Voice Clarity: Noise Reduction, Acoustic Echo Cancellation, Smart Volume
- Mic EQ (Presets & individual Bands)
- Decoder
- Normal, Full, and Night
- Mixer
- Playback, Monitoring, and Recording Levels
- Recording Source
- Lighting
- On/Off & Color
- Scout Mode
Not-Implemented Features
- Playback
- Direct Mode (not planned)
- Speaker/Headphone Channel Configuration (Stereo/5.1/7.1)
- Lighting
- Effects other than a static color (no captures yet)
Audio Quality (bit depth / sample rate) is not a setting of the device: whatever plays or records audio picks the format for each stream (on Linux that's usually PipeWire). Configure it there, e.g. with PipeWire's default.clock.allowed-rates.
About the Mixer
The Mixer (and the volume/monitoring sliders in Recording) are the G6's own hardware controls, defined by the USB Audio Class standard. They're changed through ALSA, which only forwards them to the device, the same way Windows does. Nothing is processed in software, so recordings stay exactly as the hardware produces them.
Profiles
Profiles are stored as JSON files in ~/.local/share/linuxblaster/profiles/.
A profile applies to the output that is currently active (Speakers or Headphones).
Profiles from before v2.1 will have to be remade, the old format is no longer compatible.
Applying a profile on startup
The G6 forgets its settings when it's reset or unplugged (lighting comes back on, effects are off, ...).
To get them back automatically, start the app with one of these options, e.g. in its autostart entry (Exec=linuxblaster_control --apply-last):
--apply-lastapplies the profile you loaded or saved last in the app. The app remembers it from the first time you load or save a profile with this version.--apply-profile <file>applies the given profile file.
The profile is applied as soon as the G6 is connected, also if it only shows up a few seconds after the app started. Only the settings that differ from what the device reports are written.
[!IMPORTANT] The profile format is custom to this application and is not compatible with official Creative Sound Blaster Command profiles (.json or .xml) from Windows.
System Tray
The app shows an icon in the system tray (KDE Plasma and most other desktops; GNOME needs the AppIndicator extension). Its menu can show or hide the window, switch the lighting on and off, and quit. A left click on the icon shows or hides the window.
Closing the window hides it in the tray. If there is no tray, closing the window quits as before.
| Flag | Effect |
|---|---|
--tray (or --minimized) |
Start hidden in the tray, e.g. for autostart |
--minimize-to-tray |
Minimizing the window also hides it in the tray (X11 only) |
--no-tray |
No tray icon; closing the window quits |
To start the app in the tray when you log in, add linuxblaster_control --tray to your desktop's autostart (KDE: System Settings → Autostart → Add → Add Application, then add --tray to the command). If the tray isn't there yet when the app starts, it waits up to 10 seconds for it before showing the window instead.
For Developers
Building from Source
You need a Rust toolchain and these development packages:
| Distro | Packages |
|---|---|
| Debian / Ubuntu | pkg-config libudev-dev libasound2-dev |
| Fedora | pkgconf systemd-devel alsa-lib-devel |
| Arch | pkgconf systemd-libs alsa-lib |
git clone https://github.com/RizeCrime/linuxblaster_control.git
cd linuxblaster_control
cargo build --release
./target/release/linuxblaster_control
Without the packages, you'll also need the udev rule for access to the device: copy packaging/70-linuxblaster-control.rules to /etc/udev/rules.d/ (or use the Allow access button in the app).
The device is accessed through the kernel's hidraw interface. The app never resets the USB device: a reset wakes the HID endpoint but leaves the audio interface unusable until the next re-enumeration, which breaks playback for the rest of the session. Instead it waits and retries the endpoint, reopening the hidraw node when the device re-enumerated.
To print the current device state without the GUI (read-only):
cargo run --example dump_state
Nix
nix develop   # development shell with all dependencies
nix build     # build the package
Cold boot
On some machines the G6 comes out of a cold boot with a dead HID endpoint and a broken first audio enumeration (selector reported illegal value). The app cannot repair that while it runs: resetting the device would break audio for the whole session. The optional helper does the reset once, at boot, before PipeWire opens the device:
sudo packaging/coldboot/install.sh
It runs from the G6's udev add event, is not part of the boot transaction, and does not delay the display manager. It holds snd-usb-audio back from the first enumeration and loads it after a clean re-enumeration. Side effect: the blacklist is per module, so another USB audio device attached at boot needs sudo modprobe snd-usb-audio once. Details, verification steps and removal: packaging/coldboot/README.md.
Release Packages
packaging/build-release.sh builds the .tar.gz, .deb, .rpm and AppImage for the current architecture into dist/.
On GitHub, the Release workflow runs it for x86_64 and aarch64 whenever a release is published and attaches the files to the release. The package version is taken from the release tag.
⚠️ Development Status
This project is in active development and should be considered experimental.
Current Limitations
- Limited testing — Tested only on the developer's hardware.
- The USB protocol was reverse-engineered and may not cover all device features.
- Some features available in the Windows Sound Blaster Command software are not yet implemented.
Technical Details
- Vendor ID:
0x041e(Creative Technology) - Product ID:
0x3256(Sound Blaster X G6) - Interface: 4 (HID control interface)
Communication uses 65-byte HID reports with a custom protocol consisting of DATA and COMMIT packets.
Find the details in UsbProtocol.
Contributing
Contributions are welcome! If you have a Sound Blaster X G6 and want to help:
- Report bugs or missing features
- Help reverse-engineer additional functionality
Acknowledgments
This project builds upon the USB protocol research from the soundblaster-x-g6-cli project by Nils Skowasch, which provided initial USB packet captures and protocol documentation. Additional reverse engineering (including the 10-band EQ protocol) was done for this project.
The initial versions of this project were based on the soundblaster-x-g6-cli project. However, it turns out that this work was misleadingly incomplete. What was thought to be a Commit Push from the Host was actually the Device reporting back a queried value, just as an example. I have done a bunch of extra reverse engineering to figure out the actual full protocol (see the sniffer directory), at least I think that I've got the full picture this time; but that's also what I thought before, so who knows /shrug.
AI Disclaimer
With v2 I can proudly say that almost all Code was written by me (In v1 the GUI was written by AI (and you could tell)), and AI only filled out match arms and enums for me.
I also use AI liberally to beautify anything user-facing (including this README and most other .md files).
Oh and the math for the EQ curve visualizer was also done by AI.
After getting the project to a "good enough" state for my own purposes, I sadly don't have the time for this project anymore.
It will mostly be maintained by an LLM under my supervision from v2.2 and onwards.
License
MIT License — see LICENSE for details.