
Imageomics/Prompt_CAM
Imageomics/Prompt_CAM has 78 GitHub stars and 7 forks. GitHot measured 0 stars in 24 hours and 0 in 7 days. Last checked 2026-11-16 04:42 UTC. Last push 2026-10-30.
Measured star growth
- in 24h
- 0
- in 7 days
- 0
- in 15 days
- Collecting history
- in 1 month
- Collecting history
Net star changes over overlapping periods, not daily totals. Missing measurements are left blank. Stars measure attention, not software quality.
About
This is an official implementation for PROMPT-CAM: A Simpler Interpretable Transformer for Fine-Grained Analysis (CVPR'25). Explore fine-grained trait distinctions between different specified species.
Developer ToolsREADME.md
Original:mag: Prompt-CAM: Making Vision Transformers Interpretable for Fine-Grained Analysis (CVPR'25) 
This is an official implementation for Prompt-CAM: Making Vision Transformers Interpretable for Fine-Grained Analysis (CVPR'25).
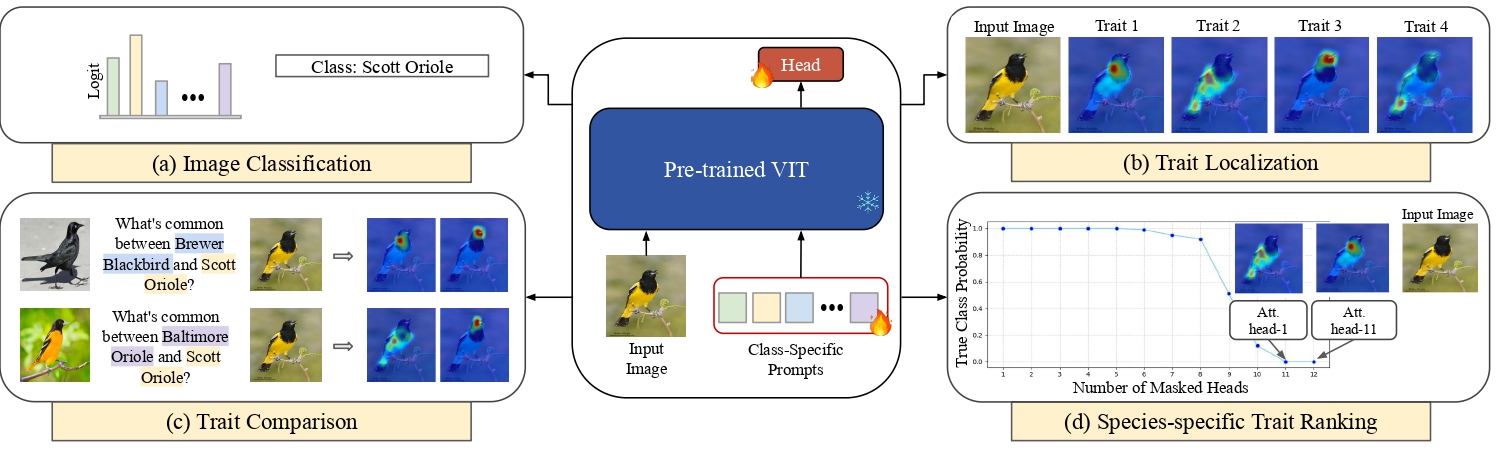
Introducing Prompt-CAM, a $${\textcolor{red}{\text{simple yet effective}}}$$ interpretable transformer that requires no architectural modifications to pre-trained ViTs, we just have to inject class-specific prompts into any ViT to make them interpretable.
Prompt CAM lets us explore:
- 🧠 What the model thinks is important for each class?
- ✨ Which traits are shared between two bird species?
- 🎨 How different classes ‘see’ the same image differently!
Update
Thank you for the people who created issues:
- Now our code base supports
python 3.10with updatedtimm==1.0.24 - Fixed minor visualization bugs
- Our codebase now supports both single and multi-gpu usage for training
Quick Start: Try out the demo
🔍 Ever wondered what traits stand out when a model looks at an image of one class but searches with another class in mind? 🤔 Witness the important traits of different class through the lens of Prompt-CAM with our interactive demos!
👉 Try our demo without installing anything in Gooogle Colab

👉 Try our demo locally in

- Setup the environment.
- Download the pre-trained models from our Hugging Face repo!
- Run the demo.
👉 You can extend this code base to include: New datasets and New backbones
Environment Setup
conda create -n prompt_cam python=3.10
conda activate prompt_cam
source env_setup.sh
Data Preparation
You can put all the data in a folder and pass the path to --data_path argument.
The structure of data/images/should be organized as follows:
cub/
├── train/
│   ├── 001.Black_footed_Albatross/
│   │   ├── image_1.jpg
│   │   ├── image_2.jpg
│   │   └── ...
│   ├── 002.Laysan_Albatross/
│   │   ├── image_1.jpg
│   │   ├── image_2.jpg
│   │   └── ...
│   └── ...
└── val/
    ├── 001.Black_footed_Albatross/
    │   ├── image_1.jpg
    │   ├── image_2.jpg
    │   └── ...
    ├── 002.Laysan_Albatross/
    │   ├── image_1.jpg
Prepare CUB dataset
CUB
Download
CUB_200_2011.tgzfrom the official website and extract it:tar -xzf CUB_200_2011.tgzYou will get a
CUB_200_2011/folder containingimages/,images.txt, andtrain_test_split.txt.Run the preparation script to arrange the images into the required structure:
python data/prepare_cub.py \
    --cub_dir /path/to/CUB_200_2011 \
    --out_dir /path/to/data/images/cub
The script uses the official train/test split and organises images into cub/train/ and cub/val/ with class folders named NNN.ClassName (e.g. 001.Black_footed_Albatross).
Prepare Oxford Pet dataset
Pet Dataset
Download both archives from the official website and extract them:
tar -xzf images.tar.gz
tar -xzf annotations.tar.gz
You will get an
images/folder with all.jpgfiles and anannotations/folder containingtrainval.txtandtest.txt.Run the preparation script to arrange the images into the required structure:
python data/prepare_pet.py \
    --images_dir /path/to/images \
    --annotations_dir /path/to/annotations \
    --out_dir /path/to/data/images/pet
The script maps trainval.txt → pet/train/ and test.txt → pet/val/, with class folders named NNN.BreedName (e.g. 001.Abyssinian).
To add new dataset, see Extensions
Results + Checkpoints:
- For each model, create a
{backbone}/{dataset}/folder under the root-levelcheckpoints/directory, then download the appropriate model checkpoint into its folder and name itmodel.pt(e.g.,checkpoints/dino/cub/model.pt). All checkpoints are available in our Hugging Face repository.
| Backbone | Dataset | Prompt-CAM(Acc top%1) | Checkpoint Link |
|---|---|---|---|
| dino | cub (CUB) | 73.2 | Prompt_CAM_checkpoint_dino_cub.pt |
| dino | car (Stanford Cars) | 83.2 | Prompt_CAM_checkpoint_dino_car.pt |
| dino | dog (Stanford Dogs) | 81.1 | Prompt_CAM_checkpoint_dino_dog.pt |
| dino | pet (Oxford Pet) | 91.3 | Prompt_CAM_checkpoint_dino_pet.pt |
| dino | birds_525 (Birds-525) | 98.8 | Prompt_CAM_checkpoint_dino_birds_525.pt |
| Backbone | Dataset | Prompt-CAM(Acc top%1) | Checkpoint Link |
|---|---|---|---|
| dinov2 | cub (CUB) | 74.1 | Prompt_CAM_checkpoint_dinov2_cub.pt |
| dinov2 | dog (Stanford Dogs) | 81.3 | Prompt_CAM_checkpoint_dinov2_dog.pt |
| dinov2 | pet (Oxford Pet) | 92.7 | Prompt_CAM_checkpoint_dinov2_pet.pt |
Evaluation and Visualization
- download the checkpoint from url in the Table above and put it in the
checkpoints/{model}/{dataset}/folder.
For example, to visualize the attention map of the DINO model on the class 024.Red_faced_Cormorant of CUB dataset, put the checkpoint in checkpoints/dino/cub/ folder and run the following command:
CUDA_VISIBLE_DEVICES=0 python visualize.py --config ./experiment/config/prompt_cam/dino/cub/args.yaml --checkpoint ./checkpoints/dino/cub/model.pt --vis_cls 23
- The output will be saved in the
visualization/dino/cub/class_23/folder. - Inside the individual image folder, there will be
top_traitsheatmaps for the target class concatenated if the prediction is correct. Otherwise, all the traits will be concatenated. (the prediction is for the respective image can be foundconcatenated_prediction_{predicted_class}.jpg).
Visualization Configuration Meaning
config: path to the config file.checkpoint: path to the checkpoint file.vis_cls: class number to visualize. (default: 23)vis_attn: set to True to visualize the attention map. (default: True)top_traits: number of traits to visualize. (default: 4)nmbr_samples: number of images from the `vis_cls to visualize. (default: 10)vis_outdir: output directory. (default: visualization/)
:fire: Training
:one: Pretrained weights
Download the pretrained weights from the following links and put them in the pretrained_weights folder.
- ViT-B-DINO rename it as
dino_vitbase16_pretrain.pth - ViT-B-DINOV2 rename it as
dinov2_vitb14_pretrain.pth
:two: Load dataset
See Data Preparation above.
:three: Start training
👉 To train the model on the CUB dataset using the DINO model, run the following command:
CUDA_VISIBLE_DEVICES=0,1,2,3 torchrun --nproc_per_node=4 main.py --config ./experiment/config/prompt_cam/dino/cub/args.yaml --gpu_num 4
The checkpoint will be saved in the output/vit_base_patch16_dino/cub/ folder. Copy the checkpoint model.pt to the checkpoints/dino/cub/ folder.
👉 To train the model on the Oxford Pet dataset using the DINO model, run the following command:
CUDA_VISIBLE_DEVICES=0,1,2,3 torchrun --nproc_per_node=4 main.py --config ./experiment/config/prompt_cam/dino/pet/args.yaml --gpu_num 4
The checkpoint will be saved in the output/vit_base_patch14_dino/pet/ folder. Copy the checkpoint model.pt to the checkpoints/dino/pet/ folder.
👉 To train the model on the Oxford Pet dataset using the DINOv2 model, run the following command:
CUDA_VISIBLE_DEVICES=0,1,2,3 torchrun --nproc_per_node=4 python main.py --config ./experiment/config/prompt_cam/dinov2/pet/args.yaml --gpu_num 4
The checkpoint will be saved in the output/vit_base_patch14_dinov2/pet/ folder. Copy the checkpoint model.pt to the checkpoints/dinov2/pet/ folder.
:four: :mag: Visualize the attention map
See Visualization above.
Extensions
To add a new dataset
- Prepare dataset using above instructions.
- add a new dataset file in
/data/dataset. Look at the existing dataset files for reference. - modify build_loader.py to include the new dataset.
- create a new config file in
experiment/config/prompt_cam/{model}/{dataset}/args.yaml- See
experiment/config/prompt_cam/dino/cub/args.yamlfor reference and what to modify.
- See
To add a new backbone
- modify
get_base_model()in build_model.py. - register the new backbone in vision_transformer.py by creating a new function.
- add another option in
--pretrained_weightsand--modelinsetup_parser()function of main.py to include the new backbone.
Citation 

If you find this repository useful, please consider citing our work :pencil: and giving a star :star2: :
@InProceedings{Chowdhury_2025_CVPR,
    author    = {Chowdhury, Arpita and Paul, Dipanjyoti and Mai, Zheda and Gu, Jianyang and Zhang, Ziheng and Mehrab, Kazi Sajeed and Campolongo, Elizabeth G. and Rubenstein, Daniel and Stewart, Charles V. and Karpatne, Anuj and Berger-Wolf, Tanya and Su, Yu and Chao, Wei-Lun},
    title     = {Prompt-CAM: Making Vision Transformers Interpretable for Fine-Grained Analysis},
    booktitle = {Proceedings of the IEEE/CVF Conference on Computer Vision and Pattern Recognition (CVPR)},
    month     = {June},
    year      = {2025},
    pages     = {4375-4385}
}
Acknowledgement
- VPT: https://github.com/KMnP/vpt
- PETL_VISION: https://github.com/OSU-MLB/PETL_Vision
Thanks for their wonderful works.
🛠 create an issue for any contributions.