
I-M-Robotics-Lab/Ball-Balancing-Robot
I-M-Robotics-Lab/Ball-Balancing-Robot has 75 GitHub stars and 13 forks. Star changes are not measured yet. Last checked 2026-11-09 05:33 UTC. Last push 2026-09-29.
An educational Ball-Balancing Robot. This project introduces some of the most core concepts of robotics: programming, inverse kinematics, computer vision, and PID control.
Measured star growth
- in 24h
- Update delayed
- in 7 days
- Update delayed
- in 15 days
- Update delayed
- in 1 month
- Update delayed
Net star changes over overlapping periods, not daily totals. Missing measurements are left blank. Stars measure attention, not software quality.
README.md
OriginalBall-Balancing-Robot
An educational Ball-Balancing Robot. This project introduces some of the core concepts of robotics: programming, inverse kinematics, computer vision, and PID control.
Discord: https://discord.com/invite/WJuUWsy6DJ
Video Overview
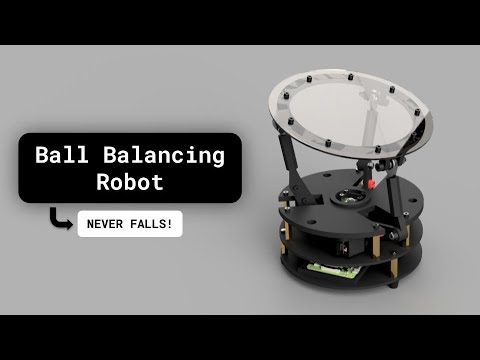
Pictures
Build Instruction
The 3D models and print profile for a Bambu A1 printer can be found here: https://makerworld.com/en/models/1197770-ball-balancing-robot#profileId-1210633
Ballbot – Ball Balancing Robot (Rev 9)
A Raspberry Pi–based ball balancing robot using real-time vision feedback and PID control.
Rev 9 represents a structural milestone:
- Clean
src/layout package structure - Separation of HMI and runtime
- Headless-safe runtime operation
- SSH auto-launch capability
- JSON-driven configuration
- Modular subsystem architecture
Getting Started
This section describes the full process from mechanical assembly to first runtime execution.
1. Mechanical Assembly
1.1 Obtain Components
Refer to the Bill of Materials (BOM) for required hardware:
- Raspberry Pi
- Camera module
- PCA9685 I2C servo driver
- Servos
- Power supply
- Ball and platform hardware
1.2 Print and Assemble Robot Structure
- 3D print structural components.
- Assemble platform and servo linkages.
- Ensure:
- Platform pivots freely.
- No binding in linkages.
- Servo horns are mounted securely.
- Ball rolls smoothly across platform surface.
Mechanical slop or binding significantly affects control stability.
2. Raspberry Pi Setup & Electrical Integration
2.1 Flash Raspberry Pi OS
- Use Raspberry Pi Imager.
- Install Raspberry Pi OS (Bookworm recommended).
- Enable SSH.
- Configure WiFi if required.
- Set username and password.
Boot the Pi and confirm SSH access.
2.2 Install Electrical Components
Wire components according to wiring instructions:
- Camera → CSI connector
- PCA9685 → I2C (SDA/SCL)
- Servo power isolated from Pi 5V rail (recommended)
- Common ground between servo supply and Pi
Enable I2C:
sudo raspi-config
# Interface Options → I2C → Enable
Reboot.
Confirm I2C device is detected:
i2cdetect -y 1
You should see the PCA9685 address (typically 0x40).
2.3 Install Software
Run installer:
bash scripts/install.sh
This installs:
- Python dependencies
- System libraries
- OpenCV
- libcamera stack
3. Initial Calibration via HMI
Move Ballbot HMI.desktop to desktop
Launch the HMI:
hmi
The HMI runs over SSH using curses and provides jog controls and calibration tools.
3.1 Zero Pose Capture (Mechanical Reference)
Before applying offsets, establish a mechanical zero pose.
Procedure:
- Power the system.
- Arm the servos.
- Manually jog the platform until it is visually level.
- Trigger Zero Pose Capture from the HMI.
- Confirm the pose is recorded.
This step defines the neutral mechanical reference position for the platform. The zero pose is stored and used as the baseline for subsequent offset adjustments.
3.2 Offset Calibration
After zero pose capture:
- Fine-adjust X and Y offsets using jog controls.
- Observe platform level and ball behavior.
- Save calibration values.
- Disarm and re-arm to confirm repeatability.
Calibration values are written to:
config/calibration.json
3.3 Verification
After calibration:
- Platform should return to level at neutral command.
- No servo drift at idle.
- No bias in ball roll direction.
- Servo sounds should be symmetrical (no constant correction hum).
Accurate zero pose capture is critical for stable PID performance.
4. Run Runtime (Control Loop)
Start runtime from the HMI or directly:
bash scripts/run_runtime.sh
Runtime performs:
- Frame capture (~60 Hz)
- Vision processing (~50 Hz)
- PID control
- Servo actuation
If running over SSH (headless):
- Video preview is disabled automatically.
- Control loop remains fully functional.
Press q to exit runtime safely.
On shutdown:
- Servos disarm.
- Camera terminates cleanly.
First Successful Bring-Up Checklist
Before declaring success:
- Ball remains near center without oscillation.
- No mechanical binding.
- Servos respond smoothly.
- No runaway tilt on startup.
- PID gains stable at low disturbance.
Explore related projects
sindresorhus/awesome
😎 Awesome lists about all kinds of interesting topics [NOTE: Pull requests are temporarily disabled until I have a chance to catch up with the existing ones]
534,376 starsEbookFoundation/free-programming-books
:books: Freely available programming books
401,397 starsnilbuild/developer-roadmap
Interactive roadmaps, guides and other educational content to help developers grow in their careers.
371,688 starsvinta/awesome-python
The definitive list that answers "I want to do X in Python, which tool should I use?"
333,651 stars