
CrypticSignal/video-quality-metrics
CrypticSignal/video-quality-metrics has 143 GitHub stars and 21 forks. GitHot measured 0 stars in 24 hours. Last checked 2026-11-09 23:13 UTC. Last push 2026-10-31.
Uses FFmpeg to benchmark video encoders to compare VMAF, SSIM and PSNR with different encoder settings.
Measured star growth
- in 24h
- 0
- in 7 days
- Collecting history
- in 15 days
- Collecting history
- in 1 month
- Collecting history
Net star changes over overlapping periods, not daily totals. Missing measurements are left blank. Stars measure attention, not software quality.
README.md
OriginalVideo Quality Metrics (VQM)
VQM will compare the VMAF, SSIM and PSNR achieved with different values of the specified encoder parameter.
Quick Links
- What does VQM produce?
- Requirements
- Usage
- Overview Mode
- Combination Mode
- Available Arguments
- FFmpeg Builds
- About the model files
- Code Structure
What does VQM produce?
VQM produces a report named report.html, which you can open in any web browser. When VQM finishes, it prints the path of the report. The report contains:
- A table of the results (see below). The highest VMAF, PSNR and SSIM values are highlighted in green, and you can click a column's heading to sort the transcodes by it.
- Notes underneath the table, such as the codec of the original video, the encoder used to transcode it and the FFmpeg options used.
- A bar graph of the mean VMAF achieved with each encoder parameter value or combination.
- Graphs of the per-frame VMAF, PSNR and SSIM of each transcode. Each transcode's graphs can be expanded by clicking its name.
The graphs are embedded in the report, so report.html is a single file that you can share.
The table contains the following for the original video and each value of the specified encoder parameter:
- Parameter value
- Time taken to transcode the video (seconds)
- Size of the video
- Video bitrate
- Mean Video Multimethod Assessment Fusion (VMAF)
- Mean Peak Signal-to-Noise-Ratio (PSNR)
- Mean Structural Similarity Index (SSIM)
If you use the -t argument or Overview Mode, the table also contains a row for the reference video, i.e. the shorter video that was transcoded.
If you use the -P argument, the table is also printed in the terminal. Here's an example of the table, as printed with -P:
┏━━━━━━━━━━━━━━━━┳━━━━━━━━━━━━━━━━┳━━━━━━━━━━━┳━━━━━━━━━━━━━━━┳━━━━━━━━┳━━━━━━━━┳━━━━━━━┓
┃ preset         ┃ Time Taken (s) ┃      Size ┃ Video Bitrate ┃   VMAF ┃   PSNR ┃  SSIM ┃
┡━━━━━━━━━━━━━━━━╇━━━━━━━━━━━━━━━━╇━━━━━━━━━━━╇━━━━━━━━━━━━━━━╇━━━━━━━━╇━━━━━━━━╇━━━━━━━┩
│ Original Video │              - │ 12.917 MB │    1.526 Mbps │      - │      - │     - │
├────────────────┼────────────────┼───────────┼───────────────┼────────┼────────┼───────┤
│ veryslow       │         23.073 │ 11.016 MB │    1.358 Mbps │ 97.371 │ 47.691 │ 0.997 │
│ slower         │         15.238 │ 11.877 MB │    1.473 Mbps │ 97.401 │ 47.844 │ 0.998 │
│ slow           │          6.144 │ 11.755 MB │    1.456 Mbps │ 97.342 │ 47.800 │ 0.998 │
│ medium         │          4.360 │ 12.163 MB │    1.511 Mbps │ 97.490 │ 47.958 │ 0.998 │
│ fast           │          3.904 │ 12.632 MB │    1.573 Mbps │ 97.460 │ 48.016 │ 0.998 │
│ faster         │          2.999 │ 12.487 MB │    1.554 Mbps │ 97.257 │ 48.006 │ 0.998 │
│ veryfast       │          2.303 │ 11.107 MB │    1.370 Mbps │ 95.400 │ 46.612 │ 0.997 │
│ superfast      │          1.705 │ 15.967 MB │    2.017 Mbps │ 96.859 │ 47.502 │ 0.997 │
│ ultrafast      │          1.185 │ 23.969 MB │    3.083 Mbps │ 97.982 │ 46.288 │ 0.996 │
└────────────────┴────────────────┴───────────┴───────────────┴────────┴────────┴───────┘
VMAF/PSNR/SSIM values are the mean of the per-frame scores. The best values are in green.
Video bitrate confidence = high, method = video packet sizes
Original File: ForBiggerFun.mp4
Original video codec: h264
Transcoded with: libx264
FFmpeg output options: None
libvmaf n_subsample: 1
Command used: python main.py -i ForBiggerFun.mp4 -e libx264 -p preset -v veryslow slower slow medium fast faster veryfast superfast ultrafast
Output folder
The results are saved in a folder named after the input video (e.g. ForBiggerFun_mp4), unless you specify one with -o. It contains:
report.html- A subfolder for each encoder parameter value or combination, containing the transcoded video and
per_frame_metrics.json(libvmaf's per-frame scores, which-slreuses). - The reference video, if you use the
-targument or Overview Mode.
Graphs
In addition to the table, the report contains two types of graphs:
- A graph (type 1) for each encoder parameter value, showing the per-frame VMAF, SSIM and PSNR.
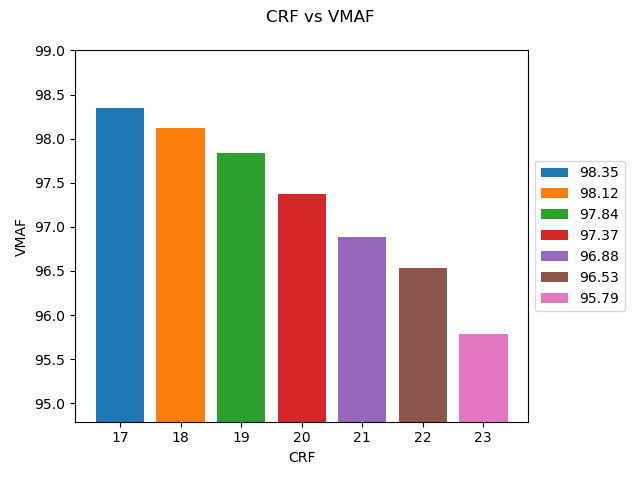
- A graph (type 2) where the average VMAF is plotted against the value of the encoder parameter.
Here's an example of graph type 1:
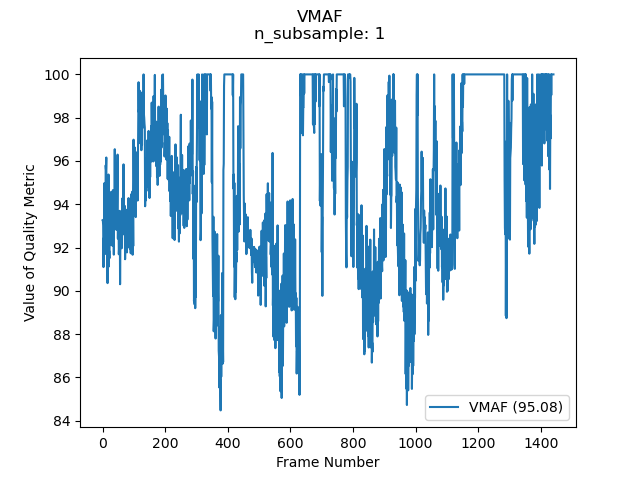
This particular graph shows the per-frame VMAF score. An example of the per-frame SSIM graph and per-frame PSNR graph can be found in the example_graphs folder.
Here's an example of graph type 2 if you opt to compare CRF values:
Usage
You must specify an encoder (using the -e argument), an FFmpeg encoder parameter (using the -p argument, e.g. -p preset, -p crf or -p quality) and the values you want to compare (using the -v argument).
If you would like to test VQM without using your own video(s), you can use ForBiggerFun.mp4.
Examples:
python main.py -i ForBiggerFun.mp4 -e libx264 -p preset -v veryfast superfast ultrafast
python main.py -i ForBiggerFun.mp4 -e libx264 -p crf -v 22 23 24
python main.py -i ForBiggerFun.mp4 -e h264_amf -p quality -v balanced speed quality
When VQM finishes, open report.html in the output folder to see the results.
Overview Mode
Overview Mode can be activated by specifying the --interval and --clip-length arguments. The benefit of this mode is especially apparent with long videos, such as movies. What this mode does is create an overview video by grabbing a <clip length> seconds long segment every <interval> seconds from the original video. As the overview video can be much shorter than the original, the process of transcoding and calculating the quality metrics is quicker.
Example: python main.py -i ForBiggerFun.mp4 -p crf -v 17 18 19 --interval 5 --clip-length 2
In the example above, an overview video is created by concatenating 2-second-long* clips (--clip-length 2) every 5s* (--interval 5) from the original video. In this example, a one-minute-long video is turned into an overview video that is 24 seconds long (12 clips). Transcoding and calculating the quality metrics of a video that is 24 seconds long is quicker than doing so with a one-minute-long video.
Sections marked with an asterisk will not be exact as FFmpeg will use the closest I-frames.
An alternative method of reducing the execution time of this program is by only using the first x seconds of the original video (you can do this with the -t argument), but Overview Mode provides a better representation of the whole video.
Combination Mode
Instead of comparing the quality achieved with various values of one encoder parameter, Combination Mode allows you to compare the quality achieved with a combination of two or more parameters.
To activate Combination Mode, specify the -c or --combinations argument, followed by a list of combinations you wish to compare. The list of combinations must be surrounded in quotes, and each combination must be separated by a comma.
For example, if you want to compare the quality achieved with:
- The combination of preset
veryslowand a CRF value of18 - The combination of preset
slowerand CRF value of16
You would run something like:
python main.py -i "ForBiggerFun.mp4" -e libx265 -c "preset slow crf 24,preset medium crf 23"
The table produced will look something like this:
┏━━━━━━━━━━━━━━━━━━━━━━━━┳━━━━━━━━━━━━━━━━┳━━━━━━━━━━━┳━━━━━━━━━━━━━━━┳━━━━━━━━┳━━━━━━━━┳━━━━━━━┓
┃ Combination            ┃ Time Taken (s) ┃      Size ┃ Video Bitrate ┃   VMAF ┃   PSNR ┃  SSIM ┃
┡━━━━━━━━━━━━━━━━━━━━━━━━╇━━━━━━━━━━━━━━━━╇━━━━━━━━━━━╇━━━━━━━━━━━━━━━╇━━━━━━━━╇━━━━━━━━╇━━━━━━━┩
│ Original Video         │              - │ 12.917 MB │    1.526 Mbps │      - │      - │     - │
├────────────────────────┼────────────────┼───────────┼───────────────┼────────┼────────┼───────┤
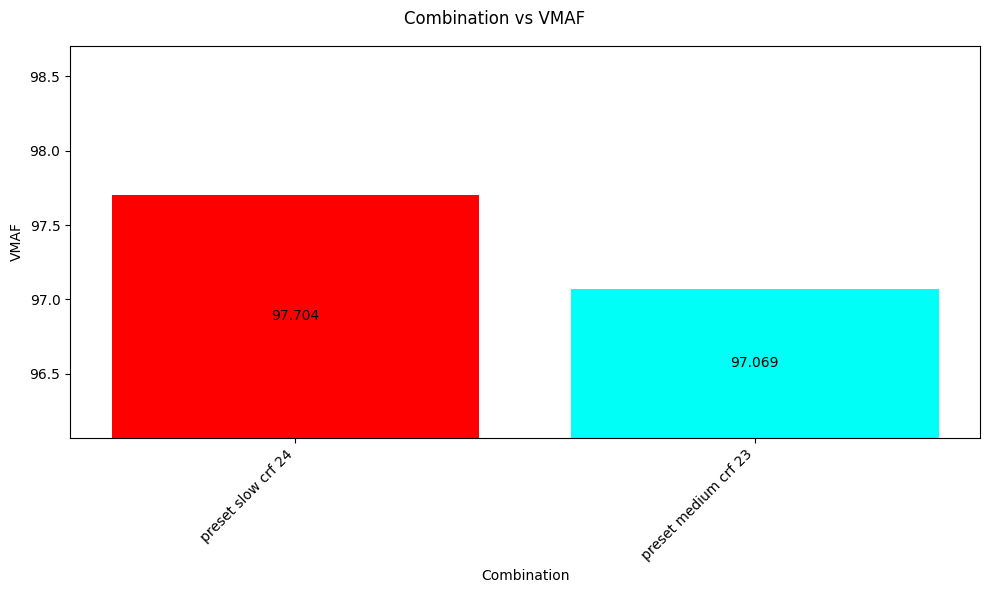
│ -preset slow -crf 24   │         36.423 │  9.114 MB │    1.104 Mbps │ 97.704 │ 47.687 │ 0.997 │
│ -preset medium -crf 23 │         14.131 │  9.364 MB │    1.138 Mbps │ 97.069 │ 47.380 │ 0.997 │
└────────────────────────┴────────────────┴───────────┴───────────────┴────────┴────────┴───────┘
VMAF/PSNR/SSIM values are the mean of the per-frame scores. The best values are in green.
The report will also contain a graph comparing each combination:
- Combination Mode can be used alongside Overview Mode.
- You need to decide whether you want to use the regular mode, which compares the quality metrics achieved with various values of one particular encoder parameter (using the
-pand-varguments), OR Combination Mode. You cannot do both.
Available Arguments
You can see a list of the available arguments with python main.py -h:
usage: main.py [-h] [--disable-psnr] [--disable-ssim] [-dp DECIMAL_PLACES] -i INPUT_VIDEO [-t TRANSCODE_LENGTH] [-o OUTPUT_FOLDER] [-vf VIDEO_FILTERS] [-sl] [-st] [-d] [-P] [--input-options INPUT_OPTIONS] [--output-options OUTPUT_OPTIONS] [--av1-cpu-used <1-8>] [-e ENCODER]
               [-p PARAMETER] [-v VALUES [VALUES ...]] [-c COMBINATIONS] [-cl <1-60>] [--interval <1-600>] [-n <x>] [--n-threads N_THREADS] [--phone-model]
               [--4k-model]

options:
  -h, --help            show this help message and exit

General Arguments:
  --disable-psnr        Disable PSNR calculation.
  --disable-ssim        Disable SSIM calculation.
  -dp DECIMAL_PLACES, --decimal-places DECIMAL_PLACES
                        The number of decimal places to use for the data in the table
  -i INPUT_VIDEO, --input-video INPUT_VIDEO
                        Input video. Must be a relative/absolute path or a glob pattern.
                        Use ** to match any number of subfolders, e.g. "videos/**/*.mp4"
                        If the path contains a space, it must be surrounded in double quotes.
  -t TRANSCODE_LENGTH, --transcode-length TRANSCODE_LENGTH
                        Create a lossless version of the original video that is just the first x seconds of the video.
                        This cut version of the original video is what will be transcoded and used as the reference video.
                        You cannot use this option in conjunction with Overview Mode (--interval).
  -o OUTPUT_FOLDER, --output-folder OUTPUT_FOLDER
                        The folder to save the results in. It can be a relative or absolute path, e.g. results/run1
                        If the path contains a space, it must be surrounded in double quotes.
                        If the input is a glob pattern that matches multiple videos, each video's results are saved in a subfolder of this folder.
  -vf VIDEO_FILTERS, --video-filters VIDEO_FILTERS
                        Apply video filter(s) to the original video before calculating quality metrics. Each filter must be separated by a comma.
                        Example: -vf bwdif=mode=0,crop=1920:800:0:140
  -sl, --skip-libvmaf   Skip quality metrics calculation if its output file exists, is newer than the transcoded video
                        and was calculated with the same settings (metrics, model, -n and -vf).
  -st, --skip-transcoding
                        Skip encoding if output file exists.
  -d, --debug           Print debug message and command line.
  -P, --print           Print the metrics table in the terminal.
  --input-options INPUT_OPTIONS
                        Set general FFmpeg input options.
                        Use FFmpeg syntax and wrap it in double quotes. Example:
                        --input-options="-hwaccel d3d11va"
  --output-options OUTPUT_OPTIONS
                        Set general FFmpeg output options.
                        Use FFmpeg syntax and wrap it in double quotes. Examples:
                        --output-options="-c:a aac -b:a 128k"--output-options="-x264-params keyint=123:min-keyint=20"

Encoder Arguments:
  --av1-cpu-used <1-8>  Only applicable if the libaom-av1 (AV1) encoder is chosen. Set the quality/encoding speed tradeoff.
                        Lower values mean slower encoding but better quality, and vice-versa
  -e ENCODER, --encoder ENCODER
                        Specify an ffmpeg video encoder.
                        Examples: libx265, h264_amf, libaom-av1
  -p PARAMETER, --parameter PARAMETER
                        The encoder parameter to compare, e.g. preset, crf, quality.
                        Example: -p preset
  -v VALUES [VALUES ...], --values VALUES [VALUES ...]
                        The values of the specified encoder parameter to compare. Must be used alongside the -p option. Examples:
                        Compare presets: -p preset -v slow fast
                        Compare CRF values: -p crf -v 22 23
                        Compare h264_amf quality levels: -p quality -v balanced speed
  -c COMBINATIONS, --combinations COMBINATIONS
                        Use this mode if you want to compare the quality achieved with a combination of two or more parameters.
                        The list of combinations must be surrounded in quotes, and each combination must be separated by a comma.
                        For example, if you want to compare the combination of preset veryslow and CRF 18, with the combination of preset slower and CRF 16:
                        -c 'preset veryslow crf 18,preset slower crf 16'

Overview Mode Arguments:
  -cl <1-60>, --clip-length <1-60>
                        When using Overview Mode, a X seconds long segment is taken from the original video every --interval seconds and these segments are concatenated to create the overview video.
                        Specify a value for X (in the range 1-60)
  --interval <1-600>    To activate Overview Mode, this argument must be specified.
                        Overview Mode creates a lossless overview video by grabbing a --clip-length long segment every X seconds from the original video.
                        Specify a value for X (in the range 1-600)

VMAF Arguments:
  -n <x>, --n-subsample <x>
                        Set a value for libvmaf's n_subsample option if you only want the VMAF/PSNR to be calculated for every nth frame.
                        Without this argument, VMAF/PSNR scores will be calculated for every frame.
  --n-threads N_THREADS
                        Specify the number of threads to use when calculating VMAF
  --phone-model         Enable VMAF phone model
  --4k-model            Use the VMAF 4K model, which predicts the quality of video viewed on a 4K display.
                        It cannot be used with --phone-model.
Requirements
- Python 3.10+ installed and in your PATH.
pip install -r requirements.txt --upgrade- FFmpeg and FFprobe installed and in your PATH (or in the same directory as this program). Your build of FFmpeg must support v2.1.1 (or above) of the
libvmaffilter and the encoders you wish you test.
You can check what your build of FFmpeg supports by running ffmpeg -buildconf -hide_banner in the terminal. If --enable-libvmaf is not printed, your build of FFmpeg is not sufficient as VQM needs the libvmaf filter.
FFmpeg builds that support the libvmaf filter can be found in the FFmpeg Builds section.
FFmpeg Builds
For convenience, below are links to FFmpeg builds that support the libvmaf filter.
Windows: https://www.gyan.dev/ffmpeg/builds/ffmpeg-git-essentials.7z
macOS: https://evermeet.cx/ffmpeg - download both ffmpeg and ffprobe and add the binaries to your PATH.
Alternatively, you can install FFmpeg using Homebrew - brew install ffmpeg
Linux (kernels 3.2.0+): https://johnvansickle.com/ffmpeg.
Download the git master build. Installation instructions, as well as how to add FFmpeg and FFprobe to your PATH, can be found here.
About the model files
Two model files are provided, vmaf_v0.6.1.json and vmaf_4k_v0.6.1.json. There is also the phone model that can be enabled by using the --phone-model argument.
This program uses the vmaf_v0.6.1.json model file by default, which is "based on the assumption that the viewers sit in front of a 1080p display in a living room-like environment with the viewing distance of 3x the screen height (3H)."
The phone model was created because the original model "did not accurately reflect how a viewer perceives quality on a phone. In particular, due to smaller screen size and longer viewing distance relative to the screen height (>3H), viewers perceive high-quality videos with smaller noticeable differences. For example, on a mobile phone, there is less distinction between 720p and 1080p videos compared to other devices. With this in mind, we trained and released a VMAF phone model."
The 4K model (vmaf_4k_v0.6.1.json) "predicts the subjective quality of video displayed on a 4K TV and viewed from a distance of 1.5H. A viewing distance of 1.5H is the maximum distance for the average viewer to appreciate the sharpness of 4K content. The 4K model is similar to the default model in the sense that both models capture quality at the critical angular frequency of 1/60 degree/pixel. However, the 4K model assumes a wider viewing angle, which affects the foveal vs peripheral vision that the subject uses."
The source of the quoted text, plus additional information about VMAF (such as the correct way to calculate VMAF), can be found here.
Notes:
If you are transcoding a video that will be viewed on a mobile phone, you can add the
--phone-modelargument which will enable the phone model.If you are transcoding a video that will be viewed on a 4K display, the default model (
vmaf_v0.6.1.json) is fine if you are only interested in relative VMAF scores, i.e. the score differences between different encoder parameter values, but if you are interested in absolute scores, it may be better to use the 4K model file which predicts the subjective quality of video displayed on a 4K screen at a distance of 1.5x the height of the screen. To use the 4K model, add the--4k-modelargument. It cannot be used together with--phone-model.
Code Structure
| File | Purpose |
|---|---|
main.py |
Entry point. Validates the arguments, then for each input video: transcodes it with each parameter value/combination, calculates the quality metrics and writes the results. |
args.py |
The command line arguments. |
reference_video.py |
Optionally creates a shorter reference video (-t or Overview Mode). |
ffmpeg_tasks.py |
The FFmpeg commands that transcode the video and run libvmaf. |
metrics.py |
Reads the per-frame scores from libvmaf's JSON log. |
video_info.py |
Uses FFprobe to get the duration, frame rate and video bitrate. |
results.py |
The rows of the results table, and how each column is shown. |
report.py |
Writes the HTML report. |
graphs.py |
Plots the per-frame graphs and the mean VMAF bar graph, for the report. |
utils.py |
Logging and formatting helpers. |
Explore related projects
ytdl-org/youtube-dl
Command-line program to download videos from YouTube.com and other video sites
141,500 starsexcalidraw/excalidraw
Virtual whiteboard for sketching hand-drawn like diagrams
135,396 starsgodotengine/godot
Godot Engine – Multi-platform 2D and 3D game engine
119,840 starsmrdoob/three.js
JavaScript 3D Library.
117,983 stars