
AndyShaman/BYDMate
AndyShaman/BYDMate has 495 GitHub stars and 93 forks. GitHot measured +4 stars in 24 hours and +26 in 7 days. Last checked 2026-11-09 10:24 UTC. Last push 2026-11-06.
BYD DiLink app (3.0/5.0/5.1, UI7): split screen 1/3+2/3, navigation on instrument cluster, Yandex Navigator on HUD, blind-spot cameras, Russian voice AI agent, real BMS consumption, trips/charges journal, automation, ABRP telemetry. EVs and DM-i/DM-o hybrids: Leopard 3 / Bao 3, Leopard 5, Sea Lion 07, Song, Song Pro DM-i, Atto 3.
Measured star growth
- in 24h
- +4
- in 7 days
- +26
- in 15 days
- Update delayed
- in 1 month
- Update delayed
Net star changes over overlapping periods, not daily totals. Missing measurements are left blank. Stars measure attention, not software quality.
README.en.md
Original
BYDMate
Trip Logger & Energy Analytics & Touch of Magic for BYD DiLink


Real consumption, GPS routes, automation, local AI analytics.
Split screen 1/3 and 2/3, navigation on the instrument cluster, Yandex Navigator guidance on the windshield, turn-signal blind-spot cameras, a Russian voice assistant, ABRP telemetry.
Tested on Leopard 3 (Fangchengbao Tai 3), with support for Sea Lion 07, Song, Atto 3, Seal, Han and the DM-i and DM-o hybrids (Song Pro DM-i, Leopard 5, Leopard 8, Sealion 06). DiLink 3.0, 4.0, 5.0, 5.1, and firmware with the new UI7 interface (OTA V1.6).
Features | Screenshots | Automation | Projection to cluster | HUD | Split screen | Voice AI Agent | Tech | Diagnostics | AI Insights | ABRP | Install | Build | Releases | Sponsor
Why This Matters
The stock BYD onboard computer underestimates consumption by 10-30%. BYDMate reads data straight from the BMS (energydata) and shows the real consumption. Plus data the stock system does not have at all: idle drain, cell balance, trip cost, AI analytics.
All core features (trips, charges, automations, local insights, offline voice agent) run locally on DiLink and need no internet. Cloud features are off by default and turn on only when you enter a key by hand. What exactly leaves the device and when is described in the Data & Network section.
What's New
The main changes in version 4.1.0.
Module fault codes with descriptions. The "Tech" screen has a new "Diagnostics" card. The "Scan" button reads fault codes from the car's modules, only in P and only when you press it, and changes nothing in the car. Codes are written the same way as in BYD manuals and service scanners, grouped by module, with a description from BYD diagnostic manuals next to each one, no internet needed. You can send the codes to yourself in Telegram. The same card shows cluster warnings and the time left until the next service. Tested on Leopard 3. Details in Diagnostics: Module Faults.
"Car status" card. Climate and tires now share one card. The tires are drawn on a picture of the car, each wheel with its own pressure and temperature. If the car has a PM2.5 sensor, the cabin and outside air quality shows there too.
Rear seat heating in automation. Left and right separately, off, 1 or 2. The actions show only on cars that report having rear seat heating.
Fixes. Two short trips in a row no longer merge into one. Yandex Navigator turn arrows are back on the cluster of the Han 2022 and similar cars. Pressing the volume wheel pauses music on DiLink 3 and 4 as well. With the "By charges" tariff, the current trip is priced at the cost of the energy in the battery, not at the home tariff.
The full list of changes is in the CHANGELOG.
Features
| Feature | Description | |
|---|---|---|
| BMS | Real consumption | BMS data (energydata), not the onboard computer. Trend over a 25 km rolling window |
| GPS | Trip tracking | GPS routes, distance, speed |
| Charge | Charges | Automatic AC/DC logging, period and lifetime stats, manual add and edit |
| AI | Insights | Driving analysis: on-device rules, no internet |
| TRIP | TRIP 1/2 counters | Distance, consumption, time, and cost since the last reset (like in the car); long-press to reset, tap for details |
| Bat | Battery health and "Tech" | Card: SoH (Leopard 3, DiLink 3.0), temperature, 12V, cell balance, insulation. Tap opens the "Tech" screen with live battery, motor, climate, and tire parameters, including the front/rear power split in percent |
| DTC | Module faults | "Diagnostics" card on the "Tech" screen: fault codes from the car's modules with descriptions from BYD manuals, cluster warnings, time until the next service. Scanning only in P and only on a press, it changes nothing in the car |
| DM-i | Hybrids | The app detects a hybrid from the car's own counters. Battery and fuel range from the car, a «Fuel» card (tank, range, rpm, engine and battery mileage), litres and engine kilometres per trip from the car's counter, litre price per tariff period. Nothing changes on EVs |
| Map | Route map | osmdroid (OpenStreetMap) in trip details |
| Rules | Automation | WHEN→THEN rules: parameter triggers → vehicle control commands |
| Cluster | Projection to cluster | Mirrors the chosen app onto the instrument cluster with a steering-wheel button (right star by default) |
| HUD | Windshield projection | Maneuvers, distance, and the speed limit sign from Yandex Navigator on the factory head-up display |
| Split | Split screen | Two apps at once: BYDMate windows in a 1/3 and 2/3 layout, or the firmware's own split |
| Cam | Blind-spot cameras | The camera of the matching side while the turn signal is on: on the cluster or in a small window on the screen |
| Voice | Voice agent | Russian offline assistant: on-device speech recognition, AI agent (32 tools), neural TTS |
| Widget | Floating widget | 7 fields over other apps: SOC, range, consumption + trend, time, cabin t°, battery t°, 12V; on a hybrid the fuel range and tank level replace consumption |
| Auto | Autostart | WorkManager, starts on boot |
| Backup | Configuration backup | Trips, charges, settings, and keys in one archive in Download, restore by parts, scheduled auto-save with a copy in your Telegram bot |
| Share | Automation sharing | A rule saved to a file without phone numbers, contacts, or your places; import someone else's rule with a preview |
| Aa | Text size | Normal, large, or extra large text on the app screens and in the voice agent windows |
Screenshots
Dashboard
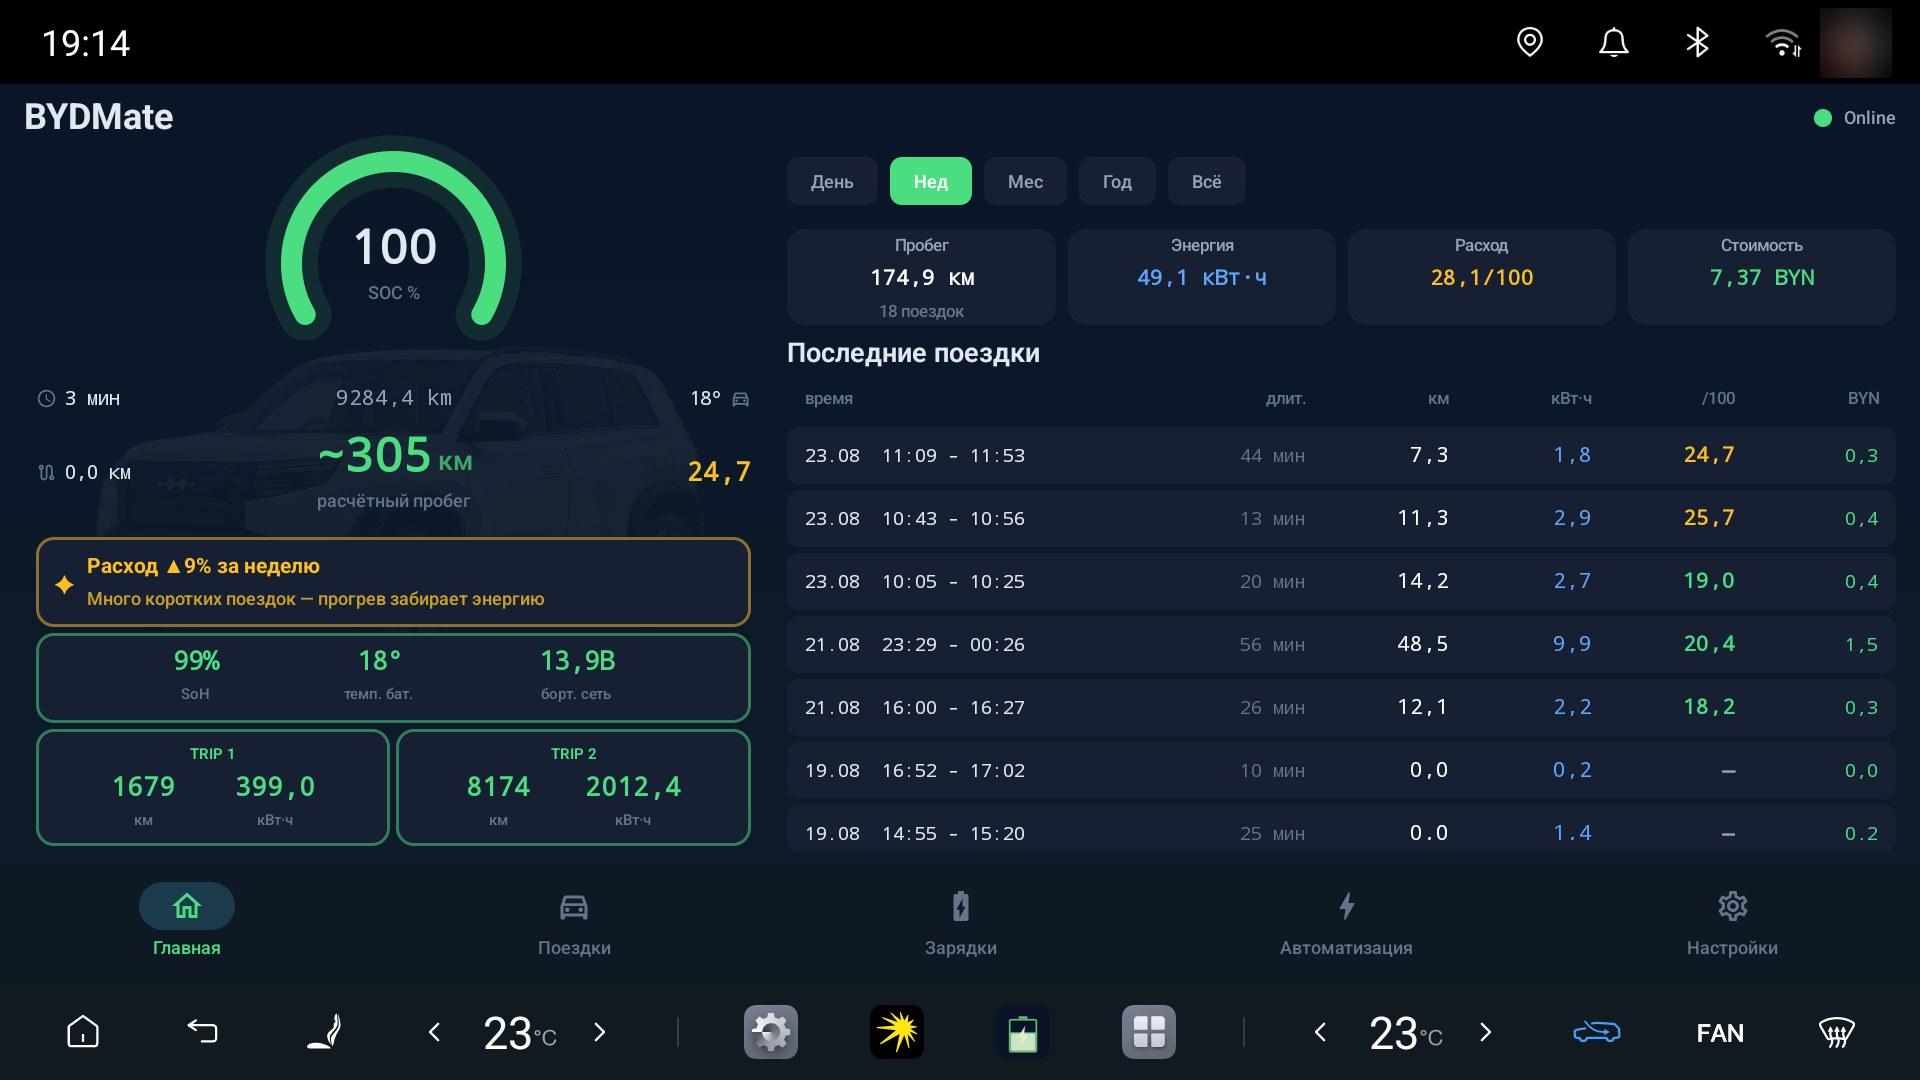
Around the SOC ring there are four fields laid out like the floating widget: at the top, trip duration, odometer, and temperature (cabin and outside temperature share one slot; if the car does not report outside temperature, the slot shows only cabin temperature, as before); at the bottom, the current trip's distance, the estimated range, and the current trip's consumption with a trend arrow. The colors and trend logic are the same as in the floating widget, so the information reads the same on the home screen and over other apps. On a hybrid, the car's own battery range sits under the ring, with no calculation of ours, and below it is a “Fuel” card: the tank level and the fuel range; a tap shows engine rpm, engine and battery mileage, litres for all time and the litre price of the current period. Consumption for a period on a hybrid is shown as l/100 and kWh/100 over all kilometres, as on the instrument cluster.
Below the ring: an AI insight, a small battery health card (SoH on Leopard 3 and DiLink 3.0, temperature, 12V), the two TRIP 1 and TRIP 2 counters, recent trips, a period filter. Each counter shows distance, consumption in kWh (including parked drain), time on the road, and cost since the last reset. A long press resets the counter, a tap opens the details. In the counter's window you can turn on reset after charging: after any charge, AC only, DC only, or only after charging to 100%.
AI Insights
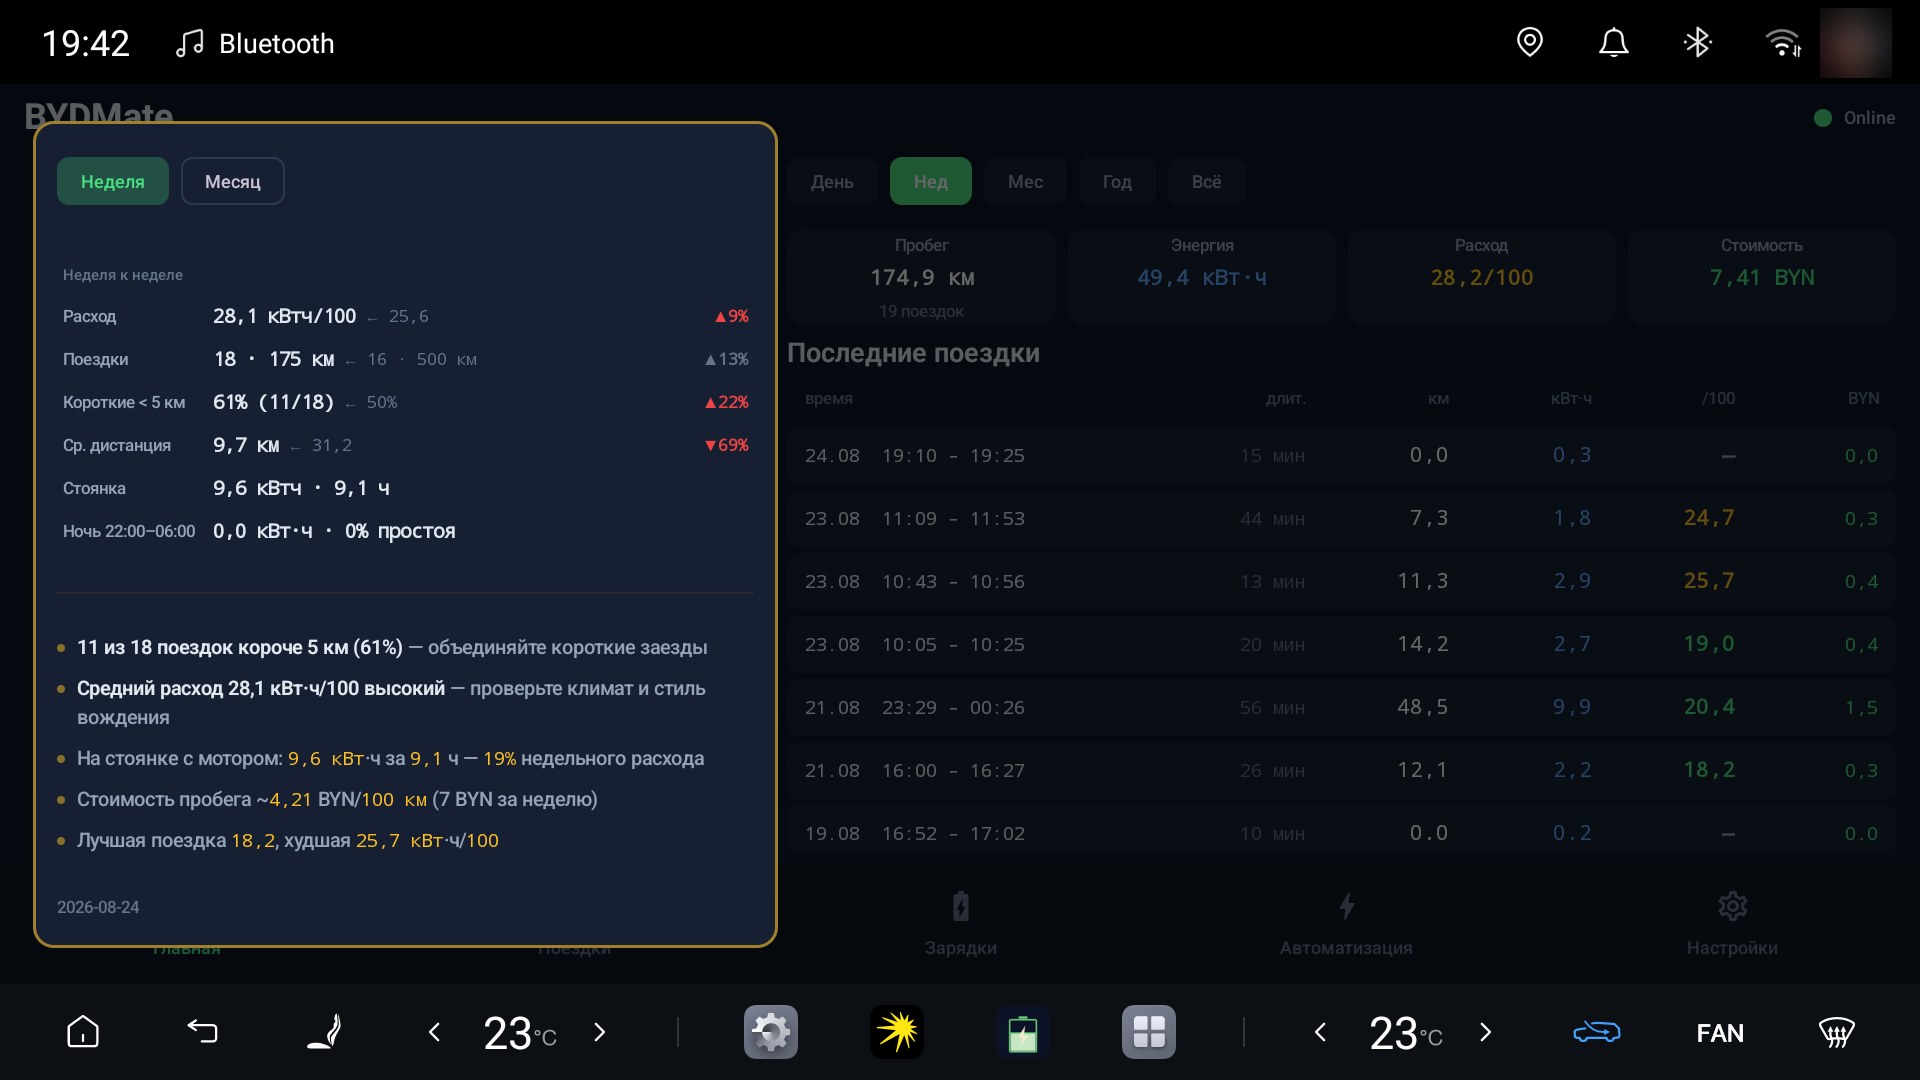
Driving efficiency analysis: consumption, trends, battery, recommendations (computed on the device)
Tech
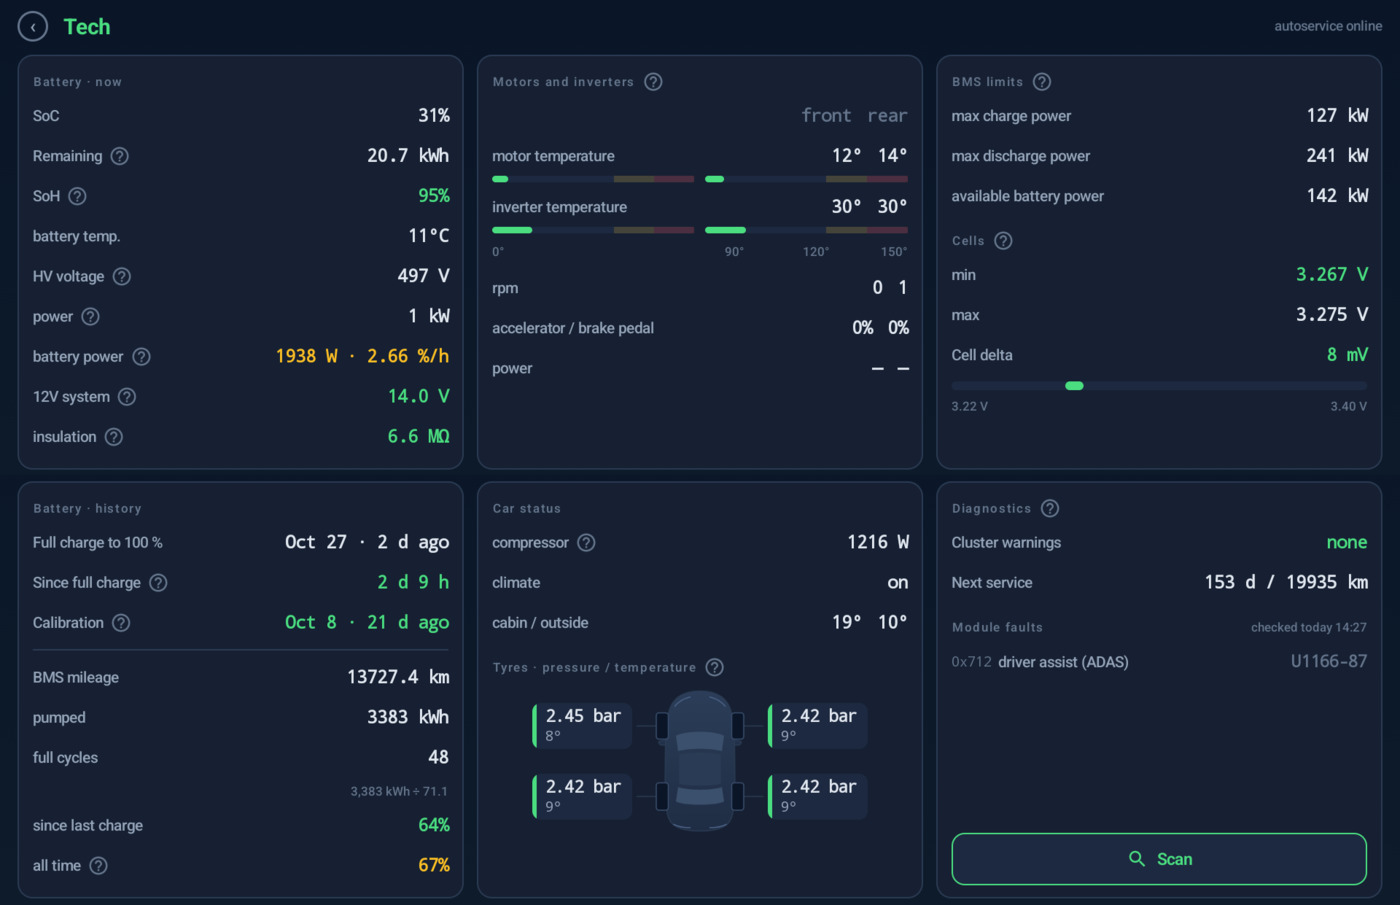
Battery, motors, BMS limits, cells, battery history, climate, tyres, diagnostics. Opens with a tap on the battery card on the Dashboard
Trips
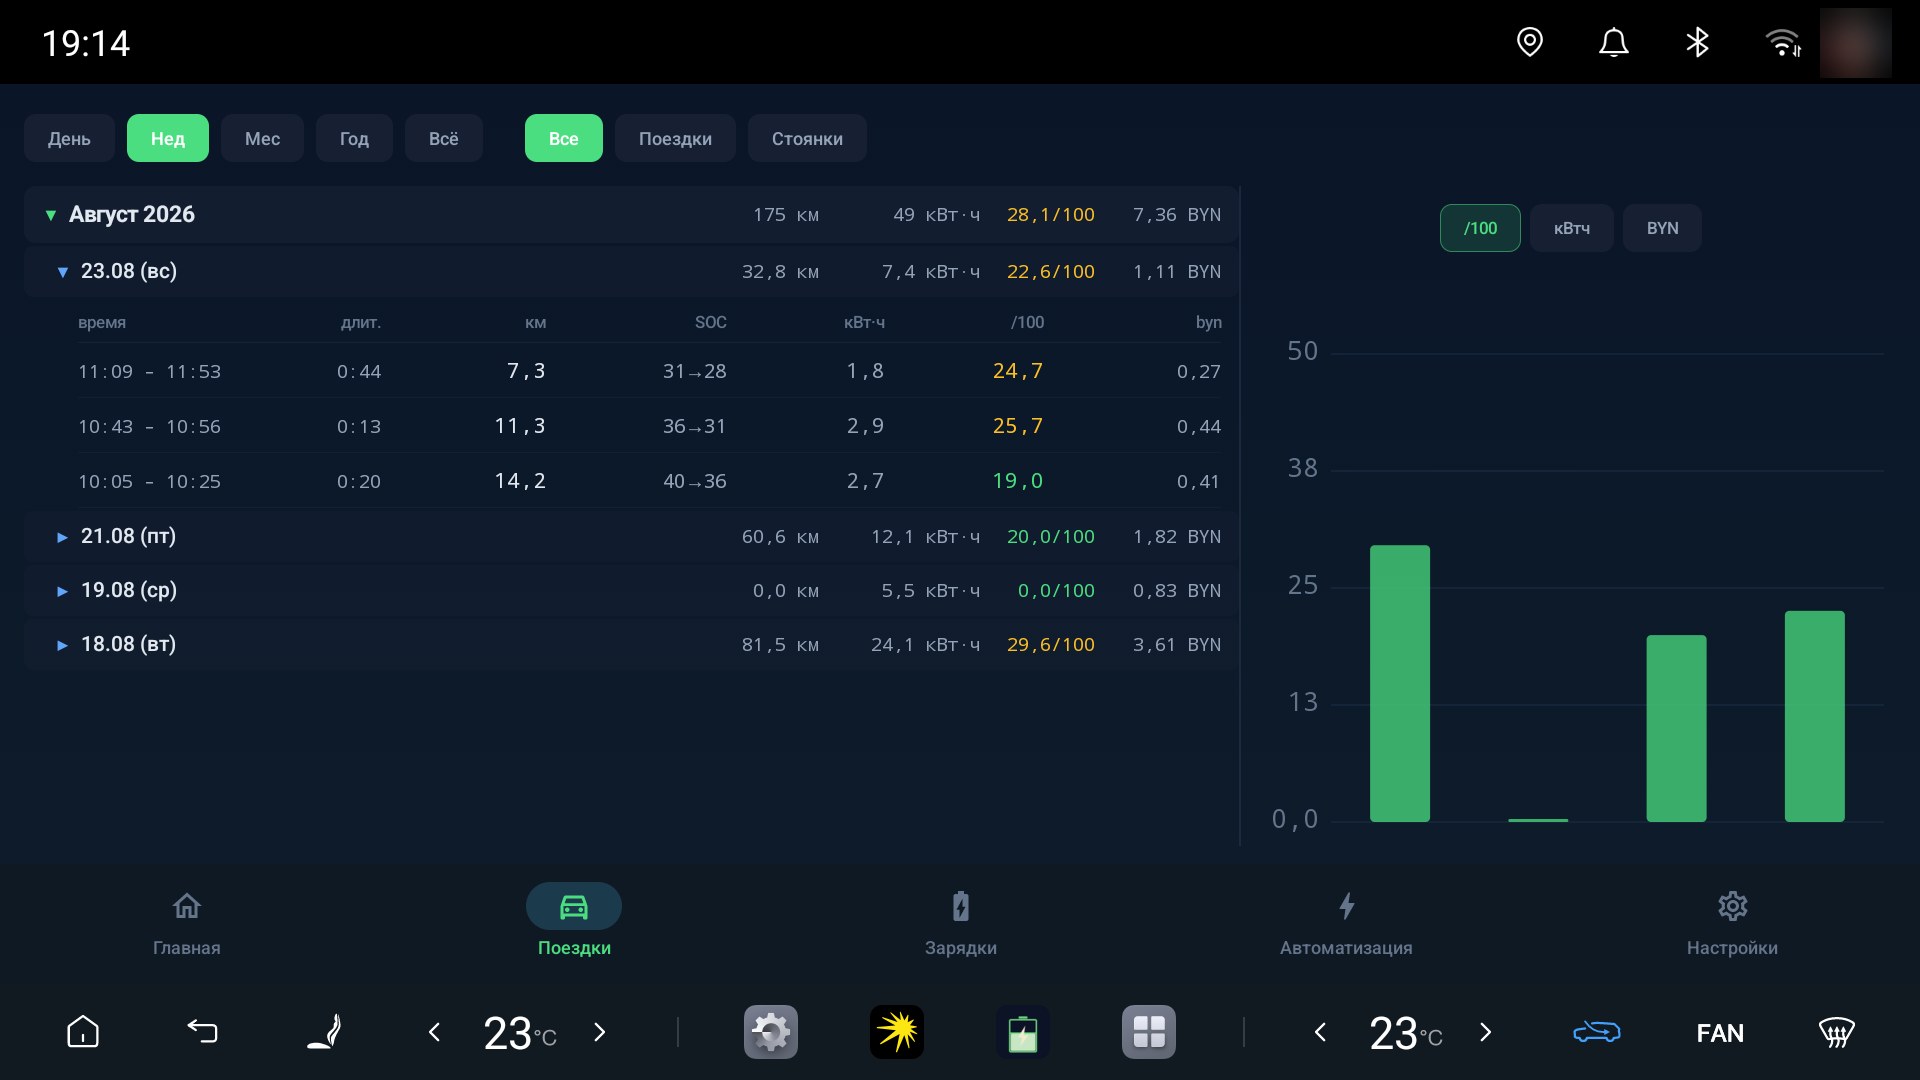
Month > Day > Trip accordion with filters and color-coded consumption
The "Temperature" chip above the list opens the "Consumption and Temperature" screen: a dot for every trip longer than 5 km, a median line over 5-degree bands, medians for cold (below 0 °C), mid-season (0 to 15 °C), and warm (above 15 °C), and a note on how many percent higher consumption is in the cold. Trips under 5 km never make it into the chart, warm-up eats up everything there. It takes 8 trips with temperature data and a spread of at least 15 °C, otherwise the screen honestly says what is missing.
The trip window shows the odometer at the start and finish, time in motion, cost per 100 km, the charge change in percent, and the outside temperature at the start and end. The odometer is recorded only for trips after the update.
On a hybrid the list has an “l” column. In the “/100” column a trip with petrol shows litres per 100 km with an “l” mark and no color, an electric trip shows kWh/100 with color as before. Litres are the difference of the car's fuel counter at the trip boundaries, in 0.1 l steps; if one of the boundaries has no snapshot, a dash is shown, and someone else's petrol is never put on the trip. In the trip window litres, engine and battery kilometres and fuel cost are separate rows.
Automation
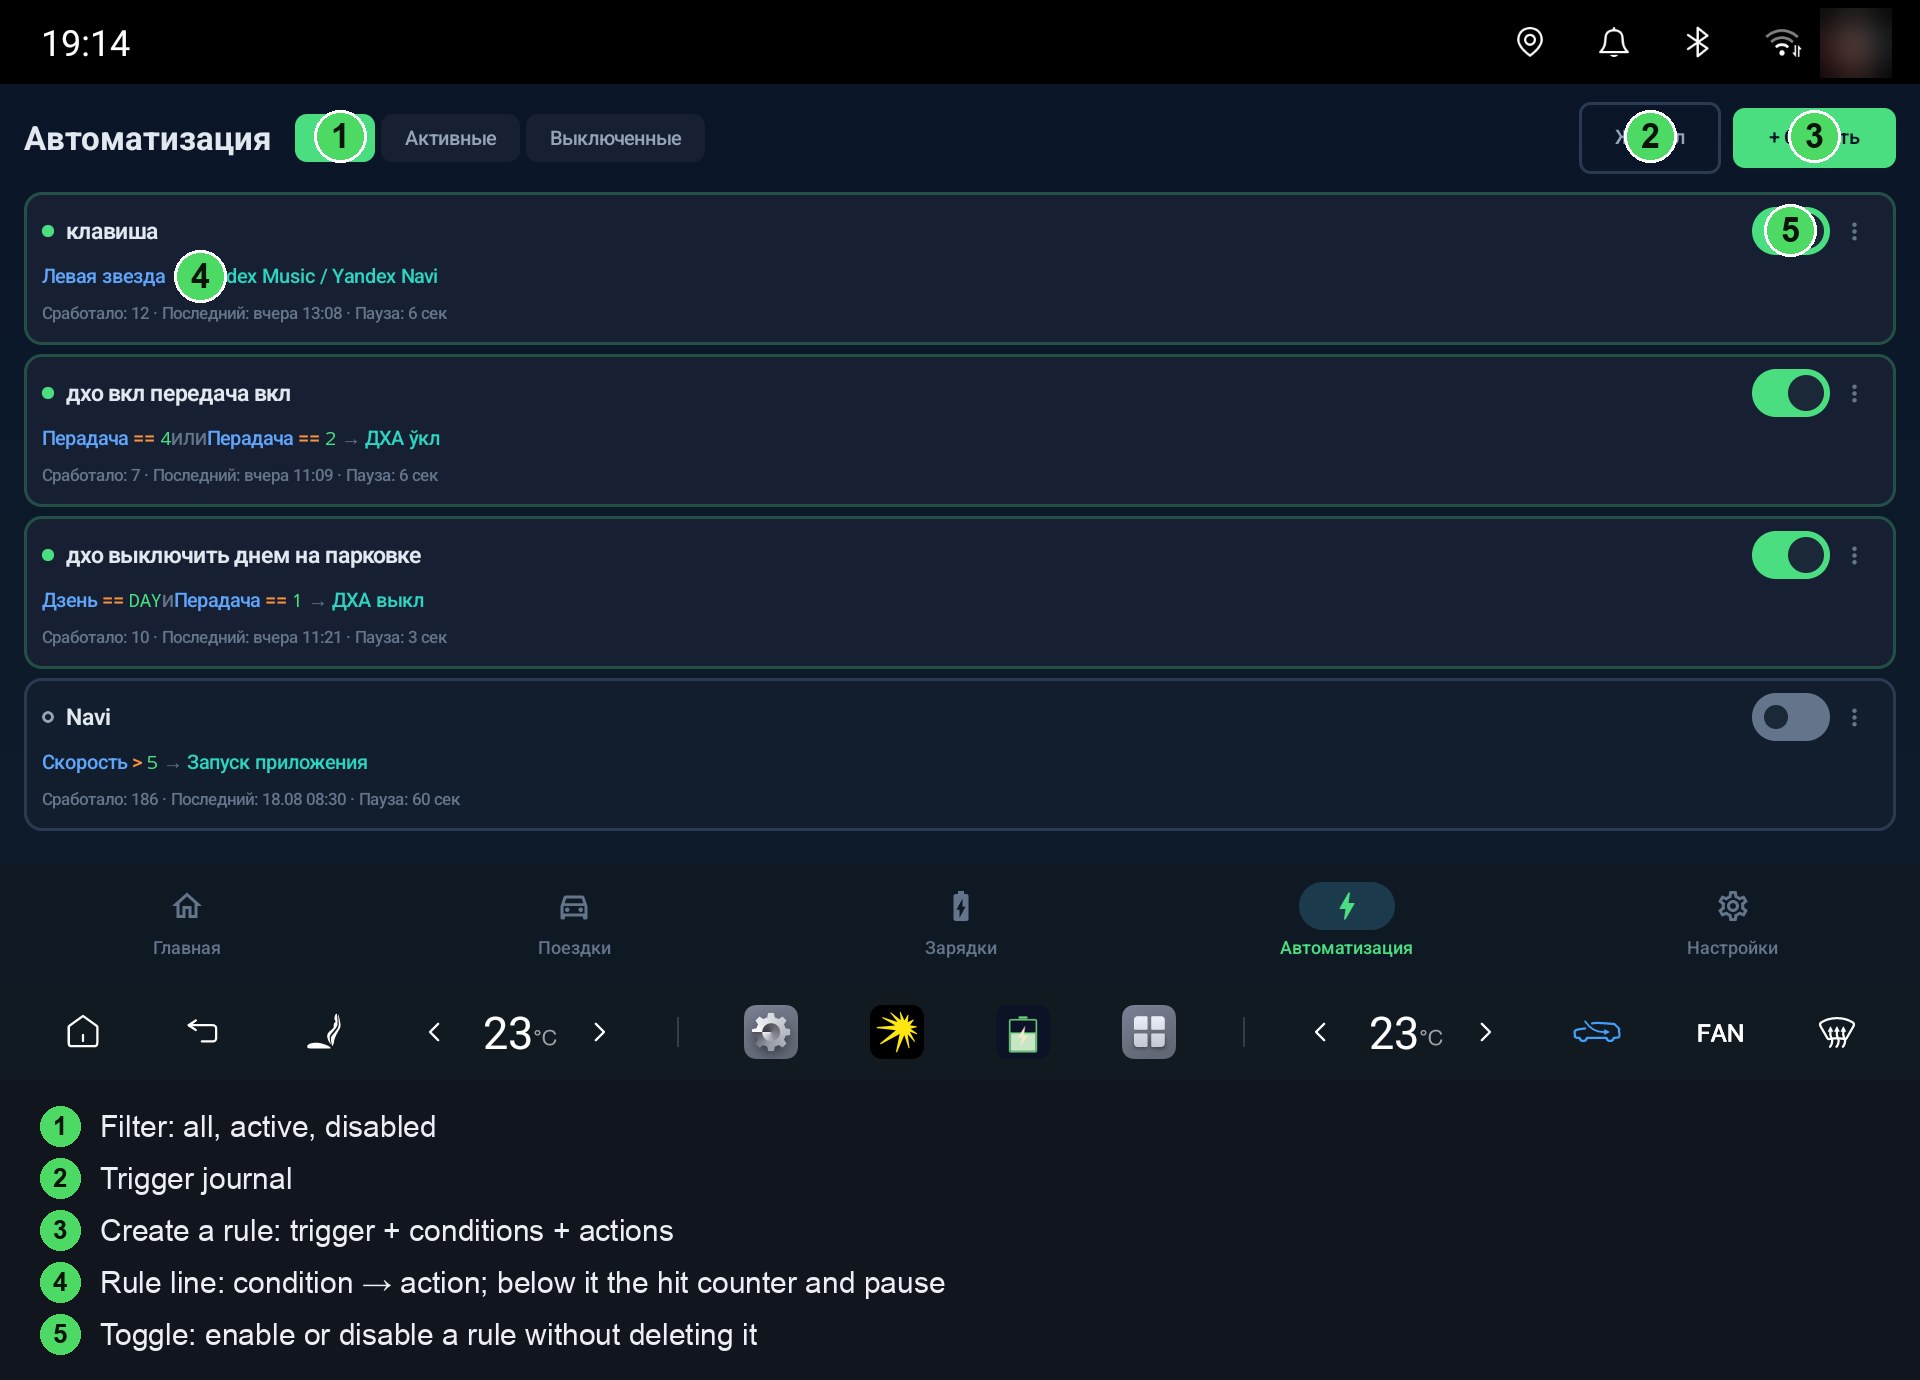
WHEN→THEN rules, condition and action editor, trigger settings
Settings
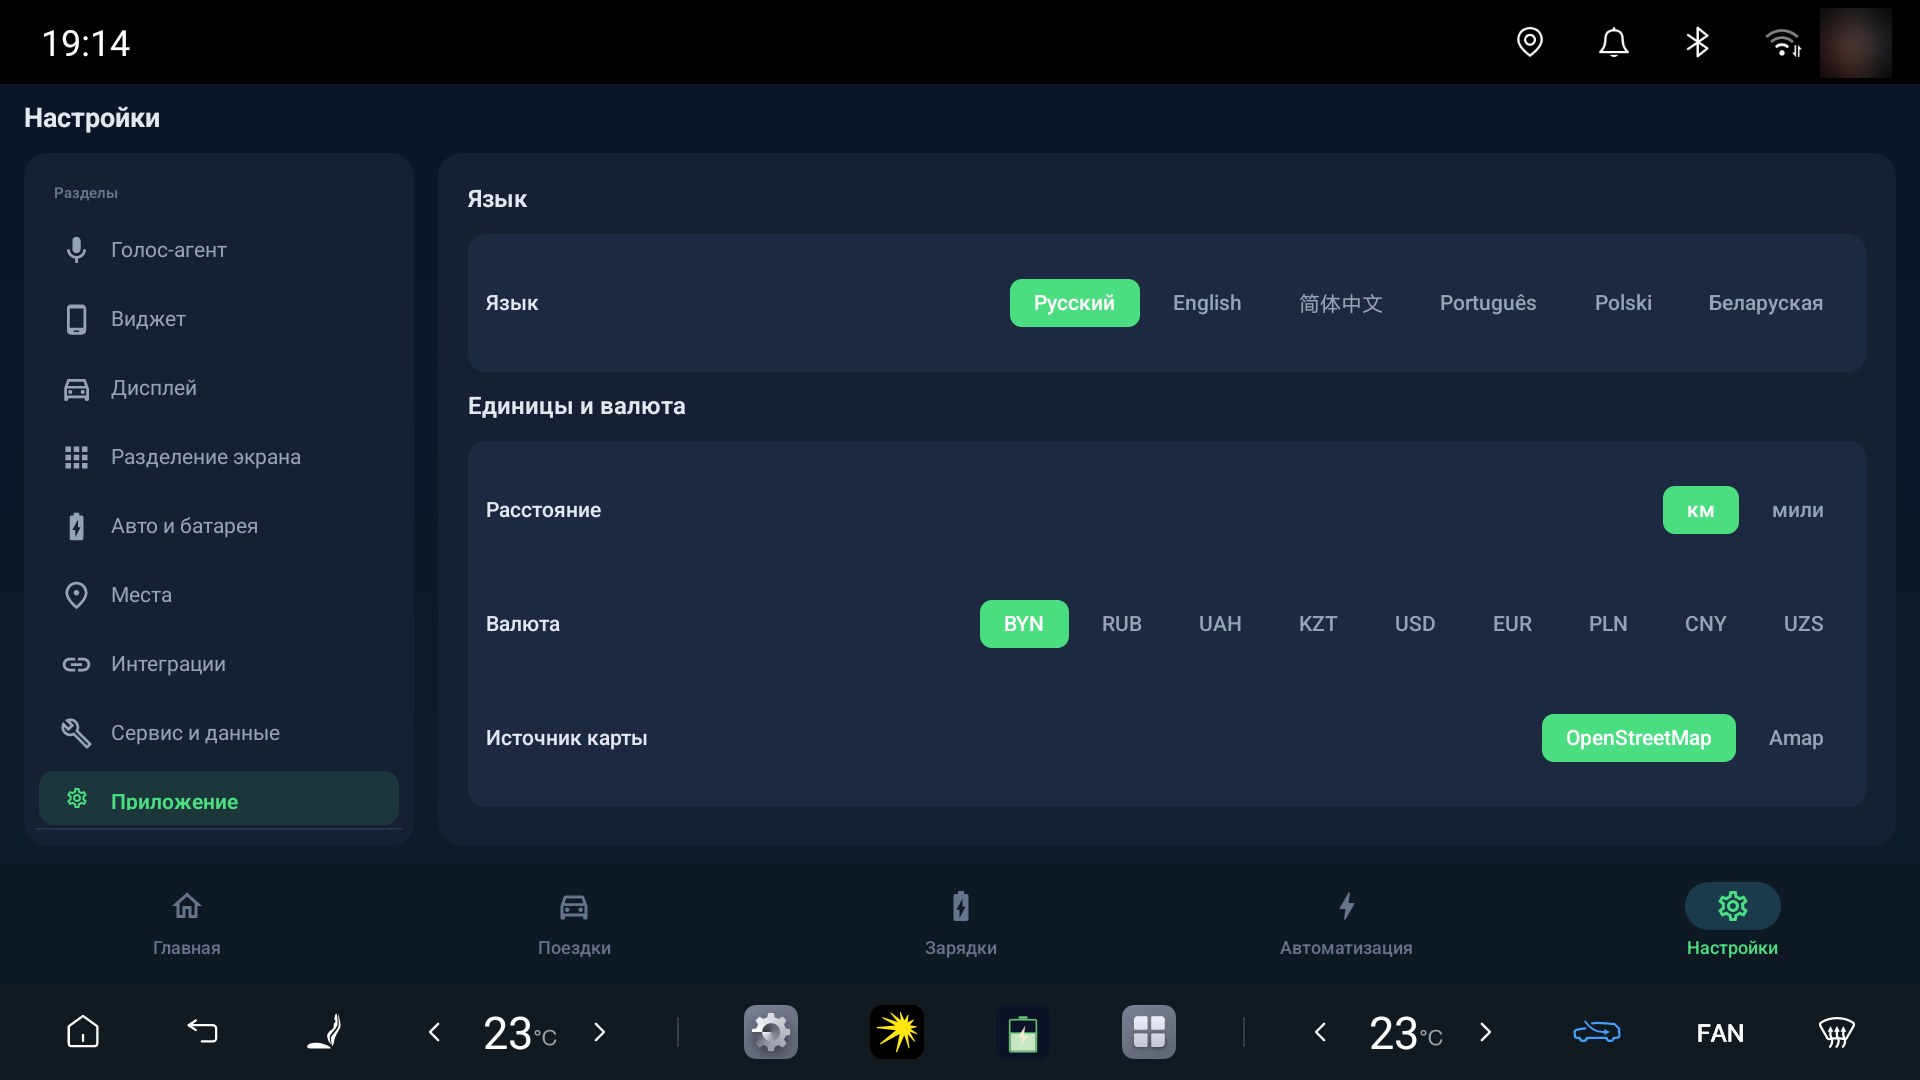
Sections: Voice agent, Widget, Display, Split screen, Car and battery, Integrations, Service & Data, App
Split Screen
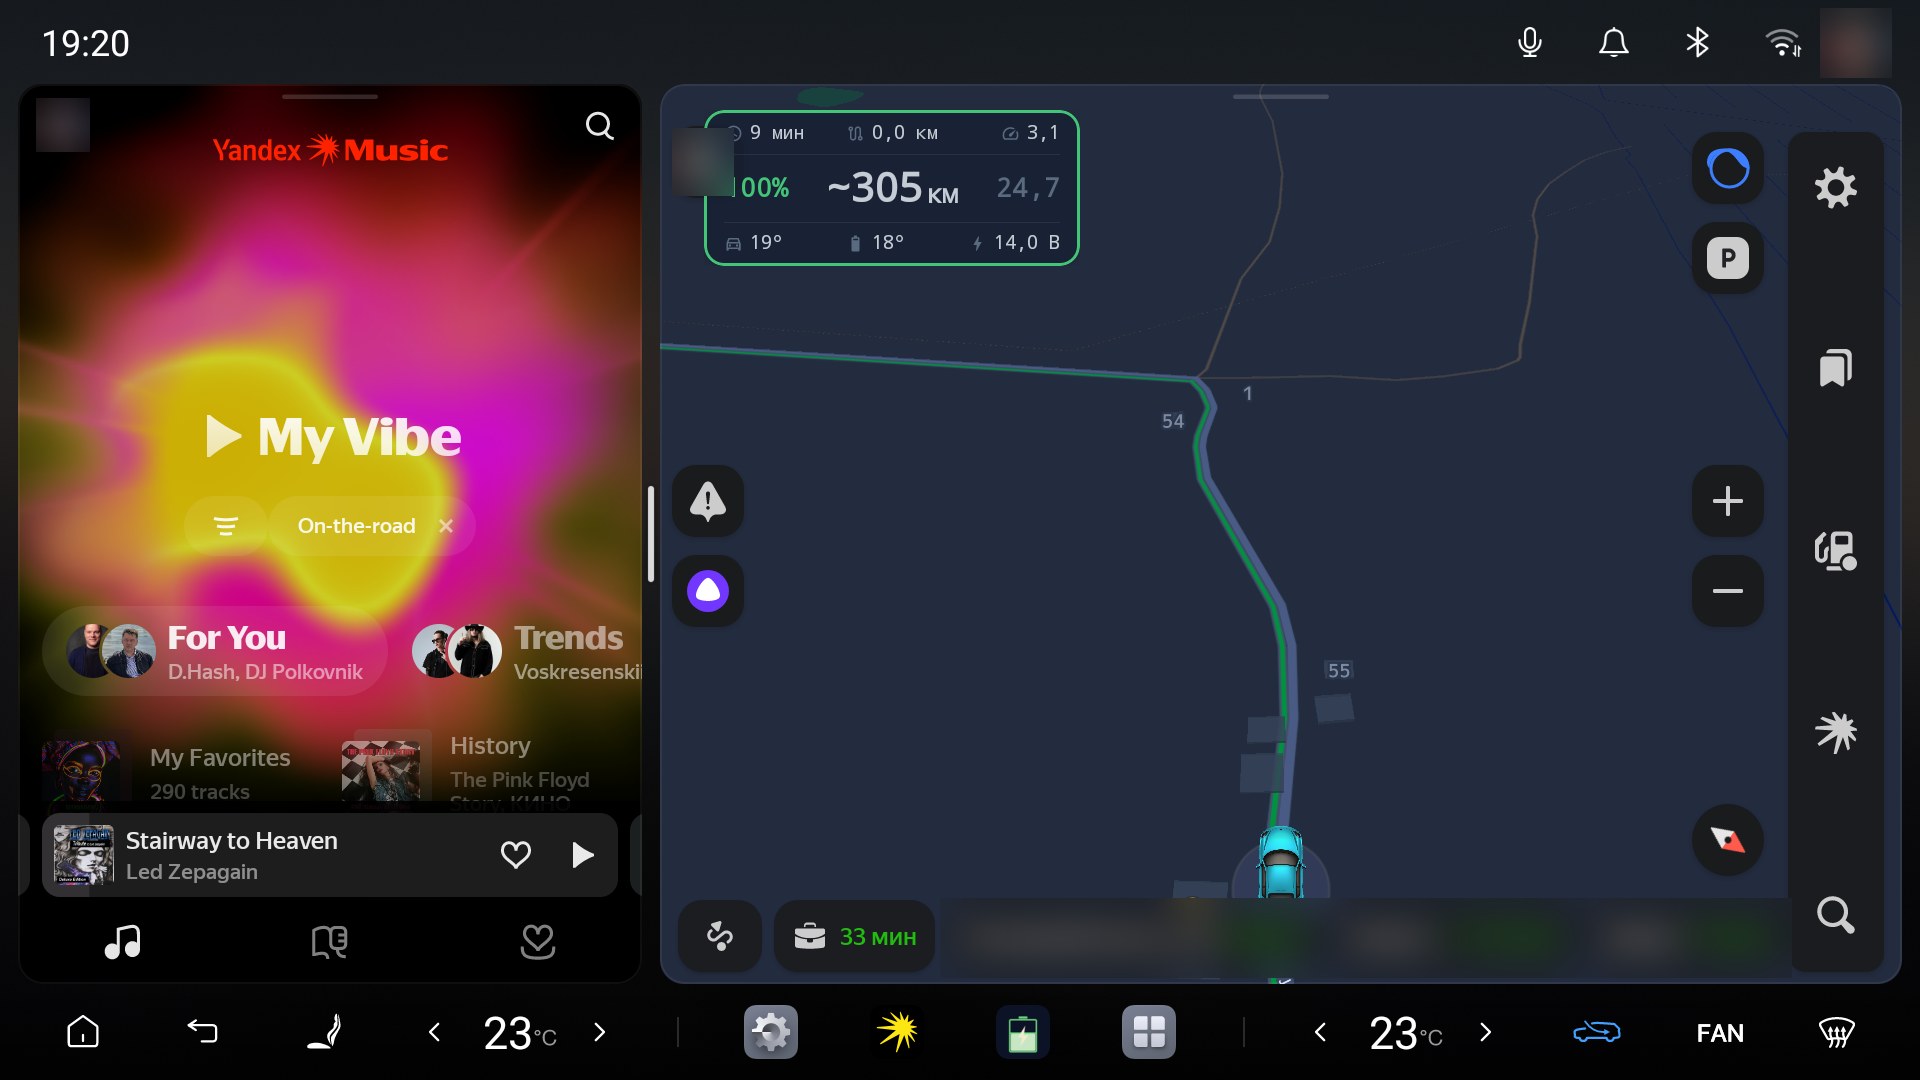
Two panes, 1/3 and 2/3, with the BYDMate widget on top
Automation
The Automation tab lets you create rules that control the car automatically, straight through the car's system interface.
How It Works
WHEN the condition holds → THEN run the command.
Examples:
- SOC < 20% → turn on recirculation
- Speed > 0 → close the sunshade
- Outside temperature < 0 → turn on mirror heating
Capabilities
| Description | |
|---|---|
| Triggers | SOC, speed, temperature, turn signal, gear, doors, windows, sunroof, trunks, tire pressure, drive mode, geofence places, time of day, exact time and a time range with weekdays, steering-wheel key, widget tap, voice phrase, service start, internet available, and more. Turn signals, gear, doors, windows, trunks, and blind-spot sensors reach the app the moment they happen, not by polling |
| Commands | Windows (including individual driver and passenger), climate, lights, locks, sunroof, mirrors, all directly through the car's system interface. Steering wheel heating on cars that have it |
| 17 action kinds | Vehicle command, notification, app launch, phone call, route in Yandex Navigator, open URL, Yandex Music, play a YouTube video, pause, media volume, sentry mode, Wi-Fi hotspot, speak text, agent query, BYDMate home screen, projection to cluster, split screen (start, close, toggle). Vehicle commands, sentry mode, and projection to cluster also have a "Toggle" option |
| Edge trigger | Fires only on a false→true transition (not every 3 seconds) |
| Cooldown | Configurable delay between firings |
| Overlay confirmation | A "Cancel / Run" popup before the action. 15-second timeout, then auto-cancel |
| Safety | Windows do not open above 120 km/h, the sunroof above 80 km/h, doors do not unlock above 30 km/h, CAN/SHELL commands are blocked |
| Log | Full trigger history with outcomes |
| Templates | 6 ready-made rules for a quick start |
| Run now | Run a rule manually from the editor, bypassing triggers and cooldown |
"Toggle" is a third option next to the action itself, not a separate item. In the command list, under the "open / close" pair there is a line like "Trunk: toggle", and sentry mode and projection to cluster gained a "Toggle" button next to "Enable" and "Disable".
Toggle works for: trunk, front trunk, sunroof, locks, hazard lights, climate, driver and passenger seat heating and ventilation, steering wheel heating, projection to cluster, and sentry mode. The state comes from the car: whatever is open closes, whatever is off turns on. A seat that is currently running turns off, and one that is off returns to the level you last set (level 3 by default). If the car does not report the state, the action honestly declines and says so instead of guessing.
Rules created in earlier versions keep working and open for editing as before, nothing needs to change.
Command and parameter lists are collapsed by section. Only the section with the current choice is open, the rest expand with a tap on the header.
Test run. In the rule editor, the "Test run" button runs all the actions right away, as if the condition had fired. This does not count as a real trigger. Opening windows, the sunroof, or the front trunk, and unlocking doors, are skipped if there is no fresh speed data: no older than 10 seconds while the service is running. An unrecognized command is skipped too, with an explanation. Closing the editor stops the run.
List or cards. A toggle in the tab header shows rules as a compact list or as cards in three columns, the choice is remembered. Each rule shows how many times and when it last fired.
Places. The "Places" button moved from Settings to the header of the "Automation" tab, next to "Journal". You can add and edit points right there.
Steering wheel heating. The "Steering wheel heating" action turns heating on, off, and toggles it. The result is checked against the car's state, and on a car without steering wheel heating the action honestly says it is not there. On a car that has it, the command is not yet field-confirmed, we are waiting for reports.
Logic
- AND: every condition must hold
- OR: any one condition is enough
- Park only: the rule fires only when the car is in Park
Checking a Condition Every Time the Car Is Turned On
A rule fires at the moment a value crosses its threshold while the app is running. If you get into a car where the cabin is already at 32 degrees and the threshold is 29, nothing crossed the threshold, so the rule does not fire. To have the condition checked every time the car is turned on, add a second rule next to the first one:
- First condition: "BYDMate startup".
- Second condition: "Cabin Temp" above 29.
- Choose "All conditions".
- Same actions as in the first rule.
Do not choose "Any condition": the rule would then fire on every startup, whatever the temperature.
Share and Import an Automation
A finished rule can be handed to another owner, and someone else's rule can be added to yours.
How to share
- Tap "Share" on the rule card or in the editor.
- Check what will go into the file: the window shows this before saving.
- Tap "Continue". The rule is saved to the Download folder as
bydmate_rule_<name>.json, the file name shows up in a popup message, and the system "Share" window opens.
What the app strips from the file:
- phone numbers and contact names;
- links to your places;
- the login and password from URLs, and URL parameters that look like keys (token, api_key, and similar). Regular parameters stay.
What stays in the file: the URL itself, notification and phrase texts, agent query prompts, and route points. Check them before sending.
How to add someone else's rule
- Put the
bydmate_rule_*.jsonfile into the Download folder on DiLink. - On the "Automation" tab tap "Import" in the header and pick the file from the list.
- Check the rule in the preview window. The real parameters are visible there: all conditions or any, the phone number and auto-dial for a call, the URL, the vehicle command, the agent query text, where the route will actually go, and whether the app will tap "Go" by itself.
- If you do not have the place or contact used in the rule, pick your own with the "Choose place" and "Choose contact" buttons.
- Tap "Add". The rule is added turned off by default; the "Turn on right away" checkbox turns it on immediately.
A rule with a URL whose address needs to be re-entered is added turned off only. If key-like parameters were stripped from the URL, the window asks you to check the address. The app rejects files with excessive nesting or very long strings.
Projection to Cluster
BYDMate can mirror the chosen app (navigation by default) onto the instrument cluster in front of the driver, so the map and maneuvers stay in view while the center screen remains free.
Steering-Wheel Button Control
- A short press of the chosen button moves the app to the cluster.
- Another short press brings it back to the center screen.
- Holding the right star works as usual (the car's menu), BYDMate does not intercept it.
The right star turns on the projection by default. You can reassign the button, see "Choosing the Button" below.
Enabling
Open Settings → Display and turn on the "Cluster projection" toggle. The app enables the needed service itself (this requires the ADB activation done during install, see "Install") and switches the cluster into projection mode by itself: that is what the "Show on the cluster right away" toggle does, on by default. Nothing needs to be set up by hand on the head unit.
After that, a short press of the chosen steering-wheel button (right star by default) moves the chosen app to the cluster and back.
If you turn "Show on the cluster right away" off, you will need to put the cluster into projection mode once yourself: the projection icon on the head unit's home screen, then the IPC button on the map that appears. It is worth turning off if, after projecting, ADAS or the native widget disappears from the cluster and does not come back by itself (on some DiLink 5.0 firmware the projection screen lives inside the native mini-map): with the toggle off the app does not touch the cluster mode at all, including for blind-spot cameras, and the picture is visible in the mini-map.
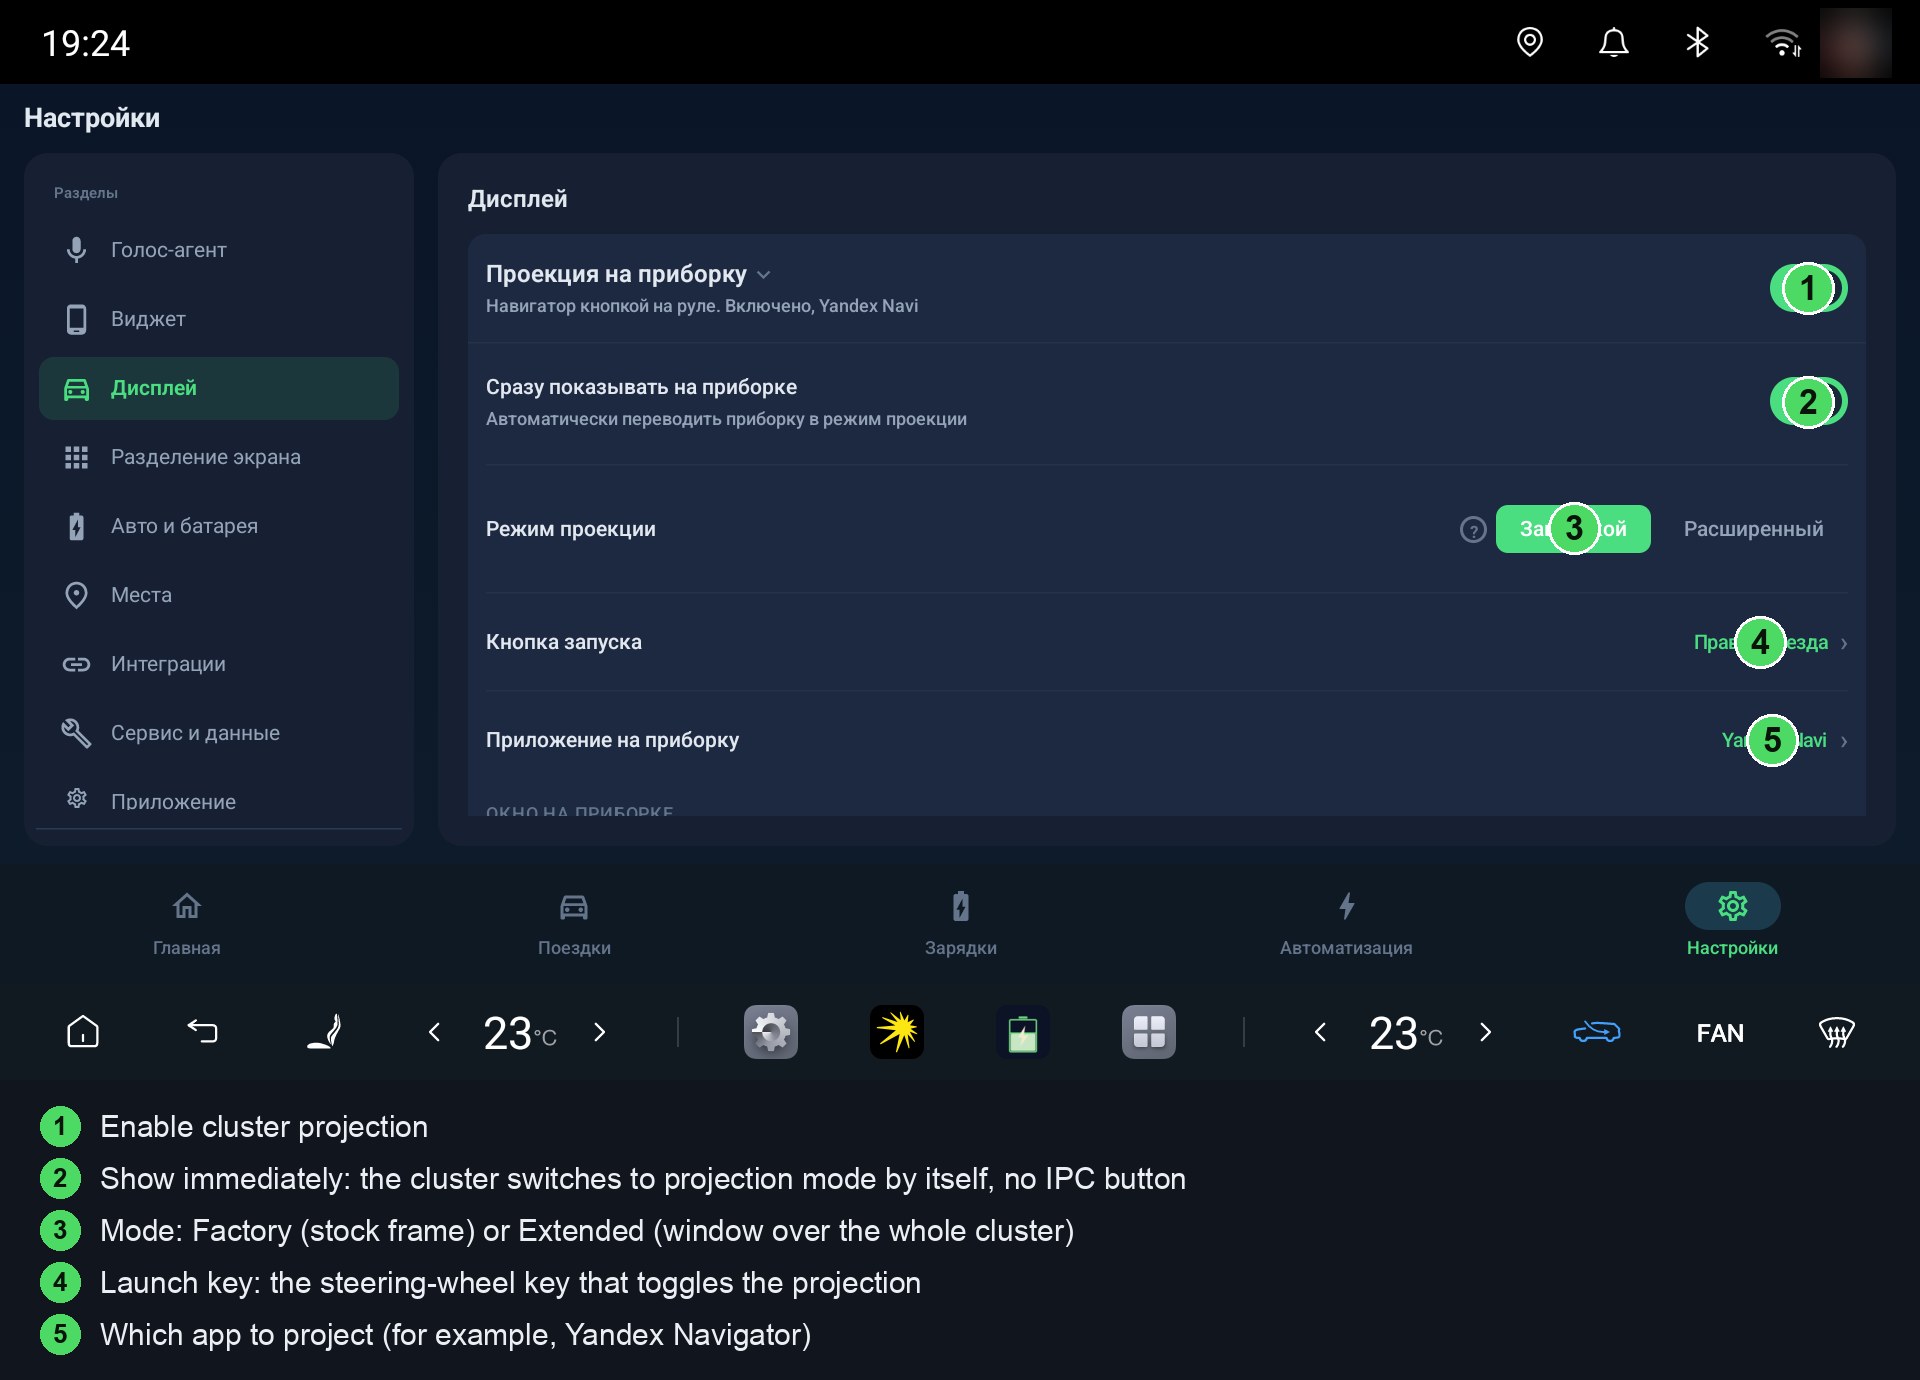
Projection Modes: Factory and Extended
In Settings → Display, next to the projection toggle, you choose the cluster output mode. There are two, and they differ in whether the app touches the car's system settings.
"Factory" (default). The app does not change a single system setting: the projection works through a virtual display (the picture is mirrored onto the cluster), and the window adjustment sliders work more precisely. Installs and uninstalls without a trace. Limitation: the voice agent and the HUD cannot see the navigator screen during projection, the agent gets maneuver hints only from the Navigator notification.
"Extended". The navigator launches as a separate window right on the cluster display, so the voice agent and the HUD see the route during projection. To do this, the app turns on a system window-mode setting (enable_freeform_support). The mode turns on only through a dialog that explains it, and after turning it on you need a one-time head-unit reboot (long-press the volume wheel). The new mode applies the next time you project.
On some firmware (DiLink 4.0, Song Plus 2021, and similar) the cluster screen is hidden from apps, and "Factory" mode cannot work there: the app finds the cluster through a service channel by itself and projects the navigator in "Extended" mode regardless of what you picked. This is confirmed on a car with DiLink 4.0. In this mode, the "Scale" slider in the "Cluster window size" setting does not work.
How to restore factory settings. Switch the mode back to "Factory": the app immediately restores the system setting to its factory value, and rebooting DiLink completes the rollback. After that the system is in the same state as before BYDMate was installed.
In the same place, under the mode choice, there is a "Full cluster screen" toggle. By default the map takes up the top of the cluster, and the native strip with speed and key readings stays at the bottom. Turn the toggle on if you want the map to fill the whole cluster without that strip. It only works on firmware with the new interface, on the rest it changes nothing; it applies the next time you project.
If you used the projection in versions before 3.7, updating keeps the old behavior automatically: the mode stays "Extended". For those who never turned the projection on, the app never touches system settings at all.
Choosing the Button
The right star on the wheel turns on the projection by default. If your car does not have this button or another one is more convenient, tap "Change" under the toggle and press the button you want on the wheel, the app remembers it. You can assign any steering-wheel button the system can see. System buttons (volume, power, and so on), the 360 view, and the cluster carousel cannot be assigned.
Which App to Project
Yandex Navigator projects to the cluster by default. Below the enable toggle there is an app picker: you can choose any installed app (another navigator, a media player, and so on). The new choice applies the next time you press the button.
Window Size and Position
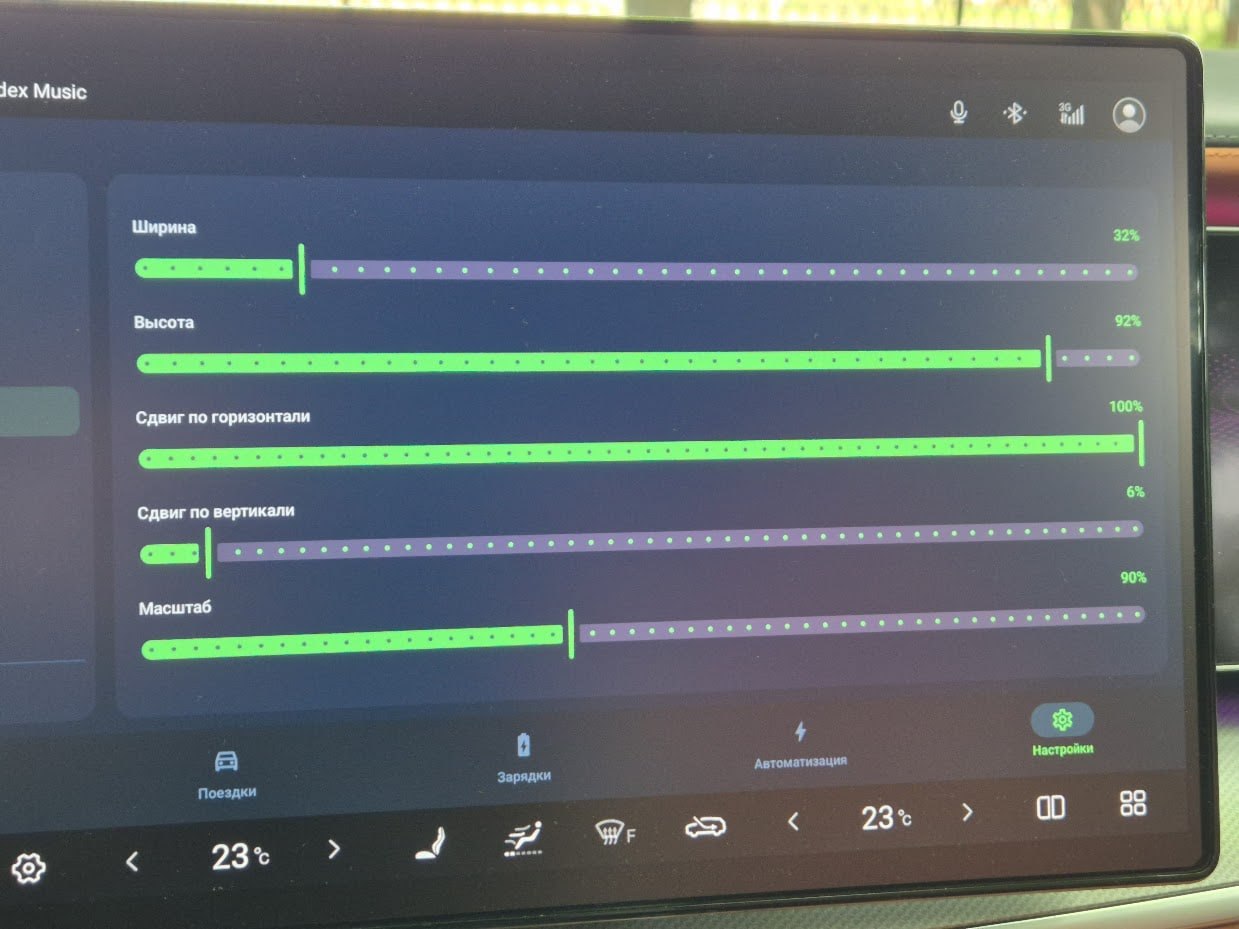
Settings → Display → "Cluster window size" has five sliders. If the projection already fills the whole cluster on your car (Leopard 3, for example), there is nothing to adjust: the defaults give the same full-screen behavior as before.
- Width and Height (20-100%): the window size as a percentage of the cluster. A smaller window frees up space, and the native cluster shows through around it.
- Horizontal offset (0-100%): window position: 0 = left edge, 50 = center, 100 = right edge. Only applies when width is below 100%.
- Vertical offset (0-100%): the same for the vertical axis: 0 = top, 50 = center, 100 = bottom.
- Scale (50-150%): the size of the projected app's interface, the lower the value, the smaller the text and the more of the map fits in the window.
Changes apply right away, during the projection itself: move a slider and watch the cluster.
Cars With a Mini Cluster Window (Sea Lion 07 and Similar)
On some models the stock cluster shows the projection not full screen but in a fixed zone (on Sea Lion 07, the right third). A full-screen window gets cropped there. Fix: shrink the window and move it into the visible zone with the sliders above.
Values confirmed by a Sea Lion 07 owner: width 32%, height 92%, horizontal offset 100%, vertical offset 6%, scale 90%.
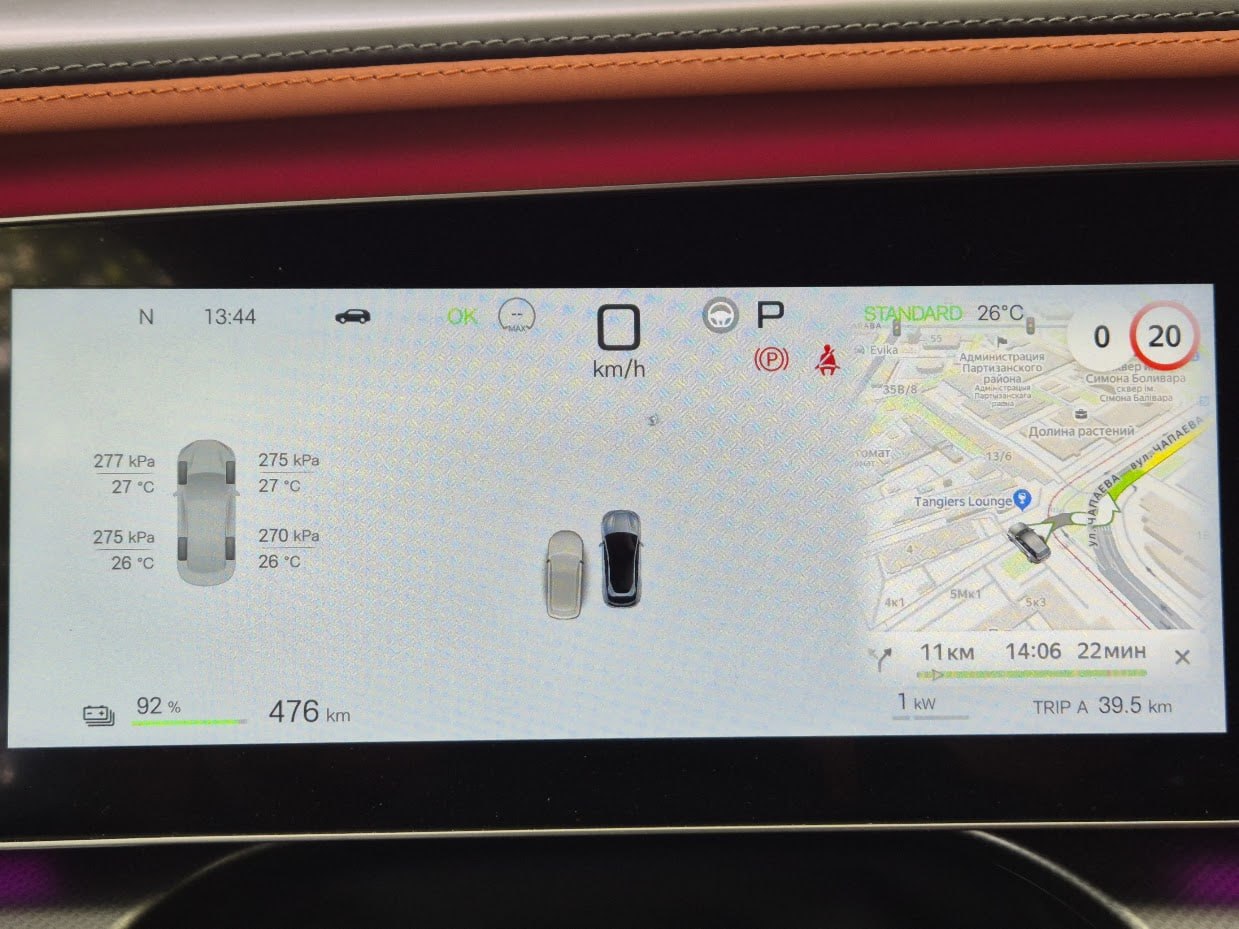
You cannot make the window fill the whole cluster on these cars: the display zone is set by the cluster's own firmware and cannot be controlled.
Under the Hood
The projection runs in one of the two modes described above. In "Factory" mode, BYDMate creates a virtual display and mirrors the chosen app into it, without changing any system settings. In "Extended" mode, the app launches as a separate window right on the instrument-cluster display, so the voice agent and the HUD see the route during projection. To catch steering-wheel button presses, the app turns on its own accessibility service. It runs only while the toggle is on, and it exists solely for the chosen button. It does not change the firmware or the car itself, and it is fully reversible.
HUD
If the car has a factory head-up display, BYDMate draws Yandex Navigator guidance on the windshield: the maneuver icon, the distance to it, the street name and the arrival time. A separate toggle adds the speed limit sign, sent as a number. While the Navigator warns about a speed camera, the camera icon and the distance to it replace the maneuver arrow. Guidance keeps running even when the Navigator is minimized or projected to the cluster; Yandex Maps works as a guidance source alongside the Navigator.
Enable it in Settings → Display, section "HUD (head-up display)": the "Navigation on HUD" toggle and, separately, "Speed sign under the arrow". The way of drawing on the glass is chosen there too: Way 1 is the default, Ways 2 and 3 are for cars where the glass is empty in Way 1. Guidance travels over the HUD's own factory channel, so a car equipped with a head-up display is required. If the car has no such channel, the app says so in Settings and does not enable the feature.
What the app changes in the car. In Way 1, nothing: hints go over the HUD's own channel. In Ways 2 and 3, while "Navigation on HUD" is on and the navigator is guiding a route, BYDMate turns on the car's navigation mode and writes the arrow, the meters and the street to the navigation card on the cluster. In Way 3 the remaining time and distance to the end of the route and the arrival time go there too. Once the route ends, the way is changed or the toggle is off, everything returns to how it was. With the toggle off, the app does not touch anything in the car.
If nothing shows up on the glass. Open Settings → Service & Data, "Data" section, and tap "Start" next to the "HUD check" line. The car needs to be parked, with no route running in the navigator. The check takes about two minutes and shows the numbers 111, 222, 333 and 444 on the glass one after another, each by its own way. At the end it asks which number you saw and sets the right way itself. If the glass showed nothing, record a log with the log recording button and send it in a GitHub issue along with your car model.
Which navigator. The maneuver arrow comes from Yandex Navigator 31.0.2 or newer. Older versions (24.5.1) give only the distance and the street, without the arrow. Yandex Maps gives the arrow intermittently, so use Navigator for the HUD and the cluster.
Blind-Spot Cameras
With the turn signal on, BYDMate shows the side camera picture by itself: the left turn signal puts the left camera on the cluster, the right one shows a small window on the main screen. If the sensor sees a car behind and to the side, the window lights up with an orange frame.
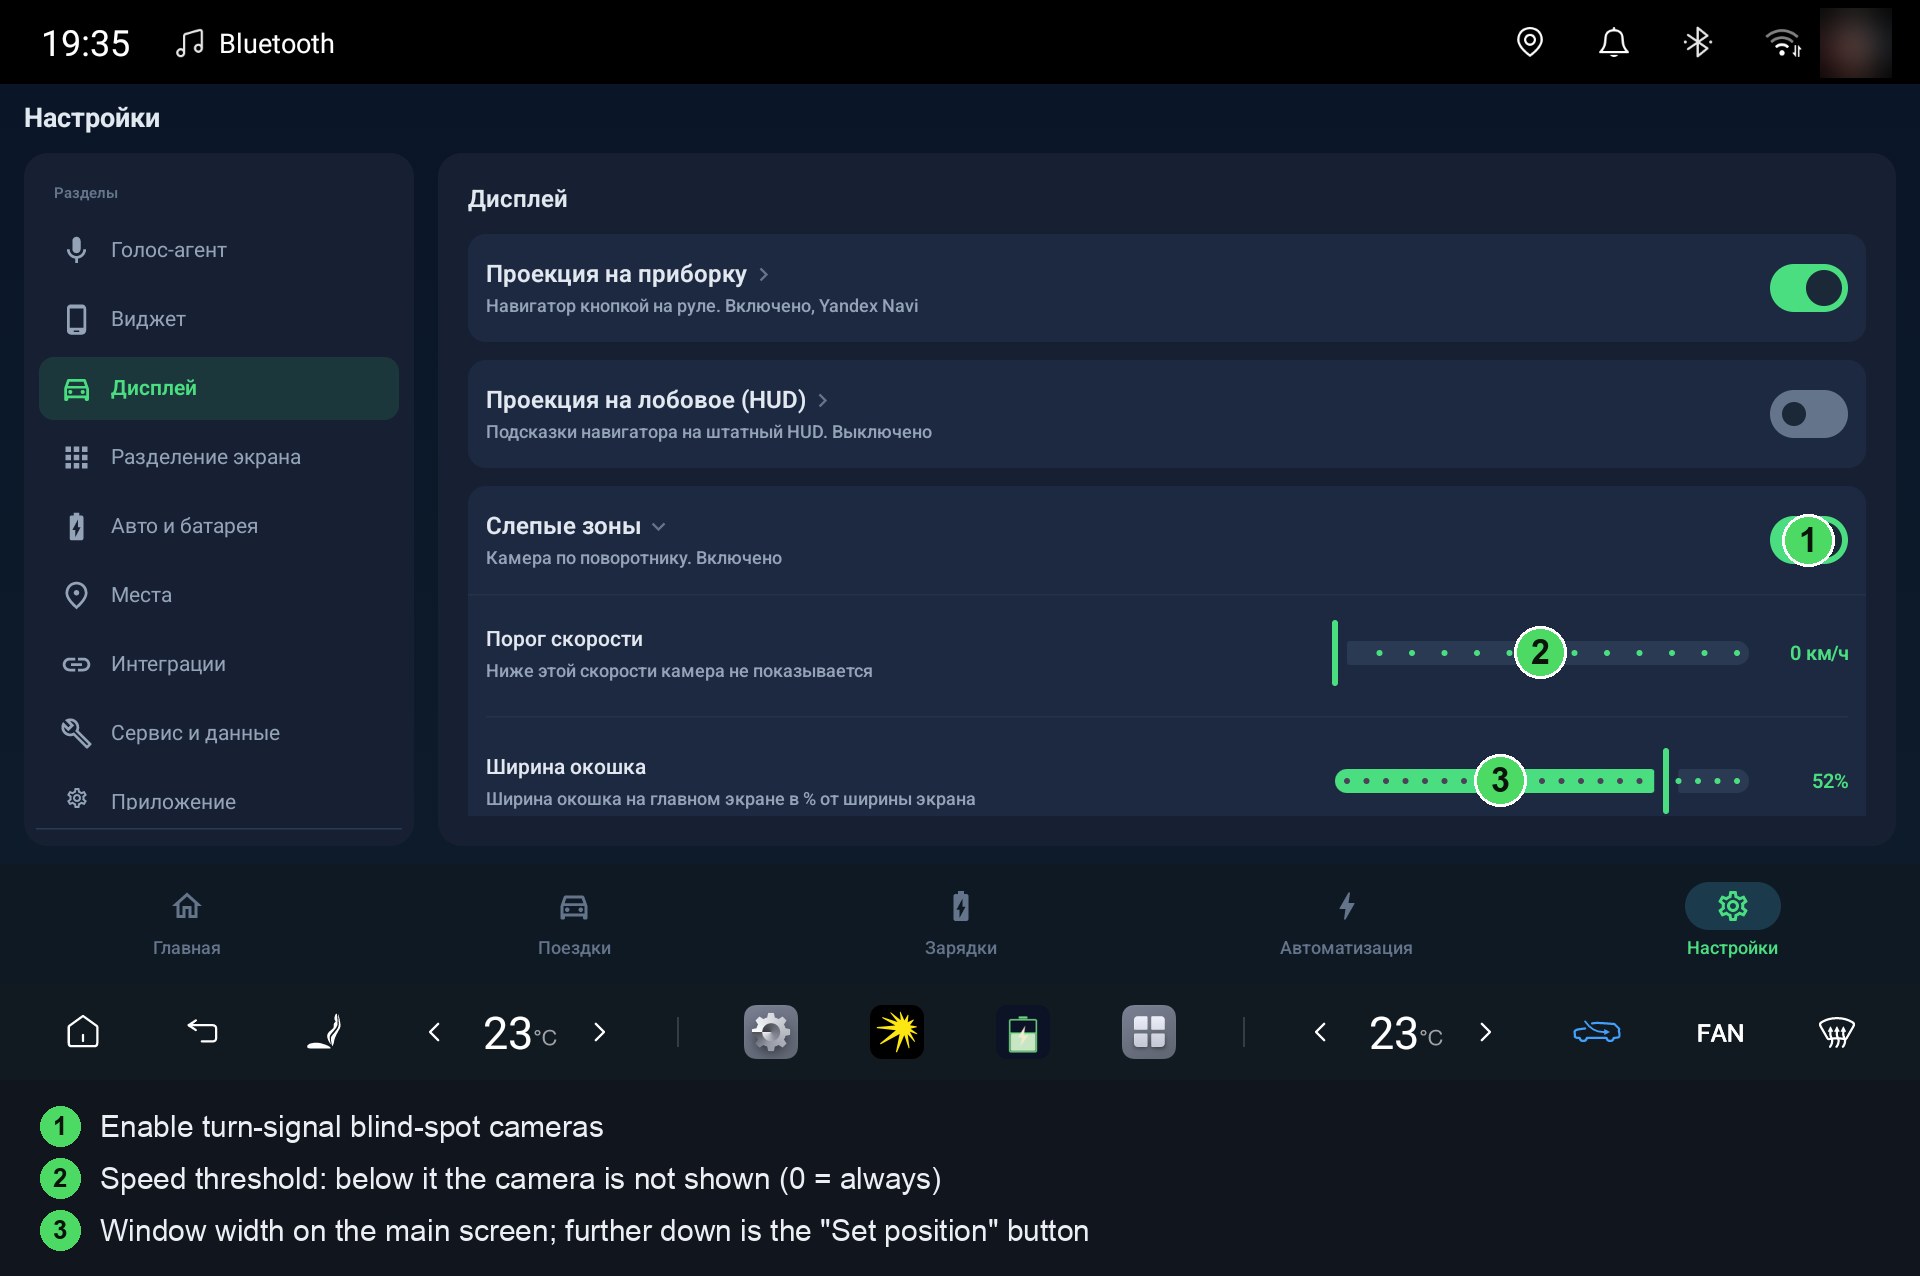
Enable it in Settings → Display, "Blind spots" section (off by default). The same place has the speed threshold below which the camera does not show, the window width, and its position: the "Adjust position" button shows an empty window you drag with a finger to where the camera should be. If the left camera on the cluster gets in the way, turn on "Both cameras on the main screen" there too: both pictures show on the tablet, the cluster is left alone. The left window mirrors the right one by default, and the "Left camera position" button under the toggle gives it its own spot. The "Vertical camera window" toggle turns the window vertical and rotates the picture 90 degrees, like a mirror: if the picture ends up facing the wrong way after turning it on, open an issue. Requires a car equipped with a surround-view system. On some cars with DiLink 4.0 the firmware does not let apps access the cameras, the feature does not work there.
Voice AI Agent
A full Russian voice assistant built into BYDMate. Speech is recognized right on the head unit, with no internet: the GigaAM v3 neural network listens and understands Russian. Simple commands run instantly through local parsing, the AI agent handles everything else: a language model with 32 tools that reads the car's data itself, controls body functions, builds routes, runs automations, and answers by voice.
Why Russian, and Only Russian
The stock BYD voice assistant already works natively in English and Chinese. Building another English assistant makes no sense. BYDMate covers what the car does not have at all: Russian. That is why speech recognition, command parsing, and the TTS voices are built specifically for Russian, and there are no plans for an English version of the agent.
How to Enable It
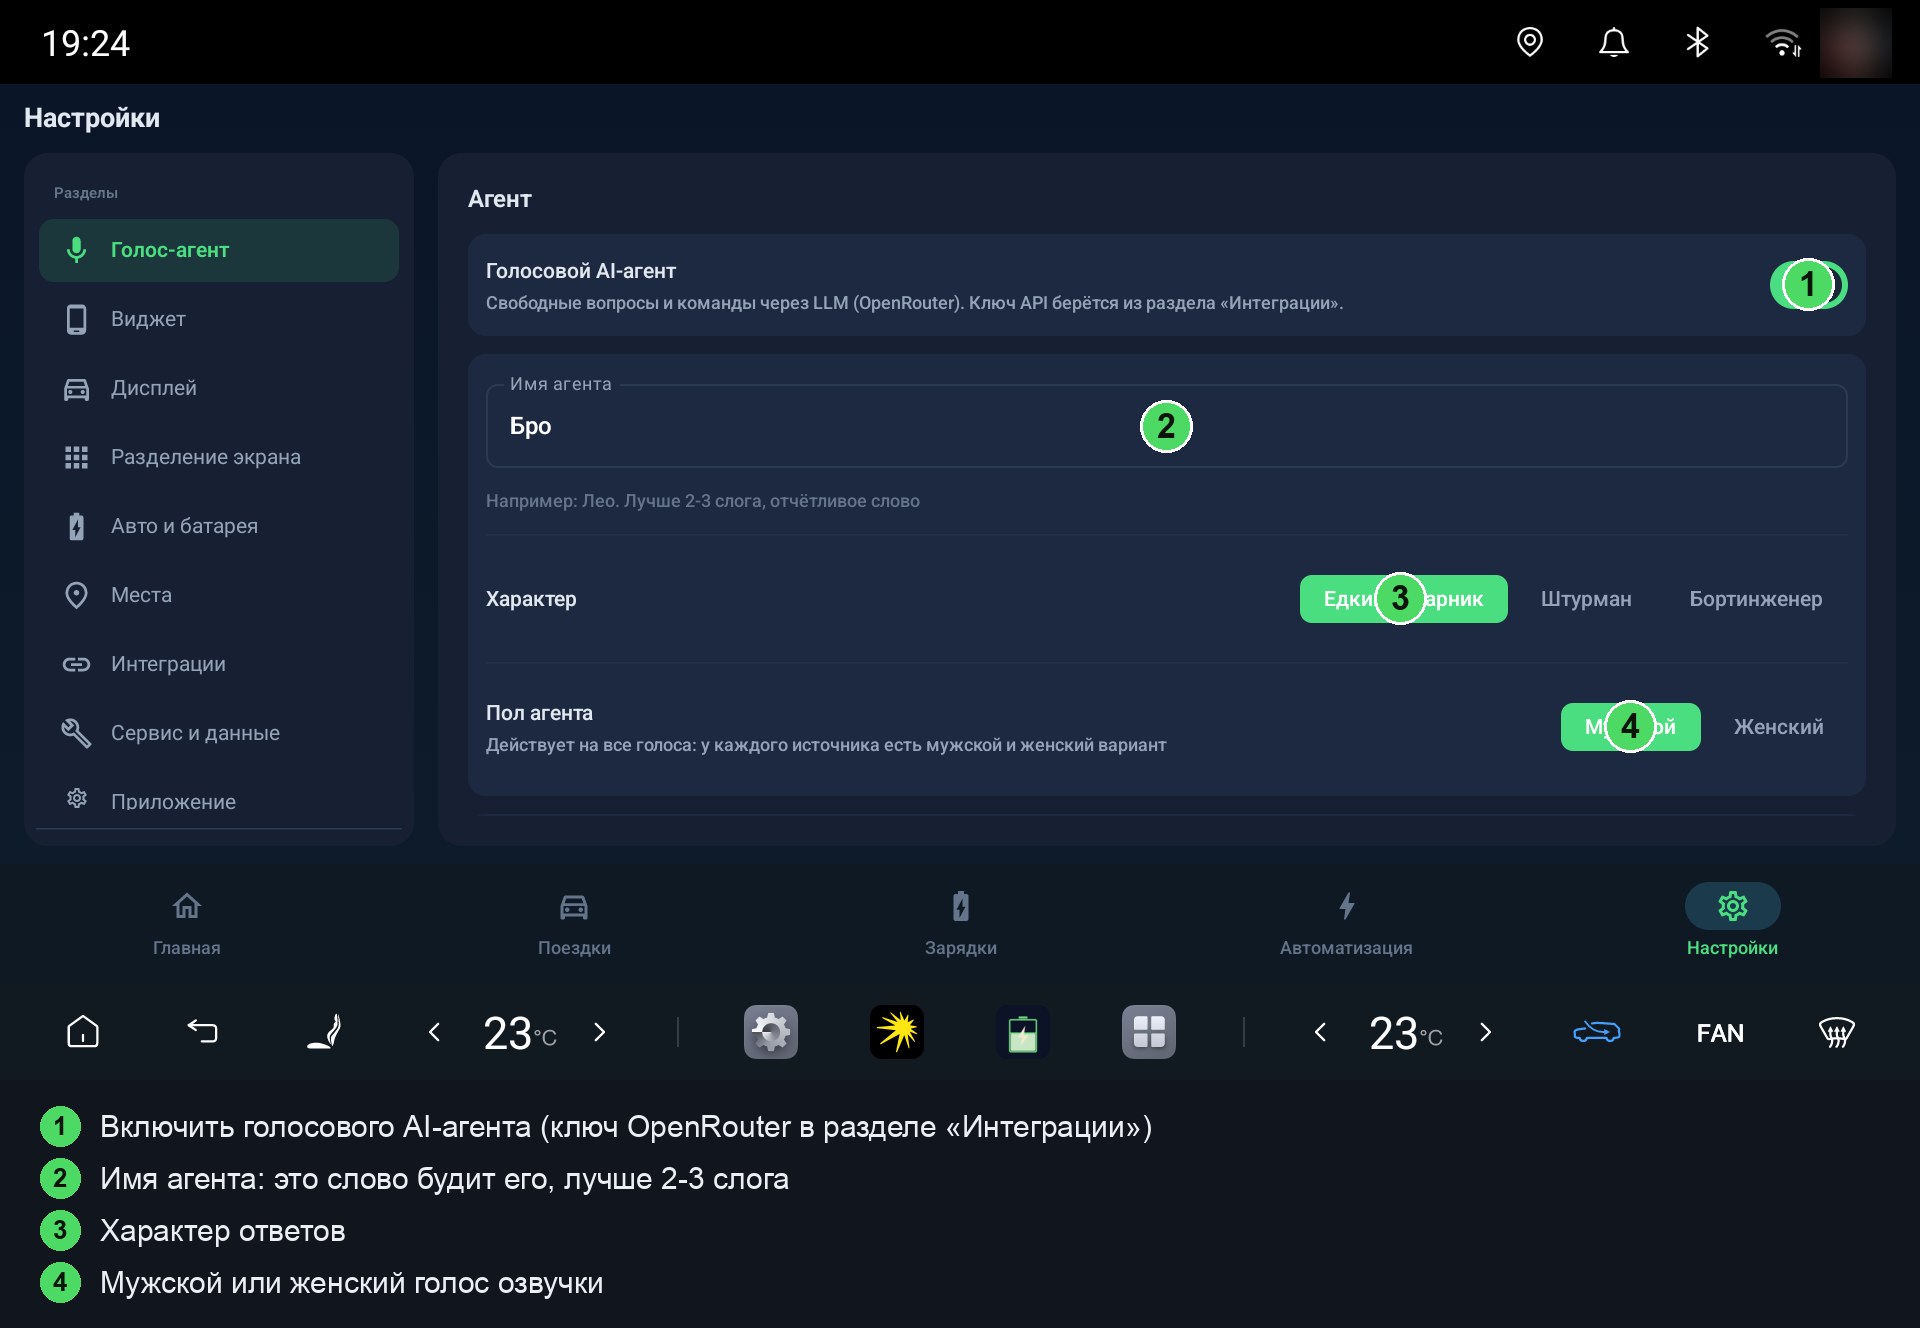
- Settings → Voice agent: turn on the "Voice AI agent" toggle. What should happen: fields for the agent's name, personality, and gender appear below.
- Set a language model key: Settings → Integrations → AI connections. We recommend OpenRouter (sign up at openrouter.ai, paid, fractions of a cent per question) with a fast model such as Gemini Flash. There is a free option, z.ai with the glm-4.7-flash model, but it answers noticeably slower. A third option: your own OpenAI-compatible server. What should happen: the connection gets a mark that the key is set. You can set up two connections: if the main one fails, the agent switches to the second one by itself.
- Go back to Voice agent, "Agent" section, and tap "Test model". What should happen: the model name, response time, and a short phrase from the agent appear under the button. If the button is gray, the key was not saved: check it in Integrations. The "Agent chat (debug)" button next to it lets you check text replies even before using the microphone.
- In the "Speech recognition" section tap "Download (226 MB)", preferably over Wi-Fi. What should happen: a download percentage appears, and at the end the line changes to "Model ready".
- In the "Button and microphone" section turn on the "Voice commands" toggle and grant the microphone. What should happen: the current steering-wheel button shows up below. On Leopard 3 it is already assigned, on other cars tap "Assign button" and press a button on the wheel once.
- Press the wheel button and say "Сколько заряда?" (How much charge is left?). What should happen: a "Listening" pill appears, a short beep follows the phrase, and an answer comes a second or two later.
- TTS is optional: in the "Agent replies" section, turn on the toggle and download a voice (a regular one is 18-21 MB, or the improved Mark or Sofia share a 145 MB download). What should happen: the agent starts answering out loud; without TTS the answer stays as text on the screen.
How to Talk to It
- Press the voice button on the wheel. On Leopard 3 it is recognized out of the box, on other models you can teach any button in Settings (catching the button press needs the accessibility service, which turns on automatically).
- A "Listening" pill indicator appears on the screen. You can drag it anywhere, the position is remembered. The pill shows the last lines: "You:" and "Agent:".
- Speak in normal phrases. The session stays open: after the agent answers, you can keep talking right away, no need to press the button again.
- The session ends by itself after 30 seconds of silence, with its own sound cue. There is no limit on how long the conversation runs: while the dialog continues, the agent keeps listening. Short beeps confirm a command was received and signal an error.
- Interrupting by name. If you give the agent a name (the "Agent name" field in Settings), saying that name while it is answering makes it stop and listen again. A name at the start of a phrase is dropped ("Штурман, открой окна" is understood as "открой окна", open the windows). Important: this is not a wake word like Alice's, the agent does not listen to the microphone without a button press. The name is empty by default and interrupting is off.
What the Agent Can Do
The agent has 32 tools. Example phrases:
Car and climate
- "Сколько заряда?" (How much charge is left?), "Какая температура за бортом?" (What's the temperature outside?), "Какой запас хода?" (What's my range?) (live vehicle status)
- "Открой окна" (Open the windows), "Включи подогрев сиденья" (Turn on seat heating), "Поставь климат на 22" (Set the climate to 22) (full catalog of 110 commands, see below)
- "Сделай музыку громче" (Turn the music up), "Потише" (Quieter) (media volume)
Trips, charges, statistics
- "Покажи поездки за неделю" (Show my trips for the week), "Сколько я проехал за месяц?" (How far did I drive this month?)
- "Когда я последний раз заряжался?" (When did I last charge?)
- "Запиши зарядку на 30 киловатт-часов за 200 рублей" (Log a charge of 30 kWh for 200 rubles) (manual entry in the charging log)
- "Какой у меня средний расход?" (What's my average consumption?)
Navigation and places
- "Поехали домой" (Let's go home), "Поехали на работу" (Let's go to work), "Поехали на дачу" (Let's go to the dacha) (saved places). On "поехали" (let's go) the assistant taps "Go" in Yandex Navigator by itself, on "построй маршрут домой" (build a route home) it only builds the route
- With split screen on, the assistant first collapses it, builds the route, and puts the panes back: otherwise the firmware recreates the Navigator and the route is lost. Requires the BYDMate accessibility service to be on
- Say "в картах" (in Maps): "поехали домой в картах" (let's go home in Maps), "найди заправку в яндекс картах" (find a gas station in Yandex Maps); the route, search, or point display go to Yandex Maps, without these words the route goes to the navigator chosen in the "Navigator for routes" setting (Settings → Voice agent → Agent), Yandex Navigator by default; 2GIS, Yandex Maps and Waze are the other choices
- "Найди зарядки рядом" (Find charging stations nearby)
- "Хватит ли заряда до Казани?" (Is there enough charge to reach Kazan?), "Сколько ехать до аэропорта?" (How long to the airport?)
- "Запомни это место как дача" (Remember this place as dacha), "Какие места сохранены?" (What places are saved?)
- "Выведи навигацию на приборку" (Put navigation on the cluster), "Убери с приборки" (Take it off the cluster) (Yandex Navigator projection)
Media and apps
- "Включи мою волну" (Turn on my wave), "Включи джаз" (Play jazz) (Yandex Music)
- "Включи на ютубе лекции по истории" (Play history lectures on YouTube)
- "Открой навигатор" (Open the navigator), "Открой камеры" (Open the cameras), "Открой регистратор" (Open the dash cam app), "Открой браузер" (Open the browser), and other apps by their Russian names
Automation
- "Запусти сценарий домой" (Run the "home" automation), "Какие у меня сценарии?" (What automations do I have?)
- "Выключи автоматизацию прогрева" (Turn off the warm-up automation)
- "Создай сценарий: когда приезжаю домой, открывай окна" (Create an automation: when I get home, open the windows) (the agent assembles the rule from a trigger and actions itself)
Internet
- "Какая погода?" (What's the weather?), "Какая погода в Москве завтра?" (What's the weather in Moscow tomorrow?)
- "Поищи в интернете, когда выйдет обновление DiLink" (Search the web for when the DiLink update comes out)
Vehicle Control: A Catalog of 110 Commands
| Group | What's available |
|---|---|
| Windows | all, front, rear, driver, passenger, rear left and rear right; open, close, halfway, vent, per group and per individual window |
| Climate | on, off, temperature from 16 to 33 |
| Seat heating | driver and passenger, levels 1-5 and off |
| Seat ventilation | driver and passenger, levels 1-5 and off |
| Mirrors | heating on/off |
| Steering wheel | heating on/off, on cars with steering wheel heating |
| Lights | cabin, ambient, and other modes (6 commands) |
| Locks | lock, unlock |
| Sunroof and shade | open, close, intermediate positions |
| Trunk | open, close |
| Front trunk | open, close |
| Fridge | cooling from -6 to +6, heating from 35 to 50, off |
| Hazard lights | on, off |
| Drive mode | ECO, Normal, Sport; Snow, Sand, Mud, Mountain, Rock and the smart mode only below 15 km/h |
| HUD | windshield projection: on, off |
| Battery preheating | on, off |
Safety: window opening is blocked above 120 km/h, the sunroof above 80 km/h, door unlocking above 30 km/h; the front trunk only opens while the car is parked.
Quick Commands Without the Agent and Without Internet
Frequent commands run instantly, without the language model and without the network. For this, the app has a fixed list of Russian phrases: windows and sunroof, seat heating and ventilation, steering wheel heating, mirrors, climate, fan, volume, locks, trunk, and lights.
How it works:
- A phrase runs offline only if said in full and exactly as in the list. A different wording of the same thing goes to the agent.
- Polite words do not get in the way: "пожалуйста" (please), "можешь" (can you), "слушай" (listen), "спасибо" (thanks) are simply dropped.
- "A and B" runs both commands if each one is in the list: "открой окно водителя и закрой люк" (open the driver's window and close the sunroof).
- Windows and the sunroof open by a fraction: "наполовину" (halfway), "на 50 процентов" (at 50 percent), "чуть-чуть" (just a bit), "полностью" (all the way), "на треть" (a third). The percent is rounded down to the nearest supported position, the window never opens wider than asked.
- Everything else goes to the cloud AI agent, if it is on. Without the agent, such a phrase gets "didn't understand" as the answer, while the phrases from the list keep working.
Examples from the list. Full list with wording variants: docs/VOICE_COMMANDS.md.
| Phrase | What happens |
|---|---|
| "Открой окна" (Open the windows) | all windows open all the way |
| "Открой окно на 50 процентов" (Open the window 50 percent) | the driver's window opens halfway |
| "Приоткрой окно водителя" (Crack the driver's window) | the driver's window opens to vent |
| "Режим проветривания" (Airing mode) | all windows go to vent, the sunroof lifts |
| "Выключи режим проветривания" (Turn off airing mode) | the windows and sunroof close |
| "Открой люк наполовину" (Open the sunroof halfway) | the sunroof opens halfway |
| "Включи подогрев сиденья пассажира на второй уровень" (Turn on the passenger seat heater, level two) | passenger seat heating, level 2 |
| "Включи подогрев руля" (Turn on the steering wheel heater) | steering wheel heating |
| "Поставь температуру 22" (Set the temperature to 22) | climate set to 22 degrees |
| "Громкость 20" (Volume 20) | media volume set to 20 |
| "Включи Яндекс Музыку", "Яндекс Музыка" (Turn on Yandex Music, Yandex Music) | starts "My Wave" in Yandex Music |
| "Запри машину" (Lock the car) | doors lock |
The English offline commands were removed, the list is Russian only. The app's interface language does not affect this: the offline commands and the agent work regardless of the app's language.
Keys: What to Enter and What's Optional
| Key | Required | Why |
|---|---|---|
| OpenRouter | Any one LLM key is enough; OpenRouter is recommended for speed | The agent's brain. Fast models (Gemini Flash, for example) answer almost instantly, price: fractions of a cent per request |
| z.ai | Free alternative | The agent's brain, glm-4.7-flash model, free but noticeably slower |
| Your own server | Alternative | Any OpenAI-compatible endpoint: URL, key, model |
| Exa | No | Better web search. Without it, "search the web" runs through the LLM provider's built-in search |
| MiniMax | No | Only for the MiniMax online voice, does not affect the agent |
All keys are entered in the app and stored locally, there are none in the code or in the secrets repository.
Voices
Offline voices (work without internet, downloaded one at a time):
| Voice | Gender | Size | Quality |
|---|---|---|---|
| Dmitri (default) | male | 21 MB | standard |
| Alyona | female | 18 MB | standard |
| Ruslan | male | 21 MB | standard |
| Irina | female | 21 MB | standard |
| Mark | male | 145 MB | improved |
| Sofia | female | 145 MB | improved |
Mark and Sofia (the Supertonic engine) sound noticeably more natural than the standard voices, but weigh more and share one download: once you get either one, you cannot get the other without a separate download. Speed and intonation liveliness are set with sliders, with a "Play a sample" button next to them.
Online voices (optional, sound more natural): Gemini and OpenAI through the OpenRouter key, MiniMax through its own key (three connection methods: the official API, fal.run, replicate). There is no offline fallback: if the online voice does not answer or fails, the reply stays as text in the pill but is not spoken.
About volume: agent replies go through BYD's own voice channel (the same one native prompts use), its volume is set by the car's system voice setting. The "turn it up" command changes the music volume, not the agent's voice. If the agent sounds too quiet or too loud, adjust the system voice volume.
What Determines Response Speed
The agent works in three steps, and delay builds up at each one.
- Speech to text. Entirely on the device, no network. Speed depends on the head unit's processor.
- Understanding the phrase. Phrases from the built-in list run almost instantly. Everything else goes to the language model: however long it thinks, plus the ping to the provider. This is the main source of delay. Gemini Flash through OpenRouter answers in a fraction of a second, the free glm-4.7-flash is noticeably slower.
- Speaking the answer. Offline voices are light and fast, but still take some time. Online voices are slower: they depend on ping too.
If you need maximum speed, turn off the "Agent replies" toggle. There will be no TTS, the reply stays as text on the screen, and only the first two steps run. Quick commands run without internet either way.
Agent Personality
In Settings you pick one of three response personalities (Navigator by default) and the agent's gender (male or female), which shapes the wording and spoken lines. The interrupt name is also set there.
Privacy
- Microphone audio never leaves the car: speech recognition is entirely offline.
- Only text goes to the cloud (to the LLM provider): your phrase and the data the agent fetched with its tools to answer it.
- The voice journal (the last 50 recognitions with their outcomes, for self-diagnosis) is stored only on the head unit and survives restarts. It ends up in the log recording file: what the head unit heard, what command it became, and why it was declined. Journal screen: Settings → Voice agent → "Voice journal", it shows how a phrase was recognized, where it went, and how it ended.
- To check the agent without a microphone there is a text chat (a debug screen in Settings).
Turning Off BYD's Built-In Assistant
At the bottom of the "Voice agent" section there is a toggle that disables BYD's built-in voice assistant, so it does not wake up alongside the agent. Fully reversible, applies after the car restarts (both turning it on and off). Off by default.
The stock assistant is disabled in the car's system, so turn this toggle off before uninstalling BYDMate, otherwise the stock assistant stays disabled. How to bring the stock assistant back if BYDMate is already uninstalled: install BYDMate again, turn the toggle off, and restart the head unit.
Requirements
- Disk space: the recognition model is 226 MB plus a TTS voice (a regular one is 18-21 MB, or the improved Mark/Sofia share a 145 MB download). Roughly 245 to 370 MB in total.
- Internet: needed only by the AI agent (language model), weather, search, and online voices. Speech recognition, quick commands, and offline voices work without the network.
- Permissions: the microphone (requested when you turn it on) and the accessibility service for the wheel button (turns on automatically).
- Confirmed on Leopard 3 (DiLink 5.0). The voice wheel button is set up for Leopard 3 out of the box, on other models teach your own button in Settings.
Memory About the Driver
Tell the agent your name or what you usually prefer, and it remembers this between conversations. Saying "Забудь ..." ("Forget ...") removes one fact. The list of facts and the "Forget everything" button: Settings → Voice agent → Agent. Facts are stored only on the head unit and only go out in the request to the language model you chose.
Floating Widget
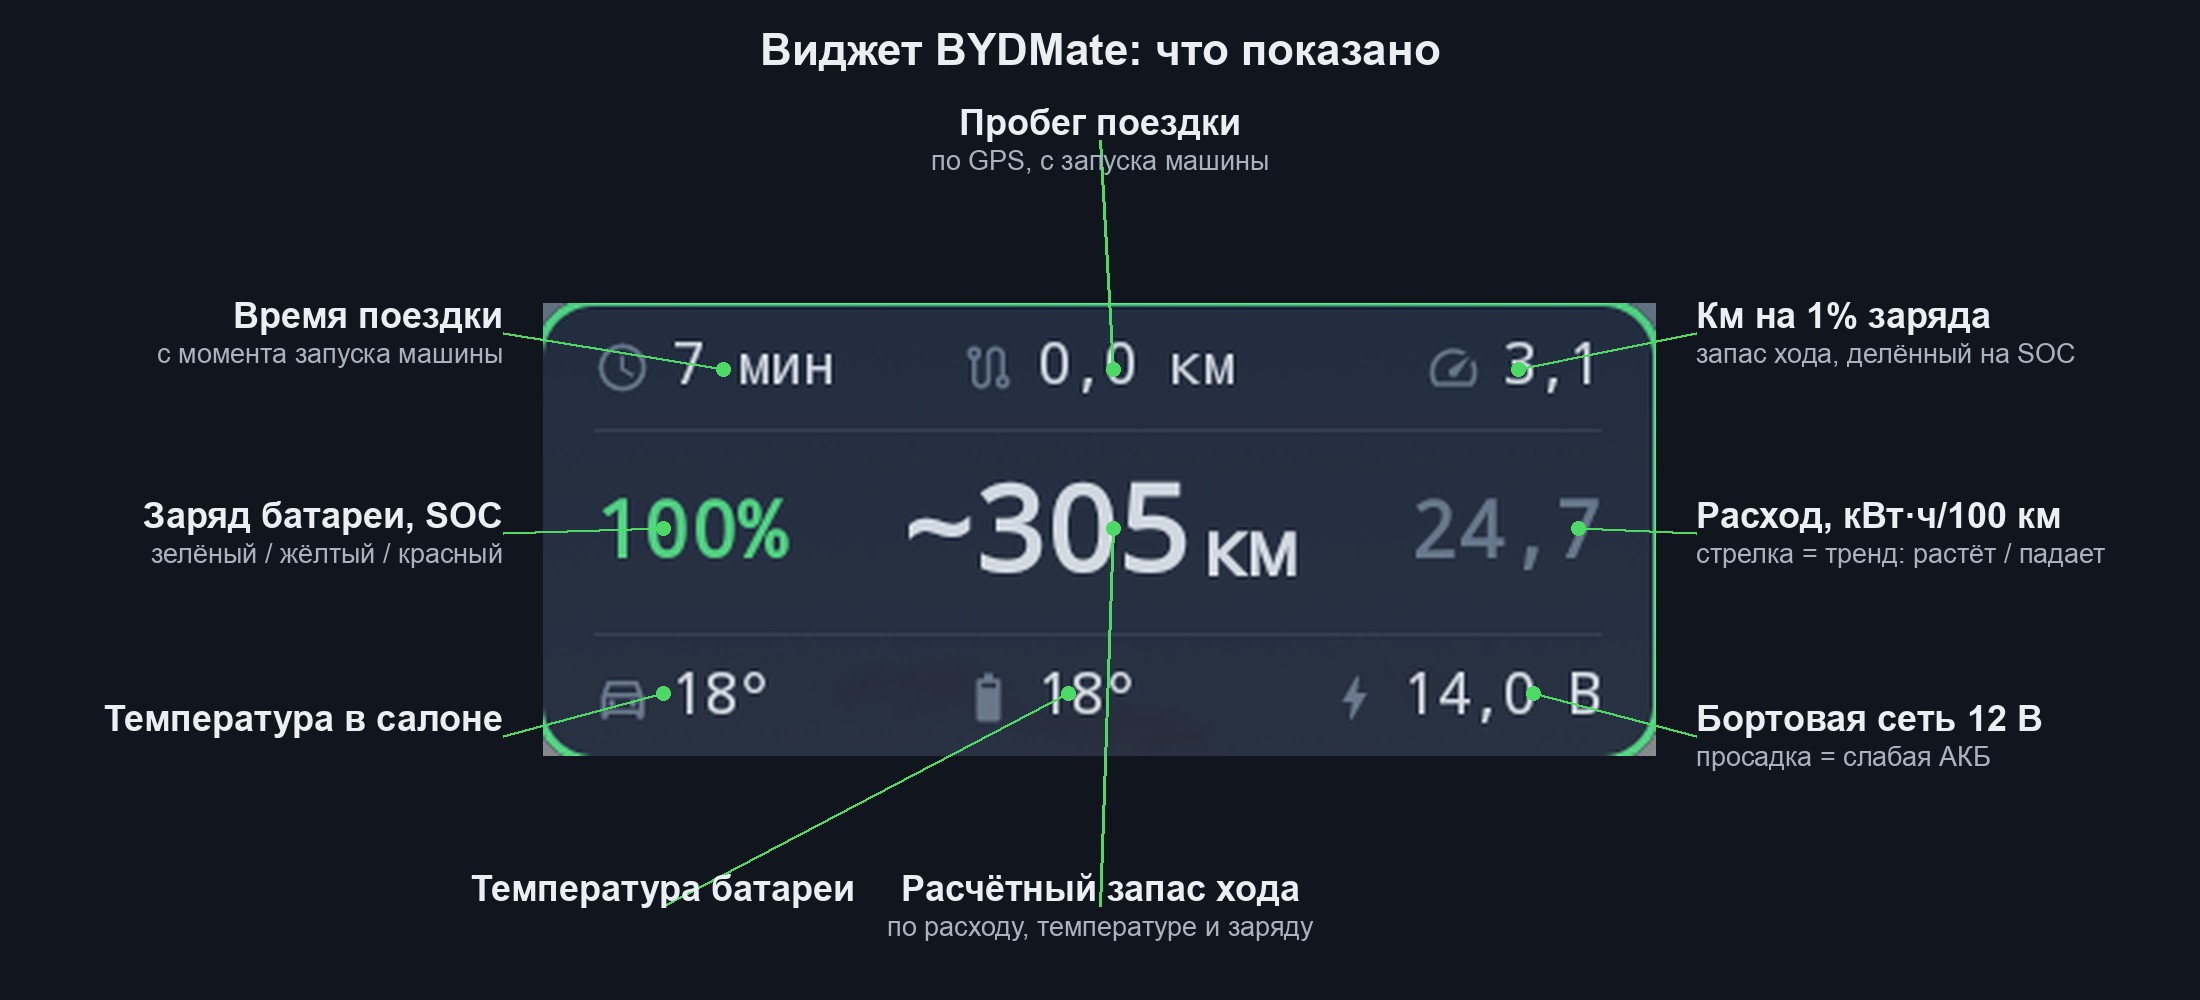
A compact 260×108 dp overlay over other apps, visible on the map, in media, and inside BYD apps.
What Is Shown
Seven fields across 3 rows. Colors: icons gray, values white. The frame and SOC% glow with the status color (whichever of SOC or 12V is worse).
Top row (small, 13sp):
- ⏱ Current trip duration:
N minorX h Y min(e.g.47 min,1 h 12 min). Start is ignition on, end is ignition off. Standstills with the car running (parked with the AC on, a passenger stepping out for water, a red light) belong to the trip: as long as the electrical system is alive, the counter does not reset - 🚗 Cabin temperature: °C
Center row (large, key values):
- SOC % (18sp bold, colored): traction battery charge. Green above 50%, yellow 20-50%, red below 20%
- ~N km (28sp white): estimated range,
SOC × battery capacity ÷ baseline consumption × 100. The tilde marks it as an estimate, not the onboard computer's reading. More on how baseline consumption is figured is below, in "Range" - On a hybrid:
~N kmis the car's own battery range, not our calculation; the fuel range from the car stands instead of consumption, and the tank level is shown in the top row. - X.X ↓ (18sp, colored by trend): current trip consumption, kWh/100km, with a trend arrow (see below)
Bottom row (small, 13sp):
- 🔋 Battery temperature: °C
- ⚡ 12V: onboard network voltage, V. Normal 12.5-14.7 V, below 12.0 V is yellow, below 11.7 V is red
Consumption and the Trend Arrow (Right Block)
The number on the right is the current trip's consumption in kWh/100km. It is the energy spent since ignition on, divided by the kilometers covered since the same moment. As you drive, the figure converges to what will end up recorded in the trip history: whatever the widget shows the moment you stop is what lands in the trip card.
For the first 2 kilometers the widget blends smoothly from the previous trip's average consumption to the current one: up to 300 m it shows the previous value, from 300 m to 2 km it mixes in the current value linearly, after 2 km it shows only the current value. This avoids scary 50-60 kWh/100km numbers from a cold start and acceleration: while the trip is still short, the already-settled average from the previous trip is used as the base, and only once the distance becomes representative does the figure switch to the trip's own consumption.
When parked (ignition off) the widget shows the average consumption of the last completed trip, the same value it showed at its last moment.
Range ~N km is figured from a blend: 50% weight from the last completed trip, 30% from the one before it, and 20% from the one before that (trips under 3 km do not count, they are not representative mileage). On a long drive, consumption over the last 10 km of the current trip is added to this blend: its share grows from zero in the first three kilometers to half by 25 kilometers. This way the forecast quickly picks up a change in driving style (a city tail before the highway, or back from the highway into the city), but does not jump around on short trips or on standstills with the climate running.
This is the automatic calculation. If it does not suit you, Settings → Car and Battery → "Range calculation method" has a "Manual" method: your own table of 5 points, battery temperature from +20 to -20 °C and the consumption at each, optionally with the range at 100% charge.
The trend arrow appears after 2 km of driving and compares a rolling 25-kilometer average against your usual style (the average of your last 10 trips):
- ↓ green: driving more efficiently than usual
- → white (straight): within your usual range
- ↑ yellow: consumption higher than usual
The arrow does not jump around at every red light, there is some inertia built in: for the arrow to change color, consumption has to clearly differ from your usual and hold that way for at least a minute.
What counts as a "trip" for this number: one ignition cycle, from on to off. A standstill with the AC running inside the trip is accounted for naturally, the extra kWh land in the shared denominator. Short blips (a red light, a reconnect) do not split a trip into two. If DiLink kills the app in the middle of a highway drive, after a restart the count continues from the real ignition-on moment, not from zero.
Controls
- Regular tap: open BYDMate
- Long tap (1.5 sec): hide until BYDMate opens next
- Drag to the trash: turn off completely
- Enable, transparency, and position reset: in Settings → Widget
Split Screen
Two apps on screen at once: one takes two thirds, the other takes a third. A typical pair is a wider navigator and narrower music or a messenger. The sides can be swapped, the apps changed on the fly, and the chosen pair is remembered.
Enabling
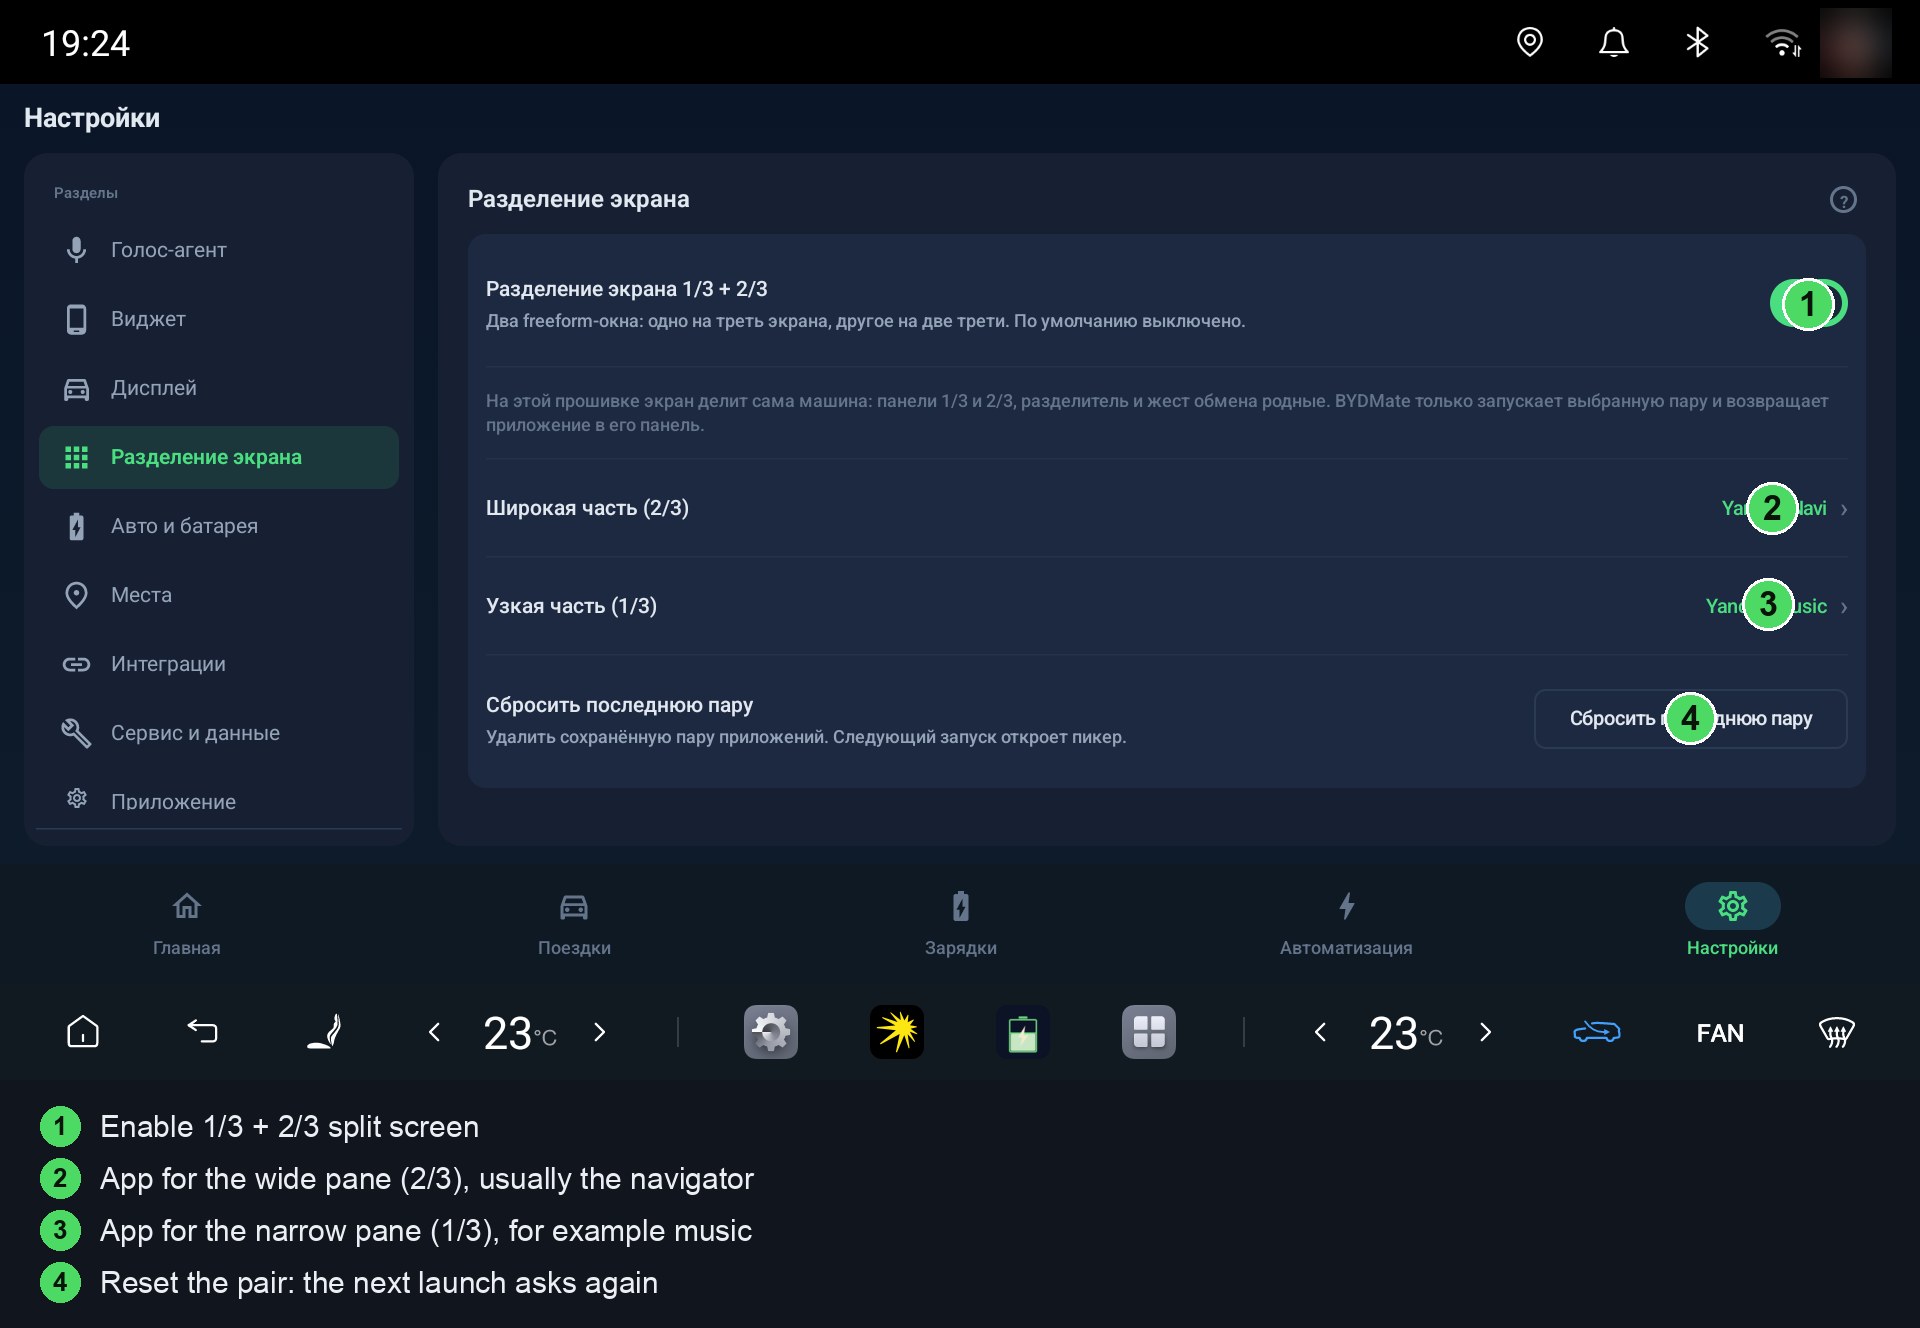
- Open Settings → Split screen and turn on the "Split screen 1/3 + 2/3" toggle.
- If a note about rebooting shows up under the toggle, reboot the head unit once (long-press the volume wheel). If you already use "Extended" projection mode, no reboot is needed: everything required is already running.
While the feature is off, the app does not touch the car's system settings. Turning the toggle off restores the setting to its factory value, unless the window mode is also needed by "Extended" projection: then it returns to factory once you turn that off too.
Split Mechanism
Under the toggle you choose what splits the screen: "BYDMate windows" (default) or "Native split".
- BYDMate windows: the same 1/3 and 2/3 layout with the control pill described below.
- Native split: the car's own firmware splits the screen. This works even where BYDMate windows are not available (DiLink 5.1). The look depends on the firmware: where thirds are supported it opens 1/3 and 2/3 panes, on the rest the screen splits in half and the second app is picked in a system window.
On firmware with the new UI7 interface the mechanism choice does not appear: the car does the split itself there, the 1/3 and 2/3 panes are native, and no head-unit reboot is needed to turn it on.
Launching
Three ways. The "?" badge next to the section header in Settings reminds you of them right in the car.
- From the widget (the most convenient). In Settings, "Widget tap" section, turn on "Tap zoning", and set "Left tap action" to "Launch split screen". A tap on the left third of the widget now opens the split, tapping again closes it.
- From automations. Rules have three actions: "Split Screen", "Close Split Screen", and "Toggle Split Screen". You can, for example, turn on the split whenever navigation starts.
- By voice. Tell the agent "включи разделение экрана" (turn on split screen).
First Launch and Choosing Apps
On the first launch the app asks what to show: first you pick the app for the wide part (2/3), then for the narrow one (1/3). The pair is remembered, and the next launch opens it right away. You can change the apps through the pill or in Settings; "Reset last pair" is there too.
The Control Pill
While the split is active, a small pill sits at the bottom of the screen. Tapping it opens a menu: swap sides, swap apps, pick a different app for the left or right pane, or exit to a normal full screen. When the split closes, the pill disappears by itself.
How It Fits With the Rest
- If something fullscreen opens on top (reverse gear, cameras, video), the split closes by itself. Bring it back the usual way: a widget tap or by voice.
- The Back button from BYDMate returns you to the split.
- If you start DiLink's own split screen, ours closes cleanly: two splits do not run at once.
Charges
The Charges tab automatically logs every real charge: a list of charges by month, stats for a period and for all time, AC and DC filters. Not every plug-in becomes a record: a record is created only if SoC actually went up. If someone just touches the plug and pulls it out a minute later, nothing gets logged.
What Counts as a Charge
A record is written if either the battery capacity or the SoC rose during the session. BYDMate tries three data sources in order and takes the first usable one:
- Capacity gain in kWh, if the onboard system reports an updated value.
- SoC gain over the active session, converted to kWh using the current battery capacity.
- A rough estimate from the SoC delta against the full rated capacity, if the first two are empty.
If BYDMate is running during the charge, the record shows up right away. If the plug-in happened before the app started, or the car went into deep sleep, BYDMate catches up on the record at the next start, as soon as it sees the SoC jumped up compared to before the charge. That is why even offline garage charges make it into the log.
How AC or DC Is Determined
The charge type is determined from two signals, in priority order:
- Connector type from the onboard system: gun-state 2 is AC, 3 or 4 is DC. On some BYD models this value does not always arrive, in which case the next point applies.
- Average session power: above 15 kW is DC, otherwise AC. AC charging physically cannot exceed 11 kW, DC stations start at 22 kW (CCS slow), so the 15 kW threshold reliably splits the two modes.
The Charges tab has three filters: "All", "AC", "DC".
Manual Add and Edit
If a record did not appear automatically, or the numbers look off:
- The
+ chargebutton in the tab header: add a session manually with the date, duration, kWh, and tariff. - Long-press a record: an "Edit" / "Delete" menu opens. In edit mode you can fix any field of an already saved charge.
The feature is under active testing. It logs reliably on Leopard 3. On other BYD models the automation may be off: for example, the onboard system may not report power or connector type, and AC/DC may then be detected wrong. In such cases edit records manually and, if you can, send logs to Issues.
Tariffs and Cost
BYDMate figures the cost of every charge and every trip itself. For the numbers to be honest, it needs two things: your price per kilowatt-hour, and the date that price started applying. On a hybrid, also the litre price.
Where to Set the Tariff
Settings → Car and Battery → "Tariffs and periods" → "Open". A separate window opens with the list of periods, it does not clutter Settings.
A period is "the date a price starts applying". A period has a start date, a home (AC) price, a fast-charging (DC) price, on a hybrid the litre price, losses, and a trip cost rule. A period has no end: it applies until the next period, or until today if there is no next one. The very first period covers all the history before it, so old trips never end up without a price.
When you set a tariff for the first time (or update from an older version), BYDMate creates one period "from the start of history" with your current numbers. Until you add a second period, everything works as before.
How to Change a Tariff Retroactively
The price went up on September 1, but you only remembered on the 16th? No problem.
- Open "Tariffs and periods" and tap "Add period".
- In the "Applies from" field pick September 1.
- Enter the new prices and save.
Everything that happened on September 1 and later recalculates automatically: both charges and trips. August stays at the old price. There is no separate "recalculate" button, and none is needed, the recalculation runs by itself when you save the period.
It works the same with petrol. You refuelled at a new price: add a period from the refuelling date and enter the litre price. Trips before that date stay at the old price, trips from it on are counted at the new one. History is not rewritten.
Editing works the same way: changing the price in an existing period recalculates everything from its date to the end of history.
Charging Losses
50 kWh went into the car, but the meter at home counted 55. The difference goes into the charger and heat: some of the energy simply never reaches the battery. You pay for 55, but BYDMate only sees 50, so without a correction the cost comes out too low.
Every period has two fields: AC losses and DC losses. The defaults are 10% for home (AC) and 5% for fast (DC) charging, typical figures from ADAC measurements and DLR research: slow charging through the onboard charger loses around 10%, fast DC charging loses less, around 5%. The current goes into the car directly, so the losses are smaller.
The cost is figured like this: how much went into the battery, divided by (1 minus the losses), times the price per kilowatt-hour. 50 kWh at 10% losses is 55.6 kWh paid for.
How to fine-tune it for your car. Note your home meter's reading before and after charging, open that charge's card (long-press the record, then "Edit"), and enter the difference in the "Meter" field. For that charge, BYDMate uses your figure instead of an estimate. Once you have a few such charges, the tariffs window shows a line, "Your losses by meter: AC ...%, DC ...%", the average percent from your own measurements. Enter it into the loss fields, and from then on every charge is figured using your real number.
How Trip Cost Is Calculated
A trip has no receipt, so its kilowatt-hour price has to come from somewhere. A period offers four rules to choose from:
| Rule | How it's figured | Who it fits |
|---|---|---|
| Home | By the period's home price | You mostly charge at home. This is the default |
| DC | By the period's fast-charging price | You never charge at home at all |
| Custom | By the number you enter | You know your own average price and want to fix it |
| By charges | By the actual price of what went into the battery | You charge both at home and on the road and want accuracy |
The "By charges" rule tracks the price of the energy in the battery: after every charge the new energy mixes with what is left, and the price becomes a weighted average. A cheap night charge makes the kilowatt-hour cheaper, an expensive fast charge makes it more expensive. If there were no charges before a trip, or the last one was more than 60 days ago, BYDMate uses the period's home price so the trip is never left without a cost.
On a hybrid, fuel is added to electricity: the trip's litres are multiplied by the litre price of the period the trip falls into. If the period has no litre price, the fuel part is not counted and the trip cost is for electricity only; if the trip has no litres, it is counted as on an EV.
What Never Gets Recalculated
A recalculation never touches charges where you set the price by hand:
- a charge added with the "+ charge" button with a tariff entered;
- a charge where you edited the tariff by hand in its card;
- a charge where you entered a meter reading.
This is deliberate: you saw the receipt and the meter, the app did not. Such records stay as they are through any tariff change.
How to put a record back into the shared calculation. Open its card and tap "Use period rate". The meter reading and the manual mark are cleared, the cost is recalculated using the period's tariff and losses, and from then on the record changes along with the rest.
Configuration Backup and Telegram Bot
Everything you set up and collected is saved as one archive. It can bring your data back after a reinstall, move BYDMate to another head unit, or just keep a copy in Telegram.
Everything is in Settings → Service & Data → Data → "Configuration".
Save Configuration
- In the "Save configuration" line, tap "Save".
- In the "What to save" window, check the parts you want:
- Tables: trips, charges, statistics.
- Car and app settings: settings, tariffs, automations, places, widget, voice.
- Keys and tokens: OpenRouter, ABRP, Telegram bot, and others. Unchecked by default. Leave them unchecked if you are giving the file to someone else.
- Tap "Save". The archive
bydmate_backup_<date>.zipappears in the Download folder. If a Telegram bot is connected, a copy goes there too. - In the "Saved" window you can tap "Share" right away. The archive holds your trip history, so only share it with someone you trust.
Restore Configuration
- In the "Restore config" line, tap "Choose file". A list of
bydmate_backup_*.ziparchives from the Download folder opens, automatic copies are there too. This is the app's own list, not the system file picker, so it works even on firmware where the system picker cannot reach the file. - Pick an archive.
- In the "What to restore" window, check the parts you need. Parts that are not in the archive cannot be picked. Unchecked parts stay as they are.
- Tap "Restore". The chosen data is replaced with the archive's contents, and the app restarts.
On a clean install it works the same way: install BYDMate, put the archive in Download, and restore it. The app restores the permission to draw over other apps by itself, if ADB works. What is left to do by hand is shown in one "After restore" window: microphone, contacts, the speech recognition model, the TTS voice, a head-unit reboot. There are "Allow" and "Download" buttons next to the items.
Auto-Save
- In the "Auto-save" line, pick a frequency: "Daily", "Weekly", or "Monthly". "Off" turns auto-save off.
- Use the "Tables", "Settings", and "Keys" chips to choose what goes into the copy. Tables and settings by default, without keys.
A copy is made when the car starts, if more than the chosen interval has passed since the last one. "Daily" means: at the first start of the day, once 24 hours have passed since the last copy. Download keeps the 5 most recent automatic copies, older ones are deleted. Archives saved with the manual button are left alone.
If a Telegram bot is connected, every copy is sent to your chat with the bot. If sending fails because of the network, the app retries later. Under the line you can see the time of the last copy and the outcome: sent to Telegram, saved locally, or an error.
How to Connect a Telegram Bot
You need your own bot: copies arrive only in your chat with the bot or in your group where you added it.
- In Telegram, open @BotFather, send it
/newbot, and pick a name and address for the bot. BotFather sends back a token, a long string like123456789:AA.... - In BYDMate open Settings → Service & Data → Data, the "Telegram bot" block. Paste the token into the "Bot token" field and tap "Check".
- The app shows a short code made of digits. Open the chat with your bot in Telegram and send it this code. You can copy the code with the "Copy code" button. To get reports and copies in a shared chat, for example for everyone who drives the car, add the bot to your private group and send
/start@your_bot CODEthere. - Go back to BYDMate and tap "Check" again. The bot sends a message to the chat, "BYDMate connected. Backups will arrive here.", and the block shows a "Connected" mark with the bot's and chat's name.
Errors show up right under the button: a wrong token, no network, the code has not arrived yet, a file over 50 MB, and others. The "Back" button on the code step returns you to the token, "Disconnect" forgets the bot, and copies stay in Download only.
The archive is not encrypted. The bot and the chat should be yours alone. If the bot is already connected to a webhook or another program, Telegram will not deliver the code message to the app: turn off the webhook.
Battery Health (SoH)
SoH (State of Health) is the percentage "health" of the traction battery, calculated by the car's own onboard system with its own internal algorithms.
On BYD Leopard 3 (Fangchengbao Tai 3) BYDMate reads this value directly from the onboard system and shows it in the battery card on Home. This is the real SoH from the car, not an estimate from the SoC difference: BYDMate simply reads what the car writes about itself.
On other BYD models, access to this value is not yet confirmed, so SoH does not show there. The rest of the card (battery temperature, 12V, cell balance, insulation resistance) works on every supported model.
Tapping the card opens the "Tech" screen with detailed battery, motor, climate and tyre data plus diagnostics, see The "Tech" Screen.
If SoH is available on your car and you want to help add support, open an Issue with your model and year.
SoH and Automatic Charge Logging (Leopard 3)
SoH and automatic charge logging on Leopard 3 work automatically, there is nothing separate to turn on. BYDMate reads the values directly from the car's onboard system as soon as wireless ADB debugging is active.
- Make sure ADB debugging is active (see the "Install" section).
- SoH shows up in the battery card on Home, and charges start logging automatically with real kWh values.
These features are confirmed on Leopard 3. On other BYD models access to this data is not confirmed, so SoH and precise charge power may not show up, but the rest of BYDMate works as usual.
The "Tech" Screen
"Tech" is the screen with the car's detailed data: battery, motors, battery limits, climate, tyres and diagnostics. The values come from the car itself and update live.
How to Open It
- Open the "Dashboard" tab.
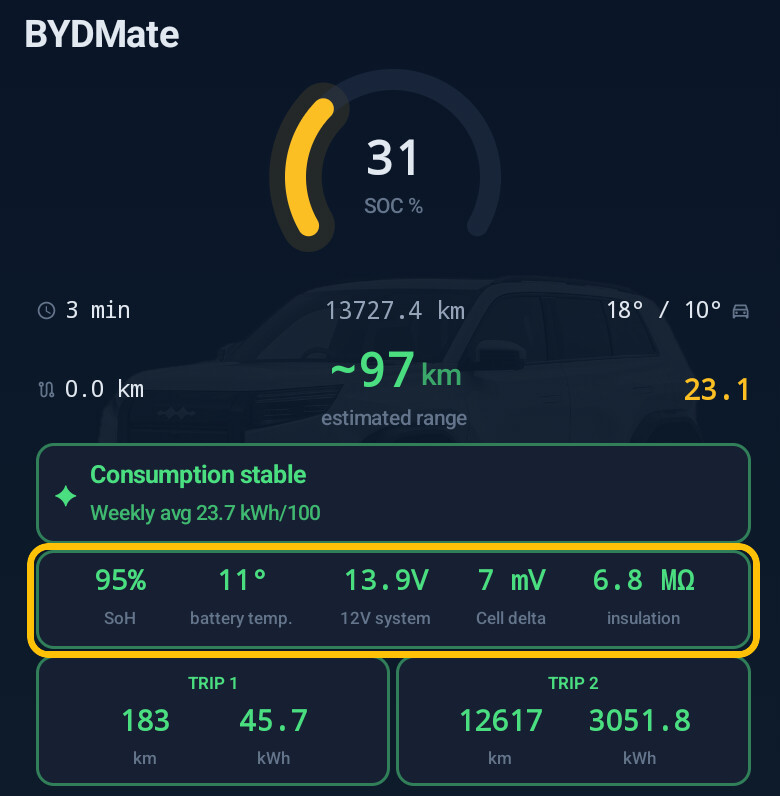
- Tap the battery card: the row with SoH, battery temperature, 12V system, cell delta and insulation. It has a yellow outline in the picture.
- The "Tech" screen opens. The arrow in the top left corner takes you back.
What Is on the Screen
Six cards, three per row. You can change their order: hold a card and drag it.
- Battery · now: charge (SoC), remaining energy in kWh as the battery itself estimates it, SoH, battery temperature, traction battery voltage, power at the motors, how much the battery is giving out right now and how many percent of charge per hour that eats, the 12V system, insulation resistance.
- Motors and inverters: front and rear separately. Motor and inverter temperatures on a scale, rpm, accelerator and brake pedal, power.
- BMS limits: the charge and discharge power the battery controller (BMS) allows right now and how much power the battery can give. Below are the cells: the weakest, the strongest and the difference between them.
- Battery · history: when the last full charge to 100 % and the last calibration happened, mileage by battery data, how much energy has passed through the battery in total, the number of full cycles (with the numbers it is figured from), average charge since the last charge and over all time.
- Car status: how much the A/C compressor draws, whether climate is on, cabin and outside temperature. Below are the pressure and temperature of each tyre on a picture of the car. If the car has a PM2.5 sensor, it is shown too.
- Diagnostics: cluster warnings, time left until the next service, and module fault codes with the "Scan" button. Details in Diagnostics: Module Faults.
Hybrids get a seventh card, "Fuel".
How to Read It
- Parameters have a "?" badge next to them. Tap it for a plain-language tip: what the number means and what value is normal.
- If the car does not report a parameter, the line shows "-". A card with no data is hidden.
- The set of parameters depends on the model. Everything on the screen is tested on Leopard 3; on other cars some lines may be empty.
- The screen only reads data and changes nothing in the car. It needs active wireless ADB debugging, like the rest of the car data (see "Install").
Diagnostics: Module Faults
A car has dozens of electronic modules: battery, brakes, steering, airbags, driver assistance and more. When a module notices a problem, it stores a fault code. A service shop reads these codes with a scanner. Since version 4.1 BYDMate can read them too, right on the car's screen, with no scanner and no internet.
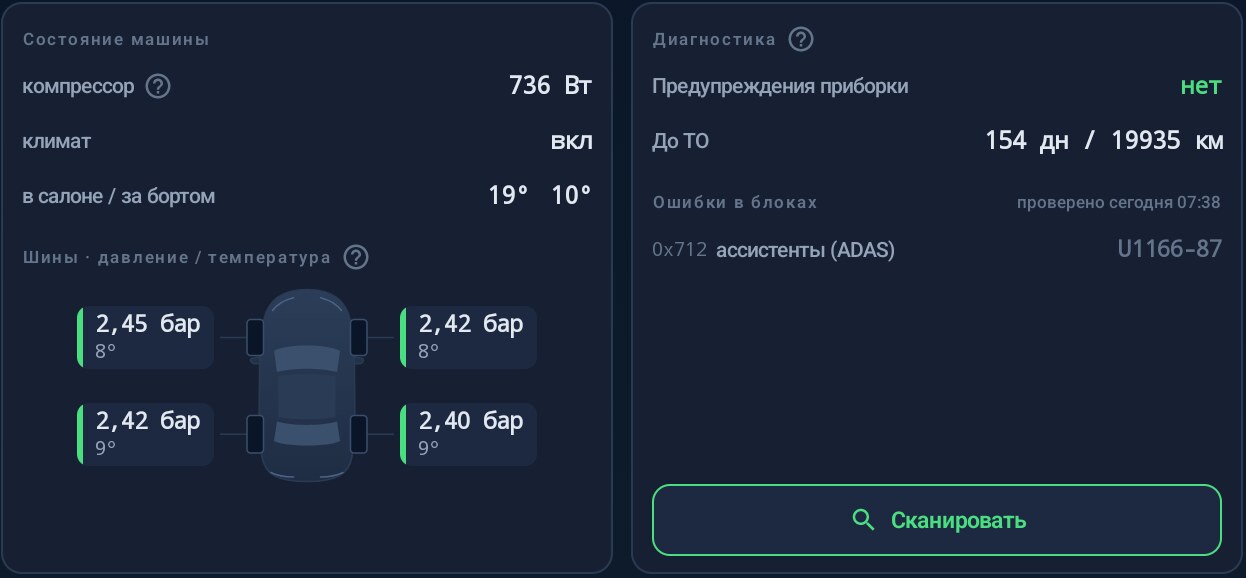
The screenshots show the app in Russian; in English the labels are the ones quoted below.
Where to find it
Dashboard → tap the battery card → the "Tech" screen → the "Diagnostics" card. The card has three parts:
- Cluster warnings: what the car itself shows on the instrument cluster. "none" means the cluster shows nothing right now.
- Next service: days and km left until the scheduled service. The row shows only if the service reminder is on in the car. On Leopard 3 it is turned on in the car settings: Vehicle → Maintenance → Maintenance Interval or Maintenance Mileage.
- Module faults: the result of the last scan and the "Scan" button.
How to scan
- Stop and shift to P. While driving the button is inactive and says "Scanning only in P".
- Press "Scan". The app asks the modules one by one, and the screen shows how many are done.
- A window with the result opens. You can close it and open it again by tapping the list in the card; the car is not asked again.
Wireless ADB debugging has to be active, as for the rest of the car data (see "Install"). The app never scans on its own: not when the car turns on, not on a schedule, not before a Telegram report. Only when you press the button.
How to read the result
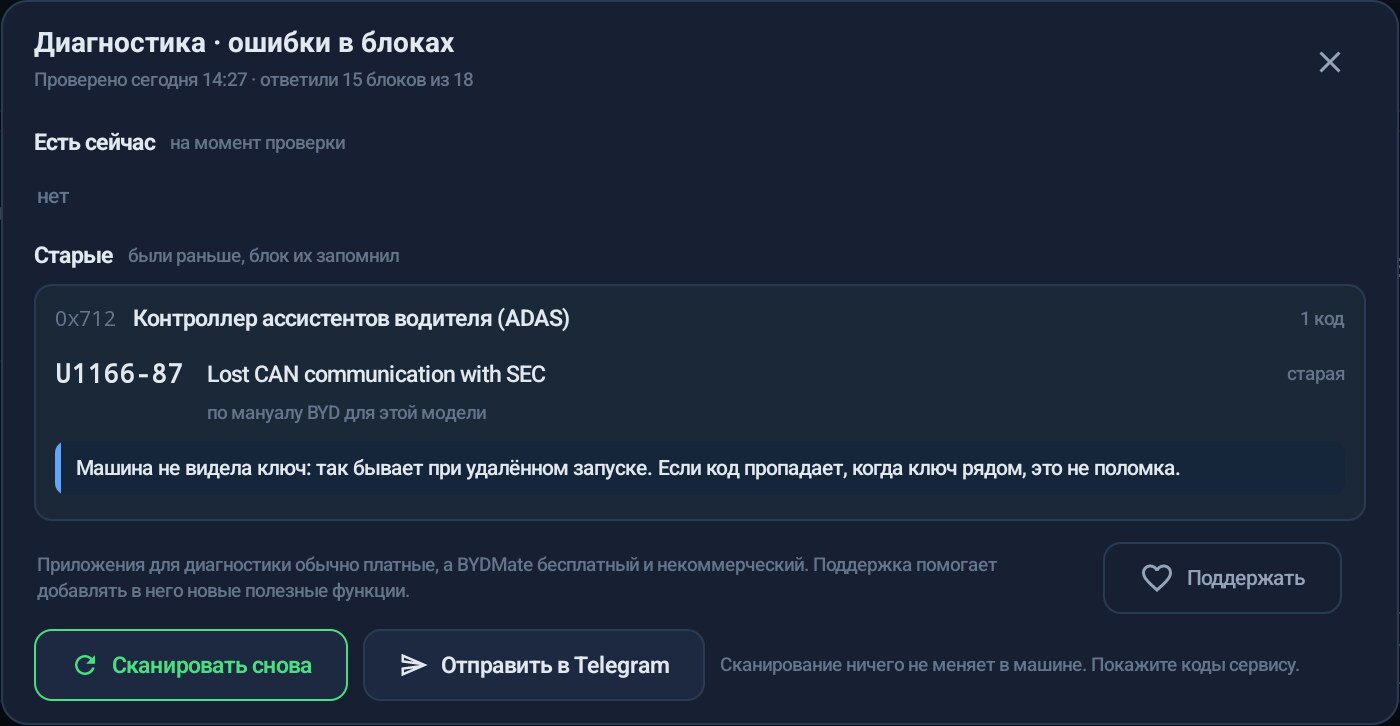
- At the top: when the check ran and how many modules answered, for example "15 of 18 modules answered". That is normal: not every module exists on every model, and some modules do not always answer.
- "Present now": the fault is active right now. These codes are yellow.
- "Old": the fault happened before and the module remembers it. These are gray. Almost every car has old codes, a module remembers even a short loss of communication. If the cluster shows no warnings and the car behaves as usual, there is usually nothing to worry about.
- Codes are grouped by module: the module address (for example 0x712) and its name (on Leopard 3; on other models some modules are labelled with the address only).
- The code is written the same way as in BYD manuals and service scanners: U1166-87. The first letter tells where the problem is: P is the powertrain (motor, battery, charging), C is the chassis (brakes, steering, suspension), B is the body and cabin, U is communication between modules. The digits after the dash say what kind of fault it is.
- The description sits next to the code, with a line under it saying where it comes from:
- "from the BYD manual for this model": text from the BYD diagnostic manual for your exact model;
- "from similar BYD models": we have no manual for your model, but in the manuals of other BYD models this code in this module has the same description;
- "No description of this code in the database": only the code is shown; you can look it up online or show it to a service.
- Description language: English in every app language, the manual's Chinese original in Chinese. BYD manuals are written in Chinese; the English translation was made for BYDMate.
- A hint at U1166-87 in the driver assistance (ADAS) module: the car did not see the key. This happens after a remote start from the phone. If the code goes away when the key is near, nothing is broken.
The descriptions are stored inside the app, no internet needed. They come from 54 diagnostic manuals of BYD, Denza and Fangchengbao: about 8,500 distinct codes, with a description for each module.
Send to yourself in Telegram
The "Send to Telegram" button in the window sends the codes with their descriptions to your bot, handy to show a mechanic or forward to a chat. Connect the bot first (see "How to Connect a Telegram Bot"), otherwise the app says "No Telegram bot connected". The app never sends the codes anywhere by itself.
Good to know
- Scanning only reads. It changes nothing in the car, does not erase faults and does not change module settings. The app sends the modules read requests only.
- Faults can be erased, the feature is experimental. "Erase all" in the window or "erase ›" next to one module, on P only and only after a fresh scan. After the erase the app re-reads the modules and shows the result for each. A fault that is present right now comes back at once while its cause remains. You erase at your own risk; if you are going to a service, send the codes to Telegram first.
- This is not a repair or a diagnosis. A code says what a module noticed, not what broke or what to replace. The service decides: show them the codes.
- Tested only on Leopard 3 (Fangchengbao Tai 3). On other BYD models the scan may not work and show "Not available on this car", fewer modules may answer, and module names will show as addresses. If you have another model, tell us in an Issue what the scan showed and attach a log recording.
- Only in P and only on a press. We chose not to query the car's modules while driving.
- "Could not check" happens if the gear left P during the scan or the app lost its connection to the car. Press "Scan" again. If it keeps happening, send a log recording in an Issue.
At the bottom of the window there is a line about supporting the project. Diagnostic apps are usually paid, BYDMate is free, and every description is available without a donation.
If You Don't Have a Leopard 3
BYDMate is developed and tested on BYD Leopard 3 (Fangchengbao Tai 3). On other BYD models most features work too, but there are differences. Before the first launch, check:
- Trip history: on Leopard 3 (Fangchengbao Tai 3) BYDMate reads trips from the built-in BMS database
energydata. On models without this database (Song, Yuan, and similar) trips are now recorded natively, by polling the car's parameters in the background (source NATIVE_POLLING), so the list is no longer empty. Consumption in such trips is figured from the SoC delta, so it is a bit coarser than on Leopard 3, where the data comes from the BMS. - DM-i and DM-o hybrids: the app detects them by itself from the engine mileage and the tank level, there are no settings; until the type is confirmed, the screen is the same as on an EV. This is the first version of the support, built from the dumps of two cars: some values may show a dash. If you see a dash where the car knows the number, attach the parameter catalog (below) to the Issue, and a photo of the cluster with the battery and fuel ranges.
- Battery capacity: defaults to 72.9 kWh for Leopard 3. Go to Settings → Car and Battery and set your own capacity. For example, Atto 3 is 60.5 kWh, Seal AWD is 82.5 kWh, Han EV is 85.4 kWh. Without this, range and trip cost calculations will be off.
- SoH: confirmed on Leopard 3 and on DiLink 3.0 (Yuan UP). On other models the "Battery health" card works without the SoH field.
- Charges: the AC and DC algorithm was designed around Leopard 3. On other models a record may appear late or with imprecise power, especially for DC. Use manual add and edit when the automation misses.
- Automation and the floating widget: work the same on any model, because they use the car's system interface.
If something does not work or shows something odd, open an Issue with your car model and DiLink firmware version, and attach your car's parameter catalog: Settings → Service & Data → "Save fid catalog". A fid-dump-….txt file appears in the Download folder. It only holds technical parameter identifiers, no VIN, no location, no personal data.
Why this matters. Different BYD models have different parameter sets: a command that turns on seat ventilation on a Leopard 3 may have a different number on a Song, or may not exist at all. That is exactly why some features fail on other cars. The catalog from your car shows how the parameters are named and numbered on your exact firmware, and we fix things using that data instead of guessing.
Target Device
| Parameter | Value |
|---|---|
| Platform | DiLink 5.0 (Android 12, API 32) |
| Processor | Snapdragon 780G |
| Screen | 15.6" landscape, 1920x1200 |
| GMS | None (AOSP without Google Play Services) |
| Tested on | BYD Leopard 3 (Fangchengbao Tai 3) |
How It Works
BYD energydata (BMS SQLite)  →  HistoryImporter    →  Room DB  →  Compose UI
autoservice (system Binder)  →  TrackingService     ↗     ↓
Android LocationManager      →  TripTracker (GPS)   ↗   LocalInsightEngine
autoservice (command writes) ←  AutomationEngine   ←  Rules (Room DB)
| Data | Source |
|---|---|
| Consumption, mileage, duration | BYD energydata (BMS) |
| SOC, speed, temperatures | Car system service (autoservice Binder) |
| Cell voltage, 12V, SoH | Car system service (autoservice Binder) |
| GPS coordinates | Android LocationManager |
| AI analytics | On-device rules, no internet |
| Vehicle control | Car system service (command writes) |
No OBD adapter and no third-party D+. BYDMate reads data and controls the car directly through the autoservice system service (the same one BYD's own system uses), under shell access over wireless ADB.
Data & Network
| Feature | Destination | What is sent | When active |
|---|---|---|---|
| Voice agent (LLM) | OpenRouter / z.ai / your own server | command text, vehicle state (SOC, climate, etc.), GPS coordinates for navigation requests | only after setting up a provider |
| Agent web search | Exa / z.ai / OpenRouter | search query text | a key is entered and the agent called the tool |
| Weather (agent) | Open-Meteo | GPS coordinates or a place name (geocoding) | the agent called the tool |
| Charging stations (agent) | Overpass (overpass-api.de / maps.mail.ru) | GPS coordinates | the agent called the tool |
| Online TTS voices | MiniMax / fal.ai / Replicate / OpenRouter | text of the spoken reply | only if an online voice is chosen |
| Map in trip details | OpenStreetMap tile servers (or Amap, if chosen in Settings) | coordinates of the visible map area | when the trip map or the places editor is opened |
| Update check | GitHub API | nothing (fetches the release list, version comparison is local) | automatically |
| ABRP live telemetry | abetterrouteplanner.com | SOC, power, speed, temperatures, odometer, tire pressure, charging status, battery capacity, SoH, kWh of the current charging session, car model (coordinates only with a separate toggle, for following the car from a phone) | only after entering a token |
| Configuration copies to Telegram | api.telegram.org, your bot | the configuration archive with the chosen parts, and a message when the bot connects | only after connecting a bot |
| Telemetry webhook | Settings → Integrations → Webhook | the same JSON as ABRP, POST to your URL every 1/8/30 s (driving/charging/parked); coordinates only with a separate toggle | off by default |
Without any keys entered, only the update check (GitHub) and map tiles when viewing a trip route leave the device, along with voice model downloads on your explicit request (github.com). API keys are stored locally in the app's database and are never sent anywhere except the provider itself.
Install
1. Enable ADB
Without ADB, BYDMate works as an offline trip logger: history from the stock database, the route map, configuration backup, AI insights on data already collected.
Enabled ADB debugging is needed for everything that reads or writes vehicle parameters: live figures in the widget and on the dashboard (SOC, range, temperatures, 12V), SoH, automatic charge logging, automation, projection to cluster, split screen, HUD guidance, blind-spot cameras, voice control of the car, and log recording.
ADB status line. On Home and in Settings, a status line shows why vehicle control does not work: ADB is not enabled, ADB turned off after a reboot, there is no access to ADB, or the helper did not start. Tapping it opens a tip with an action. The first-run wizard has an "ADB" step with a "Check" button.
These features turn on automatically, no separate switch is needed. The first time BYDMate starts, DiLink shows the "Allow ADB debugging" dialog once, tap Allow and check "Always allow from this computer" so it does not ask again.
DiLink 3 / 4: you can enable ADB yourself: install BydDevelopmentTools, go to Settings → Version Management, tap Reset to factory default 10 times, then turn on Debug Mode when USB is Connected and Wireless adb debug switch. On updated DiLink 3/4 firmware ADB may be locked the same way as on DiLink 5, then follow the path below.
DiLink 5.0: ADB debugging is locked and can only be unlocked remotely, from China. This can be done through sellers on TaoBao (search for
DiLink 5.0, about 40 CNY inside China or about 80 CNY from outside, paid via AliPay). The seller remotely opens the engineering menu using a QR code you send them, after which ADB turns on as usual.Step-by-step guide: PDF guide (Russian), included in the repository.
ADB Turns Off After Every Reboot
On DiLink firmware from summer 2026 ("2606" builds), the ADB port closes at every head-unit reboot, and every vehicle control feature stops working until ADB is turned on by hand. For these cars, Settings → Car System has a "Restore ADB after a reboot" toggle (off by default): the app brings ADB back up through Android's own built-in wireless debugging. A "?" badge next to the toggle has a detailed explanation, and there is a status line under it.
Things to know:
- Wi-Fi in the car must be on and connected to a network (home, a phone's hotspot, any). Without Wi-Fi, Android does not let you turn on wireless debugging, and there is no way around this.
- The first time you connect on each new network, a system dialog appears, "Allow wireless debugging on this network?". When the restore toggle is on, the app confirms it by itself through its accessibility service: on a phone's hotspot the network changes every time it is turned on, and "Always allow on this network" does not help there. If BYDMate's accessibility service is off, check "Always allow on this network" and tap ALLOW.
- Once, while ADB still works, the app grants itself the
WRITE_SECURE_SETTINGSsystem permission (a single command over ADB). Without it, wireless debugging cannot be turned on: the status line shows "Activation needed". - After booting, the app keeps retrying by itself as long as Wi-Fi is connected, and reacts to the screen unlocking. ADB usually comes back 10 to 30 seconds after the car connects to Wi-Fi. It works best if the phone's hotspot is already on by the time the car starts.
- If ADB on your firmware survives a reboot anyway, there is no need to turn the toggle on: the status line shows "Not needed".
- Confirmed on DiLink 5.0 (Song L) with August 2026 firmware.
2. DiPlus (D+) Is No Longer Needed
Starting with version 3.0.0, BYDMate works directly with the car's system and does not require the third-party D+ (迪加) app. All data is read and every command is sent through the car's system service.
If you used earlier versions and installed D+, you can remove it from DiLink once you have checked that BYDMate works.
3. Install BYDMate
- Download the BYDMate APK from Releases
- Move it onto DiLink: over USB flash drive, over the network, or with ADB (
adb install BYDMate.apk) - Allow installing from unknown sources if asked
4. First Launch
- Open BYDMate, the setup wizard appears
- Grant location and storage permissions. As you turn features on, the app asks for more: microphone for the voice agent, camera for blind-spot cameras, contacts for calling by name, drawing over other apps for the widget and notifications, and usage access to detect the active app. BYDMate's persistent notification in the shade cannot be removed (Android requires it to run in the background), but it can be made silent: Settings → Service & Data → "Silent tracking notification".
- Set your electricity tariffs (for figuring trip cost). You can change them retroactively later, see Tariffs and Cost
- In Automation, the "Sentry mode" action type is available: it turns BYD's sentry mode (Centuri/Sentry) on or off directly through the system setting, skipping the stock app's confirmation dialog
5. Background Work
Important: turn off "Disable background Apps" for BYDMate, otherwise DiLink kills the app:
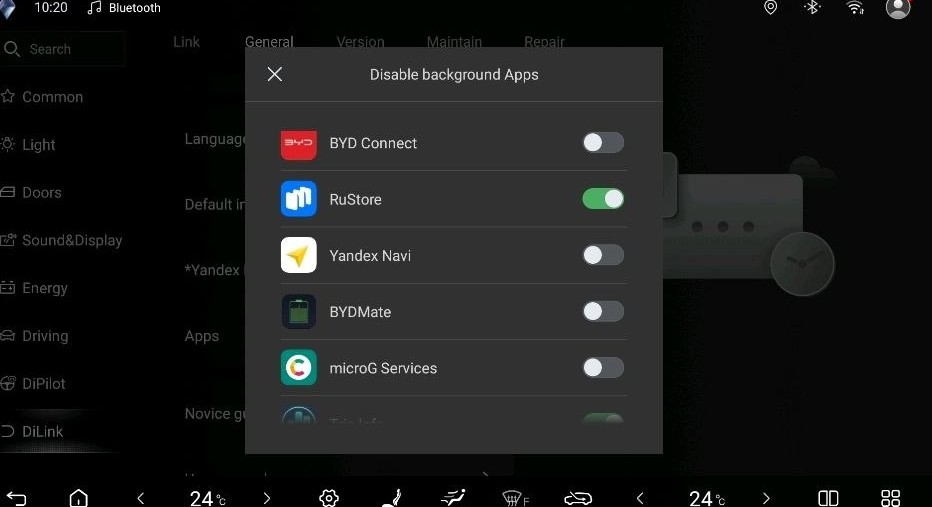
DiLink > Settings > General > Disable background Apps > BYDMate = OFF
6. Configuration (Optional)
In Settings you can change:
- Battery capacity: 72.9 kWh by default (Leopard 3)
- Tariffs and periods: home (AC) and fast-charging (DC) prices, losses, the trip cost rule, and currency. Details in Tariffs and Cost
- Consumption thresholds: the bounds for color coding (green/yellow/red)
Vehicle System
Settings → Service & Data → Car System has items that change the car's own behavior, not the app's.
Steering wheel volume knob. A toggle that makes a press pause and resume playback instead of switching the audio source. Needed after a firmware update that made the press switch the source. Off by default.
BYD cloud over Wi-Fi. Connects the car to the BYD cloud over Wi-Fi, so the BYD phone app sees the car, over-the-air updates arrive and the NFC key works. Cars on the new BYD servers need a Chinese VPN: the server only lets in connections from a Chinese address. A VPN on the router the car connects to is best, because it does not depend on the head unit. The other option is a VPN app on the head unit itself, for example SpeedCN; it works only while the head unit is on. Needs ADB. If the car has its own mobile data, the setting changes nothing; switching it off returns the previous connection settings.
Car interface language. UI7 firmware only. The button opens BYD's hidden stock dialog with the full list of languages, including Russian, Ukrainian, and Polish. The firmware itself changes the language, the app writes nothing. For some owners, auto-parking stops working in Russian, then switch back to English with the same button.
AI Insights
The dashboard card analyzes your stats for the last 7 days (compared with the previous 7) and shows a title, a short summary, a metrics table, and up to 5 recommendations. It works without internet.
Everything is figured right on the device from trip and battery data. It refreshes itself once a day, and the result is cached. In the card's expanded window, the period switches between week and month.
Where the Data Comes From
Everything is figured from the local Room database, with no GPS, routes, or personal identifiers:
- Trips: km, kWh, average consumption, speed, short trips (under 5 km), best/worst by consumption, cost
- Idle drain with the motor running: kWh and hours (
idle_drains) - Night idle: sessions that started between 10pm and 6am
- Charges: AC/DC kWh, session count, price per kWh, total cost for the week
- 12V: current voltage and the weekly trend (up to 7 days of history)
- Cells: max-min spread in mV from the car's live data
- Temperature: average outside temperature across trips
Minimum for analysis: at least 5 trips in the last 7 days. Otherwise the card shows "Not enough data to analyze".
How the Card Is Built
- Title and summary: one main message for the week, chosen by the highest-priority rule (see below).
- Dynamics: a week-over-week table: consumption, trips, % of short trips, average distance, idle drain with the motor running, night idle.
- Recommendations: up to 5 bullets from matching rules, sorted by importance.
The local engine's logic lives in LocalInsightEngine.kt: deterministic thresholds plus string templates (local_insight_* in strings.xml). The text is localized into 6 languages (ru / en / zh / pt / pl / be).
Title Priority
Whatever matters most goes in the title. The first rule to fire with the highest priority wins:
| Priority | Condition | Example title |
|---|---|---|
| 90 | 12V under 11.8 V | "12V critically low" |
| 85 | Cell spread over 50 mV | "Large cell spread" |
| 80 | Consumption up over 15% vs. last week | "Consumption up 15% this week" |
| 78 | Night drain of 4+ kWh and 35%+ of idle | "Night idle drain" |
| 70 | Consumption up over 5% | "Consumption up 8% this week" |
| 60 | Consumption down over 5% | "Consumption down 10%" |
| 10 | Otherwise | "Consumption is stable" |
Recommendations (Bullets)
A set of rules is checked in parallel, and the top 5 by priority land in the card. Example topics:
| Topic | When it fires |
|---|---|
| Night idle | 0.3+ kWh spent overnight with the motor running |
| DC costs more than AC | Both types are 3+ kWh, DC is 15%+ pricier |
| Heavy DC use | 2+ DC sessions, DC over AC × 1.5 |
| Short trips | 40%+ of trips are under 5 km |
| Idle with the motor running | 2+ kWh while parked |
| 12V low / falling | 11.8-12.4 V, or a downward weekly trend |
| Cell spread | 31-50 mV |
| Winter plus higher consumption | 5 °C or below and consumption rose |
| Best vs. worst trip | Spread of 5+ kWh/100 |
| Consumption improved | Down over 5% vs. last week |
| Highway driving | Average speed of 75+ km/h |
| High / low consumption | 28+ or 16 or under kWh/100 |
| More mileage / trips | +20% vs. last week |
| Heat plus AC | 25 °C or above, consumption of 22+ |
| Mixed charging | Both AC and DC in the same week |
| Cost | Currency per 100 km, or the week's charging cost |
| Good habits | Low night/day idle share, healthy 12V/cell balance |
Full rules and thresholds are in LocalInsightEngine.kt and the LocalInsightEngineTest.kt tests.
ABRP: Live Telemetry
BYDMate can send live vehicle data to A Better Route Planner (ABRP) through the official Iternio Telemetry API. ABRP uses this data so the route plan and the remaining-range estimate update from your battery's real state, instead of average book values.
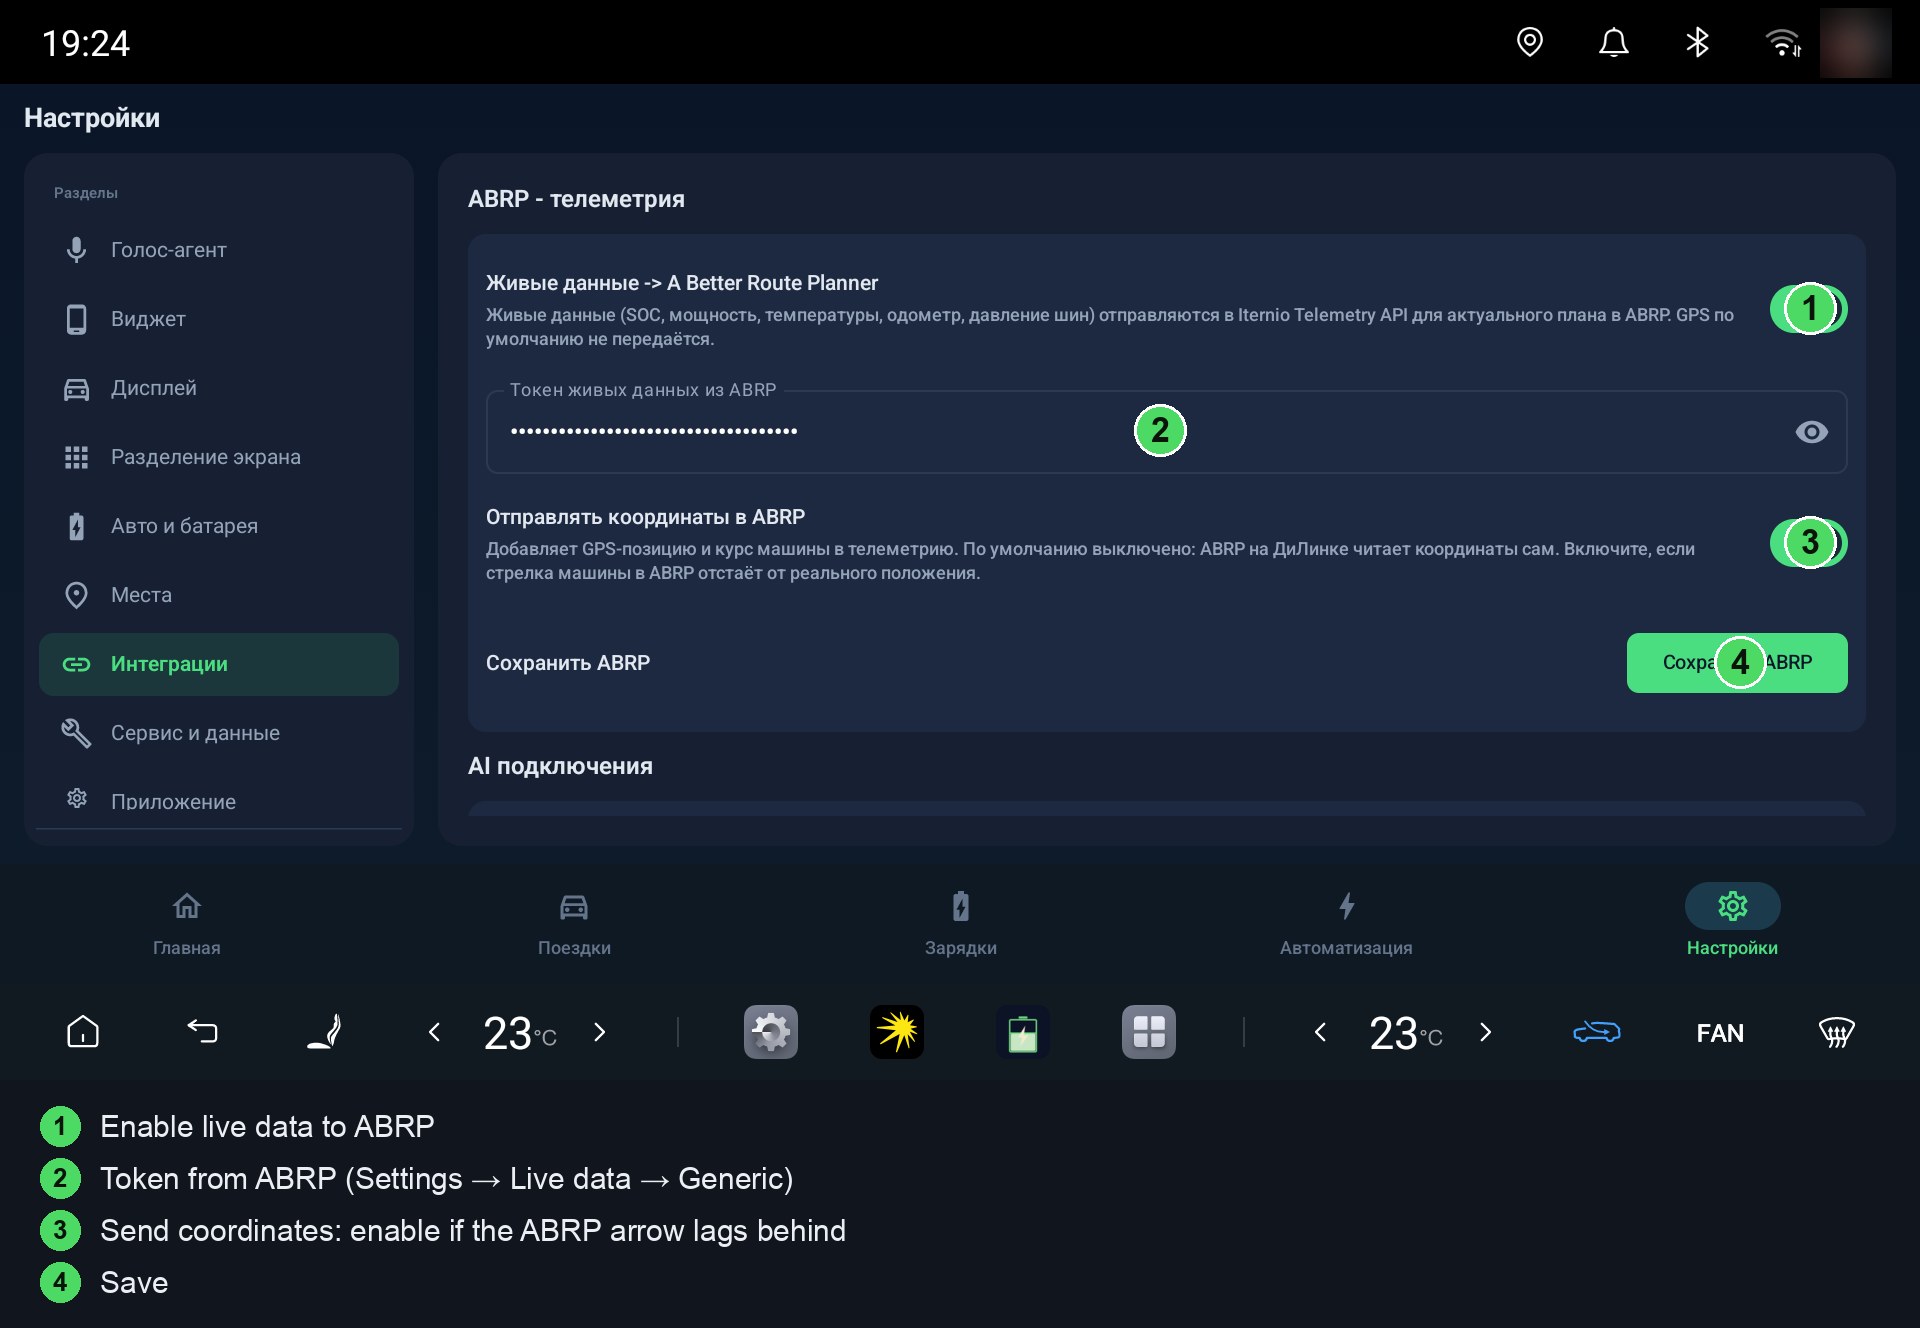
The feature is optional, off by default, and turned on by hand in Settings.
ABRP version on the head unit: install 7.1.2 or older, for example from APKMirror. In 7.1.4 and newer the car marker on the map moves in jumps or freezes. This is a bug in ABRP itself, BYDMate does not affect it.
How to Get the Token
ABRP uses a "Generic Live Data Token", a separate token for each car in the garage:
- Open abetterrouteplanner.com and sign in.
- Go to your garage and open the car you want live data for. The car must be saved in the garage, otherwise the token does not appear.
- The gear icon, "Car settings" → "Data" → "Connect live data".
- Pick "Generic" from the provider list and tap "Link". A long token string appears, this is the
User Token.
If "Generic" is not in the list: switch the car model code in the ABRP garage to any popular BYD model (BYD Atto 3 or BYD Seal, for example), save, and Generic appears. After linking the token, you can switch the model code back.
Setup in BYDMate
- Settings → Integrations → the "ABRP: telemetry" block.
- Paste the token you got into the "Live data token from ABRP" field.
- There is nothing else to set up: the send interval picks itself, once a second while driving, every 8 seconds while charging, every 30 seconds while parked. The old "interval" and "model code" fields from earlier versions are gone.
- Tap "Save ABRP", then turn on the "Live data → A Better Route Planner" toggle. Without a saved token the toggle stays off and unusable.
- The ABRP app on DiLink (or a browser on your phone) will now see live SOC, power, temperatures, and charge.
What Is Sent
Only aggregated vehicle figures, no identifiers:
- SOC: current traction battery percent
- Speed: km/h
- Power: current traction power (negative while charging, as Iternio requires). On a hybrid the power is taken only from the battery voltage and current or from charging; if the car does not give them, the field is not sent.
- Voltage / current: traction battery voltage and current
- HVAC setpoint: the set climate temperature
- Battery / cabin / exterior temp: battery, cabin, and outside temperatures
- Capacity: rated battery capacity
- Odometer: mileage, km
- Tire pressures: pressure in all 4 tires
- is_charging / is_parked: state flags
- is_dcfc / kwh_charged: charging station type (DC vs. AC) and the kWh in the current session
- soh: real battery SoH (Leopard 3)
What Is NOT Sent
- No GPS coordinates by default. ABRP runs as a separate Android app right on DiLink and reads its own location from the OS. When coordinates also come from BYDMate, the car on ABRP's map jumps between the two sources. The "Send coordinates to ABRP" setting is for one case: following the car in ABRP on a phone while ABRP in the car itself is not running. If ABRP is open in the car, leave it off.
- Also not sent: VIN, device ID, trip history, routes, user settings.
How ABRP Figures the Remaining Range
ABRP picks a forecast from its own model library plus telemetry: current SOC, battery temperature, driving speed, wind, road profile, elevation changes. BYDMate does not send its own "estimated range" to ABRP, ABRP has its own, more accurate estimate for the specific route, which also factors in weather and terrain.
Webhook: The Same Data to Your Own Server
The same JSON that goes to ABRP can be POSTed to your own address: Home Assistant, Node-RED, your own script on a VPS. Nothing is queued: if the server is unreachable, that sample is lost, and the next attempt comes a minute later.
Setup
- Settings → Integrations → the "Webhook: telemetry" block.
- URL:
https://only. Plainhttp://will not work (Android blocks unencrypted traffic, it is allowed only forlocalhost). If your server has no certificate, put Caddy or nginx with Let's Encrypt in front of it, or use a tunnel like Cloudflare Tunnel. - Secret (optional): a string sent in the
Authorization: Bearer <secret>header. It lets your server tell your car apart from someone else's requests. - "Send coordinates to the webhook": off by default. Turn it on only if the server is yours:
lat,lon,headingare added to the JSON. - Tap "Save webhook", then turn on the "Live data → your own server" toggle.
What Arrives
POST <your URL>, Content-Type: application/json, one sample in the body:
{"utc":1756040000,"soc":67,"speed":52.0,"power":18.4,"batt_temp":29.0,"ext_temp":24.5,
 "capacity":72.9,"odometer":12345.6,"cabin_temp":22.0,
 "tire_pressure_fl":2.5,"tire_pressure_fr":2.5,"tire_pressure_rl":2.4,"tire_pressure_rr":2.4,
 "is_charging":0,"is_parked":0,"soh":98.5,"car_model":"byd:leopard3"}
Fields and units follow the Iternio Telemetry API: utc in seconds, power in kW (as the car reports it), temperatures in °C, tire pressure in bar, odometer in km. Fields with no data (speed while parked, or kwh_charged outside a charging session, for example) are simply missing. Cadence: once a second while driving, every 8 seconds while charging, every 30 seconds while parked. The server's response is not read, only a 2xx status matters; after a failure the next attempt is 60 seconds later.
The webhook works independently of ABRP: you can turn on just the webhook, just ABRP, or both.
Home Assistant. The third-party integration byd-leopard3-ha-integration can receive this webhook and shows the car in Home Assistant. It is made by another author: we do not review or support its code, so please send questions about it to its author.
Build From Source
# Requires: JDK 17, Android SDK 34
git clone https://github.com/AndyShaman/BYDMate.git
cd BYDMate
./gradlew assembleDebug
Tech Stack
- Kotlin 2.1 + Jetpack Compose + Material 3
- Room (SQLite) + Hilt (DI) + OkHttp
- osmdroid (OpenStreetMap) + Coroutines/Flow
- Min SDK 29 / Target SDK 29 / Compile SDK 34
Troubleshooting
If something does not work, go through these steps, most of the time the first one solves it, and if not, you will help us find the cause fast.
1. Reboot the head unit. Press and hold the volume wheel until the screen reboots. Some features (split screen, for example) flip a system flag that only applies at boot, without a reboot the feature looks "broken" while everything is actually fine.
2. Record logs. Settings, "Service & Data" section, the "Record logs" button. Reproduce the problem (tap whatever does not work), then tap "Stop recording". A bydmate_logs_<date>.txt file appears in Download (recording stops on its own after 2 hours if you forget).
3. Save the fid catalog. Settings, "Service & Data" section, the "Save fid catalog" button. A fid-dump-<date>.txt file appears in Download. Different BYD models have different command catalogs, this file is how we adapt the app to your car.
4. Send it to us. Open a ticket in GitHub Issues and attach: your car model and DiLink generation, the BYDMate version, what you tapped and what you expected to see, and the files from steps 2-3.
Common cases:
- Split screen or projection to cluster does not work: reboot the head unit (step 1).
- A command runs but the car does not react (windows, sunroof, climate): your model most likely has a different command catalog, send logs and the fid catalog (steps 2-4).
- Something broke after an update: reboot the head unit; if that does not help, send logs.
- The "Test model" button is gray, or the reply is an error: the language model key was not saved, or the server does not answer, check it in Settings → Integrations → AI connections.
- The wheel button does not react: assign it again (Settings → Voice agent → "Assign button") and check that BYDMate's accessibility service has permission.
- The agent replies with text, not voice: turn on the "Speak agent replies" toggle and download a voice (the "Agent replies" section).
- The agent's voice is barely audible: it goes through the system Voice channel, its volume is set separately from the music, use the volume buttons during the reply or the car's sound settings.
- "Test model" passes, but the agent declines mid-conversation: send logs in an Issue and note which connection and which model are selected.
Credits
- BYD Trip Info (
org.jayb.bydapp) by jayb: the original DiLink trip app, an inspiration for BYDMate - DiPlus (迪加) by Van Design: the bridge app to vehicle data, used in early BYDMate versions (no longer needed since 3.0.0)
- Weather data by Open-Meteo.com
- @klimuts: pointed out the auto_container mechanism for projecting the navigator to the cluster
- @RBGboost: reverse-engineered the factory HUD's SOME/IP protocol and built the original YandexHUD implementation. Yandex Navigator guidance on the head-up display in BYDMate is his code and his achievement. You can thank him on Telegram: @RBGboost
- byd-turnsignal-cameraview by sunlixWhyNotAvailable: open research into the DiLink camera and window interfaces that the turn-signal blind-spot camera feature is built on. The BYDMate implementation is written from scratch, but this research saved weeks of reverse engineering, thank you!
- denza-lab by xor777 (MIT licence): the way to read the car modules' fault codes and parse their answers. The manual scan in the "Diagnostics" card is built on his research and code.
- danijar2000: fix for 2GIS's projection to the cluster (2GIS used to quit when its task moved to the cluster display)
Sponsor the Project
The project is non-commercial, built as a hobby. If you want to say thanks, the details are in SUPPORT.md. If not, thanks anyway for your trust.
License
PolyForm Noncommercial 1.0.0: source-available, noncommercial use only. See LICENSE for details.
Copyright (C) 2026 AndyShaman
Explore related projects
n8n-io/n8n
Fair-code workflow automation platform with native AI capabilities. Combine visual building with custom code, self-host or cloud, 400+ integrations.
209,932 starslanggenius/dify
Build Agentic workflows, RAG pipelines, with rich AI model and tool support on one collaborative workspace. Deploy on cloud, VPC, or self-hosted, so teams move from prototype to production without rebuilding the stack.
160,773 starsmicrosoft/PowerToys
Microsoft PowerToys is a collection of utilities that supercharge productivity and customization on Windows
140,755 starsstablyai/orca
Orca is the place for working with a fleet of agents (e.g. Grok Bot, Claude Code). Run any coding agent with your own subscription. Available on desktop, mobile and remote runtime.
120,376 stars