
qurit/rt-utils
qurit/rt-utils has 257 GitHub stars and 75 forks. Star changes are not measured yet. Last checked 2026-11-13 22:10 UTC. Last push 2026-11-13.
What you can do
- nifti to rtstruct conversion has been added.
- conversion from DICOM to NIFTI for PET and corresponding RT-struct file has been added as an example usage with no issues of shift or mismatch between the masks.
측정된 스타 증가
- in 24h
- 기록 수집 중
- in 7 days
- 기록 수집 중
- in 15 days
- 기록 수집 중
- in 1 month
- 기록 수집 중
서로 겹치는 기간의 순증가량이며 일별 합계가 아닙니다. 측정값이 없으면 비워 둡니다. 스타는 관심도를 나타내며 품질을 보장하지 않습니다.
소개
A minimal Python library to facilitate the creation and manipulation of DICOM RTStructs.
개발 도구README.md
Original
A minimal Python library for RT Struct manipulation


RT-Utils is motivated to allow physicians and other users to view the results of segmentation performed on a series of DICOM images. RT-Utils allows you to create or load RT Structs, extract 3d masks from RT Struct ROIs, easily add one or more regions of interest, and save the resulting RT Struct in just a few lines! You can also use the RT-Utils for merging two existing RT Structs to one file.
📖 Documentation
rt-utils.readthedocs.io: guides, concepts and the full API reference.
Worth reading before your first add_roi: Mask layout, which explains the (Rows, Columns, Slices) convention and what goes wrong when a mask comes from somewhere else. If something looks wrong already, start at Troubleshooting.
How it works
RT-Utils provides a builder class to faciliate the creation and loading of an RT Struct. From there, you can add ROIs through binary masks and optionally input the colour of the region along with the region name.
The format for the ROI mask is an nd numpy array of type bool. It is an array of 2d binary masks, one plane for each slice location within the DICOM series. The slices should be sorted in ascending order within the mask. Through these masks, we extract the contours of the regions of interest and place them within the RT Struct file. Note that there is currently only support for the use of one frame of reference UID and structered set ROI sequence. Also note that holes within the ROI may be handled poorly.
Mask layout
A mask is indexed (Rows, Columns, Slices):
| axis | index | runs |
|---|---|---|
| 0 | row | down a column, along ImageOrientationPatient[3:6] |
| 1 | column | along a row, along ImageOrientationPatient[0:3] |
| 2 | slice | through the series in ascending slice position |
The first two axes are ordered exactly as pydicom reads pixel_array, so a
mask produced by segmenting the series already has the right layout:
mask = np.stack([slice.pixel_array for slice in series], axis=-1) > threshold
Axis 2 follows the series sorted by spatial position, which is the order
RTStruct.series_data is in. That is not necessarily the order the files sit
in on disk, nor InstanceNumber order.
A mask from somewhere else may need rearranging first. A NIfTI volume carries
its own axis order and its own direction for each axis in its affine, and
neither is guaranteed to match the DICOM series; feeding one straight to
add_roi is what makes an ROI come back rotated, flipped or offset. Use the
converter below rather than guessing a transpose.
From NIfTI
nifti_to_mask reads the NIfTI affine and the series geometry and resamples
between them, so the result is correct for any orientation, spacing or storage
order:
from rt_utils import RTStructBuilder
from rt_utils.nifti import nifti_to_mask

rtstruct = RTStructBuilder.create_new(dicom_series_path=DICOM_SERIES_PATH)

mask = nifti_to_mask("segmentation.nii.gz", rtstruct.series_data)
rtstruct.add_roi(mask=mask, name="liver")

rtstruct.save('new-rt-struct')
Pass label= to pull one structure out of a multi-label segmentation, as
TotalSegmentator and similar tools produce:
mask = nifti_to_mask("segmentations.nii.gz", rtstruct.series_data, label=5)
Resampling uses nearest neighbour, so the result only ever contains values the input contained.
This needs SimpleITK, which is not installed by default:
pip install rt_utils[nifti]
No sequence of transpose, flipud or rot90 is a substitute. The correct
rearrangement is whatever the two affines say it is, and it differs from file
to file. That is why advice of that kind works for one dataset and fails on
the next.
Installation
pip install rt_utils
Installation in editable mode
git clone https://github.com/qurit/rt-utils.git
cd rt-utils
pip install -e .
Creating new RT Structs
from rt_utils import RTStructBuilder

# Create new RT Struct. Requires the DICOM series path for the RT Struct.
rtstruct = RTStructBuilder.create_new(dicom_series_path="./testlocation")

# ...
# Create mask through means such as ML
# ...

# Add the 3D mask as an ROI.
# The colour, description, and name will be auto generated
rtstruct.add_roi(mask=MASK_FROM_ML_MODEL)

# Add another ROI, this time setting the color, description, and name
rtstruct.add_roi(
  mask=MASK_FROM_ML_MODEL,
  color=[255, 0, 255],
  name="RT-Utils ROI!"
)

# Contours are traced along the outer voxel edges by default, so they enclose
# the area the mask occupies. To reproduce the contours written before 2.0.0,
# which pass through the centres of the boundary voxels:
rtstruct.add_roi(
  mask=MASK_FROM_ML_MODEL,
  name="Voxel-centre ROI",
  contour_mode="voxel_center"
)

rtstruct.save('new-rt-struct')
Adding an ROI from coordinates
If the geometry is already known in patient space, the contours can be given
directly instead of being derived from a mask. Each contour is a list of
[x, y, z] points in millimetres, and is attached to the slice nearest its own
position.
from rt_utils import RTStructBuilder

rtstruct = RTStructBuilder.create_new(dicom_series_path="./testlocation")

rtstruct.add_roi_from_coordinates(
  coordinates=[
    [
      # One contour, on one slice
      [-20.0, -170.0, -559.0],
      [30.0, -170.0, -559.0],
      [30.0, -110.0, -559.0],
      [-20.0, -110.0, -559.0],
    ],
    [
      # Another contour, on the next slice
      [-20.0, -170.0, -562.4],
      [30.0, -170.0, -562.4],
      [30.0, -110.0, -562.4],
      [-20.0, -110.0, -562.4],
    ],
  ],
  name="RT-Utils ROI from coordinates!",
)

rtstruct.save('new-rt-struct')
Adding to existing RT Structs
from rt_utils import RTStructBuilder
import matplotlib.pyplot as plt

# Load existing RT Struct. Requires the series path and existing RT Struct path
rtstruct = RTStructBuilder.create_from(
  dicom_series_path="./testlocation",
  rt_struct_path="./testlocation/rt-struct.dcm"
)

# Add ROI. This is the same as the above example.
rtstruct.add_roi(
  mask=MASK_FROM_ML_MODEL,
  color=[255, 0, 255],
  name="RT-Utils ROI!"
)

rtstruct.save('new-rt-struct')
Creation Results
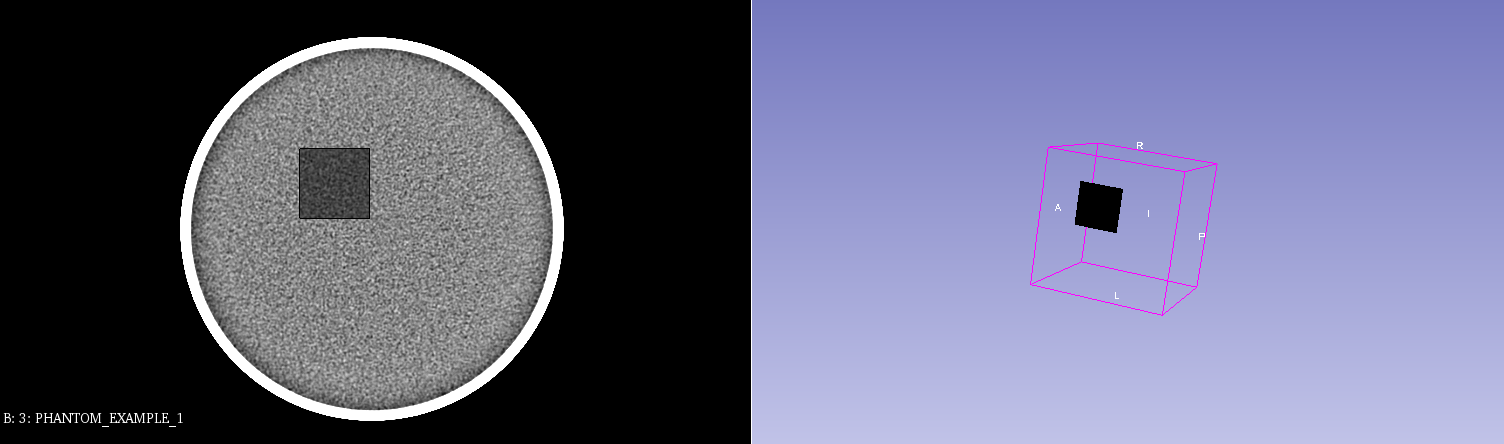
The results of a generated ROI with a dummy mask, as viewed in Slicer.
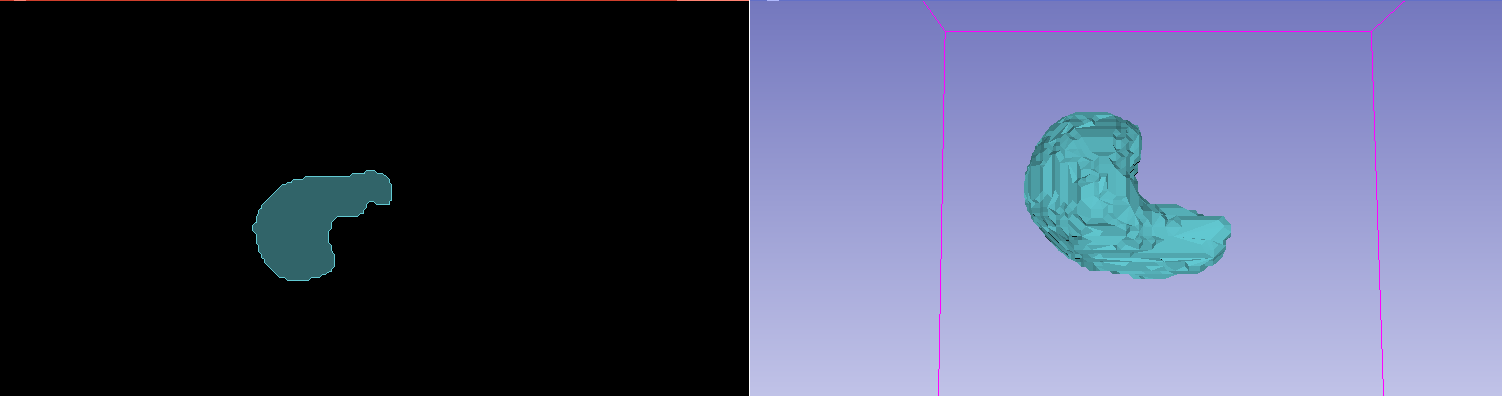
The results of a generated ROI with a liver segmentation model, as viewed in Slicer. (Note the underlying patient data has been hidden)
Loading an existing RT Struct contour as a mask
from rt_utils import RTStructBuilder
import matplotlib.pyplot as plt

# Load existing RT Struct. Requires the series path and existing RT Struct path
rtstruct = RTStructBuilder.create_from(
  dicom_series_path="./testlocation",
  rt_struct_path="./testlocation/rt-struct.dcm"
)

# View all of the ROI names from within the image
print(rtstruct.get_roi_names())

# Loading the 3D Mask from within the RT Struct
mask_3d = rtstruct.get_roi_mask_by_name("ROI NAME")

# Display one slice of the region
first_mask_slice = mask_3d[:, :, 0]
plt.imshow(first_mask_slice)
plt.show()
Loading Results
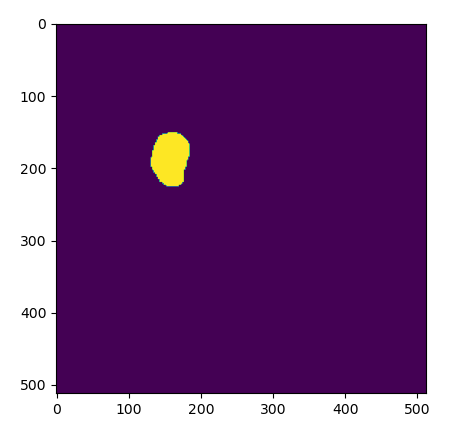
The results of a loading an exisiting ROI as a mask, as viewed in Python.
Merging two existing RT Structs
To be able to merge two RT Structs it is important that both RT Structs have to belong to the same image series, e.g. if there is one set for the organs at risk and one set for the target volume(s).
from rt_utils import RTStructMerger

# Load existing RT Structs and corresponding image series and merge them into one RTStruct
merged_rt_struct = RTStructMerger.merge_rtstructs(
  dicom_series_path="./testlocation",
  rt_struct_path1="./testlocation/rt-struct1.dcm",
  rt_struct_path2="./testlocation/rt-struct2.dcm"
  )
merged_rt_struct.save('merged-rt-struct')
Additional Parameters
The add_roi method of our RTStruct class has a multitude of optional parameters available. Below is a comprehensive list of all these parameters and what they do.
- color: This parameter can either be a colour string such as '#ffffff' or a RGB value as a list such as '[255, 255, 255]'. This parameter will dictate the colour of your ROI when viewed in a viewing program. If no colour is provided, RT Utils will pick from our internal colour palette based on the ROI Number of the ROI.
- name: A str value that defaults to none. Used to set the name of the ROI within the RT Struct. If the name is none, RT Utils will set a name of ROI-{ROI Number}.
- description: A str value that sets the description of the ROI within the RT Struct. If no value is provided, the description is just left blank.
- use_pin_hole: A boolean value that defaults to false. If set to true, lines will be erased through your mask such that each separate region within your image can be encapsulated via a single contour instead of contours nested within one another. Use this if your RT Struct viewer of choice does not support nested contours / contours with holes.
- approximate_contours: A boolean value that defaults to True which defines whether or not approximations are made when extracting contours from the input mask. Setting this to false will lead to much larger contour data within your RT Struct so only use this if as much precision as possible is required.
- roi_generation_algorithm: An enum value that defaults to 0 which defines what ROI generation algorithm will be used. 0='AUTOMATIC', 1='SEMIAUTOMATIC', or 2='MANUAL'.
🚀 New features
- nifti to rtstruct conversion has been added.
- conversion from DICOM to NIFTI for PET and corresponding RT-struct file has been added as an example usage with no issues of shift or mismatch between the masks.
Examples
You can find the comparison between RT-utils and other conversion techniques in this public repository: https://github.com/qurit/dicom_nifti_conversion_project.
The real-world example in the JOSS paper under review was generated using the code provided in the RTUTILS_read_world_example_for_PET.ipynb.
Contributing
We welcome contributions to this project! Please review our CONTRIBUTING guidelines for more details.
How to Cite
If you are incorporating RT-Utils into your projects, kindly include the following citation:

For citation please use: Shrestha, A., A. Watkins, F. Yousefirizi, A. Rahmim, C. Uribe, "RT-utils: A minimal python library for RT-struct manipulation." Journal of Open Source Software, Vol. 10 (No. 107), pp. 7361, (2025). doi:10.21105/joss.07361.
Read the full paper: Asim Shrestha, Adam Watkins, Fereshteh Yousefirizi, Arman Rahmim, and Carlos Uribe RT-utils: A Minimal Python Library for RT-struct Manipulation