
AgibotTech/agibot_x1_train
AgibotTech/agibot_x1_train has 1,702 GitHub stars and 508 forks. GitHot measured 0 in 7 days. Last checked 2026-11-10 01:13 UTC. Last push 2024-10-23.
The reinforcement learning training code for AgiBot X1.
측정된 스타 증가
- in 24h
- 업데이트 지연
- in 7 days
- 0
- in 15 days
- 업데이트 지연
- in 1 month
- 업데이트 지연
서로 겹치는 기간의 순증가량이며 일별 합계가 아닙니다. 측정값이 없으면 비워 둡니다. 스타는 관심도를 나타내며 품질을 보장하지 않습니다.
README.md
OriginalEnglish | 中文
Introduction
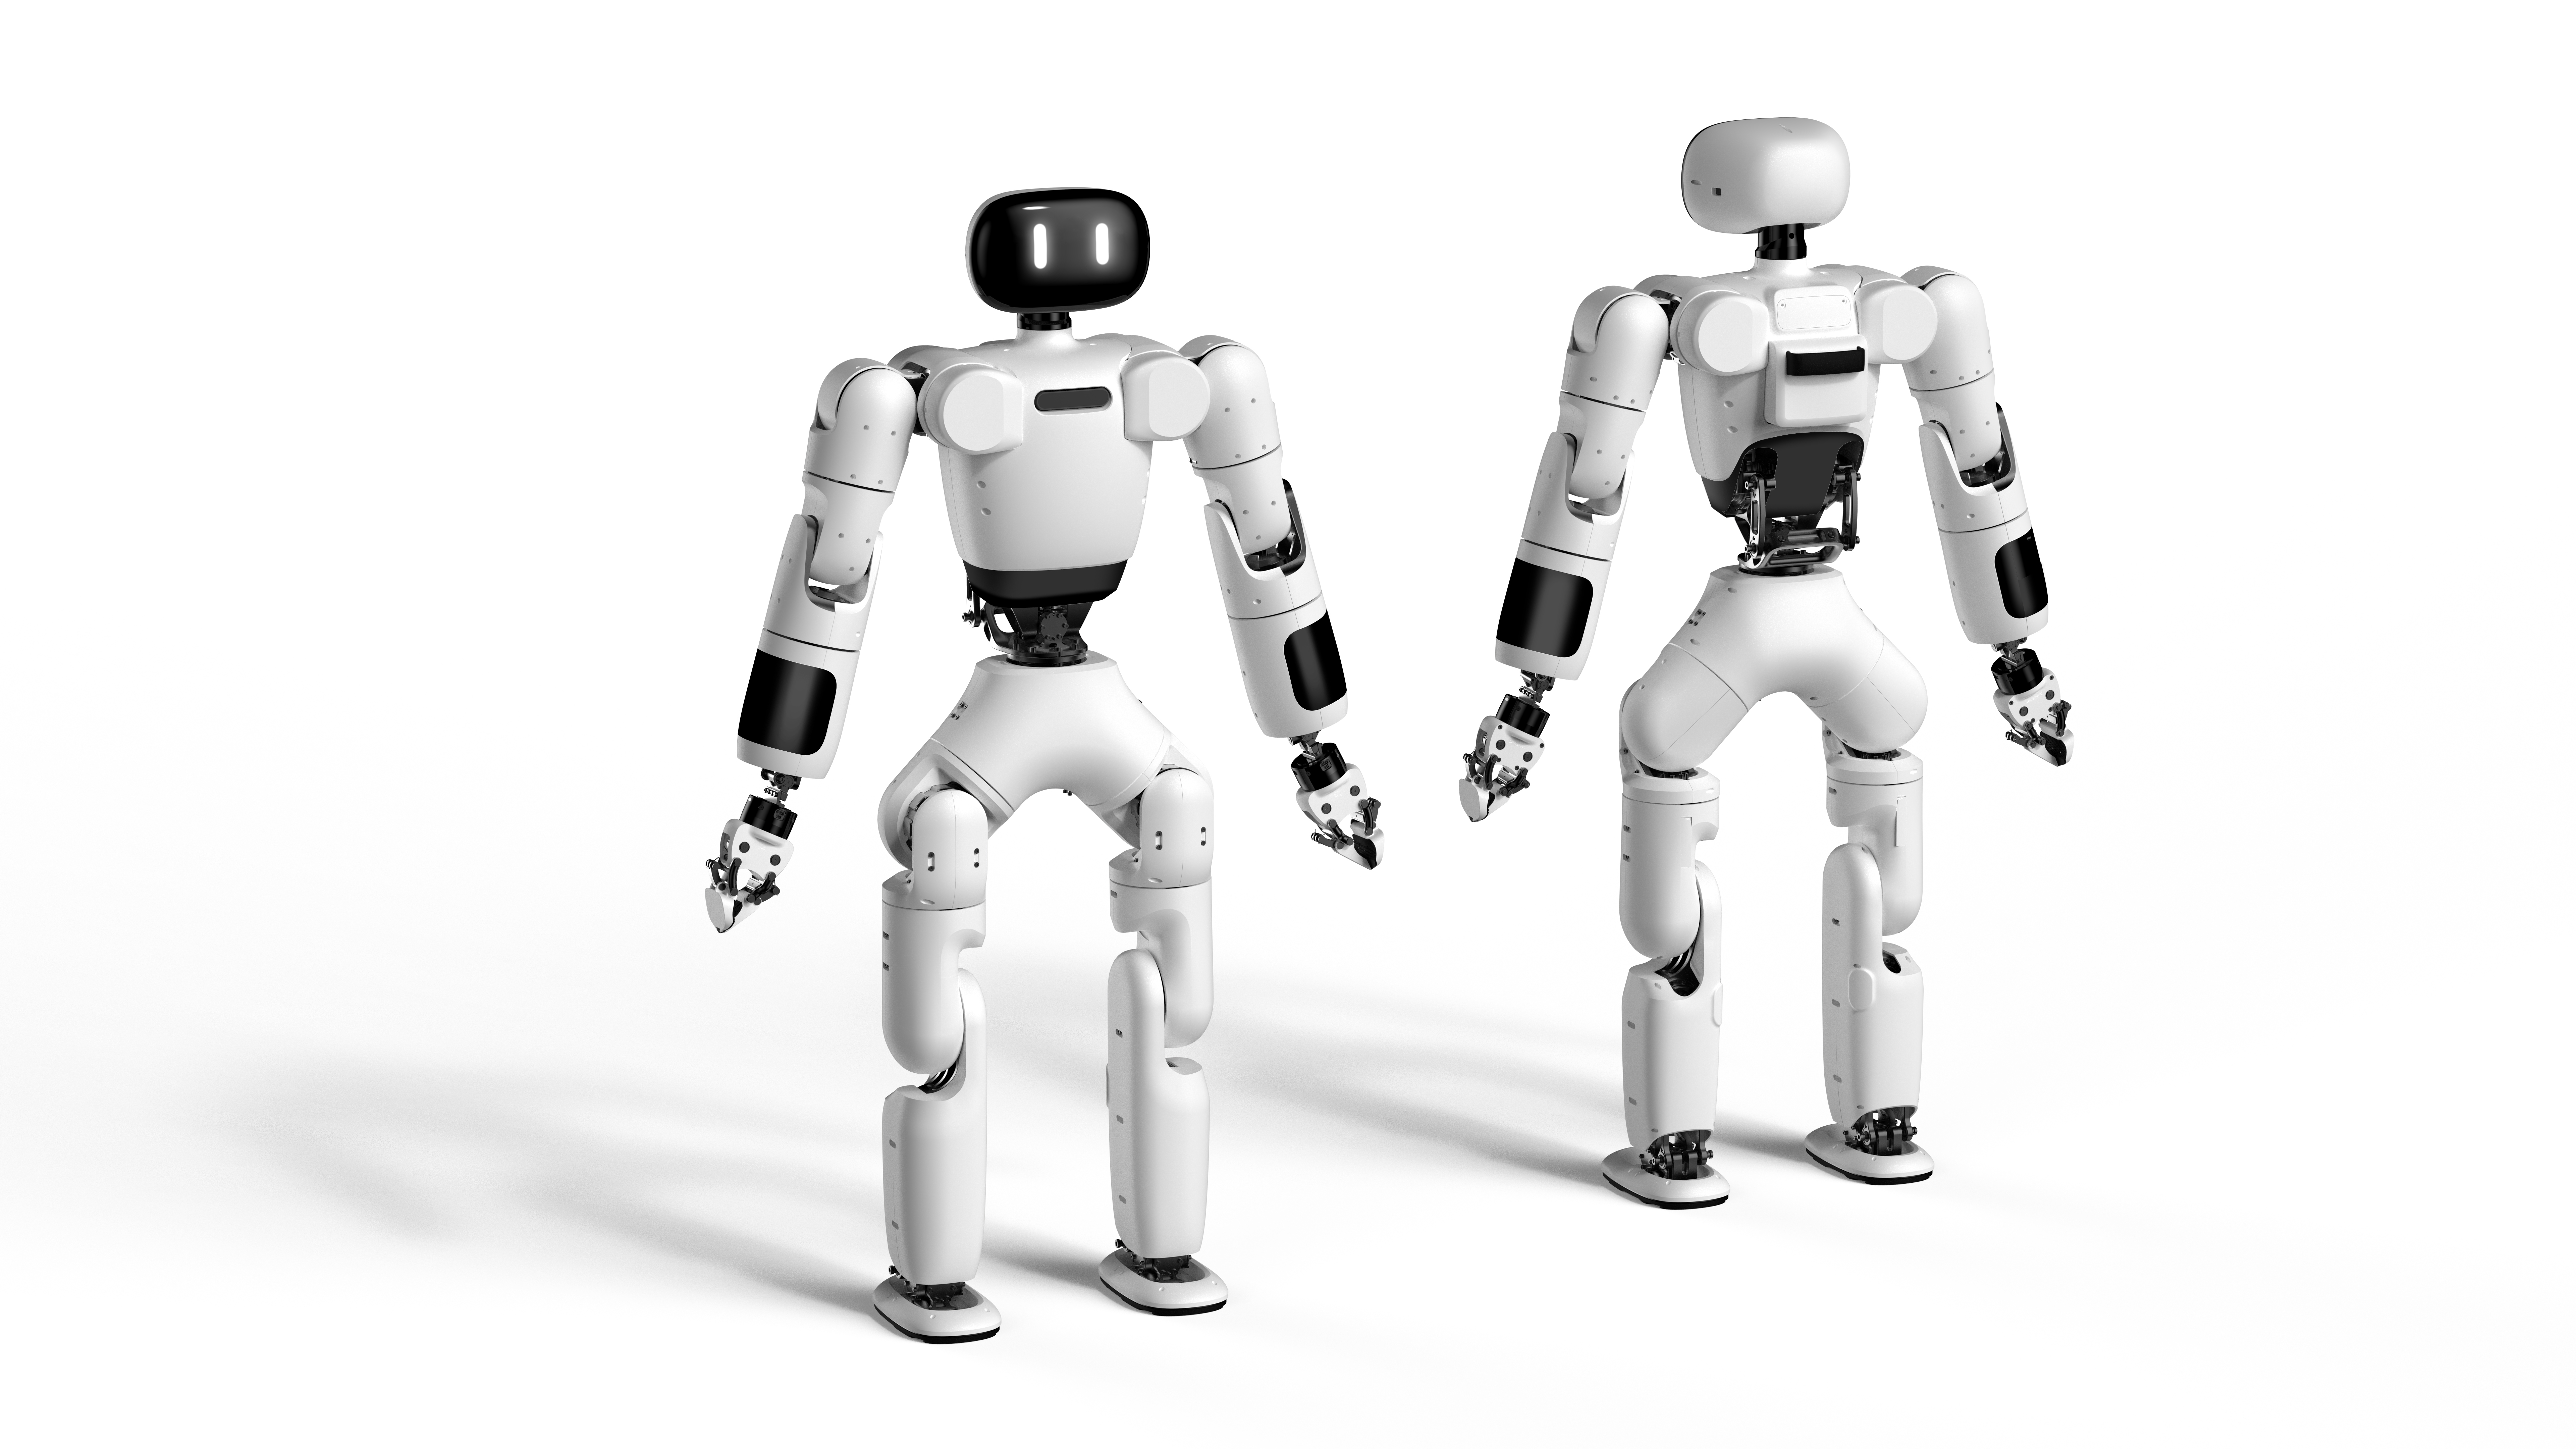
AgiBot X1 is a modular humanoid robot with high dof developed and open-sourced by AgiBot. It is built upon AgiBot's open-source framework AimRT as middleware and using reinforcement learning for locomotion control.
This project is about the reinforcement learning training code used by AgiBot X1. It can be used in conjunction with the inference software provided with AgiBot X1 for real-robot and simulated walking debugging, or be imported to other robot models for training.
Start
Install Dependencies
- Create a new Python 3.8 virtual environment:
conda create -n myenv python=3.8.
- Install pytorch 1.13 and cuda-11.7:
conda install pytorch==1.13.1 torchvision==0.14.1 torchaudio==0.13.1 pytorch-cuda=11.7 -c pytorch -c nvidia
- Install numpy-1.23:
conda install numpy=1.23.
- Install Isaac Gym:
- Download and install Isaac Gym Preview 4 from https://developer.nvidia.com/isaac-gym.
cd isaacgym/python && pip install -e .- Run an example with
cd examples && python 1080_balls_of_solitude.py. - Consult
isaacgym/docs/index.htmlfor troubleshooting.
- Install the training code dependencies:
- Clone this repository.
pip install -e .
Usage
Train:
python scripts/train.py --task=x1_dh_stand --run_name=<run_name> --headless
- The trained model will be saved in
/log/<experiment_name>/exported_data/<date_time><run_name>/model_<iteration>.pt, where<experiment_name>is defined in the config file.
Play:
python /scripts/play.py --task=x1_dh_stand --load_run=<date_time><run_name>
Generate the JIT Model:
python scripts/export_policy_dh.py --task=x1_dh_stand --load_run=<date_time><run_name>
- The JIT model will be saved in
log/exported_policies/<date_time>
Generate the ONNX Model:
python scripts/export_onnx_dh.py --task=x1_dh_stand --load_run=<date_time>
- The ONNX model will be saved at
log/exported_policies/<date_time>
Parameter Descriptions:
- task: Task name
- resume: Resume training from a checkpoint
- experiment_name: Name of the experiment to run or load.
- run_name: Name of the run.
- load_run: Name of the run to load when resume=True. If -1: will load the last run.
- checkpoint: Saved model checkpoint number. If -1: will load the last checkpoint.
- num_envs: Number of environments to create.
- seed: Random seed.
- max_iterations: Maximum number of training iterations.
Add New Environments
Create a new folder under the
envs/directory, and then create a configuration file<your_env>_config.pyand an environment file<your_env>_env.pyin the folder. The two files should inheritLeggedRobotCfgandLeggedRobotrespectively.Place the URDF, mesh, and MJCF files of the new robot in the
resources/folder.
- Configure the URDF path, PD gain, body name, default_joint_angles, experiment_name, etc., for the new robot in
<your_env>_config.py.
- Register the new robot in
humanoid/envs/__init__.py.
sim2sim
Use Mujoco for sim2sim validation:
python scripts/sim2sim.py --task=x1_dh_stand --load_model /path/to/exported_policies/
Usage of Joystick
We use the Logitech F710 Joystick. When starting play.py and sim2sim.py, press and hold button 4 while rotating the joystick to control the robot to move forward/backward, strafe left/right or rotate.
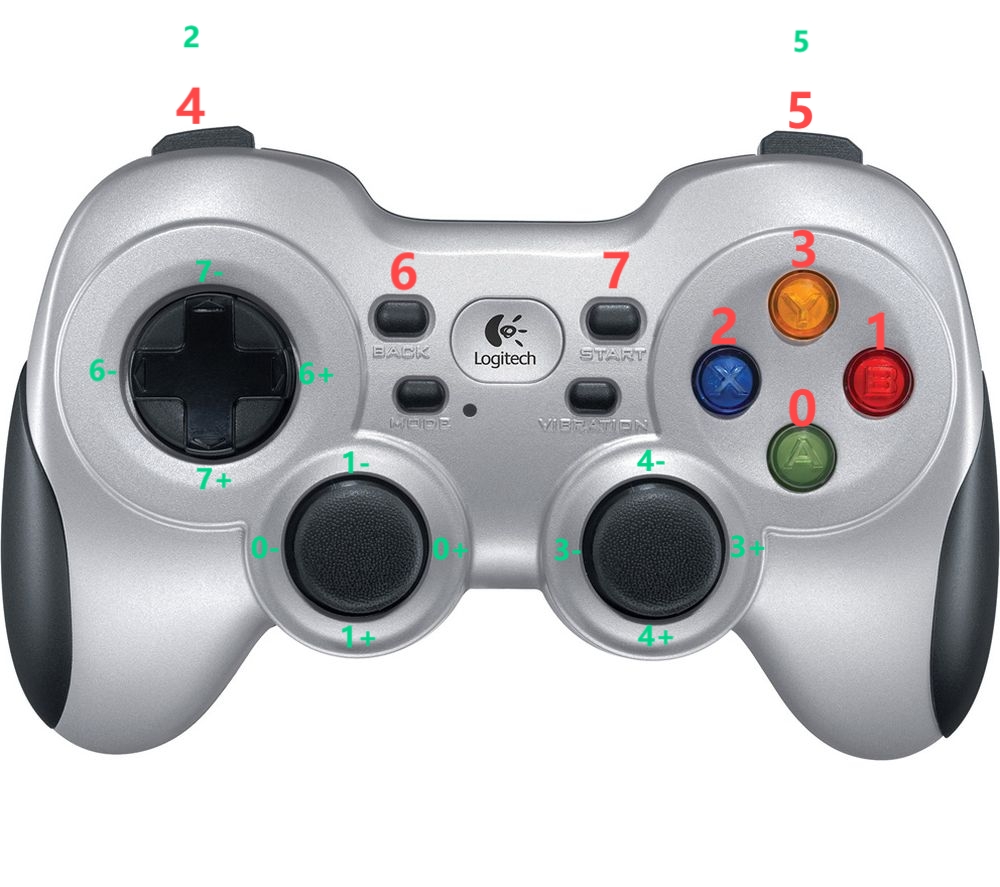
| Button | Command |
|---|---|
| 4 + 1- | Move forward |
| 4 + 1+ | Move backward |
| 4 + 0- | Strafe left |
| 4 + 0+ | Strafe right |
| 4 + 3- | Rotate counterclockwise |
| 4 + 3+ | Rotate clockwise |
Directory Structure
.
|— humanoid           # Main code directory
|  |—algo             # Algorithm directory
|  |—envs             # Environment directory
|  |—scripts          # Script directory
|  |—utilis           # Utility and function directory
|— logs               # Model directory
|— resources          # Resource library
|  |— robots          # Robot urdf, mjcf, mesh
|— README.md          # README document
References
- GitHub - leggedrobotics/legged_gym: Isaac Gym Environments for Legged Robots
- GitHub - leggedrobotics/rsl_rl: Fast and simple implementation of RL algorithms, designed to run fully on GPU.
- GitHub - roboterax/humanoid-gym: Humanoid-Gym: Reinforcement Learning for Humanoid Robot with Zero-Shot Sim2Real Transfer https://arxiv.org/abs/2404.05695
관련 프로젝트 살펴보기
sindresorhus/awesome
😎 온갖 흥미로운 주제에 관한 Awesome 목록 [참고: 기존 풀 리퀘스트를 따라잡을 여유가 생길 때까지 풀 리퀘스트가 일시적으로 비활성화되어 있습니다]
535,184 스타EbookFoundation/free-programming-books
:books: 무료로 이용할 수 있는 프로그래밍 도서
401,474 스타nilbuild/developer-roadmap
개발자의 커리어 성장을 돕는 인터랙티브 로드맵, 가이드 및 기타 교육 콘텐츠.
371,806 스타vinta/awesome-python
“Python으로 X를 하고 싶은데, 어떤 도구를 써야 할까?”에 답하는 결정판 목록.
334,006 스타