
openai/CLIP has 34,573 GitHub stars and 4,062 forks. GitHot measured +7 stars in 24 hours. Last checked 2026-11-05 20:09 UTC. Last push 2026-03-25.
CLIP(Contrastive Language-Image Pretraining):画像に基づいて最も関連性の高いテキストを予測
計測したスター増加
- 24時間
- +7
- 7日間
- 履歴を収集中
- 15日間
- 履歴を収集中
- 1か月
- 履歴を収集中
期間ごとの純増数です。期間は重複しており、日別の値ではありません。未計測の値は空欄です。スター数は注目度の指標であり、品質の保証ではありません。
README.md
オリジナルCLIP
[Blog] [Paper] [Model Card] [Colab]
CLIP (Contrastive Language-Image Pre-Training) is a neural network trained on a variety of (image, text) pairs. It can be instructed in natural language to predict the most relevant text snippet, given an image, without directly optimizing for the task, similarly to the zero-shot capabilities of GPT-2 and 3. We found CLIP matches the performance of the original ResNet50 on ImageNet “zero-shot” without using any of the original 1.28M labeled examples, overcoming several major challenges in computer vision.
Approach
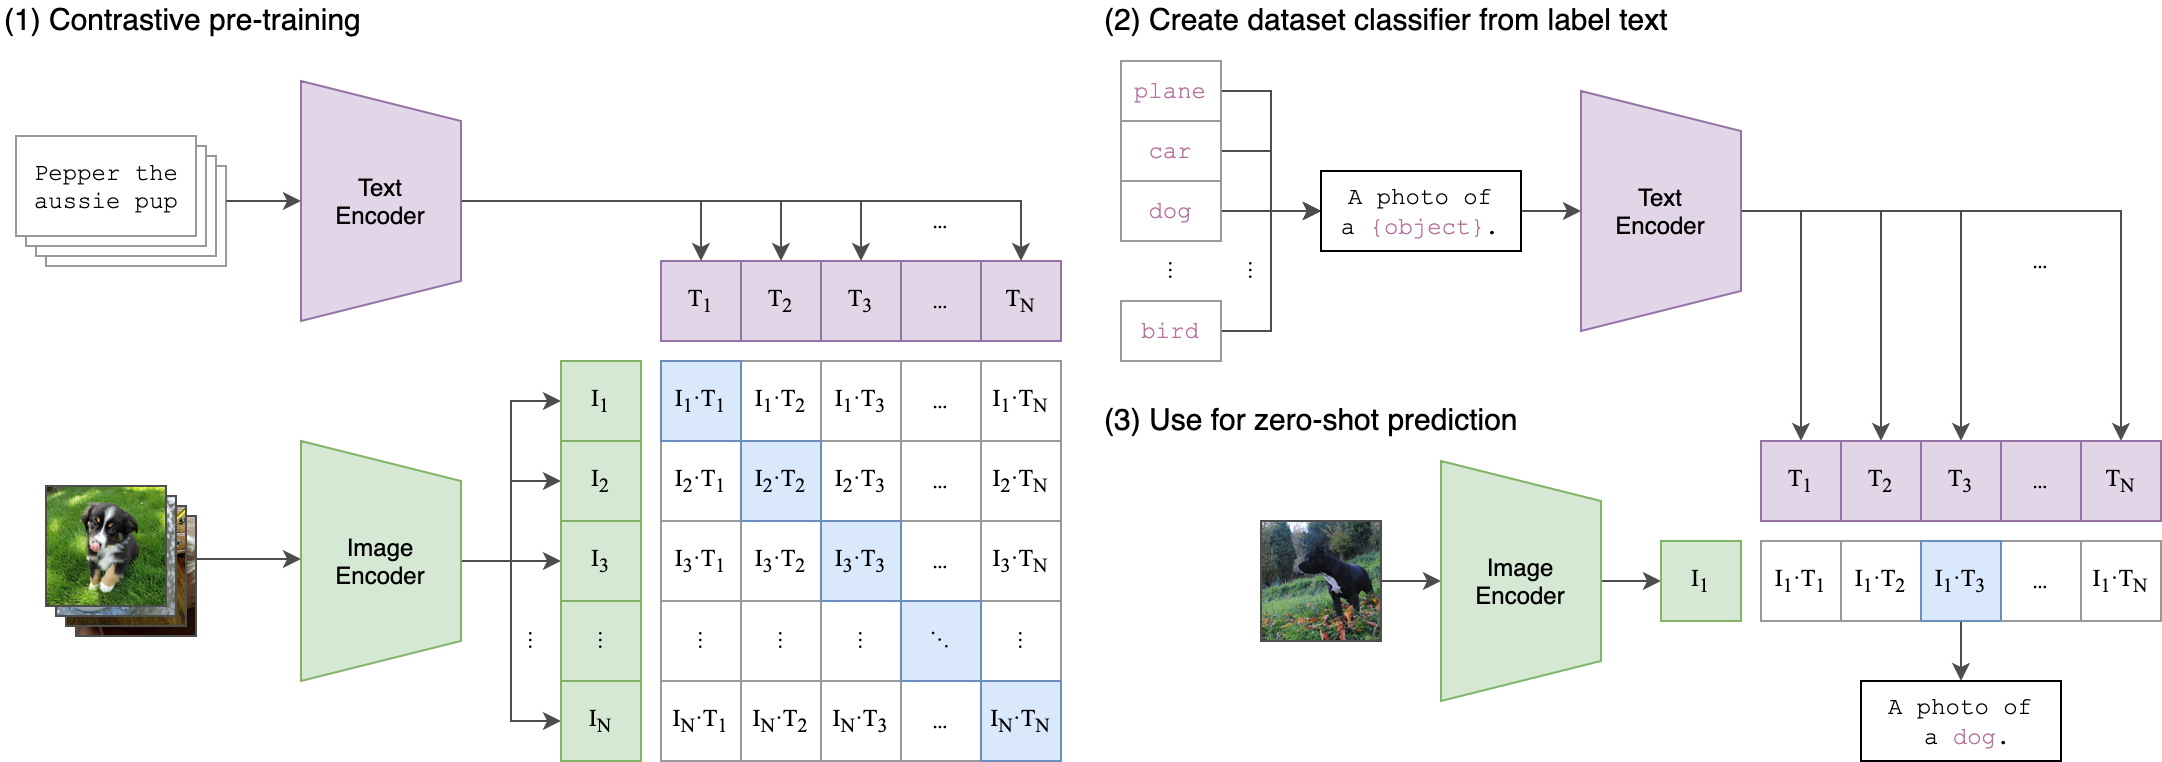
Usage
First, install PyTorch 1.7.1 (or later) and torchvision, as well as small additional dependencies, and then install this repo as a Python package. On a CUDA GPU machine, the following will do the trick:
$ conda install --yes -c pytorch pytorch=1.7.1 torchvision cudatoolkit=11.0
$ pip install ftfy regex tqdm
$ pip install git+https://github.com/openai/CLIP.git
Replace cudatoolkit=11.0 above with the appropriate CUDA version on your machine or cpuonly when installing on a machine without a GPU.
import torch
import clip
from PIL import Image

device = "cuda" if torch.cuda.is_available() else "cpu"
model, preprocess = clip.load("ViT-B/32", device=device)

image = preprocess(Image.open("CLIP.png")).unsqueeze(0).to(device)
text = clip.tokenize(["a diagram", "a dog", "a cat"]).to(device)

with torch.no_grad():
    image_features = model.encode_image(image)
    text_features = model.encode_text(text)

    logits_per_image, logits_per_text = model(image, text)
    probs = logits_per_image.softmax(dim=-1).cpu().numpy()

print("Label probs:", probs)  # prints: [[0.9927937  0.00421068 0.00299572]]
API
The CLIP module clip provides the following methods:
clip.available_models()
Returns the names of the available CLIP models.
clip.load(name, device=..., jit=False)
Returns the model and the TorchVision transform needed by the model, specified by the model name returned by clip.available_models(). It will download the model as necessary. The name argument can also be a path to a local checkpoint.
The device to run the model can be optionally specified, and the default is to use the first CUDA device if there is any, otherwise the CPU. When jit is False, a non-JIT version of the model will be loaded.
clip.tokenize(text: Union[str, List[str]], context_length=77)
Returns a LongTensor containing tokenized sequences of given text input(s). This can be used as the input to the model
The model returned by clip.load() supports the following methods:
model.encode_image(image: Tensor)
Given a batch of images, returns the image features encoded by the vision portion of the CLIP model.
model.encode_text(text: Tensor)
Given a batch of text tokens, returns the text features encoded by the language portion of the CLIP model.
model(image: Tensor, text: Tensor)
Given a batch of images and a batch of text tokens, returns two Tensors, containing the logit scores corresponding to each image and text input. The values are cosine similarities between the corresponding image and text features, times 100.
More Examples
Zero-Shot Prediction
The code below performs zero-shot prediction using CLIP, as shown in Appendix B in the paper. This example takes an image from the CIFAR-100 dataset, and predicts the most likely labels among the 100 textual labels from the dataset.
import os
import clip
import torch
from torchvision.datasets import CIFAR100

# Load the model
device = "cuda" if torch.cuda.is_available() else "cpu"
model, preprocess = clip.load('ViT-B/32', device)

# Download the dataset
cifar100 = CIFAR100(root=os.path.expanduser("~/.cache"), download=True, train=False)

# Prepare the inputs
image, class_id = cifar100[3637]
image_input = preprocess(image).unsqueeze(0).to(device)
text_inputs = torch.cat([clip.tokenize(f"a photo of a {c}") for c in cifar100.classes]).to(device)

# Calculate features
with torch.no_grad():
    image_features = model.encode_image(image_input)
    text_features = model.encode_text(text_inputs)

# Pick the top 5 most similar labels for the image
image_features /= image_features.norm(dim=-1, keepdim=True)
text_features /= text_features.norm(dim=-1, keepdim=True)
similarity = (100.0 * image_features @ text_features.T).softmax(dim=-1)
values, indices = similarity[0].topk(5)

# Print the result
print("\nTop predictions:\n")
for value, index in zip(values, indices):
    print(f"{cifar100.classes[index]:>16s}: {100 * value.item():.2f}%")
The output will look like the following (the exact numbers may be slightly different depending on the compute device):
Top predictions:

           snake: 65.31%
          turtle: 12.29%
    sweet_pepper: 3.83%
          lizard: 1.88%
       crocodile: 1.75%
Note that this example uses the encode_image() and encode_text() methods that return the encoded features of given inputs.
Linear-probe evaluation
The example below uses scikit-learn to perform logistic regression on image features.
import os
import clip
import torch

import numpy as np
from sklearn.linear_model import LogisticRegression
from torch.utils.data import DataLoader
from torchvision.datasets import CIFAR100
from tqdm import tqdm

# Load the model
device = "cuda" if torch.cuda.is_available() else "cpu"
model, preprocess = clip.load('ViT-B/32', device)

# Load the dataset
root = os.path.expanduser("~/.cache")
train = CIFAR100(root, download=True, train=True, transform=preprocess)
test = CIFAR100(root, download=True, train=False, transform=preprocess)


def get_features(dataset):
    all_features = []
    all_labels = []

    with torch.no_grad():
        for images, labels in tqdm(DataLoader(dataset, batch_size=100)):
            features = model.encode_image(images.to(device))

            all_features.append(features)
            all_labels.append(labels)

    return torch.cat(all_features).cpu().numpy(), torch.cat(all_labels).cpu().numpy()

# Calculate the image features
train_features, train_labels = get_features(train)
test_features, test_labels = get_features(test)

# Perform logistic regression
classifier = LogisticRegression(random_state=0, C=0.316, max_iter=1000, verbose=1)
classifier.fit(train_features, train_labels)

# Evaluate using the logistic regression classifier
predictions = classifier.predict(test_features)
accuracy = np.mean((test_labels == predictions).astype(float)) * 100.
print(f"Accuracy = {accuracy:.3f}")
Note that the C value should be determined via a hyperparameter sweep using a validation split.
See Also
- OpenCLIP: includes larger and independently trained CLIP models up to ViT-G/14
- Hugging Face implementation of CLIP: for easier integration with the HF ecosystem
関連プロジェクトを探す
tensorflow/tensorflow
すべての人のためのオープンソース機械学習フレームワーク
201,314 スターhuggingface/transformers
🤗 Transformers:テキスト、ビジョン、音声、マルチモーダルの最先端機械学習モデル向けモデル定義フレームワークで、推論と学習の両方に対応します。
168,559 スターAUTOMATIC1111/stable-diffusion-webui
Stable Diffusion の Web UI
165,250 スターComfy-Org/ComfyUI
グラフとノードによるインターフェースを備えた、最も強力でモジュール性の高い拡散モデル向け GUI、API、バックエンド。世界最速のローカル推論エンジン。
145,137 スター