
tatsy/torchmcubes
tatsy/torchmcubes has 231 GitHub stars and 58 forks. GitHot measured 0 stars in 24 hours. Last checked 2026-11-21 10:52 UTC. Last push 2026-10-19.
Progression mesurée des étoiles
- in 24h
- 0
- in 7 days
- Historique en cours
- in 15 days
- Historique en cours
- in 1 month
- Historique en cours
Variations nettes sur des périodes qui se chevauchent, pas des totaux quotidiens. Les mesures absentes restent vides. Les étoiles indiquent l’intérêt, pas la qualité.
À propos
Marching cubes implementation for PyTorch environment.
Apprentissage automatiqueREADME.md
Originaltorchmcubes: marching cubes for PyTorch

Marching cubes for PyTorch environment. Backend is implemented with C++ and CUDA.
Install
Requirements
- Python (3.9 or later)
- PyTorch
- C++20 compiler (GCC 10+, Clang 12+, or Visual Studio 2019 16.11+), required by recent PyTorch headers
- CUDA Toolkit 12 or later (optional, only for GPU support; nvcc needs CUDA 12 for C++20)
- Without a CUDA toolkit a CPU-only build is produced. CUDA tensors are then processed on the CPU with a warning. ROCm/HIP is not supported.
- CMake (3.24 or later)
Make sure that you have nvcc CUDA compiler with the following command.
nvcc --version
If you have CUDA installed but not able to run nvcc, you might need to add it to your path:
export CUDA_HOME=/usr/local/cuda/
export PATH=$CUDA_HOME/bin:$PATH
Pip installation
torchmcubes is compiled against the PyTorch installed in your environment. Install PyTorch first, then install the build dependencies and torchmcubes without build isolation.
# 1. Install PyTorch (if you need GPU support, choose the correct CUDA version)
pip install torch

# 2. Install build dependencies
pip install scikit-build-core pybind11

# 3. Build and install torchmcubes against the PyTorch installed above
pip install --no-build-isolation git+https://github.com/tatsy/torchmcubes.git
To build from a local checkout, run pip install --no-build-isolation . in the repository root instead of the last command.
Usage
See mcubes.py for more details (the example additionally needs numpy and matplotlib).
import time
import numpy as np

import torch
from torchmcubes import marching_cubes, grid_interp

# Grid data
N = 128
xs = np.linspace(-1.0, 1.0, N, endpoint=True, dtype="float32")
ys = np.linspace(-1.0, 1.0, N, endpoint=True, dtype="float32")
zs = np.linspace(-1.0, 1.0, N, endpoint=True, dtype="float32")
zs, ys, xs = np.meshgrid(zs, ys, xs)

# Implicit function (metaball)
f0 = (xs - 0.35)**2 + (ys - 0.35)**2 + (zs - 0.35)**2
f1 = (xs + 0.35)**2 + (ys + 0.35)**2 + (zs + 0.35)**2
u = 4.0 / (f0 + 1.0e-6) + 4.0 / (f1 + 1.0e-6)

rgb = np.stack((xs, ys, zs), axis=-1) * 0.5 + 0.5
rgb = np.transpose(rgb, axes=(3, 2, 1, 0))
rgb = np.ascontiguousarray(rgb)

# Test
u = torch.from_numpy(u)
rgb = torch.from_numpy(rgb)
u = u.cuda()
rgb = rgb.cuda()

t_start = time.time()
verts, faces = marching_cubes(u, 15.0)
colors = grid_interp(rgb, verts)
t_end = time.time()
print(f"verts: {verts.size(0)}, faces: {faces.size(0)}, time: {t_end - t_start:.2f}s")

verts = verts.detach().cpu().numpy()
faces = faces.detach().cpu().numpy()
colors = colors.detach().cpu().numpy()
verts = (verts / (N - 1)) * 2.0 - 1.0  # Get back to the original space
visualize(verts, faces, colors)
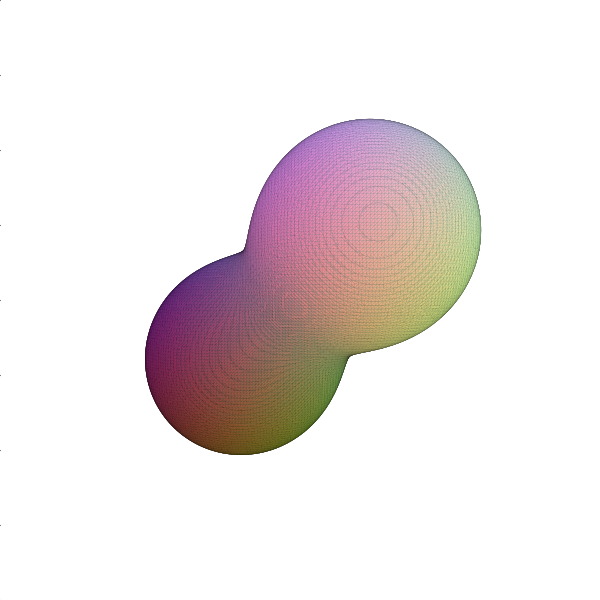
Screen shot
Copyright
Mozilla Public License 2.0, 2019-2026 (c) Tatsuya Yatagawa