
watsonyanghx/CNN_LSTM_CTC_Tensorflow
watsonyanghx/CNN_LSTM_CTC_Tensorflow has 368 GitHub stars and 202 forks. GitHot measured 0 stars in 24 hours. Last checked 2026-11-21 22:56 UTC. Last push 2018-04-24.
Crecimiento de estrellas medido
- in 24h
- 0
- in 7 days
- Recopilando historial
- in 15 days
- Recopilando historial
- in 1 month
- Recopilando historial
Cambios netos en períodos que se solapan, no totales diarios. Los datos no disponibles se dejan en blanco. Las estrellas indican interés, no calidad.
Acerca de
CNN+LSTM+CTC based OCR implemented using tensorflow.
Aprendizaje automáticoREADME.md
OriginalCNN_LSTM_CTC_Tensorflow
CNN+LSTM+CTC based OCR(Optical Character Recognition) implemented using tensorflow.
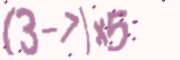
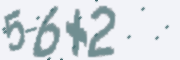
Note: there is No restriction on the number of characters in the image (variable length). Have a look at the image bellow.
I trained a model with 100k images using this code and got 99.75% accuracy on test dataset (200k images) in the competition. The images in both dataset:
Update 2017.11.6:
The competiton page is not available now, if you want to reproduce this result, please see this issue about dataset, the lable file (a .txt file) is in the same folder with images after extracting .tar.gz file.
Update 2018.4.24:
Update to tensorflow 1.7 and fix some bugs reported at issue #8.
Structure
The images are first processed by a CNN to extract features, then these extracted features are fed into a LSTM for character recognition.
The architecture of CNN is just Convolution + Batch Normalization + Leaky Relu + Max Pooling for simplicity, and the LSTM is a 2 layers stacked LSTM, you can also try out Bidirectional LSTM.
You can play with the network architecture (add dropout to CNN, stacked layers of LSTM etc.) and see what will happen. Have a look at CNN part and LSTM part.
Prerequisite
Python 3.6.4
TensorFlow 1.2
Opencv3 (Not a must, used to read images).
How to run
There are many other parameters with which you can play, have a look at utils.py.
Note that the num_classes is not added to parameters talked above for clarification.
# cd to the your workspace.
# The code will evaluate the accuracy every validation_steps specified in parameters.

ls -R
  .:
  imgs  utils.py  helper.py  main.py  cnn_lstm_otc_ocr.py

  ./imgs:
  train  infer  val  labels.txt

  ./imgs/train:
  1.png  2.png  ...  50000.png

  ./imgs/val:
  1.png  2.png  ...  50000.png

  ./imgs/infer:
  1.png  2.png  ...  300000.png


# Train the model.
CUDA_VISIBLE_DEVICES=0 python ./main.py --train_dir=../imgs/train/ \
  --val_dir=../imgs/val/ \
  --image_height=60 \
  --image_width=180 \
  --image_channel=1 \
  --out_channels=64 \
  --num_hidden=128 \
  --batch_size=128 \
  --log_dir=./log/train \
  --num_gpus=1 \
  --mode=train

# Inference
CUDA_VISIBLE_DEVICES=0 python ./main.py --infer_dir=./imgs/infer/ \
  --checkpoint_dir=./checkpoint/ \
  --num_gpus=0 \
  --mode=infer
Run with your own data.
- Prepare your data, make sure that all images are named in format:
id_label.jpg, e.g:004_(1+4)*2.jpg.
# make sure the data path is correct, have a look at helper.py.

python helper.py
- Run following How to run
Explorar proyectos relacionados
Cargando…