
datitran/face2face-demo
datitran/face2face-demo has 1,462 GitHub stars and 407 forks. GitHot measured 0 stars in 24 hours, +1 in 7 days, and +1 in 15 days. Last checked 2026-11-22 15:05 UTC. Last push 2023-10-10.
Crecimiento de estrellas medido
- in 24h
- 0
- in 7 days
- +1
- in 15 days
- +1
- in 1 month
- Recopilando historial
Cambios netos en períodos que se solapan, no totales diarios. Los datos no disponibles se dejan en blanco. Las estrellas indican interés, no calidad.
Acerca de
Demo de pix2pix que aprende de puntos de referencia faciales y los transforma en un rostro
Aprendizaje automáticoREADME.md
Originalface2face-demo
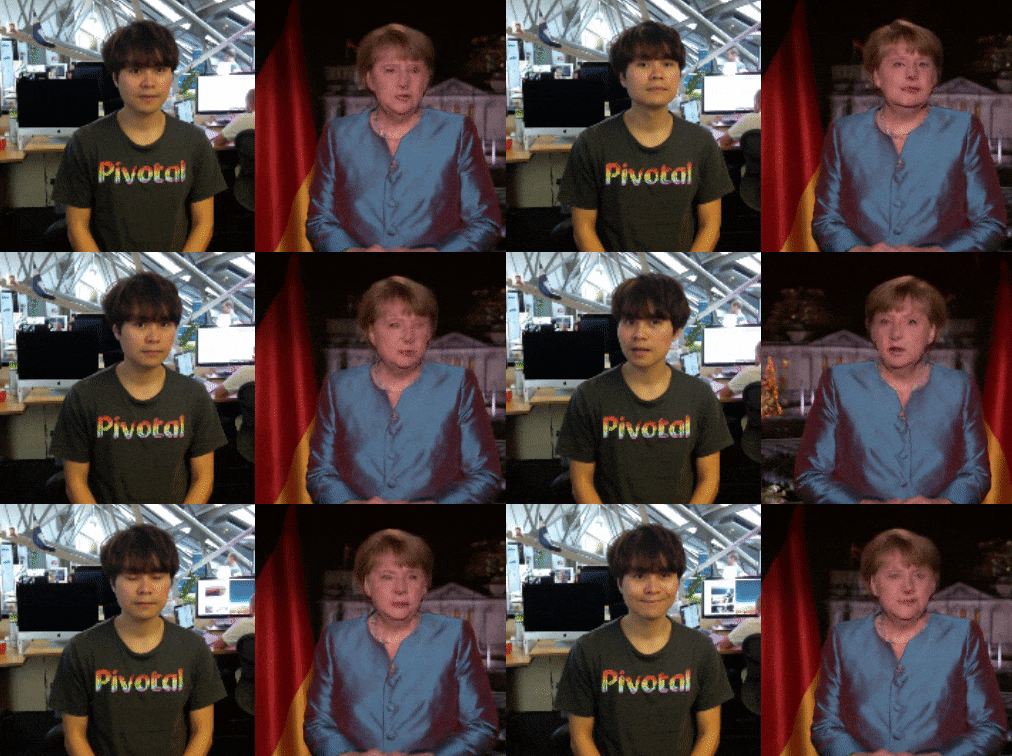
This is a pix2pix demo that learns from facial landmarks and translates this into a face. A webcam-enabled application is also provided that translates your face to the trained face in real-time.
Getting Started
1. Prepare Environment
# Clone this repo
git clone [email protected]:datitran/face2face-demo.git

# Create the conda environment from file (Mac OSX)
conda env create -f environment.yml
2. Generate Training Data
python generate_train_data.py --file angela_merkel_speech.mp4 --num 400 --landmark-model shape_predictor_68_face_landmarks.dat
Input:
fileis the name of the video file from which you want to create the data set.numis the number of train data to be created.landmark-modelis the facial landmark model that is used to detect the landmarks. A pre-trained facial landmark model is provided here.
Output:
- Two folders
originalandlandmarkswill be created.
If you want to download my dataset, here is also the video file that I used and the generated training dataset (400 images already split into training and validation).
3. Train Model
# Clone the repo from Christopher Hesse's pix2pix TensorFlow implementation
git clone https://github.com/affinelayer/pix2pix-tensorflow.git

# Move the original and landmarks folder into the pix2pix-tensorflow folder
mv face2face-demo/landmarks face2face-demo/original pix2pix-tensorflow/photos

# Go into the pix2pix-tensorflow folder
cd pix2pix-tensorflow/

# Resize original images
python tools/process.py \
  --input_dir photos/original \
  --operation resize \
  --output_dir photos/original_resized

# Resize landmark images
python tools/process.py \
  --input_dir photos/landmarks \
  --operation resize \
  --output_dir photos/landmarks_resized

# Combine both resized original and landmark images
python tools/process.py \
  --input_dir photos/landmarks_resized \
  --b_dir photos/original_resized \
  --operation combine \
  --output_dir photos/combined

# Split into train/val set
python tools/split.py \
  --dir photos/combined

# Train the model on the data
python pix2pix.py \
  --mode train \
  --output_dir face2face-model \
  --max_epochs 200 \
  --input_dir photos/combined/train \
  --which_direction AtoB
For more information around training, have a look at Christopher Hesse's pix2pix-tensorflow implementation.
4. Export Model
First, we need to reduce the trained model so that we can use an image tensor as input:
python reduce_model.py --model-input face2face-model --model-output face2face-reduced-modelInput:
model-inputis the model folder to be imported.model-outputis the model (reduced) folder to be exported.
Output:
- It returns a reduced model with less weights file size than the original model.
Second, we freeze the reduced model to a single file.
python freeze_model.py --model-folder face2face-reduced-modelInput:
model-folderis the model folder of the reduced model.
Output:
- It returns a frozen model file
frozen_model.pbin the model folder.
I have uploaded a pre-trained frozen model here. This model is trained on 400 images with epoch 200.
5. Run Demo
python run_webcam.py --source 0 --show 0 --landmark-model shape_predictor_68_face_landmarks.dat --tf-model face2face-reduced-model/frozen_model.pb
Input:
sourceis the device index of the camera (default=0).showis an option to either display the normal input (0) or the facial landmark (1) alongside the generated image (default=0).landmark-modelis the facial landmark model that is used to detect the landmarks.tf-modelis the frozen model file.
Example:
Requirements
Acknowledgments
Kudos to Christopher Hesse for his amazing pix2pix TensorFlow implementation and Gene Kogan for his inspirational workshop.
Copyright
Explorar proyectos relacionados
Cargando…