
open-edge-platform/anomalib
open-edge-platform/anomalib has 6,375 GitHub stars and 1,033 forks. Star changes are not measured yet. Last checked 2026-11-08 19:06 UTC. Last push 2026-11-07.
So werden diese Zahlen gemessen
An anomaly detection library comprising state-of-the-art algorithms and features such as experiment management, hyper-parameter optimization, and edge inference.
What you can do
- Simple and modular API and CLI for training, inference, and benchmarking.
- The largest public collection of ready-to-use deep learning anomaly detection algorithms and benchmark datasets.
- Lightning based model implementations to reduce boilerplate code and limit the implementation efforts to the bare essentials.
- The majority of models can be exported to OpenVINO Intermediate Representation (IR) for accelerated inference on Intel hardware.
Gemessener Sternzuwachs
- in 24h
- Aktualisierung verzögert
- in 7 days
- Aktualisierung verzögert
- in 15 days
- Aktualisierung verzögert
- in 1 month
- Aktualisierung verzögert
Nettoänderungen in überlappenden Zeiträumen, keine Tagessummen. Fehlende Messwerte bleiben leer. Sterne zeigen Interesse, nicht Qualität.
README.md
Original
A library for benchmarking, developing and deploying deep learning anomaly detection algorithms
Key Features • Docs • Notebooks • License








🌟 Announcing v2.7.0 Release! 🌟
This minor release adds new models and hardens checkpoint and path handling, while removing APIs scheduled for 2.7.0.
Key Changes
- New models: MH-PatchCore, RAD (retrieval-based), and FoundAD (few-shot).
- Security / API: Checkpoint loading defaults to
weights_only=True. When a datasetrootis set, metadata paths must resolve under that root.- Removals: Legacy ONNX exporter (
dynamo=False) is gone — usedynamo=True(default) withanomalib[openvino]. Pre-timm ViT checkpoint migration is no longer supported. Minimum PyTorch is 2.10+ (ROCm 2.13+).We value your input! Please share feedback via GitHub Issues or our Discussions
👋 Introduction
Anomalib is a deep learning library that aims to collect state-of-the-art anomaly detection algorithms for benchmarking on both public and private datasets. Anomalib provides several ready-to-use implementations of anomaly detection algorithms described in the recent literature, as well as a set of tools that facilitate the development and implementation of custom models. The library has a strong focus on visual anomaly detection, where the goal of the algorithm is to detect and/or localize anomalies within images or videos in a dataset. Anomalib is constantly updated with new algorithms and training/inference extensions, so keep checking!

Key features
- Simple and modular API and CLI for training, inference, and benchmarking.
- The largest public collection of ready-to-use deep learning anomaly detection algorithms and benchmark datasets.
- Lightning based model implementations to reduce boilerplate code and limit the implementation efforts to the bare essentials.
- The majority of models can be exported to OpenVINO Intermediate Representation (IR) for accelerated inference on Intel hardware.
- A set of inference tools for quick and easy deployment of the standard or custom anomaly detection models.
📦 Installation
Anomalib can be installed from PyPI. We recommend using a virtual environment and a modern package installer like uv or pip.
🚀 Quick Install
For a standard installation, you can use uv or pip. This will install the latest version of Anomalib with its core dependencies. PyTorch will be installed based on its default behavior, which usually works for CPU and standard CUDA setups.
# With uv
uv pip install anomalib

# Or with pip
pip install anomalib
For more control over the installation, such as specifying the PyTorch backend (e.g., XPU, CUDA and ROCm) or installing extra dependencies for specific models, see the advanced options below.
💡 Advanced Installation: Specify Hardware Backend
To ensure compatibility with your hardware, you can specify a backend during installation. This is the recommended approach for production environments and for hardware other than CPU or standard CUDA.
Using uv:
# CPU support (default, works on all platforms)
uv pip install "anomalib[cpu]"

# CUDA 12.6 support (Linux/Windows with NVIDIA GPU)
uv pip install "anomalib[cu126]"

# CUDA 13.0 support (Linux/Windows with NVIDIA GPU)
uv pip install "anomalib[cu130]"

# ROCm support (Linux with AMD GPU)
uv pip install "anomalib[rocm]"

# Intel XPU support (Linux/Windows with Intel GPU)
uv pip install "anomalib[xpu]"
Using pip:
The same extras can be used with pip:
pip install "anomalib[cu130]"
🧩 Advanced Installation: Additional Dependencies
Anomalib includes most dependencies by default. For specialized features, you may need additional optional dependencies. Remember to include your hardware-specific extra.
# Example: Install with OpenVINO support and CUDA 13.0
uv pip install "anomalib[openvino,cu130]"

# Example: Install all optional dependencies for a CPU-only setup
uv pip install "anomalib[full,cpu]"
Here is a list of available optional dependency groups:
| Extra | Description | Purpose |
|---|---|---|
[openvino] |
Intel OpenVINO optimization | For accelerated inference on Intel hardware |
[clip] |
Vision-language models | winclip |
[vlm] |
Vision-language model backends | Advanced VLM features |
[loggers] |
Experiment tracking (wandb, comet, etc.) | For experiment management |
[notebooks] |
Jupyter notebook support | For running example notebooks |
[video] |
Video decoding | Video datasets such as Avenue |
[huggingface] |
Hugging Face Hub and safetensors | Hub-backed models and checkpoints |
[datasets] |
Dataset storage extras | Formats such as those that need pyarrow |
[full] |
Optional feature dependencies | clip, datasets, openvino, loggers, notebooks, vlm, video, huggingface |
🔧 Advanced Installation: Install from Source
For contributing to anomalib or using a development version, you can install from source.
Using uv:
This is the recommended method for developers as it uses the project's lock file for reproducible environments.
git clone https://github.com/open-edge-platform/anomalib.git
cd anomalib

# Create the virtual environment
uv venv

# Sync with the lockfile for a specific backend (e.g., CPU)
uv sync --extra cpu

# Or for a different backend like CUDA 13.0
uv sync --extra cu130

# To set up a full development environment
uv sync --extra dev --extra cpu
Using pip:
git clone https://github.com/open-edge-platform/anomalib.git
cd anomalib

# Install in editable mode with a specific backend
pip install -e ".[cpu]"

# Install with development dependencies
pip install -e ".[dev,cpu]"
🧠 Training
Anomalib supports both API and CLI-based training approaches:
🔌 Python API
from anomalib.data import MVTecAD
from anomalib.models import Patchcore
from anomalib.engine import Engine

# Initialize components
datamodule = MVTecAD()
model = Patchcore()
engine = Engine()

# Train the model
engine.fit(datamodule=datamodule, model=model)
⌨️ Command Line
# Train with default settings
anomalib train --model Patchcore --data anomalib.data.MVTecAD

# Train with custom category
anomalib train --model Patchcore --data anomalib.data.MVTecAD --data.category transistor

# Train with config file
anomalib train --config path/to/config.yaml
🤖 Inference
Anomalib provides multiple inference options including Torch, Lightning, Gradio, and OpenVINO. Here's how to get started:
🔌 Python API
# Load model and make predictions
predictions = engine.predict(
    datamodule=datamodule,
    model=model,
    ckpt_path="path/to/checkpoint.ckpt",
)
⌨️ Command Line
# Basic prediction
anomalib predict --model anomalib.models.Patchcore \
                 --data anomalib.data.MVTecAD \
                 --ckpt_path path/to/model.ckpt

# Prediction with results
anomalib predict --model anomalib.models.Patchcore \
                 --data anomalib.data.MVTecAD \
                 --ckpt_path path/to/model.ckpt \
                 --return_predictions true
📘 Note: For advanced inference options including Gradio and OpenVINO, check our Inference Documentation.
Training on Intel GPUs
[!Note] Currently, only single GPU training is supported on Intel GPUs. These commands were tested on Arc 750 and Arc 770.
Ensure that you have PyTorch with XPU support installed. For more information, please refer to the PyTorch XPU documentation
🔌 API
from anomalib.data import MVTecAD
from anomalib.engine import Engine, SingleXPUStrategy, XPUAccelerator
from anomalib.models import Stfpm

engine = Engine(
    strategy=SingleXPUStrategy(),
    accelerator=XPUAccelerator(),
)
engine.train(Stfpm(), datamodule=MVTecAD())
⌨️ CLI
anomalib train --model Padim --data MVTecAD --trainer.accelerator xpu --trainer.strategy xpu_single
🧪 Experiment Management
Track your experiments with popular logging platforms through PyTorch Lightning loggers:
- 📊 Weights & Biases
- 📈 Comet.ml
- 📉 TensorBoard
Enable logging in your config file to track:
- Hyperparameters
- Metrics
- Model graphs
- Test predictions
📘 Note: For logging setup, see our Logging Documentation.
📊 Benchmarking
Evaluate and compare model performance across different datasets:
# Run benchmarking with default configuration
anomalib benchmark --config tools/experimental/benchmarking/sample.yaml
💡 Tip: Check individual model performance in their respective README files:
Anomalib Studio
[!IMPORTANT] Anomalib Studio is currently under active development and should be considered a pre-release. Features may change, and some functionality may be incomplete or unstable. We welcome feedback and contributions as we work towards a stable release.
Anomalib Studio is a low/no-code web application that allows users to train and deploy anomaly detection models. It enables users to leverage Anomalib's features in their operational environment. Users can connect USB and IP cameras, or use a folder of images, as input to the training pipeline. The tool allows direct output to their industrial pipelines through ROS messages, MQTT, etc.
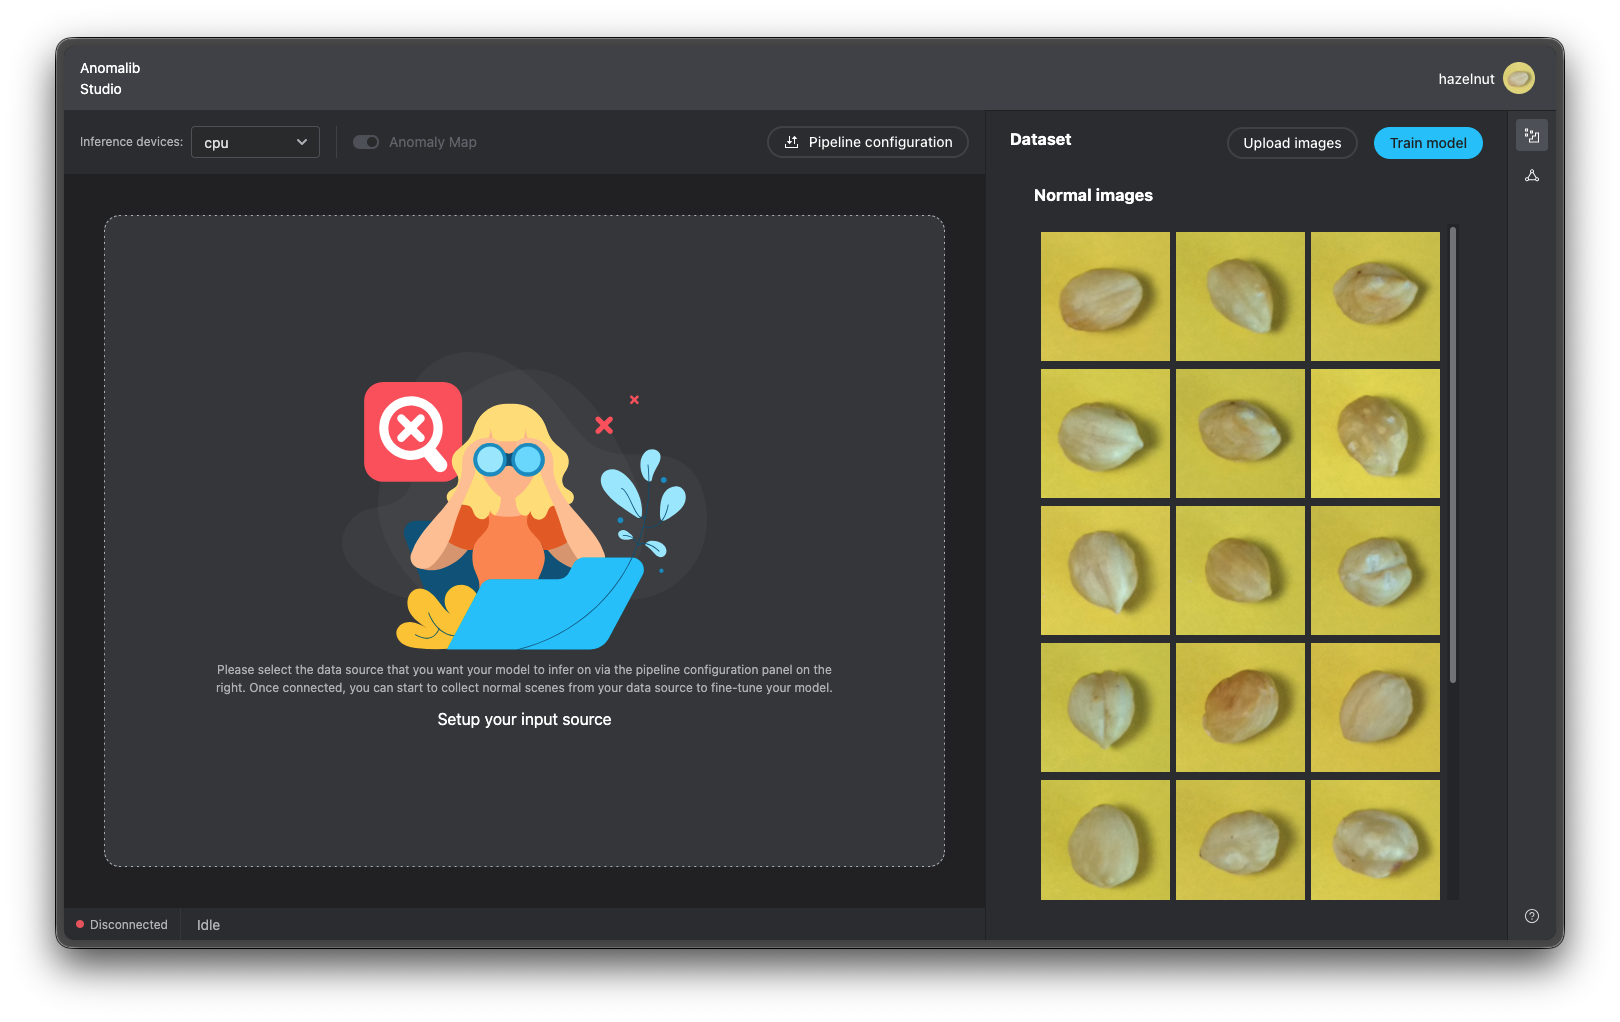
The source code for Anomalib Studio lives in the application folder.
Anomalib Studio is available as two distributions:
- As a docker container
- As a standalone application
For more information on each, refer to the respective README files.
Get started with development build
Setup Backend Dependencies
[!NOTE] This assumes that you have
uvinstalled. If not, please refer to the installation guide.
cd application/backend
uv sync --extra xpu # or uv sync --extra cu130 for CUDA 13.0, uv sync --extra cpu for CPU
Setup Frontend Dependencies
cd application/ui
npm install
Run the application
[!IMPORTANT] Both backend and frontend dependencies should be installed before running the application.
Run the backend server:
cd application/backend
./run.sh
Run the frontend server:
cd application/ui
npm run start
Navigate to http://localhost:3000 to see the application.
✍️ Reference
If you find Anomalib useful in your research or work, please cite:
@inproceedings{akcay2022anomalib,
  title={Anomalib: A deep learning library for anomaly detection},
  author={Akcay, Samet and Ameln, Dick and Vaidya, Ashwin and Lakshmanan, Barath and Ahuja, Nilesh and Genc, Utku},
  booktitle={2022 IEEE International Conference on Image Processing (ICIP)},
  pages={1706--1710},
  year={2022},
  organization={IEEE}
}
👥 Contributing
We welcome contributions! Check out our Contributing Guide to get started.
Thank you to all our contributors!
Ähnliche Projekte entdecken
codecrafters-io/build-your-own-x
Meistere das Programmieren, indem du deine Lieblingstechnologien von Grund auf neu erschaffst.
561,256 Sternepublic-apis/public-apis
Eine gemeinschaftliche Liste kostenloser APIs
497,513 Sternemorluto/rea
Mit Agenten alles per Reverse Engineering untersuchen, vom Verhalten der Anwendung bis hin zu nativen Binärdateien.
445,836 Sterneopenclaw/openclaw
Die KI, die wirklich Dinge erledigt. Jedes Betriebssystem, jede Plattform. Auf die Hummer-Art. 🦞
394,231 Sterne