
Panic-Signals/Deckard
Panic-Signals/Deckard has 39 GitHub stars and 10 forks. Star changes are not measured yet. Last checked 2026-11-11 04:06 UTC. Last push 2026-11-10.
So werden diese Zahlen gemessen
NI Maschine like software and hardware integration written in rust
Gemessener Sternzuwachs
- in 24h
- Aktualisierung verzögert
- in 7 days
- Aktualisierung verzögert
- in 15 days
- Aktualisierung verzögert
- in 1 month
- Aktualisierung verzögert
Nettoänderungen in überlappenden Zeiträumen, keine Tagessummen. Fehlende Messwerte bleiben leer. Sterne zeigen Interesse, nicht Qualität.
README.md
OriginalDECKARD
DECKARD is a groovebox for your computer that works like NI's Maschine: scenes and patterns, a song arrangement, sixteen pads per group, a sampler, drum synths, effects and a mixer. It opens Maschine projects and saves them in Maschine's own format, so you can move between the two. It can also be played from a Maschine MK3 controller or a Novation Launchpad Pro MK3.
DECKARD also does a few things Maschine doesn't:
- Expressive recording: MPE, polyphonic aftertouch and pad pressure are recorded as curves on each note.
- Modulation: a mod matrix with up to 16 LFOs and envelopes per project.
- Launchpad Pro MK3: a session grid you can use alongside the MK3.
- Two synths of its own: Replicant and Plaits.
- CV out to a modular: LFOs and envelopes as CV, and Zhora, which plays a modular voice and keeps it in tune.
- Custom themes for the MK3's screens, which anyone can write.
The DECKARD Manual covers all of this in depth. In the app, Help ▸ DECKARD Manual opens it.
What you need
- A computer running macOS, Linux or Windows.
- Speakers or headphones. DECKARD uses your system's audio output. On Windows, a
build made with the
asiofeature can also play through an interface's ASIO driver, for lower latency (Preferences ▸ Audio; how to build it). - Optional: a Maschine MK3, or a Maschine+ in controller mode. DECKARD drives its pads, buttons, knobs, lights and both screens directly. Maschine+ support hasn't been tested on the hardware yet.
- Optional: a Novation Launchpad Pro MK3, connected over USB.
- Optional: Maschine and its libraries. Maschine projects use samples, kits and expansions from NI's libraries. DECKARD finds the ones you have installed and plays them, but it doesn't come with any. Without them DECKARD still works: you can use your own samples and DECKARD's built-in instruments.
Sponsoring DECKARD
DECKARD is free and open. If it earns a place in your music, these keep it going:
- GitHub Sponsors
- Patreon
- Splice: sounds for your projects, through a referral link that pays DECKARD's author a commission at no cost to you.
Getting DECKARD
- Download the build for your system from the
releases page:
- macOS:
DECKARD-<version>-macos-universal.zip, which holdsDECKARD.appand runs on both Apple Silicon and Intel Macs. - Linux: the
.deb(Debian, Ubuntu, Mint) or.rpm(Fedora, openSUSE) package, which installs the program, its menu entry and icon, the.mxprjfile type and the udev rule that lets you use the MK3 without root; ordeckard-<version>-linux-<arch>.tar.gz, which holds the same files for you to place yourself. - Windows:
DECKARD-<version>-windows-x64-setup.exe, the installer, which adds DECKARD to the Start menu and search; orDECKARD-<version>-windows-x64.zip, which holds the same files for you to place yourself.
- macOS:
- Install it.
- macOS: unzip it and move DECKARD.app to Applications.
- Linux:
sudo apt install ./deckard_<version>-1_amd64.deborsudo dnf install ./deckard-<version>-1.x86_64.rpm. With the tarball instead, unpack it and copy the udev rule into/etc/udev/rules.d/if you use an MK3. - Windows: run the installer (it needs no administrator approval; DECKARD isn't signed yet, so SmartScreen may ask you to confirm). With the zip instead, unzip it.
- Start DECKARD. It opens the project you had open last, or a new empty one. The first time, it offers to download the stem separation model (84 MB); you can also leave that until you first use STEMS.
- Keep it current. At launch DECKARD asks GitHub once whether a newer release exists (Preferences ▸ General turns this off). When one does, a dot appears on the DECKARD wordmark in the header, and Help ▸ About DECKARD shows the version with an Update button that downloads it, checks it, installs it the way yours was installed (the package through apt or dnf, with your password; the app bundle, tarball or zip swapped in place) and restarts DECKARD.
If you build DECKARD yourself, the packages end up in the dist/ folder of your
checkout. DEVELOPMENT.md explains how.
New to DECKARD? Start with the DECKARD Manual, also at Help ▸ DECKARD Manual.
Opening and saving projects
- Opening: use File ▸ Open…, pick from File ▸ Open Recent, or drag a
Maschine project (
.mxprj) onto the window. Samples (WAV and other audio files) dropped onto a sound load into it. - Saving: File ▸ Save writes a normal Maschine project. The first time you save
over a file in a session, the previous version is kept beside it as
<name>.mxprj.bak. - If DECKARD closes with unsaved changes, it brings them back from a backup the next time it starts.
- Exporting: File ▸ Export Audio… renders the song, or stems per group or per sound, to WAV files. A plug-in's extra-output strip on a hardware output gets a stem of its own too, whichever Source is picked, each with its own checkbox. File ▸ Export MIDI… writes a MIDI file.
Using a Maschine MK3
- Quit Maschine and NI's hardware agents first (NIHardwareAgent and NIHostIntegrationAgent). While they run, they hold on to the controller's screens. On macOS, DECKARD asks to quit NIHostIntegrationAgent when it finds it holding them. On Windows, NI's driver has them, so DECKARD asks to switch just the screens to Windows' WinUSB driver (with administrator approval). Maschine can't use the screens until you give them back in Preferences ▸ Hardware.
- Plug in the MK3. DECKARD finds it on its own. A Maschine+ in controller mode is used the same way.
DECKARD runs the MK3 with its own controller layer, so you don't need Maschine installed. Its screens can be themed (see Custom themes). You can also change what any button or page does: Controller ▸ Open Controller Scripts Folder opens a folder of editable scripts (see docs/controller-api.md).
SHIFT + STEP opens the step grid: the eight buttons above the screens are steps, and LEFT and RIGHT move through them eight at a time. In Pad mode a pad picks the sound and the buttons place it. In Keyboard mode the screen shows the piano roll with the scale, and the buttons place the notes you pick on the pads (hold several for more than one). Chords mode works the same with a pad's chord. Hold a step's button and turn knobs 1–4 to edit it. SHIFT + STEP again goes back.
A tour
Ideas view
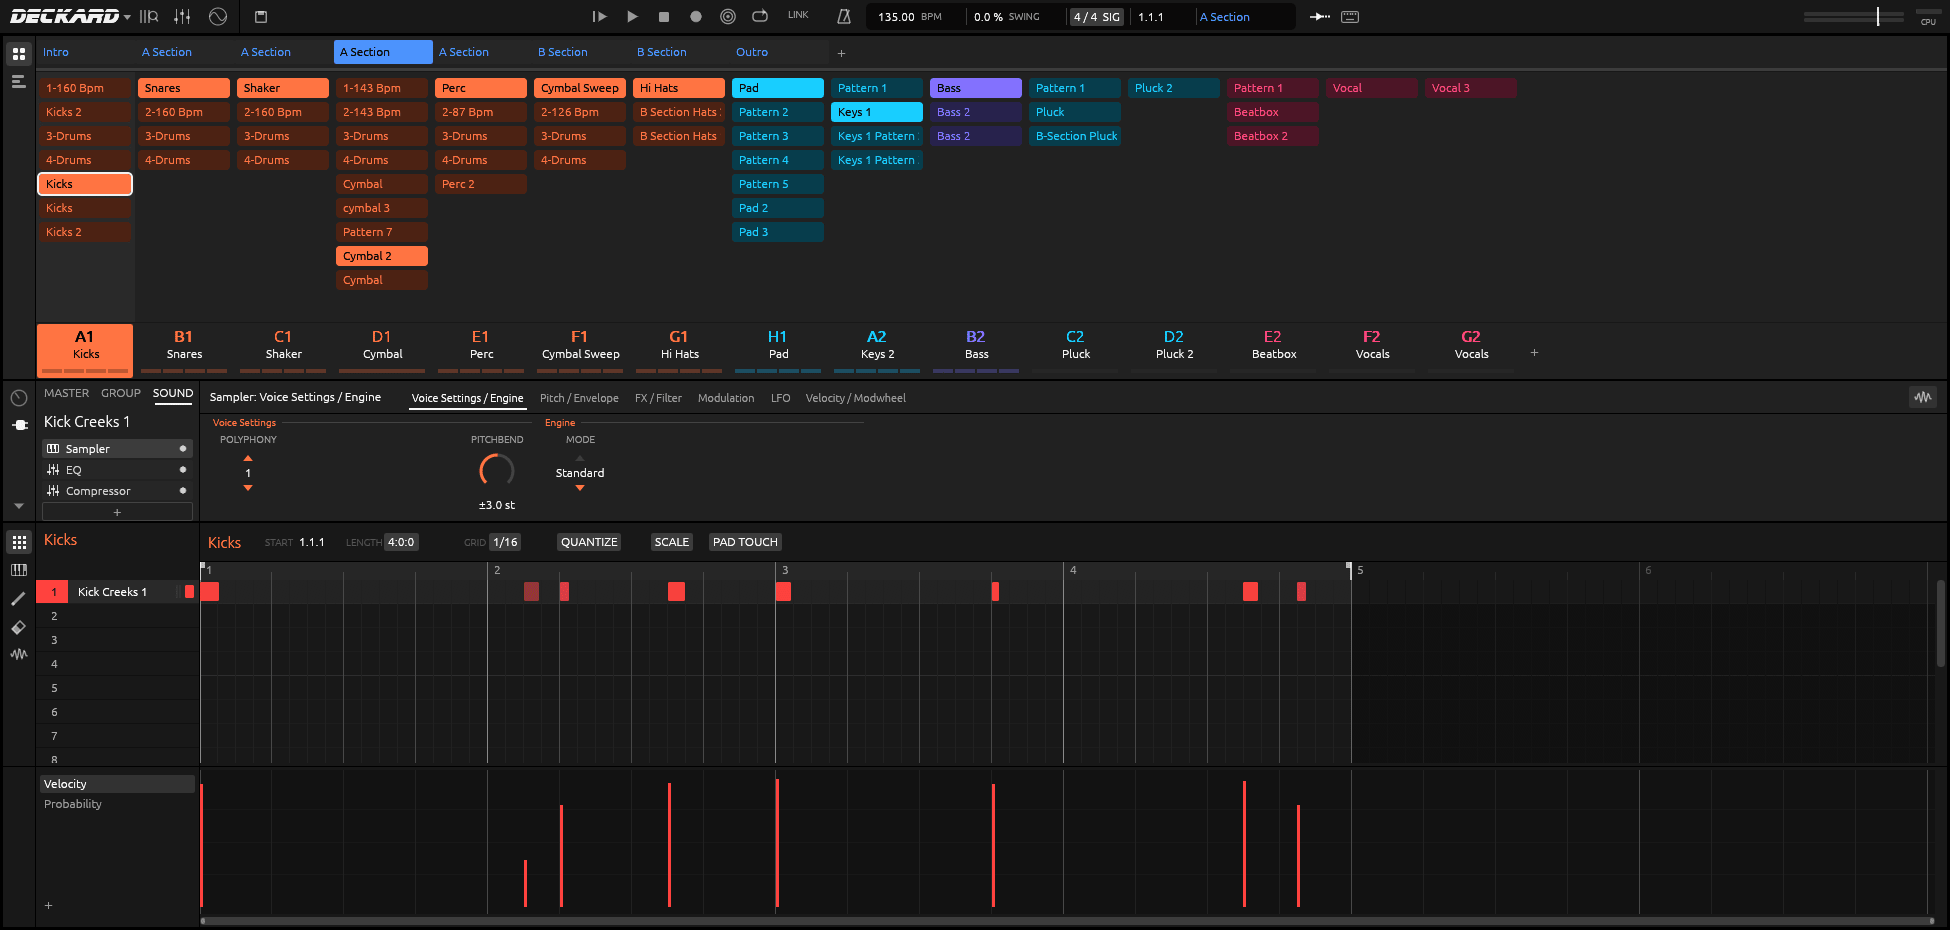
Above is the Ideas view:
- Scenes are the tabs along the top. Each group has a column of its patterns, and the group tiles sit at the bottom.
- Playing: PLAY (or Space) loops the focused scene. Clicking another scene queues it, and it takes over when the current one ends.
- Editing scenes: click a pattern to put it in the scene. Right-click a scene to rename, duplicate or delete it.
Below the scenes is the Control area, with the MASTER, GROUP and SOUND tabs and the knobs of whatever you've picked. Below that is the pattern editor, with its lanes for velocity, probability, MIDI controllers and expression.
Song view
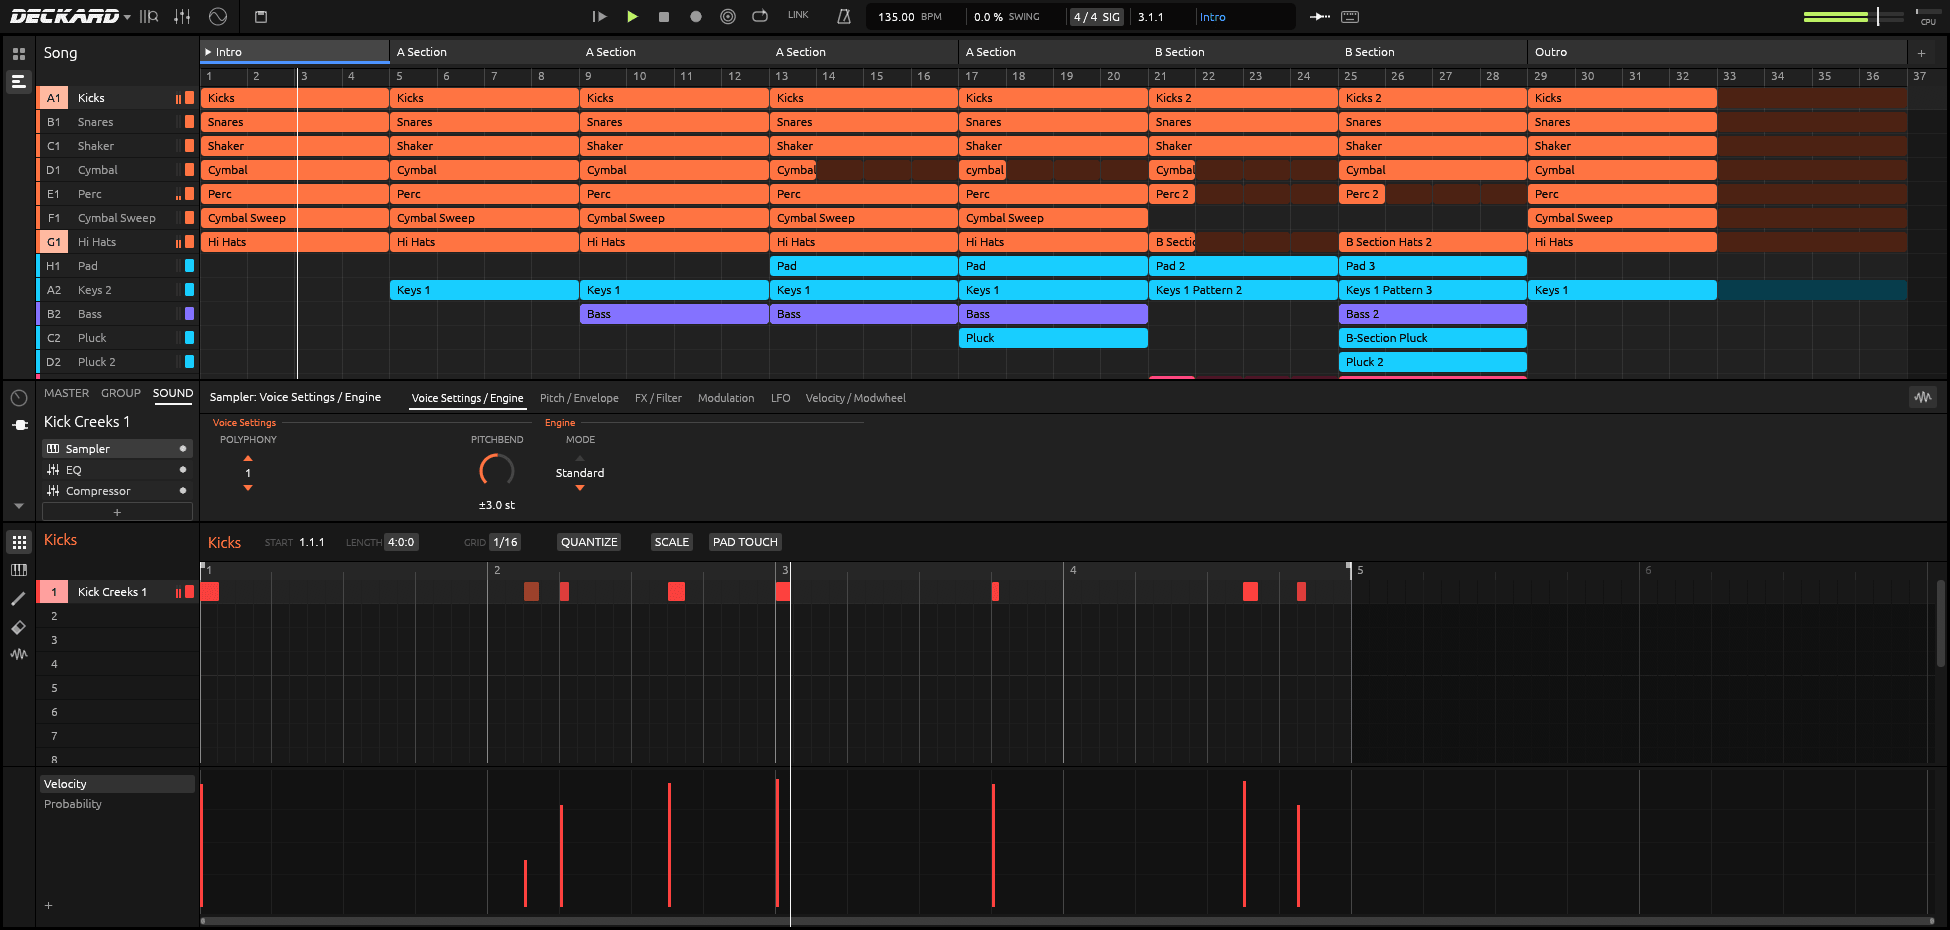
The Song view is the arrangement: one section after another, each playing a scene. You can:
- add, move, duplicate and resize sections;
- click a section to jump there when the current one ends.
Piano roll
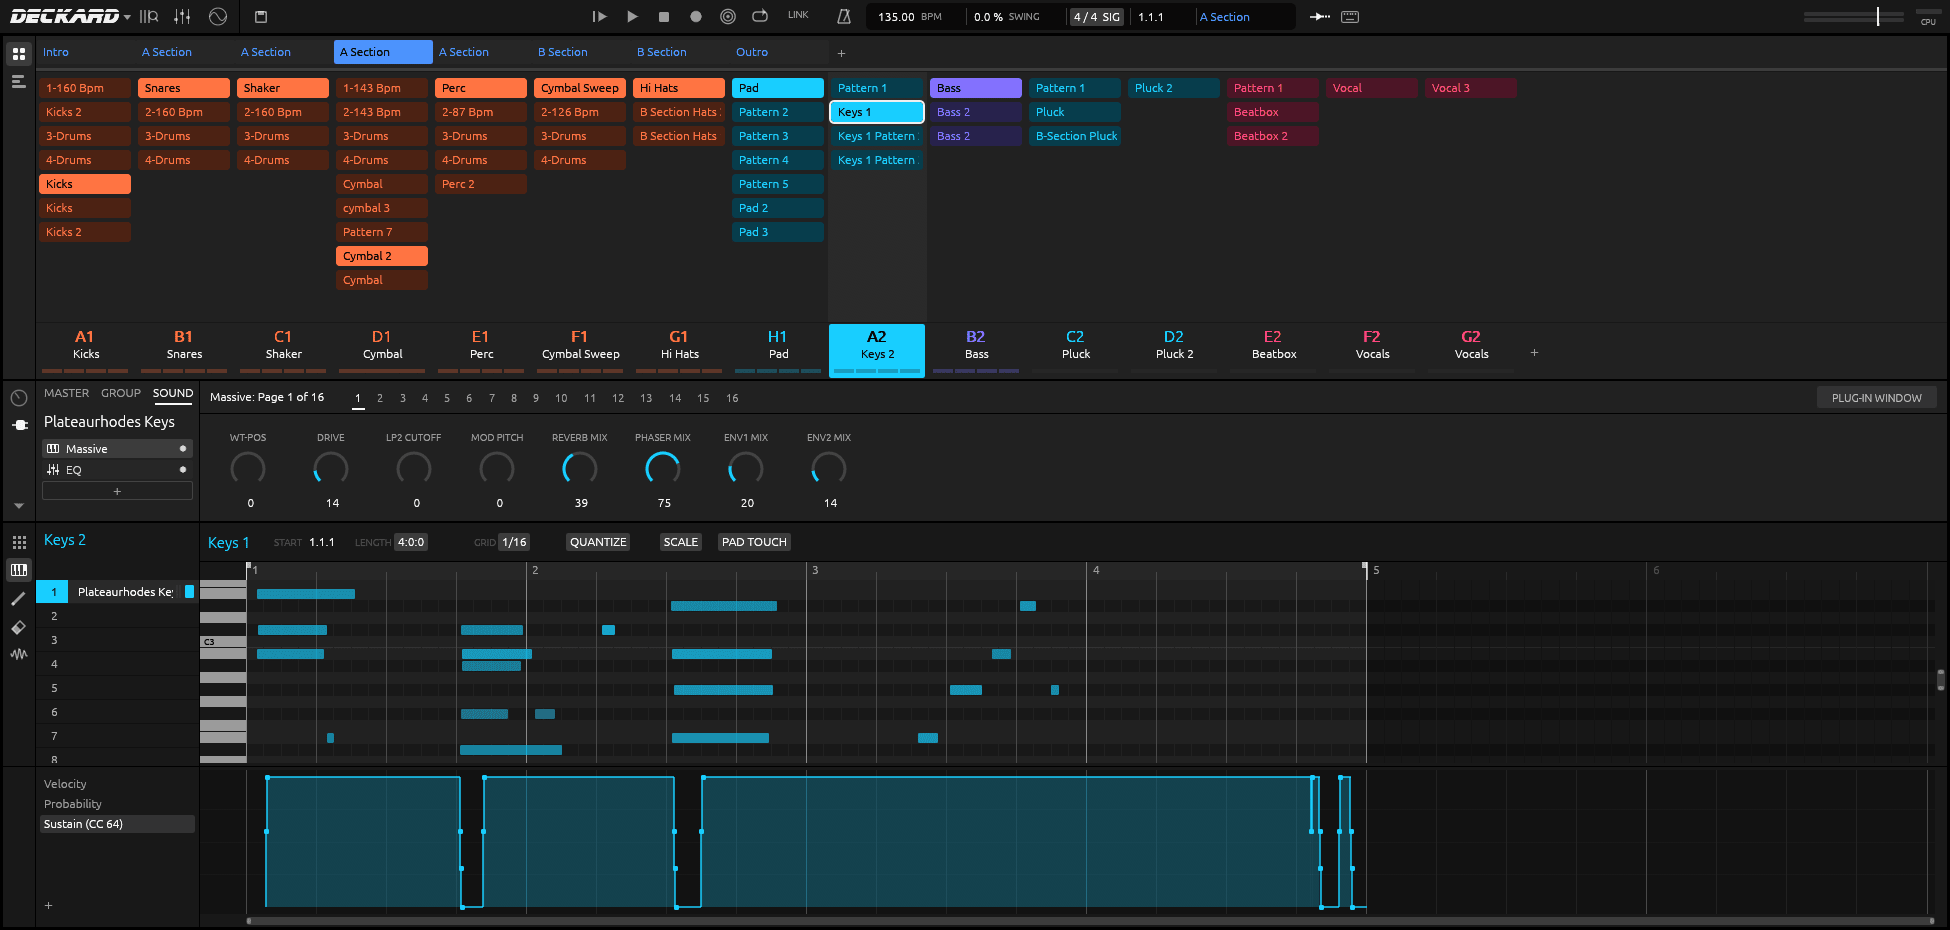
Switch the pattern editor between the drum grid and the piano roll (View ▸ Piano Roll). Use the pencil to draw notes. Set GRID, QUANTIZE, LENGTH and SCALE from the pattern header. The lane underneath shows velocity, probability (how likely a note is to play), or any MIDI controller such as the sustain pedal or pitch bend.
Mixer
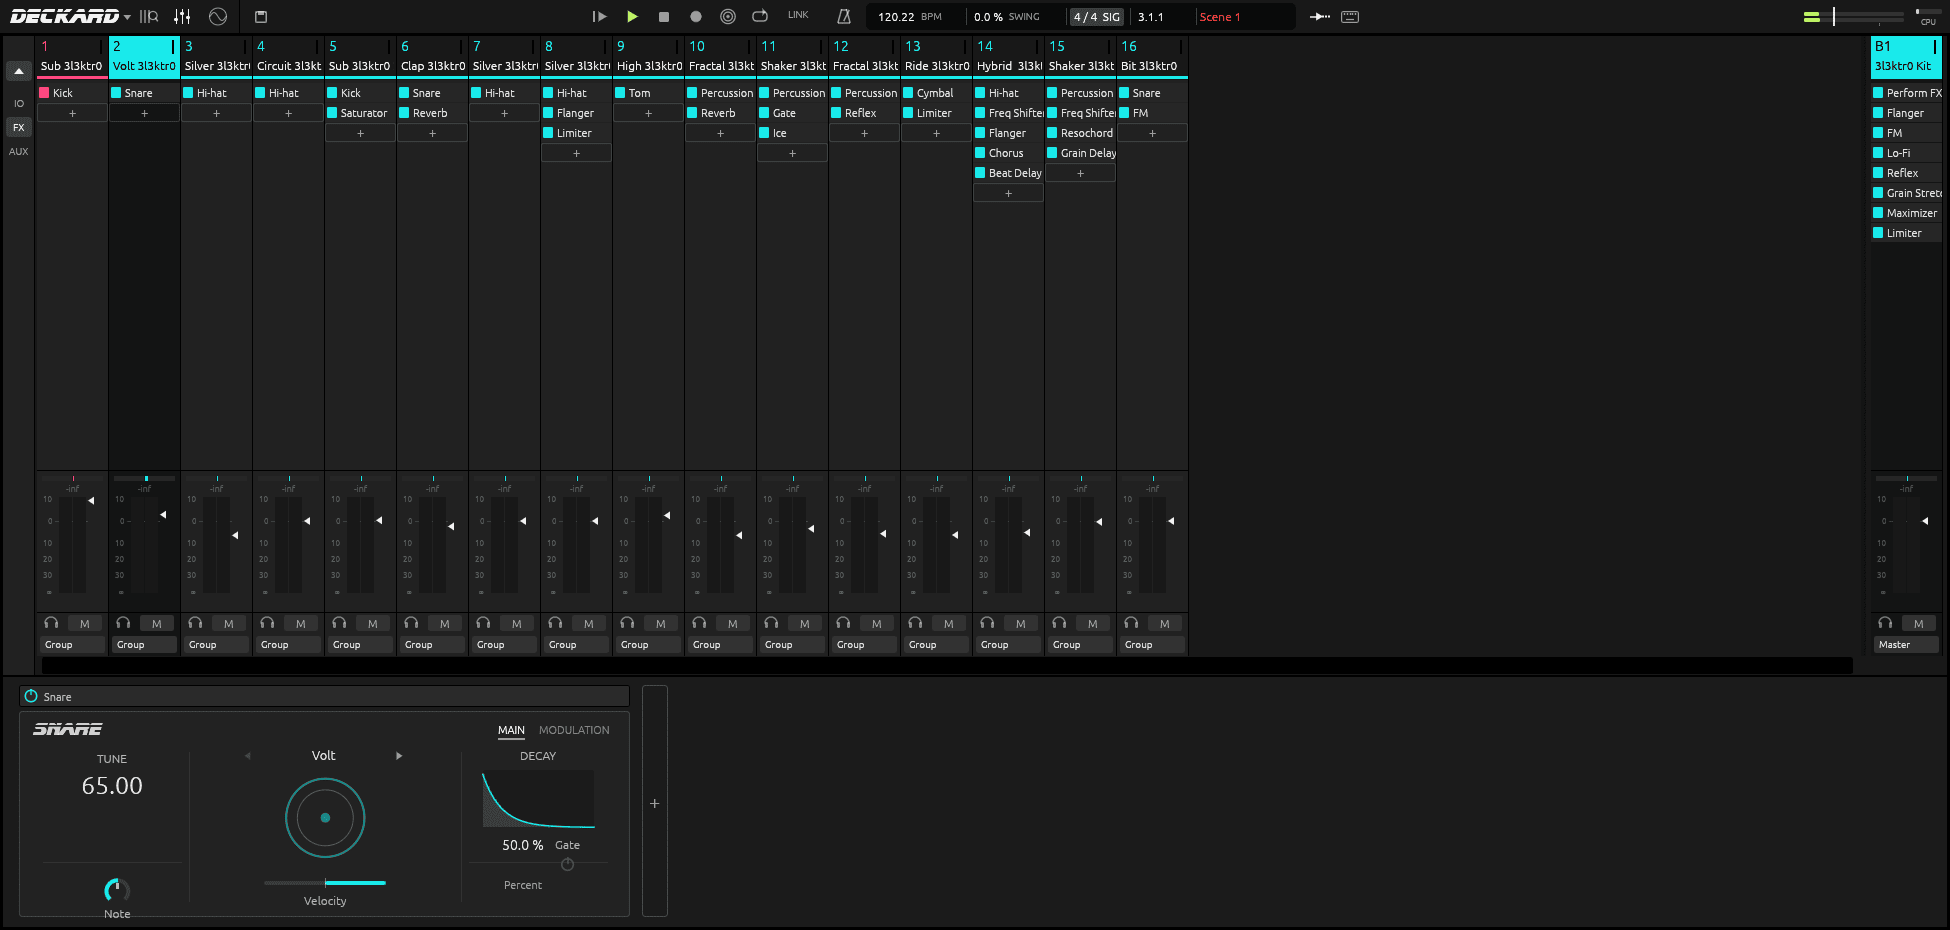
Open the mixer with the faders button in the header or View ▸ Mixer. Each strip has:
- the sound's or group's chain of instruments and effects;
- pan, meters and a fader;
- cue, mute and solo.
The panel along the bottom shows the selected module's controls. Here it is DECKARD's Snare drum synth.
Built-in instruments and effects
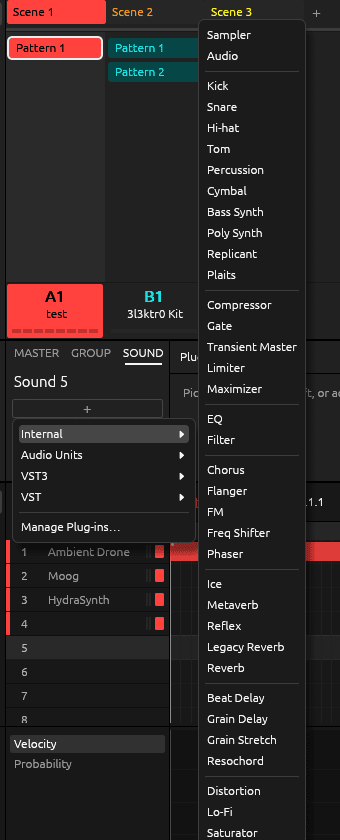
The + at the end of any chain opens the plug-in menu. Under Internal you'll find:
- Sampler and Audio: the Sampler plays multi-sample zones. Audio plays loops that follow the tempo.
- Drum synths: Kick, Snare, Hi-hat, Tom, Percussion and Cymbal.
- Synths: Bass Synth and Poly Synth, plus DECKARD's own Replicant and Plaits (see below), and Zhora, which plays a modular synth over CV.
- Effects: Compressor, Gate, Transient Master, Limiter, Maximizer, EQ, Filter, Chorus, Flanger, FM, Freq Shifter, Phaser, Ice, Metaverb, Reflex, Reverb, Beat Delay, Grain Delay, Grain Stretch, Resochord, Distortion, Lo-Fi, Saturator and more, plus DECKARD's own Tuner (see below).
- Perform FX: Filter, Flanger, Burst Echo, Reso Echo, Ring, Stutter, Tremolo and Scratcher. These go first in a group's chain and are played from a strip.
DECKARD's versions of Maschine's modules are its own sound engines, written to behave like Maschine's.
Recording, with expression
To record, arm with REC and press PLAY. SHIFT + REC adds a count-in. Pads, MIDI keyboards and your computer keyboard (⌘K) all record into the playing pattern. Each take is one undo step.
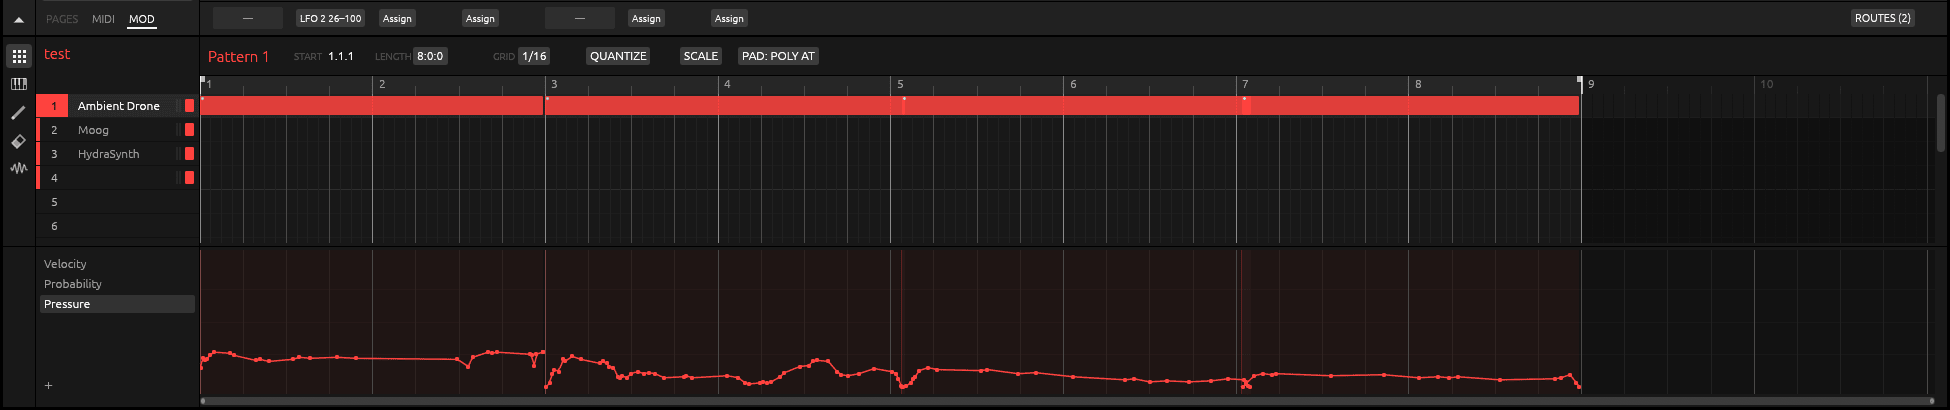
DECKARD records more of your playing than Maschine does. Each note can keep up to four curves of its own, as in Ableton's Note Expression:
- Pressure: how hard you press while the note is held;
- Slide: the up-and-down movement of a finger on an MPE key (MIDI CC 74);
- Pitch: a bend of that one note;
- Release: how fast the key was let go.
Where the expression comes from:
MPE controllers (for example a Hydrasynth in MPE mode, Roli or Linnstrument keyboards):
- Tick MPE beside the controller's input in Preferences ▸ MIDI.
- Set its pitch-bend range there; the default is ±48 semitones.
- Each note's own bend, slide and pressure are then recorded with it.
Polyphonic aftertouch: a keyboard (or a Launchpad) that sends pressure per key records it as each note's Pressure. Nothing to set up.
Channel aftertouch, pitch bend and other controllers go into the pattern's controller lanes ("Aftertouch", "Pitch Bend", a CC number). They overwrite while you move a control and stop when you let go.
MK3 pad pressure: each sound has a Pad Touch setting. Find it in the pattern header (PAD TOUCH), or on the MK3's Keyboard page under its third and fourth knob pages. The modes are:
- Velocity (the default): pressure only shapes Note Repeat;
- Poly AT: each pad's pressure is recorded as that note's Pressure curve;
- Aftertouch: channel pressure;
- CC: a controller number of your choice.
Curve, Min and Max shape how pressure maps to the value sent. The pressure modes play notes at a fixed velocity.
Seeing and editing expression. Once a sound's notes have expression, the lane list under the pattern offers Pitch, Slide, Pressure and Release:
- click to add a point, drag a point or a segment, and ⌥-drag a segment to bend it;
- double-click a point to remove it, or draw freehand in draw mode;
- right-click to clear one kind of expression, or all of it, from the selected notes.
Playing it back.
- To a MIDI synth:
- A normal MIDI output gets each note's pressure as polyphonic aftertouch, plus its release velocity.
- An output marked MPE in Preferences ▸ MIDI gives every note its own channel with its bend, slide and pressure.
- DECKARD can send the synth its MPE setup for you (Send MPE setup to synths, on by default).
- To DECKARD's own sounds: use Pressure, Slide and Pitch as sources in the mod
matrix (below).
- These routes drive the whole sound, not each voice: Pressure follows the hardest-pressed note, Pitch the latest one.
- Expression isn't passed to hosted plug-ins yet.
Saving. Expression, LFOs and routes are saved inside the .mxprj in an extra block
that Maschine 3 ignores, so the project still opens in Maschine. If Maschine saves the
project again, that extra data is lost.
Modulation: the mod matrix, LFOs and envelopes
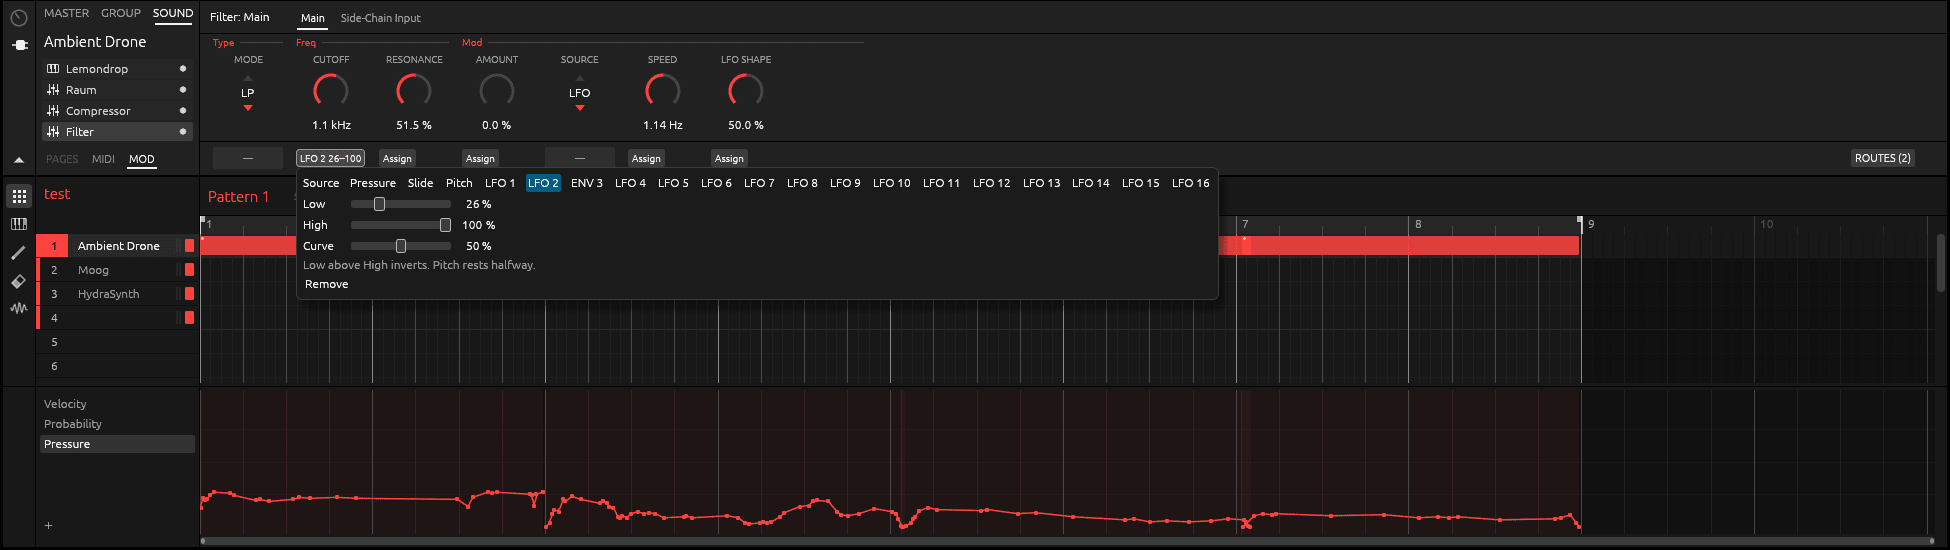
A route connects a source to a knob:
- Sources:
- Pressure, Slide and Pitch, from your playing;
- LFO 1–16 and envelopes, from the LFO panel.
- Targets: any continuous knob in a sound's chain. That includes the Sampler, a drum synth, a built-in effect, Replicant, Plaits, or a hosted plug-in's parameter.
- Depth: each route has a Low and a High. The knob sweeps between them as the source moves, and setting Low above High turns it upside down. Curve bends the response.
While a route drives a knob, the knob moves on screen and on the MK3 so you can see it. Turning the knob yourself still sets its own value.
To make a route in the software:
- Pick a sound and a module in the Control area.
- Open the Assignment area with the small arrow under the Control area's icons, and choose its MOD tab.
- Click Assign under a knob, then pick a source and its range.
ROUTES at the right lists every route of the sound in one place.
LFOs and envelopes
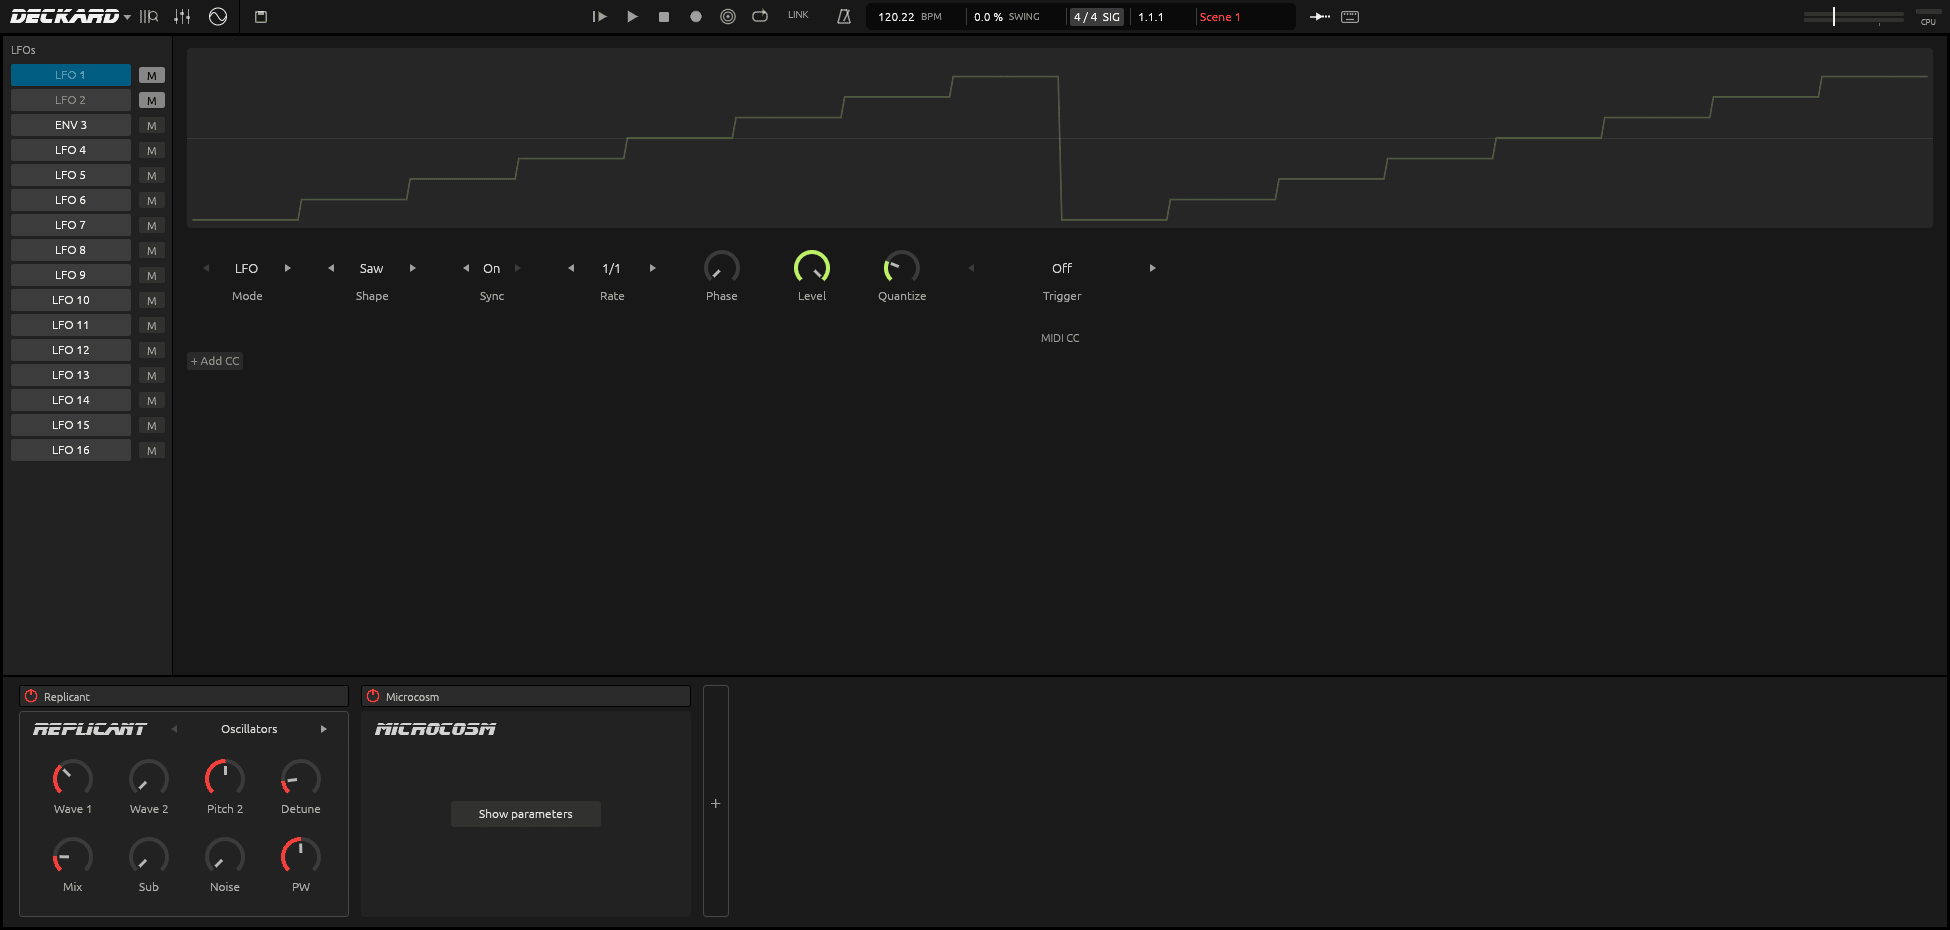
The LFO panel opens from the circle-and-sine button in the header. A project can have up to 16 LFOs, one per pad.
- LFO mode:
- Shape: Sine, Square, Triangle, Saw, Random or Wander;
- Sync to the tempo, or a free Rate;
- Phase, Level and Quantize, which steps the wave into stairs;
- Trigger: a sound whose notes restart it;
- Fade in.
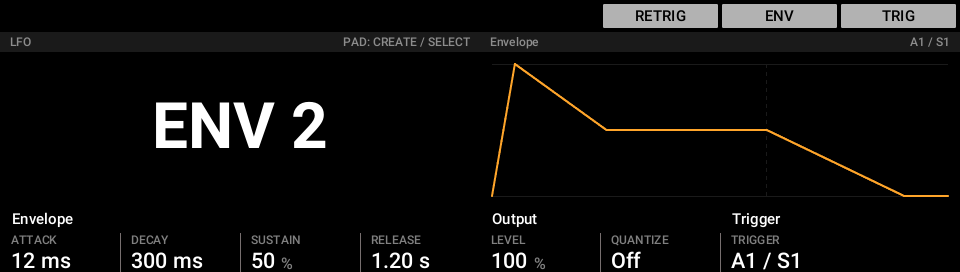
- Envelope mode: the same slot becomes an ADSR envelope (shown as ENV n). Its
trigger sound's notes play it, from patterns and live.
- Attack, Decay and Release each run from 1 ms to 10 s. Sustain is the level held while notes are down.
- Retrigger on or off.
- Muting: M mutes an LFO.
- MIDI CC out: an LFO or envelope can also be sent to external gear. The panel's MIDI CC section sends it as a MIDI controller to the port, channel and CC number you choose.
CV out
With a DC-coupled interface, an LFO or envelope can drive a modular synth:
- In Preferences ▸ Audio ▸ Routing ▸ Output, mark the channels wired to the modular CV only. Audio never goes to them. A channel the master or cue plays on can't be marked.
- In the LFO panel's CV section, click + Add CV and pick the LFO, the output, and a Low and High (−100% to +100% of full scale). On the MK3's mod matrix, turn Group past MIDI.
CV skips the master, faders and effects, and isn't in exports or stems. Each CV only channel has one owner: CV routes first, then Zhora. A route whose channel isn't CV only on this computer stays silent and says so.
On the MK3
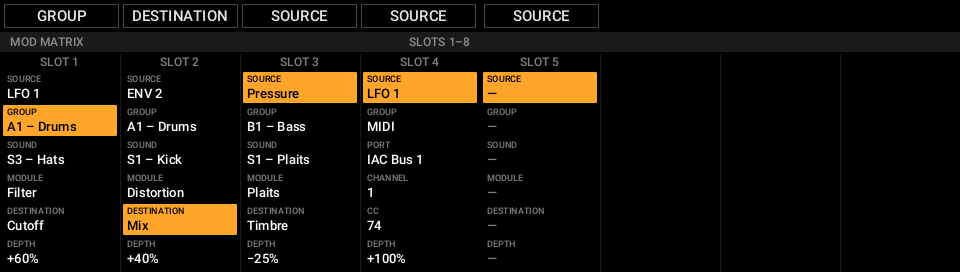
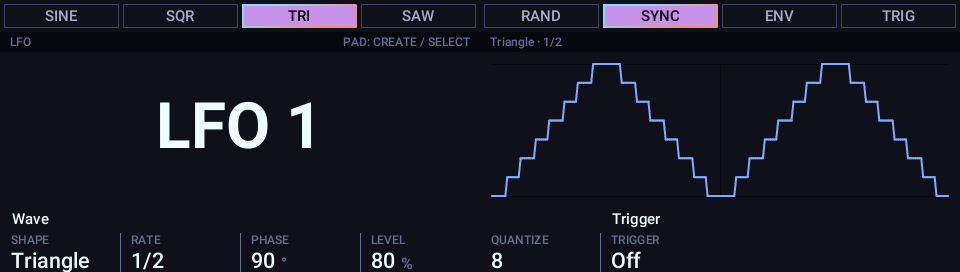
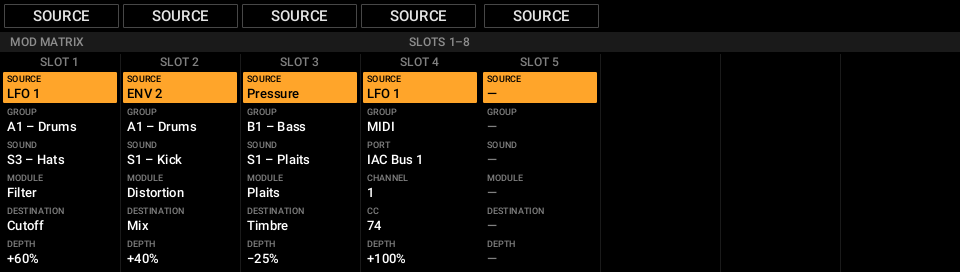
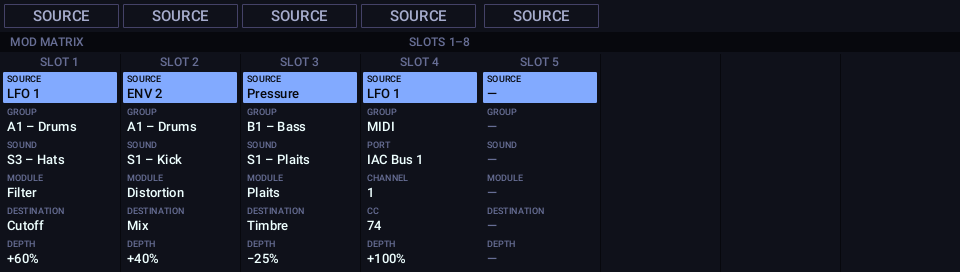
The MK3's two screens show the LFO page (here LFO 1, a tempo-synced triangle stepped by Quantize), the same page in Envelope mode, and the mod matrix:
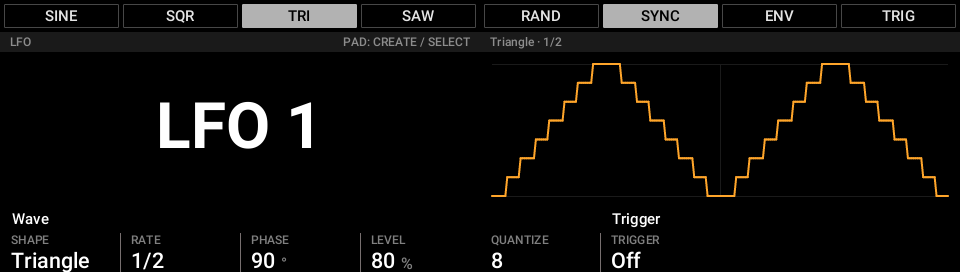
- SHIFT + SELECT opens the LFO page:
- the pads pick, create, mute (MUTE + pad) and delete (ERASE + pad) LFOs;
- the display buttons choose the shape, SYNC, ENV and the trigger;
- knobs 1–7 set Shape, Rate, Phase, Level, Quantize, Trigger and Fade in;
- the right-hand screen draws the wave.
- SHIFT + SOLO opens the mod matrix:
- every route in the project, eight per page;
- columns for Source, Group, Sound, Module, Destination and Depth;
- turn a knob to change a row, ERASE + knob to remove a route, and the empty slot at the end to make a new one;
- turn Group past the last group to choose MIDI, for an LFO-to-CC route.
Knob movements can also be recorded as automation: drag a knob while the song plays, or switch on Auto-write (the bullseye button in the header, or AUTO on the MK3).
Custom themes for the MK3's screens
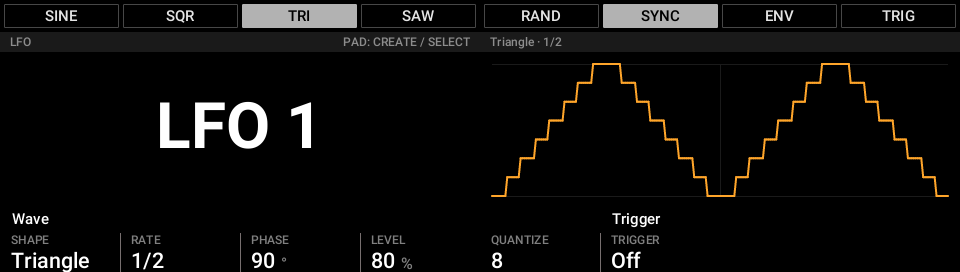
The MK3's screens can be restyled with themes: colours, fonts and text sizes, plus an optional animated border on the chosen button. Every page uses the theme, so one file changes them all. Pick one in Preferences ▸ Hardware ▸ Controller theme.
DECKARD comes with three:
- Maschine: the look of Maschine's own screens.
- Palenight: deep blue-grey with lavender text and purple and cyan accents. A new install starts with it.
- Solarized Dark.
The same two pages in the Maschine theme (left) and Palenight (right):
| Maschine | Palenight |
|---|---|
 |
 |
 |
 |
Making your own takes one small file: a theme only lists what it changes from another. DECKARD reloads it as you save, so you can tweak it with the MK3 in front of you. THEMING.md shows how, step by step.
The DECKARD app's own window isn't themable yet.
Launchpad Pro MK3
Plug a Launchpad Pro MK3 in over USB and DECKARD takes it over. It switches the Launchpad to DAW mode, and the status bar says so. There's nothing to set up, and when DECKARD quits the Launchpad goes back to standalone.
Session mode shows the Ideas view as a grid:
- The grid:
- Each column is a group, with its patterns in the colours you gave them.
- A pattern is bright where the focused scene plays it.
- A pad turns its pattern on or off in the scene, and a faint pad makes a new pattern.
- The bottom row is a playhead counting the bars of the longest pattern.
- The scene buttons:
- The row under the grid holds the scenes: press one to launch it.
- The playing scene pulses and a queued one flashes. A faint button makes a new scene.
- The other buttons:
- The arrows scroll through scenes and patterns, and SHIFT + left/right moves through groups.
- Mute mode mutes groups from their pads or scene buttons.
- Play and Record work as on the MK3.
Note, Chord and Sequencer modes are the Launchpad's own. They play the focused sound, and its pressure is recorded as polyphonic aftertouch.
- Drums: set a channel for the Launchpad in Preferences ▸ MIDI ▸ Drum channel, and a drum track on that channel plays the focused group's 16 pads.
- Print to Clip: writes the Launchpad's sequence into the focused group's pattern in one undoable step.
- Tempo: to keep the sequencer in time, send MIDI clock to the Launchpad (Preferences ▸ MIDI ▸ Sync).
The Launchpad is driven by an editable script, like the MK3. It has been tested on macOS; on Windows its port names haven't been checked yet. Details: docs/launchpad-pro-mk3.md.
DECKARD's own synths
Replicant

Replicant is a classic subtractive synth:
- Oscillators: two of them (saw, pulse, triangle or sine), a sub oscillator and noise.
- Filter: a resonant filter (low-pass, band-pass or high-pass) with its own envelope.
- Amp and modulation: an amp envelope, an LFO to pitch and cutoff, and vibrato on the mod wheel.
- Voices: 16, or Mono with glide. Stereo spread and analog-style drift.
- Super page: turns oscillator 1 into a JP-8000-style supersaw, with up to seven detuned copies, their detune and their mix.
Its pages are Oscillators, Filter, Amp, Modulation and Super. Add it from + ▸ Internal ▸ Replicant.
Plaits

Plaits is Mutable Instruments' macro-oscillator module, built into DECKARD from Émilie Gillet's open-source code, so it sounds like the module.
- Engines: all 24, including virtual analogue, waveshaping, FM, grains, additive, wavetables, chords, speech, strings, modal resonators and the drum models.
- Knobs: Harmonics, Timbre and Morph take the names the module's manual gives them for the engine chosen. For example, Virtual Analog shows Detune, Square and Saw.
- Envelope: the module's low-pass gate (Decay, Colour), or a plain gate with a Release.
- Voices: 1, 2, 4 or 8.
Plaits' code is © Emilie Gillet and used under the MIT licence; the licence is shown in DECKARD's About box. Add it from + ▸ Internal ▸ Plaits.
Zhora
Zhora plays one voice of a modular synth over CV, listens to it come back, and keeps it in tune. It needs outputs marked CV only (see CV out).
- Signals: pitch, gate, clock (at a division of the tempo, while playing), its own envelope, velocity and mod wheel. Each goes to a CV only output, or None. Gate, clock, envelope, velocity and mod wheel have a Level, 50% to start: set it by ear or with a scope.
- Playing: one voice, the newest note wins, with pitch bend and Glide.
- The return: Input picks the input the modular comes back on: one channel, by the name you gave it in Audio Setup (heard on both sides), or Sound's Input, which listens on whatever the sound's own audio input is set to, mono or stereo. Either way the audio passes through Zhora's sound unchanged, like any input sound, with its input gain, level, effects, mute and recording.
- Tune: turn off the modular's effects, open its filter, and press TUNE. Zhora steps the pitch for a few seconds, listens, and builds a table that puts every note in the range it found within 5 cents. If it can't hear a clear pitch, it says so and keeps the old table. The table is saved in the project, as its own undo step. Tune allows for the interface's delay up to half a second; a buffer of 256 frames is a good setting for tuning. Pressing TUNE or CHECK again stops it.
- Check: measures a spread of notes again and shows the worst, without changing the table. Use it after touching the oscillator's tune knob or an output trim.
- Live: trims slow drift while you play, on held notes only. Vibrato survives.
- Hold: holds pitch and gate on Hold Note, so both hands are free for the oscillator. The tuner reads the input all the time, at A = 440 Hz.
On the MK3, display buttons 1–4 pick OUTS, ENV, LEVELS and MOD, and 5–8 are TUNE, CHECK, LIVE and HOLD. The right screen shows the note, its cents and a needle, green within 5 cents, under a bar like "Tuned today 14:02 · worst note 3¢ · C1–C7". On the ENV page the left screen draws the envelope, redrawn as you turn Attack, Decay, Sustain and Release. The plug-in panel shows the tuner beside the knobs.
An export has no modular, so Zhora's part is left out of mixdowns and stems, and the Export panel says so. Record its return as audio first to include it. Add Zhora from + ▸ Internal ▸ Zhora.
Tuner
The Tuner is an effect for tuning a guitar, a bass, a voice, or anything else coming in. Put it on any sound's, group's or master's chain from + ▸ Internal ▸ Tuner. The sound passes through untouched. When the Tuner is the focused slot, the MK3's right screen shows the note it hears, its cents and a needle, green within 5 cents, as Zhora's tuner does. The plug-in panel shows the same beside the knobs.
- Reference: the pitch of A4, 430 to 450 Hz; 440 Hz to start.
- Mute: silences the sound after the Tuner while it keeps reading, to tune quietly.
Replicant, Plaits, Zhora and the Tuner are saved in the project like plug-ins, so the project still opens in Maschine. Maschine can't play them and reports them as missing plug-ins. In DECKARD's tests it kept their settings when it re-saved the project.
More
- Sampling: record from your audio input, then edit, slice, map zones and time-stretch. Stems splits a sample into drums, bass, vocals and the rest. The model it needs (84 MB) downloads the first time you use it.
- Note Repeat and Arpeggiator, scales and chords, Euclidean patterns, Lock snapshots and Macros, as in Maschine.
- Ableton Link and MIDI clock: LINK in the header shares tempo and start/stop with other apps on your network. MIDI clock can be sent or followed (Preferences ▸ MIDI ▸ Sync).
- Browser (F4): your Maschine library, if Maschine 3 is installed, and DECKARD's own.
- Undo history: Edit ▸ Undo History jumps back up to 30 steps at once.
- Plug-ins: DECKARD loads the VST3 plug-ins a project uses,
and the VST2 plug-ins that have a VST3 version. Each one is restored to the state
Maschine saved, and you can open its own window. On macOS it also loads Audio Units.
DECKARD's built-in instruments and effects work everywhere.
- The standard plug-in folders are always searched; Preferences ▸ Plug-ins ▸ Add…
adds your own. On macOS they are
/Library/Audio/Plug-Ins/VST3andVST, and the same under your home folder'sLibrary. - Linux:
~/.vst3, the system'svst3folders,~/.vstand$VST_PATH. NI's plug-ins have no Linux versions, but their Windows versions run through Wine and yabridge. Preferences ▸ Plug-ins ▸ Windows plug-ins shows what you have and installs what you don't: Wine from your distribution's packages (Debian, Ubuntu, Mint, Fedora, Arch; it asks for an administrator's password), and yabridge into your home folder. Then install your plug-ins into Wine (NI's through Native Access, run withwine) and press Sync; DECKARD also syncs before each rescan. Plug-in windows are X11 windows (through XWayland on a Wayland desktop). With Wine 9.22 or later, yabridge's 5.1.1 release takes no mouse clicks or typing in plug-in windows; Preferences notices and offers to build yabridge from its source instead (Build yabridge, after Install build tools…). When a plug-in doesn't show up or its window doesn't answer, see Windows plug-ins on Linux: troubleshooting. - Windows:
Common Files\VST3(system-wide and per user),VstPlugins,Steinberg\VstPlugins,Native Instruments\VSTPlugins 64 bitandCommon Files\VST2.
- The standard plug-in folders are always searched; Preferences ▸ Plug-ins ▸ Add…
adds your own. On macOS they are
- File compatibility: DECKARD reads and writes Maschine projects, groups, sounds and presets. Projects it saves open in Maschine 3, and files it doesn't change are written back byte for byte.
For developers
Building from source, the workspace layout, the command-line tools and the testing conventions are in DEVELOPMENT.md.
Legal
DECKARD is not affiliated with or endorsed by Native Instruments. Maschine is a trademark of Native Instruments GmbH. NI's controller scripts, style sheets, pictures and library content are read from your own Maschine install when you have one, and are not part of DECKARD.
DECKARD includes Ableton Link, which is licensed under the GPL (version 2 or later). A DECKARD built with Link is distributed under the GPL, as the About box says. Plaits' code is Mutable Instruments' (MIT licence).
"Sounds on Splice" in the Help menu, the Splice button at the top of the browser's LIBRARY tab and its "find it on Splice" line open splice.com through a referral link. Splice pays DECKARD's author a commission on subscriptions started through it; it costs you nothing extra and changes nothing on Splice's side. The Splice name and logo are Splice's trademarks, used under its affiliate programme.
Ähnliche Projekte entdecken
ytdl-org/youtube-dl
Kommandozeilenprogramm zum Herunterladen von Videos von YouTube.com und anderen Videoseiten
141,539 Sterneexcalidraw/excalidraw
Virtuelles Whiteboard zum Skizzieren von Diagrammen im handgezeichneten Stil
135,492 Sternegodotengine/godot
Godot Engine – Plattformübergreifende 2D- und 3D-Spiele-Engine
120,003 Sternemrdoob/three.js
JavaScript-3D-Bibliothek.
118,122 Sterne